Applies To: Locally-managed Fireboxes
WatchGuard EDR Core includes the WatchGuard Agent and protection software installed on endpoints, as well as an Endpoint Security management UI in WatchGuard Cloud to manage security for the devices on your IT network.
To get started with WatchGuard EDR Core, complete these high-level steps:
- Step 1: Activate a Total Security Suite License
- Step 2: Allocate Endpoints (Service Providers Only)
- Step 3: Configure Pre-Deployment Settings
- Step 4: Deploy the WatchGuard Agent
EDR Core includes EDR and adds XDR capabilities via ThreatSync. For information on ThreatSync, go to About ThreatSync.
Step 1: Activate a Total Security Suite License
To get started with EDR Core, make sure you have an active Total Security Suite license for your Firebox and a WatchGuard Cloud account.
- If you do not have a WatchGuard account, create one at https://accountmanager.cloud.watchguard.com/create-account.
-
Activate your Total Security Suite subscription at www.watchguard.com.
For more information, go to Activate a Device or Service at WatchGuard.com.
Step 2: Allocate Endpoints (Service Providers Only)
When you activate a Total Security Suite license, the EDR Core license and available endpoints appear in the Inventory page in WatchGuard Cloud.
- Log in to your WatchGuard Cloud account.
-
Allocate endpoint licenses to your managed accounts.
For more information, go to Allocate Endpoints.
Step 3: Configure Pre-Deployment Settings
The WatchGuard EDR Core installation process consists of a series of steps that depend on the status of the network at the time of deployment and the number of computers and devices you want to protect. Before you deploy the endpoint agent, we recommend that you complete these steps to plan the installation of WatchGuard EDR Core:
- Identify Unprotected Devices
- Verify Minimum Requirements for Target Devices
- Determine Computer Default Settings
Identify Unprotected Devices
Identify the physical and virtual Mac, Android, iOS, Windows, or Linux computers and devices you want to protect with Endpoint Security.
Verify that you have purchased enough licenses for the unprotected devices. Endpoint Security allows you to install the WatchGuard Agent even when you do not have enough licenses for all the computers you want to protect. Computers without a license still show information such as installed software and hardware on the computer details page, but are not protected.
For more information, go to Unmanaged Computers Discovered List .
Verify Minimum Requirements for Target Devices
Make sure that the computers and devices you want to protect meet the minimum installation requirements. For information on requirements, go to Installation Requirements in the Release Notes.
For modules requirements, go to the appropriate topic:
- WatchGuard Full Encryption Requirements
- Patch Management Requirements
- Advanced Visualization Tool Requirements
- Data Control Requirements
- SIEMFeeder Requirements
WatchGuard endpoint security products require access to multiple Internet-hosted resources. Make sure these URLs and ports are open to allow communication with the WatchGuard servers.
For more information on URLs and port access, go to WatchGuard Cloud URLs and Network Access Requirements.
Determine Computer Default Settings
When the client software is installed on the computer or device, Endpoint Security applies the group security settings to the computer or device. During installation, you select a target group for the computer with the required network settings. If the network settings for the selected group differ from the settings specified during installation, the installation settings apply.
For more information, go to Best Practices — Installation Tips for Endpoint Groups and Settings.
Configure the group organization and define settings before you deploy the WatchGuard Endpoint Agent.
For more information about the different types of groups, and specific instructions, go to Manage Computers and Devices in Groups in Endpoint Security.
To add a group:
- In WatchGuard Cloud, select Configure > Endpoint Security.
- Select Computers.
- From the left pane, select
 My Organization.
 - Next to the group in which you want to add a group, click
 .
.
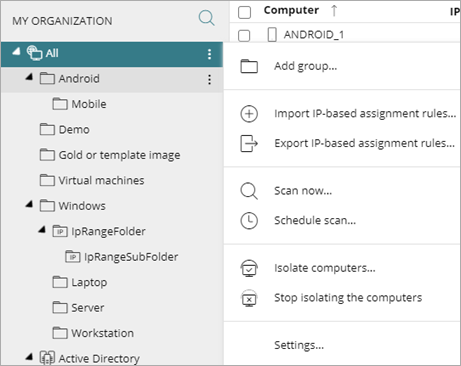
- Select Add Group.
The Add Group dialog box opens.
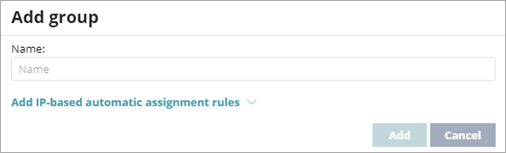
- Type a Name for the group.
- Click Add.
To configure settings from WatchGuard Cloud, you must first create a settings profile. For more information, go to Best Practices — Installation Tips for Endpoint Groups and Settings.
To create a settings profile:
- In WatchGuard Cloud, select Configure > Endpoint Security.
- Select Settings.
- From the left pane, select the type of security settings you want to create a profile for.
- In the upper-right corner, click Add.
The Add Settings page opens.
The Add Settings page shows different options for WatchGuard Advanced EPDR, EPDR, EDR, EDR Core, and EPP.
- In the Name text box, type a new name for the settings profile.
- In the Description text box, type a description of the profile.
For example, you might describe the security needs addressed in the settings. - Expand each section and configure the settings.
- Configure Per-Computer Settings
- Configure Remote Control Settings (Advanced EPDR only)
- Configure Network Settings
- Configure Workstations and Servers Security Settings
- About the IOC Gallery (Advanced EPDR only)
- Configure Indicators of Attack Settings
- Configure Risks Settings
- Configure Script Blocking (Windows Computers)
- Configure Program Blocking Security Settings (Windows Computers)
- Configure Authorized Software Settings (Windows Computers)
- Configure Mobile Device Security Settings
- Configure Vulnerability Assessment Settings
- Configure Patch Management Settings
- Configure Endpoint Access Enforcement Settings (Windows Computers)
- Encryption Settings
Settings vary for Advanced EPDR, EPDR, EDR, EDR Core, and EPP. Throughout this documentation, Endpoint Security refers generally to all products. If you do not have a setting in the Endpoint Security management UI, it is not supported by your product.
For more information, go to:
- When you have configured all the settings, click Save.
Step 4: Deploy the WatchGuard Agent
Deploy the WatchGuard Agent to computers and devices in your organization with the correct network settings. The deployment strategy depends on the number of devices to protect, the devices with an WatchGuard Agent already installed, and the company network architecture, including whether there is a mobile device management solution in use.
For more information, go to the appropriate installation procedure for your scenario and platform:
- Download the WatchGuard Agent Installer for Endpoint Security Products
- Install the Endpoint Software Locally
- Install the Endpoint Security Software on Windows Computers and Servers
- Install the Endpoint Security Software on Mac Computers
- Install the Endpoint Security Software on Linux Computers
- Install the WatchGuard Mobile Security App on Android Devices
- Install the WatchGuard Mobile Security App on iOS Devices
- Install the Endpoint Software Remotely (Windows Computers)
- Deploy the Endpoint Software with Centralized Tools (Windows Computers)
- Install the Endpoint Software on Virtual Environments with a Template or Gold Image (Windows Computers)