Applies To: Endpoint Security Elite, Endpoint Security 360, Endpoint Security Prime, WatchGuard EDR, WatchGuard EDR Core, Endpoint Security Basic
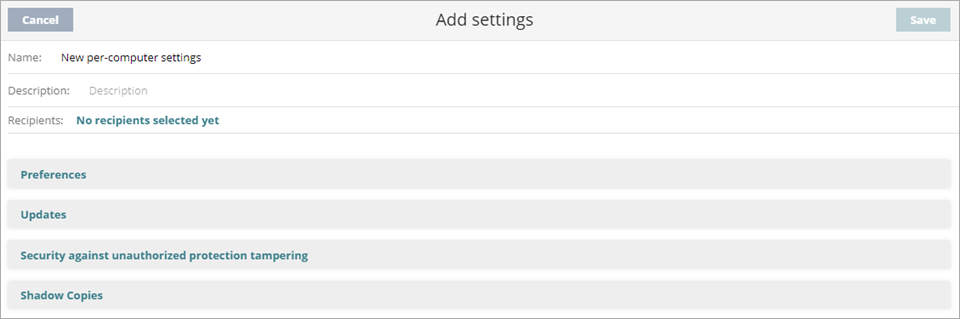
On the Per-Computer Settings page, you create settings profiles that specify how often to install protection software updates on workstations and servers. You can also define settings to prevent tampering and unauthorized uninstallation of the protection software.
Settings vary for Endpoint Security Elite, 360, Prime, Basic, WatchGuard EDR, and EDR Core. Throughout this documentation, Endpoint Security refers generally to all products. If a setting is not visible in the Endpoint Security management UI, it is not supported by your product.
Your operator role determines what you can see and do in WatchGuard Cloud. Your role must have the Configure Per-Computer Settings permission to view or configure this feature. For more information, go to Manage WatchGuard Cloud Operators and Roles.
To configure a per-computer settings profile:
- In WatchGuard Cloud, select Configure > Endpoint Security.
- Select Settings.
- From the left pane, select Per-Computer Settings.
- Select an existing security settings profile to edit, copy an existing profile, or in the upper-right corner of the page, click Add to create a new profile.
The Add Settings or Edit Settings page opens.
- In the Name text box, type a name for the settings profile.
- (Optional) In the Description text box, type a brief description of the settings profile.
- Configure these settings, as required:
- Click Save.
The new settings profile displays in the list. - Select the profile and assign recipients, if required.
For more information, go to Assign a Settings Profile.
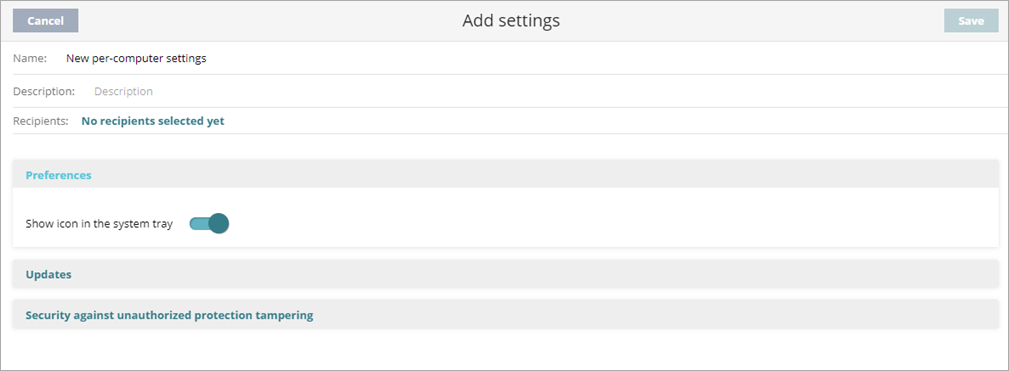
Configure Preferences
You can choose to show the WatchGuard ![]() icon in the system tray of computers where Endpoint Security is installed.
icon in the system tray of computers where Endpoint Security is installed.
To show the WatchGuard icon in the system tray:
- Select Preferences.
- Enable the Show icon in the system tray toggle.
Configure Updates
Configure the time and frequency of updates of the Endpoint Security protection software.
Update options are not configurable for Android devices. For more information, go to Configure Android Device Settings.
In the General settings of a workstations and servers settings profile, you can also configure automatic knowledge updates. For more information, go to Configure Automatic Knowledge (Signature File) Updates.
When you configure a maintenance window, the settings override the restart settings defined in per-computer settings profiles. For information on how to configure maintenance windows, go to Configure Maintenance Windows in Endpoint Security.
To configure updates to the endpoint security software:
- Select Updates.
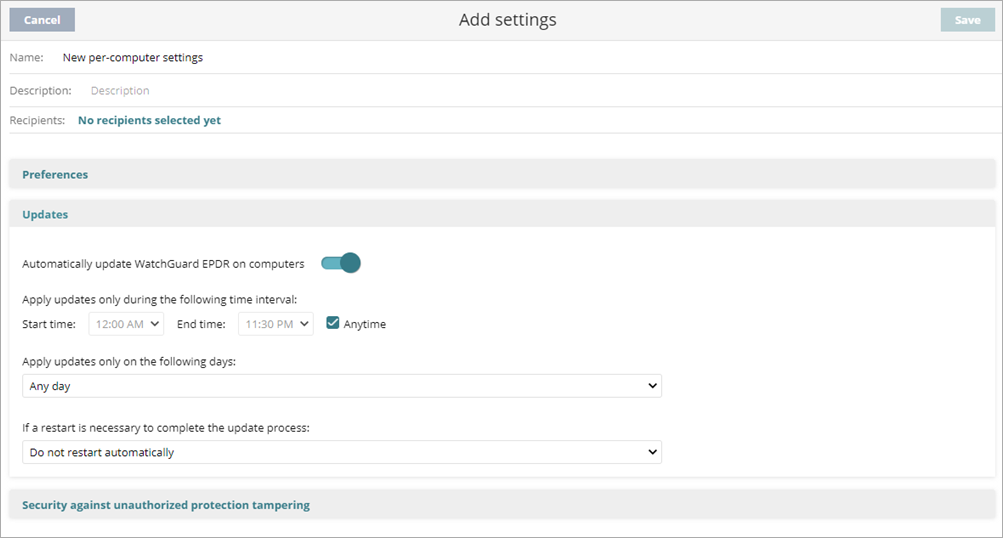
- To automatically update the software on computers, enable the toggle.
Updates occur as soon as they are available unless you specify a day and time. - Specify the time when the software can update. We recommend that you schedule updates when they will not interfere with other updates or backups. Avoid Endpoint Security updates at the same time as Windows updates. Windows updates will take precedence and could cause the Endpoint Security update to fail.
- To apply updates to the software on managed computers during a specified time period, specify the Start Time and End Time.
- To allow updates to the software on managed computers at any time, select the Anytime check box.
- To specify the days on which to apply software updates, select an option from the Apply Updates Only on the Following Days list:
- Any Day — Applies updates when they are available, on any day of the week or month.
- Days of the Week — Select the days of the week to apply updates. You must select at least one day. When an update is available, it runs on the first day of the week that matches the selection.
- Days of the Month — In the Start Day and End Day boxes, select the days of the month between which to apply updates. When an update is available, it runs on the first day of the month that matches the selection.
- On the Following Days — In the From and To calendars, select the dates between which to apply updates. This update does not repeat.
-
From the If a Restart Is Necessary to Complete the Update Process list, select an option:
- Do Not Restart Automatically — A restart dialog box on the target computer prompts the user to restart the computer. The dialog box continues to open until the computer restarts.
- Automatically Restart Workstations Only — Computers automatically restart after the update completes. Servers do not restart automatically.
- Automatically Restart Servers Only — Servers automatically restart after the update completes. Computers do not restart automatically.
- Automatically Restart Workstations and Servers — Computers and servers automatically restart after the update completes.
If you select an Automatically Restartoption, select whether you want to Restart only during defined maintenance windows. For more information on maintenance windows, go to Configure Maintenance Windows in Endpoint Security.
The actual time when the restart begins is four hours after the option you select. If a Windows update requires a reboot at the same time as the Endpoint Security update, then the WatchGuard Agent will not restart and the upgrade will fail.
Configure Security Against Tampering (Windows and Linux computers)
Configure security against tampering to make sure that only authorized users can uninstall or disable the Endpoint Security protection. To prevent tampering, Endpoint Security enables you to set limits for the uninstallation and configuration of the security software on Windows and Linux computers.
Request password to uninstall the protection from computers
If you enable this option, users must enter the configured password to uninstall the Endpoint Security protection or the WatchGuard Agent from any computer that has these settings applied. This prevents unauthorized uninstallations.
Allow the protections to be temporarily enabled or disabled from the protected computer
If you enable this option, users must enter the configured password to get access to the administrator panel on the protected computer. In the Endpoint Security window, users can temporarily enable and disable Endpoint Security. After the specified time period, the changes revert to the settings specified in the profile applied to the computer.
Enable anti-tamper protection
Anti-tamper protection makes sure that only authorized users can uninstall, disable, or uninstall Endpoint Security. If you enable this option, the configured password is required to disable anti-tamper protection locally from the protected computer.
For Service Provider accounts, if a managed account copies a settings profile assigned by you and the profile has a QR code or password to uninstall the security software or locally manage computers, the managed account operator could view the QR code or the password in the copied profile. To prevent this security issue, the existing QR code and password are deleted and a new QR code and password are automatically created in the copied profile.
Enable protection when Windows computers start in Safe Mode
Some types of malware force Windows computers to restart in Safe Mode with networking enabled. In this mode, antivirus is automatically disabled and computers are vulnerable. You can configure Endpoint Security to protect computers when they start in Safe Mode with networking enabled, so that all configured protections remain active and working normally.
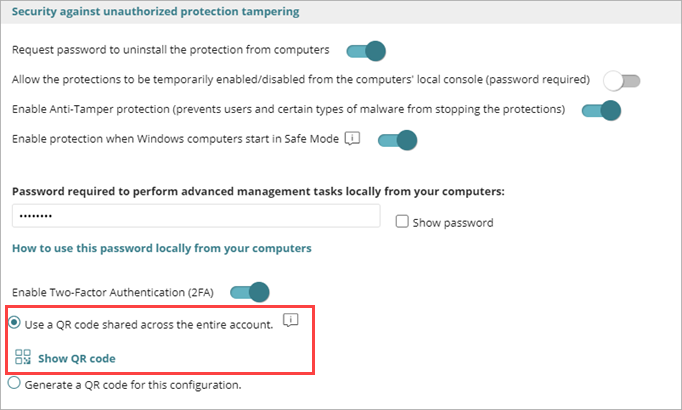
Enable two-factor authentication (2FA)
Based on a QR code to configure, disable, or uninstall the security software from the computer. To use the two-factor authentication, you must have access to a smart phone or tablet with a built-in camera.
Download the free AuthPoint app from:
- iOS: https://apps.apple.com/app/watchguard-authpoint/id1335115425
- Android: https://play.google.com/store/apps/details?id=com.watchguard.authpoint
If a computer loses its license because it is manually removed or because it expires or is canceled, the anti-tamper protection and password-based uninstallation protection are disabled.
To configure security against tampering:
- Select Security Against Unauthorized Protection Tampering.
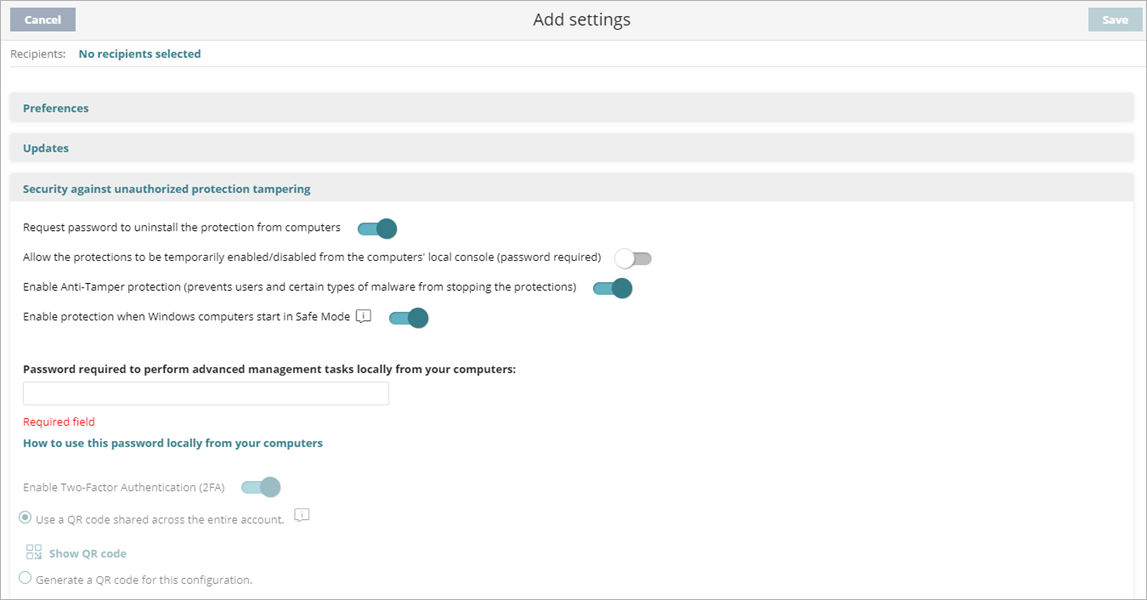
Screen shot of Security against unauthorized protection tampering from a Subscriber account
- To require the user on the client computer to enter a password to uninstall Endpoint Security, enable the Request Password to Uninstall the Protection from Computers toggle.
- To allow administrators to temporarily manage computer security settings from the endpoint software on the computer, enable the Allow the Protections to Be Temporarily Enabled/Disabled from the Computer's Local Console toggle.
- To stop users and malware that try to disable protection, enable the Enable Anti-Tamper Protection toggle.
- To protect network Windows computers in Safe Mode from tampering, the Enable Protection when Windows Computers Start in Safe Mode toggle is enabled by default. We recommend that you do not disable this toggle.
In Safe Mode, antivirus is automatically disabled. Some types of malware force Windows computers to restart in Safe Mode with networking enabled. When this toggle is enabled, all configured protections remain active to provide protection for your Windows computers. - If you enabled any toggle, in the Password Required to Perform Advanced Management Tasks Locally from your Computers text box, specify the password the user must enter on the client computer. The password must be between 6 and 15 characters long.
- To require two-factor authentication when the user logs in to the local management UI or when they try to uninstall the protection software from an endpoint, select the Enable Two-Factor Authentication (2FA) toggle.
- Generate a QR code. For more information, go to Generate a QR Code for Two-Factor Authentication.
- Click Save.
Generate a QR Code for Two-Factor Authentication
When you enable two-factor authentication, you generate a QR code to scan with AuthPoint, or any authenticator app, to create a token.
When enabled, two-factor authentication is required in AuthPoint or another authenticator app to log in to the local management UI or to uninstall the protection software from a device.
You can scan a QR code that can be shared on the entire account or create a unique QR code for each per-computer settings profile.
Generate a Shared QR Code
Generate a QR code that is automatically shared to all per-computer settings profiles in the account. The QR code is automatically generated at account level and applied to all settings profiles that have the Use a QR Code Shared Across the Entire Account setting enabled.
To generate a shared QR code for the account:
- In the Security Against Unauthorized Protection Tampering section, enter a password to perform advanced management tasks locally from your computers.
- Select Enable Two-Factor Authentication (2FA).
- Select Use a QR Code Shared Across the Entire Account. If you selected a Service Provider account, select Generate a Shared QR Code.
All per-computer settings profiles will share the same QR code. For Service Provider accounts, all per-computer settings profiles assigned to managed accounts will share the same QR code, except for managed accounts with their own QR code.
Screen shot of 2FA for Subscriber accounts

Screen shot of 2FA for Service Provider accounts
- Click Show QR Code.
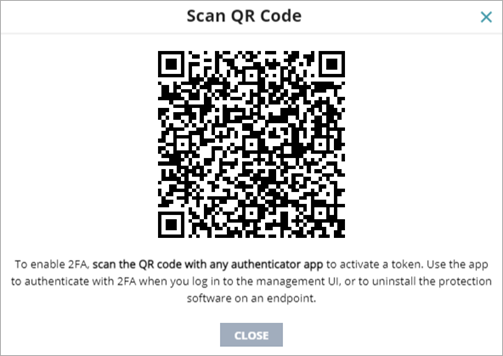
- Scan the QR code in the AuthPoint app (or another authenticator app) to activate a token.
Make sure that all administrators with the existing QR code use the new QR code to activate a new token. - Click Close.
- Save the updated configuration settings profile.
The QR code is saved in this settings profile and applies to all per-computer settings profiles assigned to your computers.
Generate a QR Code for a Single Per-Computer Settings Profile
When you generate a QR code for a per-computer settings profile, where the settings profile is assigned, each administrator requires the QR code to activate a token and access the local management UI or uninstall the protection software from a device.
To generate a QR code for this per-computer settings profile:
- In the Security Against Unauthorized Protection Tampering section, enter a password to perform advanced management tasks locally from your computers.
- Select Enable Two-Factor Authentication (2FA).
- Select Generate a QR Code for this Configuration.
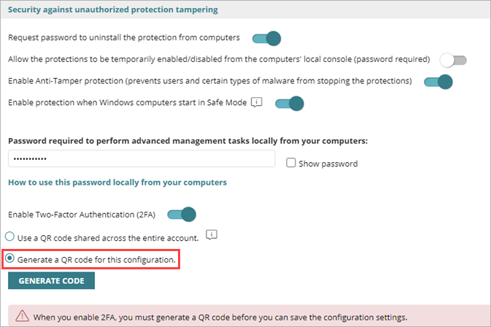
- Click Generate Code.

- Enter a 6- to 20-character combination of letters and numbers for the QR code key.
This QR code key (passphrase) is linked to the generated QR code. You can reuse the QR code key in other per-computer settings profiles to enable two-factor authentication. - Click Generate Code.
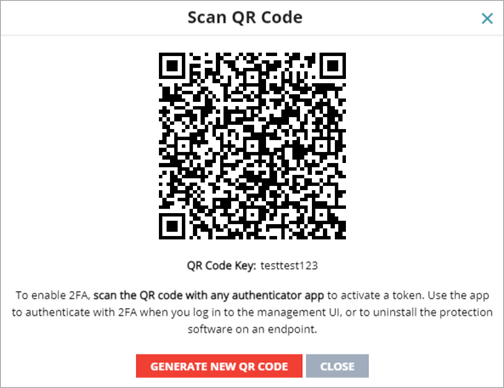
- Scan the QR code in the authenticator app, such as AuthPoint.
- Click Close.
- Save the updated configuration settings profile.
Administrators can use this QR code key (passphrase) in other security settings profiles to generate the same QR code.
Share an Existing QR Code to Another Profile
To assign an existing QR code to another per-computer settings profile:
- Select Settings > Per-Computer Settings.
- Select the settings profile from which you want to copy the QR code.
- Select Security Against Unauthorized Protection Tampering.
- In Generate a QR Code for this Configuration, click Show QR code.
A dialog box opens and shows the QR code and the QR code key.
- Copy the QR Code Key.
- Click Close.
- On the settings profile page, click Close.
- Select the settings profile where you want to use the QR code you copied, or click Add and create a new profile.
- Select Security Against Unauthorized Protection Tampering.
- Select the Enable Two-Factor Authentication toggle.
- Select Generate a QR Code for this Configuration.
- Click Generate Code.
- In the text box, paste the QR code key you copied.
- Click Generate Code.
- Click Close.
- Click Save.
Copy Exceptions for Security Settings Profile with Anti-Tamper Protection Enabled
If you copy a settings profile with a password or two-factor authentication enabled:
- The copied profile does not include the password specified in the Password required to perform advanced management tasks locally from your computers text box. The administrator must enter a new password.
- If the administrator copies an inherited settings profile, WatchGuard Endpoint Security automatically enables the Generate a QR Code for this Configuration option and generates a new QR code. It does not copy the password specified in the Password required to perform advanced management tasks locally from your computers text box.
Configure Shadow Copies
Shadow copies is a technology included in Windows computers that can create a snapshot of computer files, even when they are in use. From Endpoint Security, you can remotely interact with the Windows Shadow Copies service on the computers on the network. This feature is available for endpoints that run Windows Vista or Windows 2003 Server, and higher.
When enabled in Endpoint Security, Windows creates a shadow copy every 24 hours. Endpoint Security retains up to 7 copies at a given time. You cannot delete a shadow copy created by the software (Endpoint Security Elite, Endpoint Security 360, Prime, EDR, EDR Core, and Basic). To restore a backup, you must use the Windows Shadow Copies app on your computer.
To enable shadow copies for endpoints in Endpoint Security:
- Select Shadow Copies.
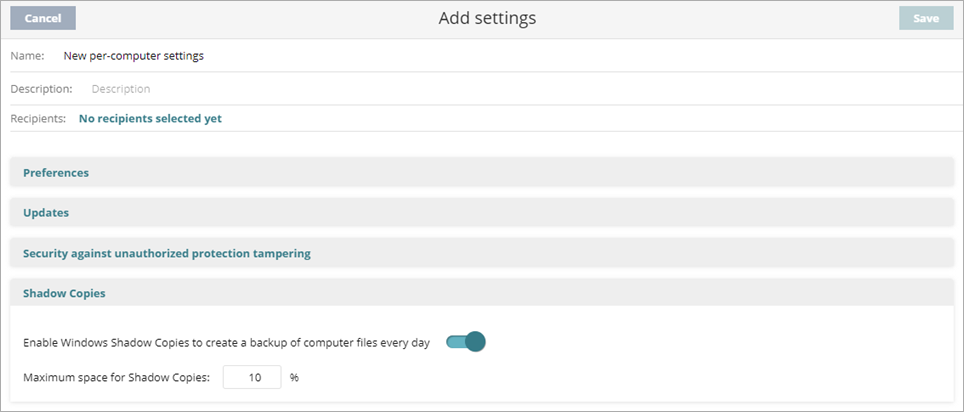
- Enable the Activate Windows Shadow Copies to Create a Backup of your Computer's Files Every Day toggle.
Windows creates shadow copies of your computer files. Endpoint Security retains up to 7 copies of a file. - In the Maximum Space for Shadow Copies text box, enter a value between 5% and 20%.
By default, the value is set to 10%. We recommend a value between 5% and 20%. Shadow Copies makes sure that the set volume is not exceeded. This value has priority over other space settings established by the network administrator.
Configure the WatchGuard Agent Remotely for Endpoint Security