Applies To: WatchGuard Advanced EPDR, WatchGuard EPDR, WatchGuard EPP
On the Mobile Devices page, you can configure settings to protect Android and iOS tablets and smart phones against threats, malware, and theft.
Configure Android Device Settings
In an Android device settings profile, you configure settings to enable updates, permanent anti-virus protection, and anti-theft protection.

To configure Android device settings:
- In WatchGuard Cloud, select Configure > Endpoints.
- Select Settings.
- From the left pane, select Mobile Devices.
- Select an existing Android settings profile to edit, copy an existing profile, or in the upper-right corner of the window, click Add to create a new profile.
The Add Settings or Edit Settings page opens. - Enter a Name and Description for the profile, if required.
- To only update devices over Wi-Fi, click Updates and enable the toggle.
- Configure these settings, as required.
- Click Save.
- Select the profile and assign recipients, if required.
For more information, see Assign a Settings Profile.
Configure Antivirus Settings for Android Devices
In the Antivirus section, you enable permanent antivirus protection. Permanent antivirus protection is a traditional security module used to defend organizations against the infection vectors most commonly used by hackers. This module leverages locally stored signature file as well as real-time queries to Collective Intelligence.
You can also enable WatchGuard Endpoint Security to scan apps before they are installed and add exclusions for files you do not want to scan.
- Select Antivirus.
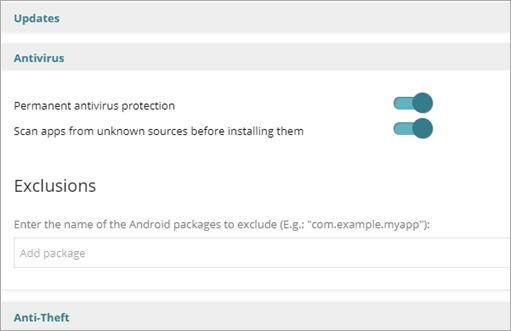
- To enable Permanent Antivirus Protection, enable the toggle.
- To Scan apps from unknown sources before installing them, enable the toggle.
- In the Exclusions section, in the text box, type the name of Android packages you want to exclude from antivirus protection (for example, com.example.myapp).
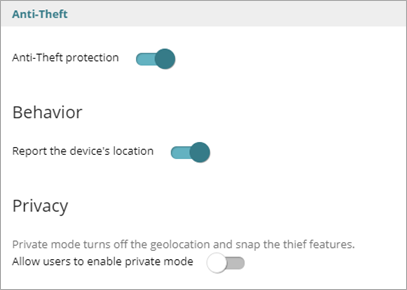
Configure Anti-Theft Settings for Android Devices
The anti-theft feature enables you to send actions to target Android devices to prevent data loss or locate them in the event of loss or theft. In the Anti-Theft section, you enable anti-theft protection, including geolocation tracking and "snap the thief" photo features.
To configure anti-theft settings:
- Select Anti-Theft.
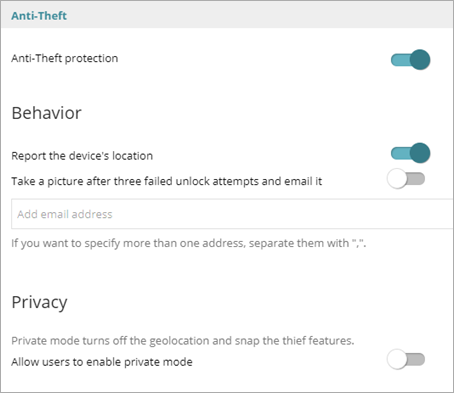
- To enable Anti-Theft Protection, enable the toggle.
- In the Behavior section, to Report the device's location, enable the toggle.
The device sends its GPS coordinates to the WatchGuard Endpoint Security server. - To take a photo from the device after three failed unlock attempts and send the photos by email to a specified address, enable the Take a picture after three failed unlock attempts and email it toggle.
- In the text box, type the email addresses you want to receive the photos, separated by a comma.
- In the Privacy section, to Allow users to enable private mode, enable the toggle.
Private mode disables geolocation tracking and "snap the thief" photo features.
Configure iOS Device Settings
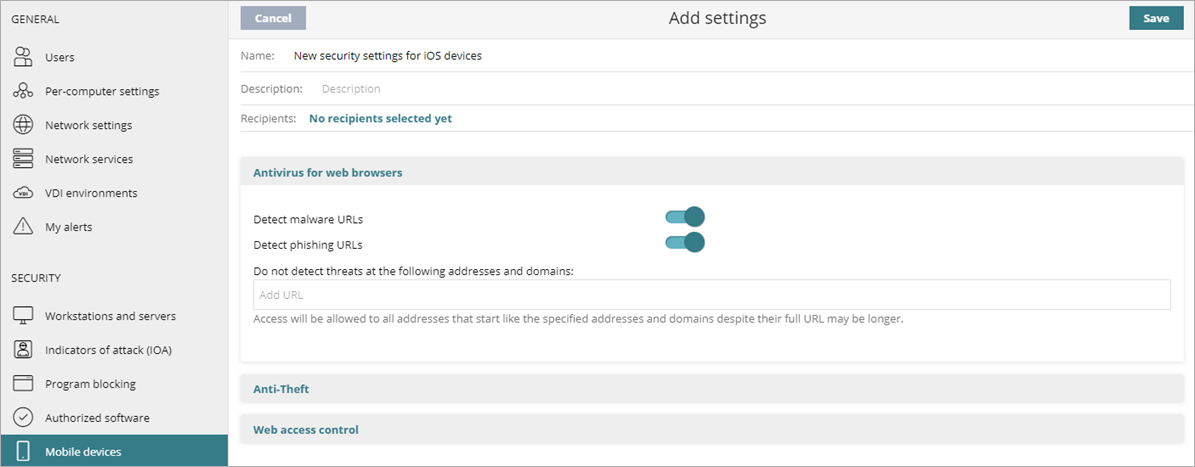
In an iOS device settings profile, you configure settings to enable antivirus protection for web browsers, anti-theft protection, and web access control.
To configure iOS device settings:
- In WatchGuard Cloud, select Configure > Endpoints.
- Select Settings.
- From the left pane, select Mobile Devices.
- Select iOS Devices.
- Select an existing iOS settings profile to edit, copy an existing profile, or in the upper-right corner of the window, click Add to create a new profile.
The Add Settings or Edit Settings page opens. - Enter a Name and Description for the profile, if required.
- Configure these settings, as required.
- Click Save.
- Select the profile and assign recipients, if required.
For more information, see Assign a Settings Profile.
Configure Web Protection for Web Browsers on iOS Devices
In the Antivirus for Web Browsers section, you enable detection of malware and phishing URLs. You can also add exclusions.
Antivirus for Web Browsers is only available for supervised iOS devices integrated with the WatchGuard MDM solution. For more information, see Mobile Device Management for iOS Devices.
- Select Antivirus for Web Browsers.
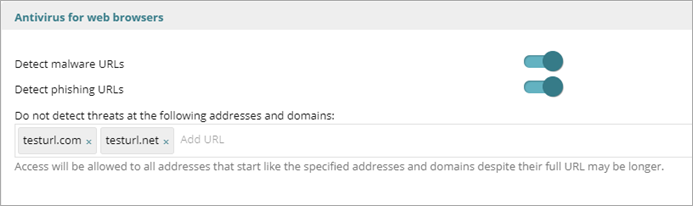
- To detect malware URLs, enable the toggle.
- To detect phishing URLs, enable the toggle.
- In the text box, type addresses and domains you want to exclude from antivirus protection.
Configure Anti-Theft Settings for iOS Devices
The anti-theft feature enables you to send actions to target iOS devices to prevent data loss or locate them in the event of loss or theft. In the Anti-Theft section, you can enable anti-theft protection, including reporting.
Anti-theft Settings are only available for iOS devices integrated in the WatchGuard MDM solution.
You can also permit users to enable private mode on their devices. When private mode is enabled on the device, you cannot use geolocation to locate the device or snap the thief to take a picture of the person who holds the device.
To configure anti-theft settings:
- Select Anti-Theft.
- Enable the Anti-Theft Protection toggle.
- In the Behavior section, enable the toggle to report the device location.
- In the Privacy section, enable the toggle to Allow Users to Enable Private Mode.
When the user enables private mode, geolocation and snap the thief features are no longer available.
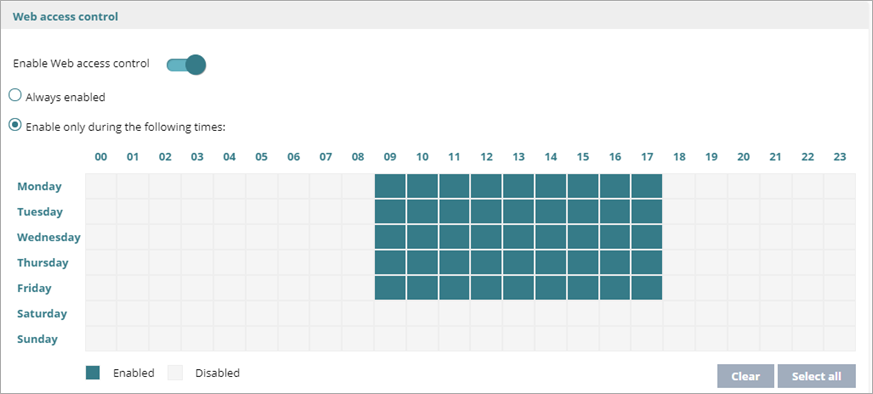
Configure Web Access Control for iOS Devices
In the Web Access Control settings, you can limit access to specific web content categories, and configure a list of URLs to allow and deny access to.
Web Access Control is only available for supervised iOS devices integrated with an MDM solution. For more information, see Mobile Device Management for iOS Devices.
To configure web access control:
- Select Web Access Control.
- Enable the Enable Web Access Control toggle.
- To specify when you want to enable web access control:
- Select Enable Only During the Following Times.
- On the calendar, select the days and hours when you want to enable web access control.
Click the day to select the whole day. Click and drag the squares to select multiple days and times. Click Clear to disable web access control for all of the times selected.
- Select the categories you want to deny computers access to.
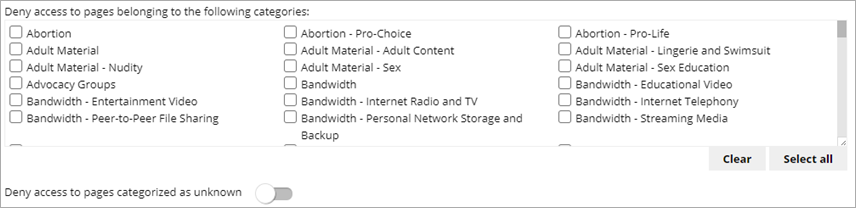
- To Deny Access to Pages Characterized as Unknown, enable the toggle.
Internal and intranet sites accessible on ports 80 and 8080 could be categorized as unknown. To avoid this, add exclusions for internal pages you want to allow. - To exclude sites from web access control and always allow access to them, in the Always allow access to the following addresses and domains text box, enter the URLs.
Access is allowed to all addresses that start with the specified addresses and domains, even if the full URL is longer. - To always deny access to an IP address or domain, in the Deny access to the following addresses and domains text box, enter the IP address or domain.
Access is denied to all addresses that start with the specified addresses and domains, even if the full URL is longer. You can use wildcard domains such as *.example.com.