Applies To: AuthPoint Multi-Factor Authentication, AuthPoint Total Identity Security
This help topic shows you how to set up and fully deploy AuthPoint, WatchGuard's multi-factor authentication solution. Some steps in this deployment guide only apply to accounts that have an AuthPoint Total Identity Security license.
For a shorter overview of how to get started and test AuthPoint, see Quick Start — Set Up AuthPoint.
You manage AuthPoint from WatchGuard Cloud. For more information about WatchGuard Cloud, see About the WatchGuard Cloud User Interface.
When you set up AuthPoint, we recommend that you first connect AuthPoint to your firewall and LDAP database. To do this, you must download and install the AuthPoint Gateway that connects them with AuthPoint, then add a RADIUS client or Firebox resource for your firewall and an external identity for your LDAP database.
Next, you can add SAML resources for the applications that your users connect to and create authentication policies for those resources.
Finally, when everything is set up and ready to go, sync users from your LDAP database to AuthPoint.
You manage AuthPoint from WatchGuard Cloud. There are two types of WatchGuard Cloud account — Service Provider and Subscriber — each with a different view of WatchGuard Cloud.
You can determine whether you have a Service Provider account or a Subscriber account based on the appearance of the WatchGuard Cloud UI and the navigation menu.
If you see an Account Manager menu and the navigation menu includes an Inventory menu option, then you have a Service Provider account.

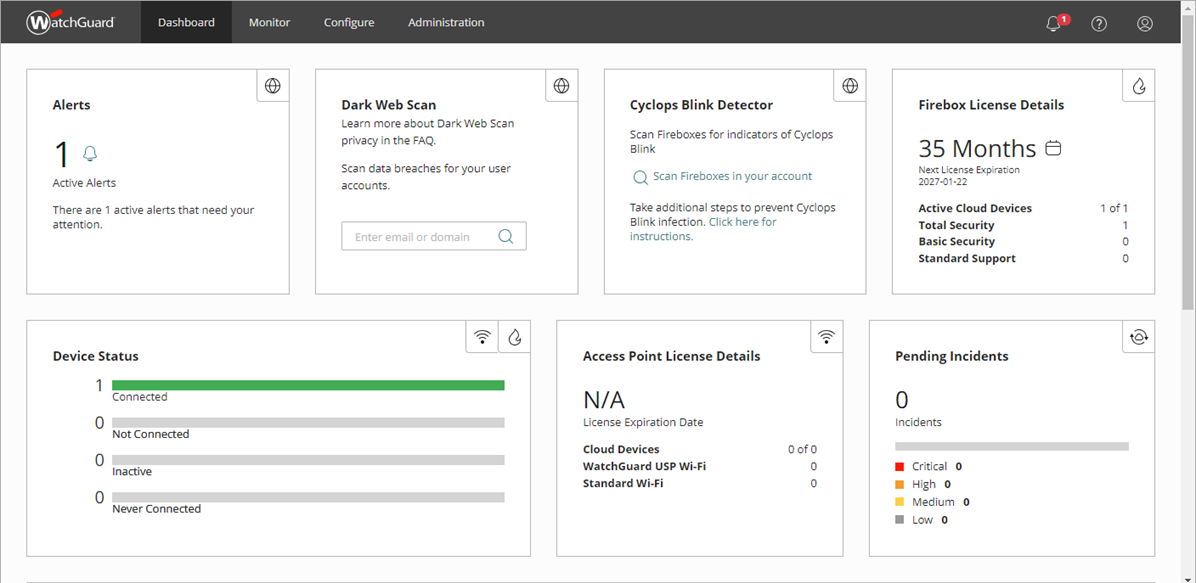
If you see a dashboard similar to this and no Account Manager menu, then you have a Subscriber account.
If you have a Service Provider account, before you can set up AuthPoint, you must go to the Inventory page and allocate AuthPoint user licenses to your account. For more information, see Allocate Users to Your Account.
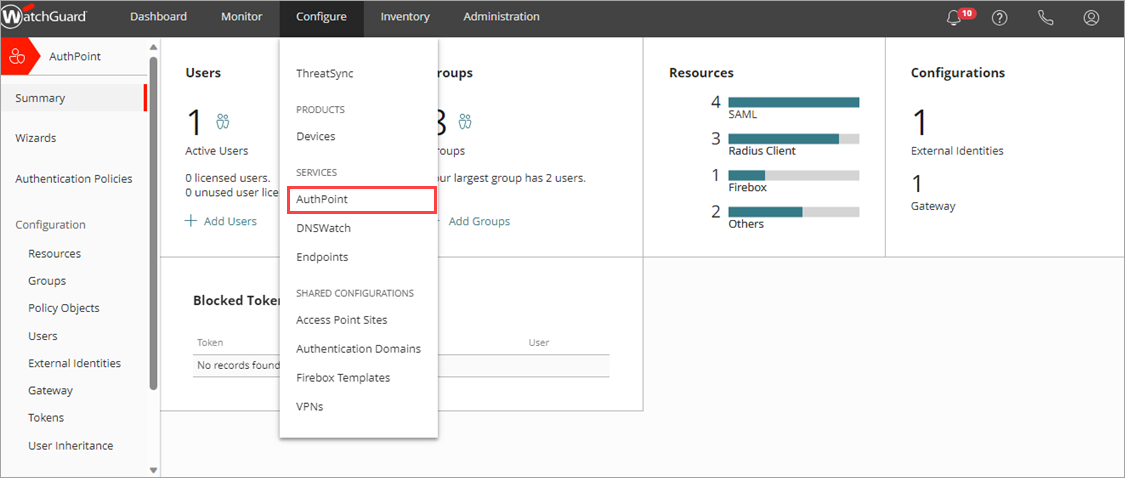
You configure and manage AuthPoint from the Configure Services section of WatchGuard Cloud.
To navigate to the AuthPoint management UI in WatchGuard Cloud:
- Log in to WatchGuard Cloud at http://cloud.watchguard.com/.
The WatchGuard Cloud Dashboard page is shown. - From the navigation menu, select Configure > AuthPoint. If you have a Service Provider account, you must select an account from Account Manager.
The AuthPoint Summary page opens.
The AuthPoint Gateway is an application that you install on your network to synchronize user account information between your LDAP or Active Directory server and AuthPoint.
The Gateway functions as a RADIUS server and is required for RADIUS authentication and for LDAP synced users to authenticate with SAML resources. You must install the Gateway so that AuthPoint can communicate with your RADIUS clients and LDAP databases.
You can configure more than one Gateway on a network. For each primary Gateway that you configure, you can configure up to five secondary Gateways.
Primary Gateway
The primary Gateway synchronizes your LDAP users and enables RADIUS authentication and LDAP user authentication. This Gateway is the primary point of communication between AuthPoint and your RADIUS clients, the AuthPoint agent for ADFS, and your Active Directory or LDAP database.
Secondary Gateway
You can configure secondary Gateways as a failover for LDAP user authentication. When your primary Gateway is not available, AuthPoint automatically sends LDAP user authentications through the secondary Gateway until the primary Gateway becomes available again.
You can also use secondary Gateways as a backup RADIUS server. The only limitation is that the third-party software or device that sends authentication requests to the Gateway must support the use of additional RADIUS servers.
You cannot use secondary Gateways for load balancing or LDAP user synchronization.
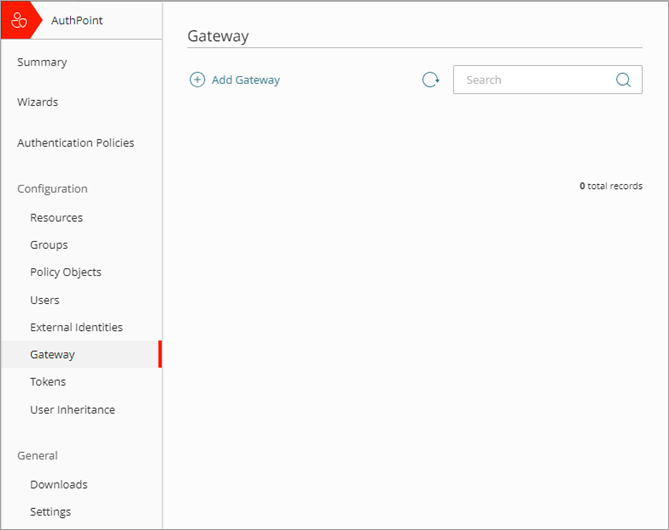
Before you install the Gateway, you must configure it in the AuthPoint management UI.
To configure and install the AuthPoint Gateway:
- From the AuthPoint navigation menu, select Gateway.
- Click Add Gateway.
- In the Name text box, type a descriptive name for the Gateway.
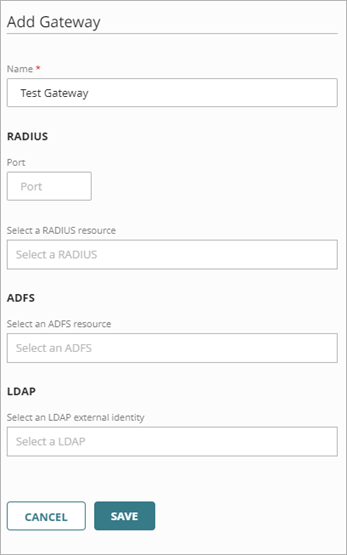
- Click Save.
- On the Gateway page, at the bottom of the tile for your Gateway, click Registration Key.
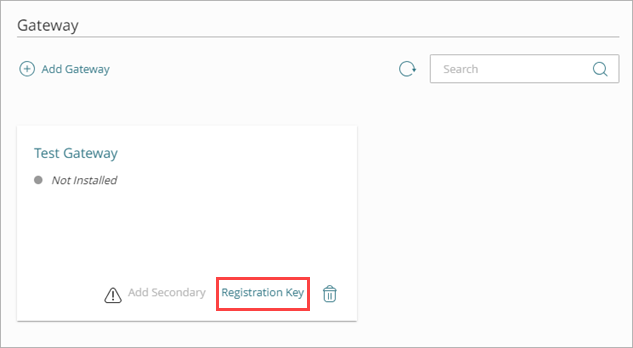
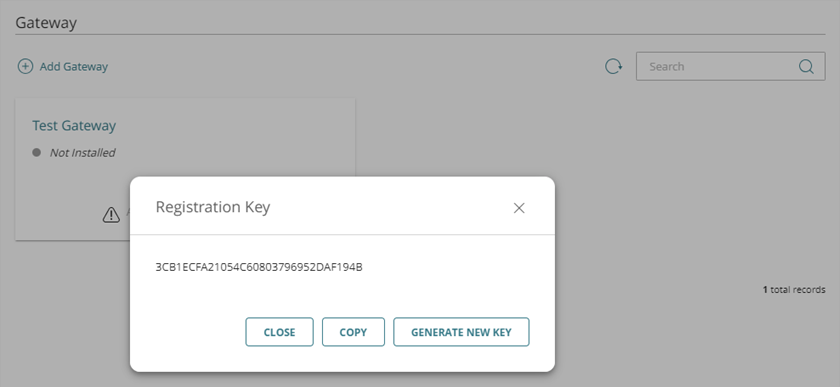
- In the Gateway Registration Key dialog box, copy the registration key. You need this value to install the Gateway.
The Gateway registration key is a one-time use key. If the installation of the Gateway fails, you must generate a new key to use for the installation.
- From the navigation menu, select Downloads.
- In the Gateway Installer section, click Download Installer.

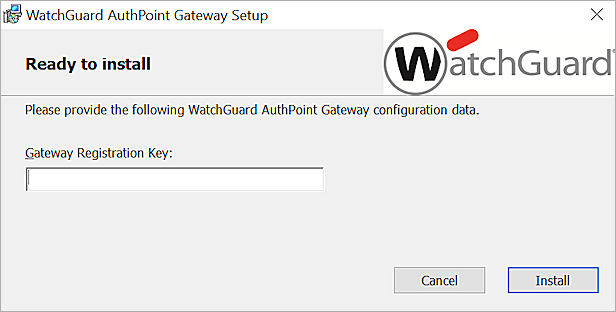
- Run the downloaded Gateway installer anywhere on your network that has Internet access and that can connect to your RADIUS clients and LDAP servers.
WatchGuard AuthPoint Gateway Setup dialog box opens. - In the Gateway Registration Key text box, type or paste the Gateway registration key you copied from AuthPoint.
- Click Install.
- Click Finish.
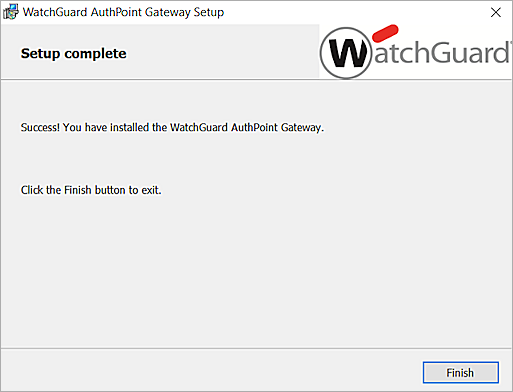
- In the AuthPoint management UI, on the Gateway page, check the circular icon next to your Gateway name. A green icon indicates that the Gateway is successfully installed and can communicate with AuthPoint.
If the installation of the Gateway fails, you must generate a new registration key to use for the installation. For more information, see Gateway Registration Key.
For detailed steps to configure one or more secondary Gateways, see Configure and Install Secondary Gateways.
External identities connect to user databases to get user account information and validate passwords. To sync users from an external user database, you must add an external identity.
In this example, we show the steps to sync users from Active Directory or a Lightweight Directory Access Protocol (LDAP) database. To learn how to create an external identity to sync users from Entra ID, see Sync Entra ID Users to AuthPoint.
To add an external identity, from the AuthPoint management UI:
- Select External Identities.
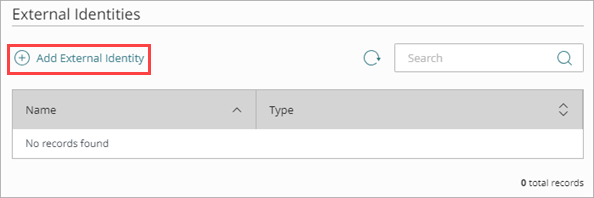
- Click Add External Identity.
The Add External Identity page opens.
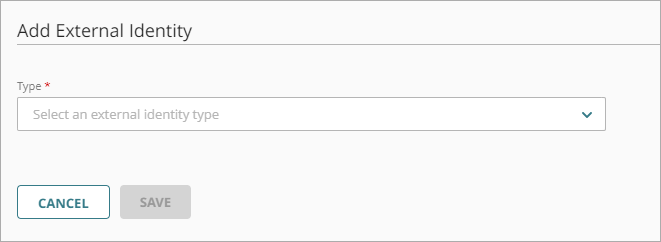
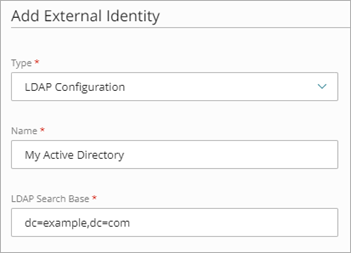
- From the Type drop-down list, select LDAP Configuration.
Additional fields are shown. - In the Name text box, type a descriptive name for the external identity.
- In the LDAP Search Base text box, type your LDAP database. In this example, the domain is example.com so we type dc=example,dc=com. Tip!
For more information about LDAP syntax and how to use a search base to limit the directories on the authentication server where the external identity can search for users, see Find Your Active Directory Search Base.
- In the System Account and Passphrase text boxes, type the credentials for a user that has permissions to perform LDAP searches and binds. If this user is not in the default Users folder, select the toggle and type the full distinguished name of the user. You can specify a passphrase up to 255 characters in length.Tip!
In this example, we have a user named administrator that is in an OU called AuthPoint (not the default Users folder). So, we must select the toggle and type the distinguished name of our user as CN=administrator,OU=AuthPoint,DC=example,DC=com. If this user was in the default Users folder, we would just type the user name administrator.
If the user is in the Users folder and the user name is different than the account name (sAMAccountName), you must type the account name in the System Account text box.
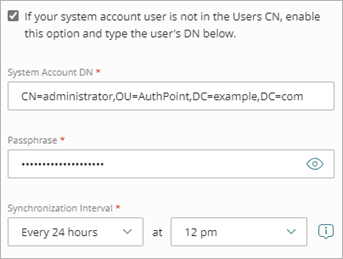
- From the Synchronization Interval drop-down list, specify how often you want to synchronize the LDAP database. If you select Every 24 hours, you must also specify what time the synchronization starts each day.
For LDAP external identities that you configure to sync once every 24 hours, the Synchronization Interval time uses the time zone of the LDAP server.
- For Type, select whether this is an Active Directory server or a different type of LDAP database. For other databases, you must specify each attribute value. You do not have to do this for Active Directory because the attribute values are known.
- In the Domain text box, type your LDAP domain name.
- If this not an Active Directory server, type a value for each attribute.
If your Active Directory users use ADFS, you must keep the default sAMAccountName value for the attribute related to user login.

-
In the Server Address text box, type the IP address of your LDAP server.
If your Active Directory instance does not use LDAPS, you must disable the LDAPS toggle for the external identity. When you do this, the default port changes from 636 to 389.
- In the Server Port text box, type the port for your server.
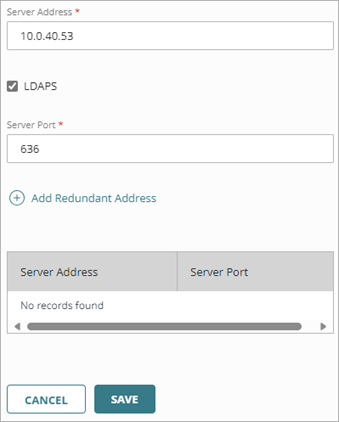
- (Optional) To add a redundant address for your external identity, click Add Redundant Address and type a different address and port for the same LDAP database.
- Click Save.
Next, you must add your external identity to the configuration for your AuthPoint Gateway. After you do that, you can test the connection to your LDAP database.
- From the navigation menu, select Gateway.
- Click the Name of your Gateway.
- In the LDAP section, in the Select an LDAP external identity list, select your LDAP or Active Directory server.
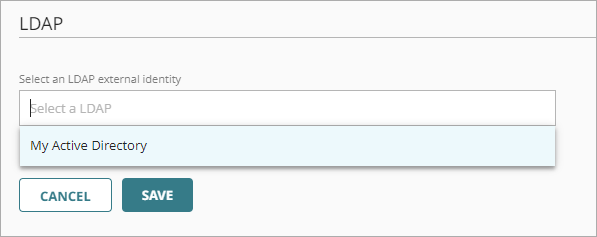
- Click Save.
- From the navigation menu, select External Identities.
- Next to the external identity you added for your LDAP database, click
 and select Check Connection.
AuthPoint is now connected to your LDAP database. You can create a query to sync users, but before you do that we recommend that you add resources for all of the applications and services that you want to require authentication for.
In AuthPoint, resources are the applications that you protect with AuthPoint. When you add a resource, you provide the information required for AuthPoint to connect to that resource.
When you add and configure a resource in AuthPoint, authentication is required to log in to that resource. For each resource, users must be a member of a group that has an authentication policy that includes that resource to authenticate and log in.
Users who are not a member of groups that have an authentication policy for a specific resource cannot authenticate to log in to that resource.
See AuthPoint Integration Guides for more information about how to set up authentication with specific third-party services and applications.
To enable AuthPoint as an authentication server on a Firebox that runs Fireware 12.7 or higher, configure a Firebox resource in AuthPoint. This makes it easier to configure AuthPoint MFA for:
- Mobile VPN with SSL
- Mobile VPN with IKEv2
- Firebox Web UI
- Firebox Authentication Portal
When you configure a Firebox resource to add MFA to a Firebox, AuthPoint receives the IP address of the end user, so network location conditions apply when a user authenticates with a VPN client.
You do not have to add a Firebox resource to your Gateway configuration, even if the Firebox resource has MS-CHAPv2 enabled. In this scenario, the Firebox validates the user password with NPS and AuthPoint authenticates the user with MFA.
Before you configure a Firebox resource, make sure that you have registered and connected the device to WatchGuard Cloud as a locally-managed Firebox. For cloud-managed Fireboxes and Fireboxes that run Fireware v12.6.x or lower, we recommend that you configure a RADIUS client resource for the Firebox.
For detailed instructions to register and connect your Firebox to WatchGuard Cloud, see Add a Locally-Managed Firebox to WatchGuard Cloud.
To add a Firebox resource:
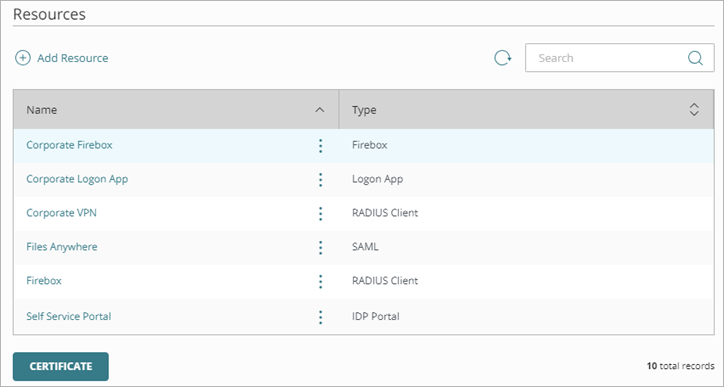
- From the navigation menu, select Resources.
The Resources page opens.
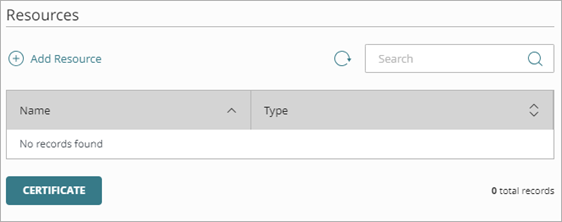
- Click Add Resource.
The Add Resource page opens.
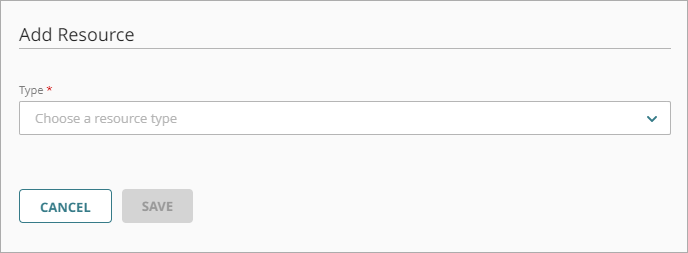
- From the Type drop-down list, select Firebox.
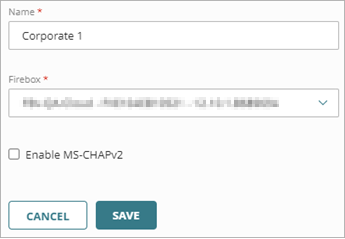
- In the Name text box, type a descriptive name for the resource.
- From the Firebox drop-down list, select the Firebox or FireCluster that you want to connect to AuthPoint. This list only shows locally-managed Fireboxes and FireClusters that you have added to WatchGuard Cloud.
- To configure the Firebox resource to accept MS-CHAPv2 authentication requests, click the Enable MS-CHAPv2 toggle.
Additional text boxes appear.You do not have to enable MS-CHAPv2 if the IKEv2 VPN client is only used by local AuthPoint users.
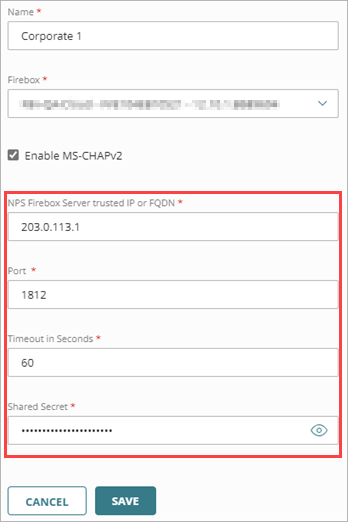
- In the NPS RADIUS Server Trusted IP or FQDN text box, type the IP address or fully qualified domain name (FQDN) of the NPS RADIUS server.
- In the Port text box, type the port that NPS uses for communication. The default port is 1812.
- In the Timeout In Seconds text box, type a value in seconds. The timeout value is the amount of time before a push authentication expires.
- In the Shared Secret text box, type the shared secret key that NPS and the Firebox use to communicate.
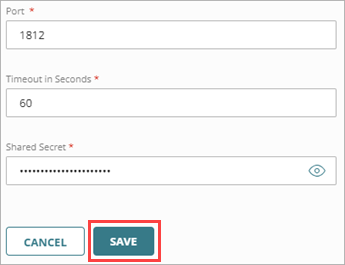
- Click Save.
After you add the Firebox resource in AuthPoint, the AuthPoint authentication server on your Firebox is enabled. To add MFA, you must configure the Firebox to use the AuthPoint authentication server for the features you want:
- Mobile VPN with SSL — In Fireware, configure AuthPoint as the primary authentication server for your Mobile VPN with SSL configuration. For detailed steps, see Firebox Mobile VPN with SSL Integration with AuthPoint.
If you add the AuthPoint authentication server to your Mobile VPN with SSL configuration, users must download and use the WatchGuard Mobile VPN with SSL client v12.7 or higher or the OpenVPN SSL client.
- Mobile VPN with IKEv2— In Fireware, configure AuthPoint as the primary authentication server for your Mobile VPN with IKEv2 configuration. For detailed steps, see Firebox Mobile VPN with IKEv2 Integration with AuthPoint for Active Directory Users or Firebox Mobile VPN with IKEv2 Integration with AuthPoint for Azure Active Directory Users.
- Firebox Authentication Portal — In Fireware, specify AuthPoint as the authentication server for users and groups. For detailed steps, see Firebox Authentication with AuthPoint.
- Fireware Web UI — In Fireware, select System > Users and Roles and add Device Management users with AuthPoint as the authentication server. For more information, see Manage Users and Roles on Your Locally-Managed Firebox
RADIUS client resources represent a device or application that sends RADIUS packets to the AuthPoint Gateway. These are commonly used to authenticate users for firewalls and VPNs.
To configure MFA for a Firebox that runs Fireware v12.7 or higher and has been added to WatchGuard Cloud as a locally-managed Firebox, we recommend that you add a Firebox resource.
RADIUS client resources must be linked to the AuthPoint Gateway and you must choose a shared secret key so that the RADIUS server (AuthPoint Gateway) and the RADIUS client can communicate.
To add RADIUS client resources:
- From the navigation menu, select Resources.
- Click Add Resource.
The Add Resource page opens. - From the Type drop-down list, select RADIUS Client.
- In the Name text box, type a descriptive name for the resource.
- In the RADIUS client trusted IP or FQDN text box, type the IP address that your RADIUS client uses to send RADIUS packets to the AuthPoint Gateway. This must be a private IP address. For Fireboxes, this is usually the Trusted IP address of your Firebox.
- From the Value sent for RADIUS attribute 11 drop-down list, specify what is sent for the attribute 11 (Filter-ID) value in RADIUS responses. You can choose to send the user's AuthPoint group or the user's Active Directory groups.
To specify a Filter-ID value, you must install version 5 or higher of the AuthPoint Gateway.
- In the Shared Secret text box, type a password that the RADIUS server (AuthPoint Gateway) and the RADIUS client will use to communicate.
- To configure the RADIUS client resource to accept MS-CHAPv2 authentication requests, enable the Enable MS-CHAPv2 toggle. You might do this if you want to configure AuthPoint MFA for IKEv2.
Additional fields appear.To enable MS-CHAPv2, you must install version 5.3.1 or higher of the AuthPoint Gateway.
- In the NPS RADIUS Server trusted IP or FQDN text box, type the IP address or FQDN of the NPS RADIUS server.
- In the Port text box, type the port number for the Gateway (RADIUS server) to use to communicate with NPS. The default port is 1812.
If NPS and the Gateway are installed on the same server, the port that the Gateway uses to communicate with NPS must be different than the port that the Gateway uses to communicate with the RADIUS client.
- In the Timeout in Seconds text box, type a value in seconds. The timeout value is the amount of time before a push authentication expires.
- Click Save.
Next, you must add your RADIUS client resource to the configuration for your AuthPoint Gateway. This is necessary for the RADIUS client to communicate with the RADIUS server (Gateway) and with AuthPoint.
To connect your RADIUS client resource to the Gateway:
- From the navigation menu, select Gateway.
- Click the Name of your Gateway.
- In the RADIUS section, in the Port text box, type the port number for the RADIUS client to use to communicate with the Gateway (RADIUS server). The default Gateway ports are 1812 and 1645.
If you already have a RADIUS server installed that uses port 1812 or 1645, you must use a different port for the AuthPoint Gateway.
- From the Select a RADIUS resource list, select your RADIUS client resource or resources.
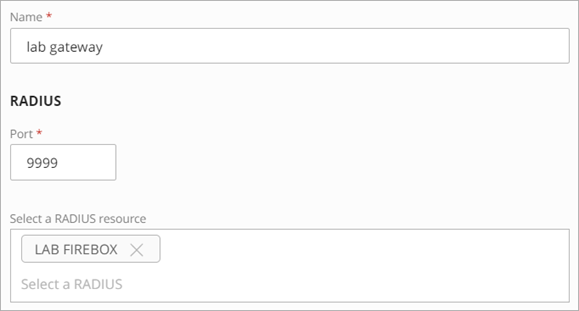
- Click Save.
You have successfully added a RADIUS client resource and connected it with your Gateway. The last step is to configure your RADIUS client for authentication. Refer to the AuthPoint Integration Guides for the steps to configure specific RADIUS client resources.
SAML resources connect AuthPoint with the provider of a third-party service that users connect to (third-party service provider), such as Microsoft or Salesforce. Add SAML resources and define access policies to require that users authenticate before they can connect to those services or applications.
Before you add a SAML resource in AuthPoint, you must configure SAML authentication for your third-party service provider. To do this, download the AuthPoint metadata from the Resources page in the AuthPoint management UI and import the metadata file to the third-party service provider.
The AuthPoint metadata provides information that is necessary to identify AuthPoint and establish a trusted relationship between the third-party service provider and the identity provider (AuthPoint).
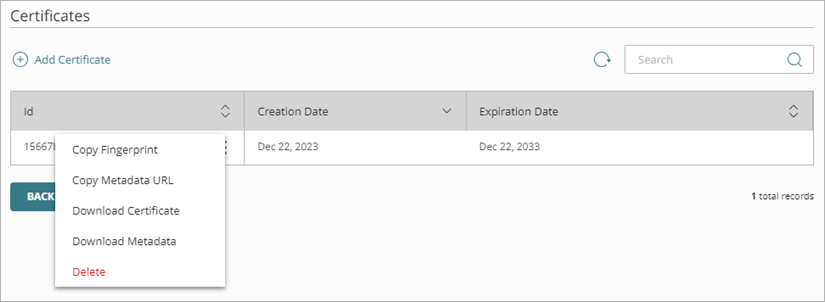
To configure SAML authentication for your third-party service provider:
- Select Resources.
- Click Certificate.
- On the Certificate Management page, next to AuthPoint certificate you will associate with your resource, click and select an option to download the metadata, copy the metadata URL, download the certificate, or copy the fingerprint based on what the service provider for your resources requires.
The AuthPoint metadata provides your resource with information necessary to identify AuthPoint as a trusted identity provider. This is necessary for SAML authentication.
- Import the AuthPoint metadata file to the third-party service provider and get the Service Provider Entity ID and Assertion Consumer Service values from the service provider. These values are necessary to configure the SAML resource in AuthPoint.
Refer to the AuthPoint Integration Guides for the steps to configure specific SAML resources.
To add a SAML resource in the AuthPoint management UI:
- Select Resources.
- Click Add Resource.
The Add Resource page opens.
- From the Type drop-down list, select SAML.
- In the Name text box, type a name for the resource. We recommend you use the name of the application.
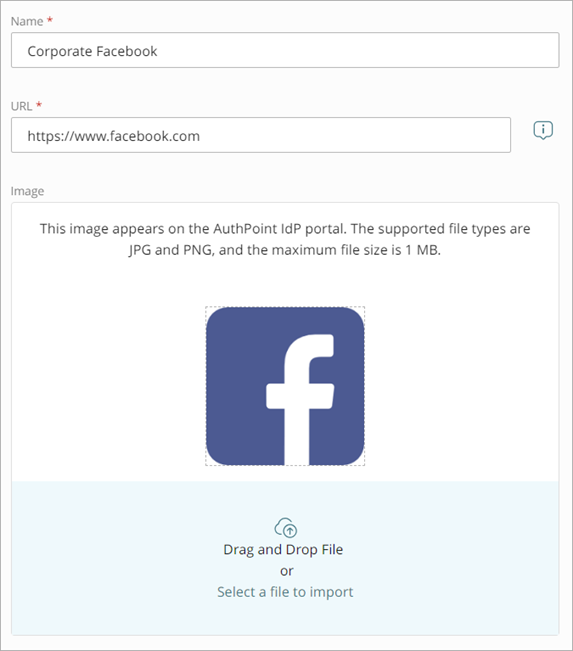
- From the Application Type drop-down list, select the relevant application, or select Others if the application is not listed. For the Others application type, you can specify the relay state, custom attributes, and a custom image to appear for this application in the IdP portal.
You can click the Integration Guide link to open a help topic with the steps to set up your application. This link is context sensitive.
- (Optional) If you selected the Others application type, you can specify a Relay State parameter for this SAML resource.
- In the Service Provider Entity ID and Assertion Consumer Service text boxes, type the values from the service provider of the application.
- From the User ID drop-down list, select which user ID attribute to send to the service provider. The service provider compares the user ID attribute for the AuthPoint user with the user name in your application. These values must match.
For example, Salesforce requires a user name in an email format that includes a domain. Because the AuthPoint user name does not include a domain, your user ID must be email to match the Salesforce user name.
- (Optional) Click Choose File to upload a certificate from the service provider. When you upload a certificate, you can select the Encryption enabled toggle to enable or disable encryption for the SAML communication.
- From the AuthPoint Certificate drop-down list, select the AuthPoint certificate to associate with your resource. This must be the same certificate that you downloaded the metadata for. The AuthPoint certificate provides your resource (service provider) with the information necessary to identify AuthPoint as a trusted identity provider. If you have not replaced the default AuthPoint certificate for your account, you can leave the default value. For more information, see Certificate Management.
- Some application types require additional information. If applicable, complete any additional fields required for the application.
- (Optional) If you selected the Others application type, you can specify one or more custom attributes for this SAML resource. This is necessary for some applications. To add a custom attribute:
- Click Add Attribute.
The Add Attribute window opens. - Enter the Attribute Name. This value is case-sensitive.
- From the Get Value From drop-down list, select what value is used for this custom attribute. If the value is static, select Fixed value and specify the fixed value to use.
- Click Save.
- Click Add Attribute.
- (Optional) If you selected the Others application type, you can upload a custom image to appear for this application in the IdP portal. To upload an image, drag an image file from your computer, or click Select a file to import and select an image file.
- Click Save.
- From the AuthPoint navigation menu, select Resources.
- Click Add Resource.
The Add Resource page opens. - From the Type drop-down list, select OIDC.
The OIDC settings appear.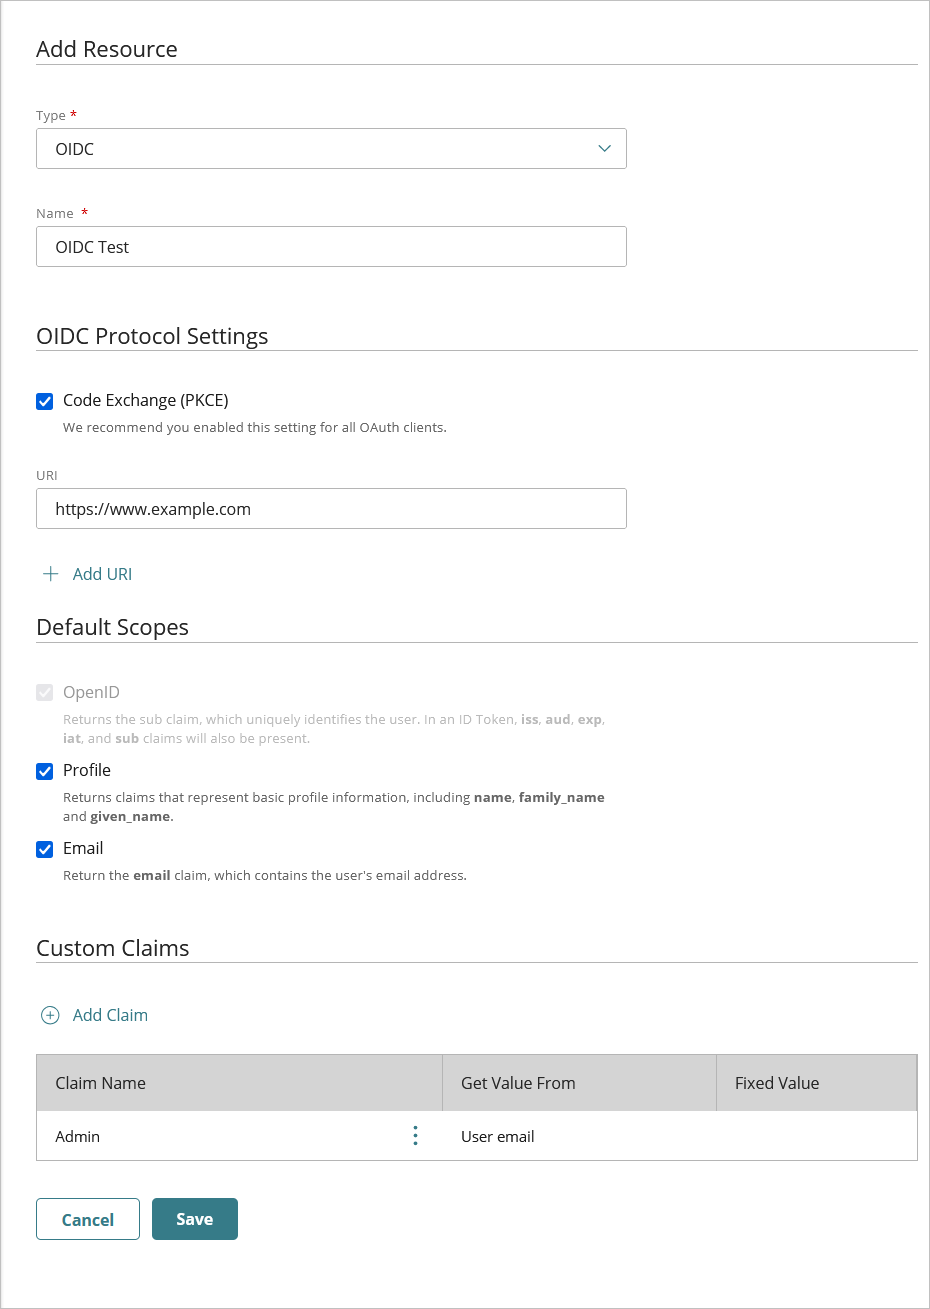
- In the Name text box, type a name for the resource.
- In the OIDC Protocol Settings section, enable Code Exchange (PKCE).
We recommend you enable this setting for all OAuth clients to improve security.
- In the URI text box, type the Redirect URI for your application.
- To add more URIs, click Add URI and type the additional Redirect URI.
- In the Default Scopes section, select the scopes that the application requires:
- OpenID (required) — Returns the sub claim, which uniquely identifies the user.
- Profile — Returns claims that represent basic profile information, including name, family_name, and given_name.
- Email — Returns the email claim with the email address of the user.
- To add a custom claim, in the Custom Claim section, click Add Claim.
The Add Claim dialog box opens.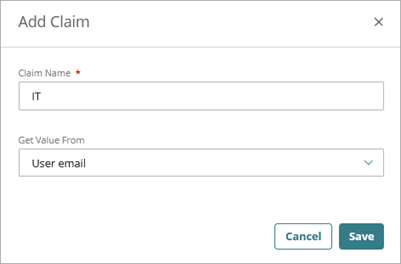
- In the Claim Name text box, type the name of the claim.
- In the Get Value From column, select the source of the claim name.
- (Optional) In the Fixed Value column, type a static value.
The Fixed Value option allows you to assign a constant value to the claim for all users who authenticate through this resource. You use this when the application expects a specific claim with the same value for every user (for example, role=admin or tenant=default).
- To save your claim, click Save.
- To save your resource, click Save.
WARNING: Do not install the Logon app on computers that run Windows 7 or lower or on servers that run Windows 2008 R2 or lower.
The Logon app enables you to require authentication when users log in to a computer or server. This includes protection for RDP and RD Gateway.
There are two parts to the Logon app:
- The resource you configure in AuthPoint
- The application you install on a computer or server
When you install the Logon app, authentication is required to log in. On the login screen, users must type their password and then select one of the allowed methods of authentication (push notification, one-time password, or QR code).
If your AuthPoint license expires or you delete your Logon app resource, users can log in to their computers with only their password.
To start, you must add a resource for the Logon app:
- From the AuthPoint navigation menu, select Resources.
- Click Add Resource.
The Add Resource page opens.
- From the Type drop-down list, select Logon App.
Additional fields appear.
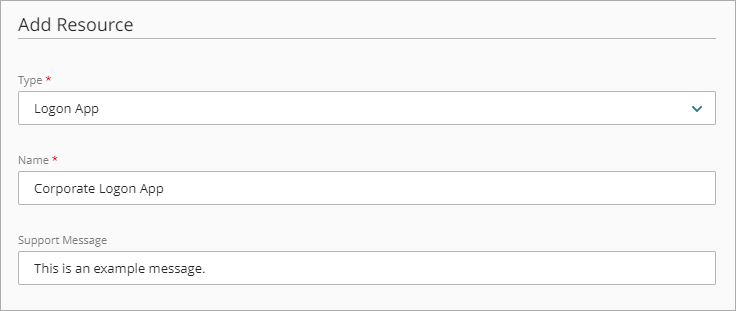
- In the Name text box, type a name for this resource.
- (Optional) In the Support Message text box, type a message to show on the logon screen.
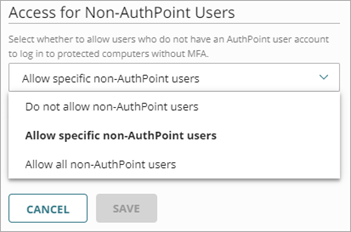
- From the Access for Non-AuthPoint Users drop-down list, select whether to allow users who do not have an AuthPoint user account to log in to protected computers without MFA. You can choose from three options:
- Do not allow non-AuthPoint users
- Allow specific non-AuthPoint users to log in without MFA
- Allow all non-AuthPoint users to log in without MFA
Non-AuthPoint users can only log in without MFA if an AuthPoint user account with the same user name does not exist.
- If you chose to allow specific non-AuthPoint users to log in without MFA, in the Add User Names text box, type the user name of each non-AuthPoint user that can log in without MFA. You can specify up to 50 non-AuthPoint users that can log in without MFA.
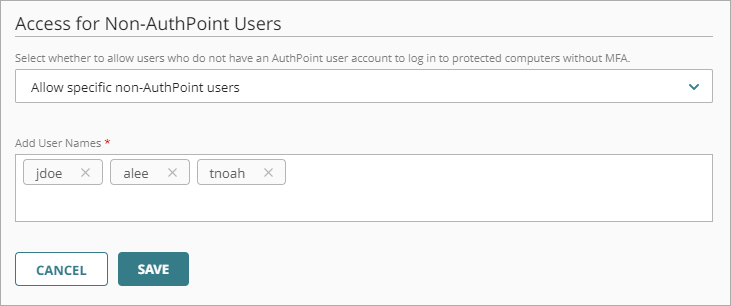
- Click Save.
You do not have to add additional Logon app resources for each computer that the Logon app is installed on, regardless of the OS. You only need multiple Logon app resources if you have multiple domains.
Now that you have added a Logon app resource, you must install the Logon app on any computers and servers that you want to require authentication for. The steps in the next procedure cover how to manually install the Logon app. You can also install the Logon app from a Windows command prompt or use an Active Directory GPO to install the Logon app remotely on multiple computers. For detailed steps, see Install the Logon App from a Windows Command Prompt and Use an Active Directory GPO to Install the Logon App.
To install the Logon app:
- Select Downloads.
- In the Logon App section, next to your operating system, click Download Installer.
- Click Download Config to download the configuration file for the Logon app.
You can use the same configuration file for every installation of the Logon app on the same domain, regardless of the OS.
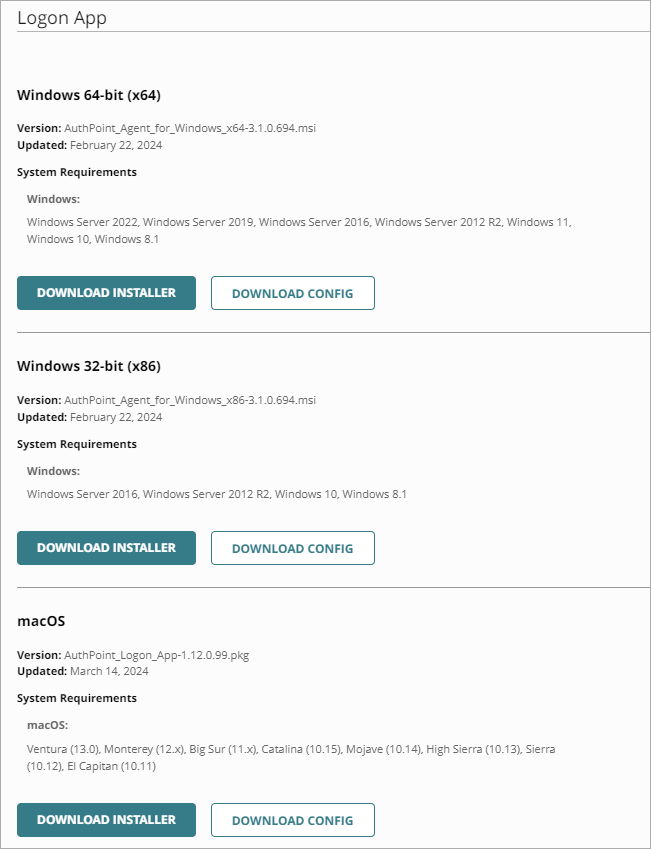
- On your computer, move the downloaded configuration file to the same directory as the Logon app installer (.MSI or .PKG file).
- Run the Logon app installer and install the Logon app.
When you install the Logon app, the computer you install the Logon app on must connect to the Internet before the user logs on for the first time. This is required so that the Logon app can communicate with AuthPoint to check the authentication policies.
The Identity Provider (IdP) portal resource is a portal page that shows users a list of SAML resources available to them. It makes it easier for users to get access to resources. Users log in to the IdP portal and see each resource they have access to.
If you enable the feature, users can also log in to the IdP portal to activate hardware and software tokens.
When you add the IdP portal resource to an authentication policy, the SSO login page redirects users in the groups added to that authentication policy to the portal page.
To set up AuthPoint with an IdP portal:
- Select Resources.
- Click Add Resource.
The Add Resource page opens.
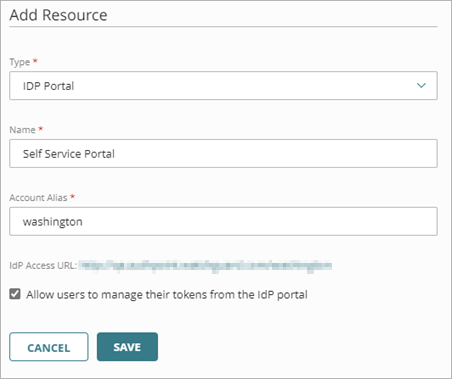
- From the Type drop-down list, select IDP Portal.
- In the Name text box, type a descriptive name for the resource.
- In the Account Alias text box, type a unique value to append to the URL for your IdP portal. The URL for the IdP portal is always https://authpoint.watchguard.com/<account_alias>. In our example, the account alias is washington, so the URL for the IdP portal is https://authpoint.watchguard.com/washington.
- To allow users to activate hardware and software tokens from the IdP portal, enable the Allow users to manage their tokens from the IdP portal toggle.
- Click Save.
Multiple authentication policies can use the same IdP Portal resource. You do not have to add additional IdP resources in AuthPoint.
The Authentication API is a RESTful API that you can use to add the protection of AuthPoint MFA to custom applications. To use the Authentication API, you must configure a RESTful API Client resource in the AuthPoint management UI. This resource represents your API client, and is used to configure authentication policies that determine how your users can authenticate.
For detailed steps to configure an resource, see Configure MFA for a RESTful API Client.
Remote Desktop Web Access is a page that shows a list of applications published from a server. From the page, you can click the icon for an application to launch that application.
The AuthPoint agent for RD Web adds the protection of multi-factor authentication to RD Web Access. When you configure the agent for RD Web, users must authenticate with AuthPoint MFA to connect to the RD Web page.
There are two parts to configure MFA for RD Web:
- The resource you configure in AuthPoint
- The agent you install on the RD Web server
For detailed steps to configure MFA for RD Web, see About the AuthPoint Agent for RD Web.
Active Directory Federation Services (ADFS) is a single sign-on solution for Active Directory that enables users to log in to external systems and applications with their Active Directory credentials. It provides users with a single sign-on experience when they log in to their organization’s web based applications.
With the AuthPoint ADFS agent, you can add multi-factor authentication (MFA) to ADFS for additional security. To do this, you must add an ADFS resource in the AuthPoint management UI and install the ADFS agent on your ADFS server.
For detailed steps to configure MFA for ADFS, seeConfigure MFA for ADFS.
After you add and configure resources in AuthPoint, you must create groups for your users. In AuthPoint, groups are how you define which resources your users have access to. You add users to groups in AuthPoint, then you add the groups to the authentication policies that specify which resources users can authenticate to.
You must add at least one group before you can add authentication policies or add users to AuthPoint.
There are two ways to add AuthPoint groups:
- Add WatchGuard Cloud-hosted groups to the WatchGuard Cloud Directory
- Sync groups from an external user database
You can add WatchGuard Cloud-hosted users and groups to the WatchGuard Cloud Directory in WatchGuard Cloud Directories and Domain Services. Groups that you add to the WatchGuard Cloud Directory are automatically added to AuthPoint as well. To learn more about the WatchGuard Cloud Directory, go to About the WatchGuard Cloud Directory.
To sync external groups from Active Directory or Entra ID, you must add an external identity and create a group sync with the Create new synchronized groups option enabled. This is covered in Step 9 — Sync users from your LDAP database.
To add the WatchGuard Cloud Directory and create WatchGuard Cloud-hosted groups:
- Select Configure > Directories and Domain Services.
The Directories and Domain Services page opens.

- Click Add Authentication Domain.
The Add Authentication Domain page opens.

- Select the WatchGuard Cloud Directory.
- Click Next.
- Confirm that you want to create the WatchGuard Cloud Directory.
The Directories and Domain Services page opens and the WatchGuard Cloud Directory is added to your WatchGuard Cloud account.
- On the Directories and Domain page, click the WatchGuard Cloud Directory domain name.
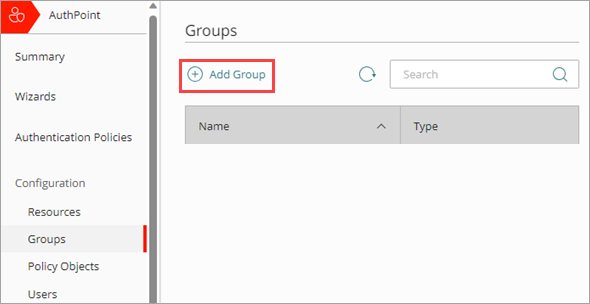
- Select the Groups tab.
- Click Add Group.
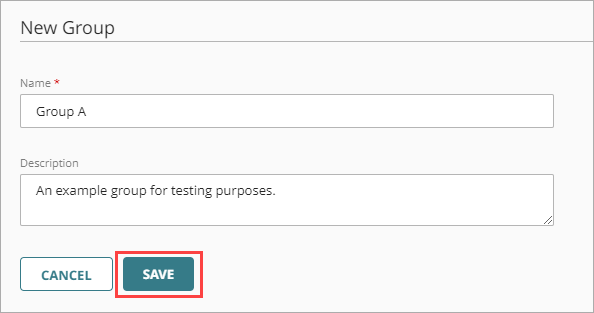
- On the New Group page, type a Name and Description for your group. The description is optional, but we recommend that you specify the purpose of the group. In our example, the name of this group is Group A.
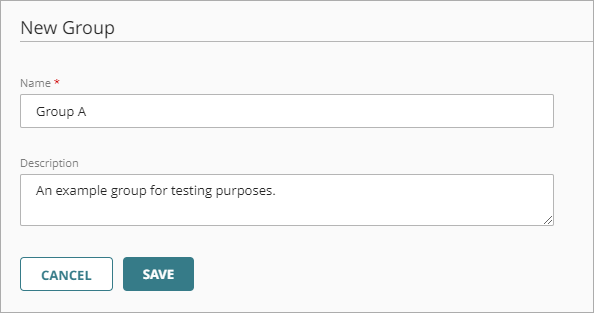
- Click Save.
Your group is listed in the Groups list for the WatchGuard Cloud Directory. The group is also added to the Groups page in AuthPoint.
Zero Trust in WatchGuard Cloud is where you create and manage policies and policy conditions for products such as AuthPoint.
With Zero Trust conditions, you can set parameters that must be met for a policy to apply to a user authentication. This enables you to create policies that are more specific and granular. You configure conditions and then add them to policies.
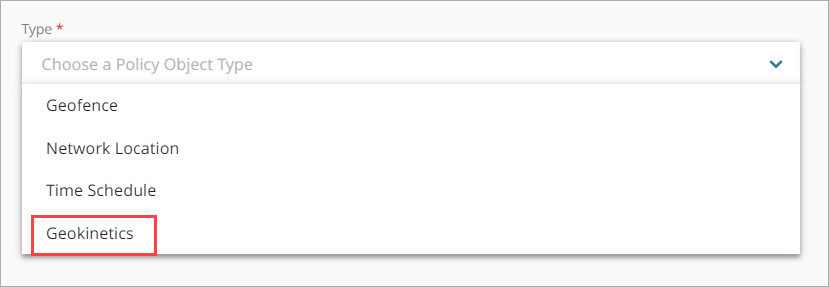
You can configure these kinds of conditions:
Network Locations
Network location conditions enable you to specify a list of IP addresses. You can then configure authentication policies that only apply when users authenticate from the IP addresses in the specified network location.
Time Schedule
Time schedule conditions enable you to specify the dates and times when authentication policies apply to user authentications. When you add a time schedule to an authentication policy, the policy only applies when a user authenticates during the specified time schedule.
Geofence
Geofence conditions enable you to specify a list of countries. You can then configure authentication policies that only apply when users authenticate from those countries. You might do this if you want to enforce different MFA requirements for different locations, or if you want to block authentication from specific countries.
Geokinetics
Geokinetics conditions enable you to create conditions that compare the user's current location and the location of their last valid authentication. AuthPoint automatically denies authentications from a location the user could not have travelled to since their previous authentication, based on the distance and time between authentications.
When you add conditions to an authentication policy, the policy only applies to user authentications that match those conditions. For example, if you add a specific network location to a policy, the policy only applies to user authentications that come from that network location.
We recommend that you create a second policy for the same groups and resources without the condition. Users who only have a policy that includes a condition do not get access to the resource when the authentication does not meet the settings specified in the condition (because they do not have a policy that applies, not because authentication is denied).
- Users who only have a policy that includes a network location do not get access to the resource when they authenticate outside of that network location.
- Users who only have a policy that includes a time schedule do not get access when they authenticate outside the hours of that time schedule.
- Users who only have a policy to allow access that includes a geofence do not get access to the resource when they authenticate outside of the specified countries.
If you have two policies (one with a condition and one without), assign a higher priority to the policy with the condition. For more information, go to About Zero Trust Policy Precedence.
Geokinetics conditions work differently than other conditions because they apply after an authentication is complete. Geokinetics do not affect the circumstances authentication, so when you add a geokinetics condition to an authentication policy, you do not have to create a second policy without the geokinetics condition.
These resources do not support geokinetics or geofence conditions:
- AuthPoint agent for macOS
- RADIUS
To support authentication with the geofence and geokinetics conditions, you must install these versions of the AuthPoint agents:
- AuthPoint agent for Windows v2.7.1 or higher
- AuthPoint agent for RD Web v1.4.2 or higher
- AuthPoint agent for ADFS v1.2.0 or higher
RDWeb and ADFS have additional requirements to support authentications with location data. For more information, go to Geofence for RD Web and Geofence for ADFS.
Network locations require an Internet connection.
For RADIUS authentication, policies that include a network location are not applied because Zero Trust cannot determine the IP address of the user or the origin IP address.
To configure a network location condition in WatchGuard Cloud:
- Select Configure > Zero Trust.
- Select Conditions.
- Click Add Condition.
The Add Condition page appears.
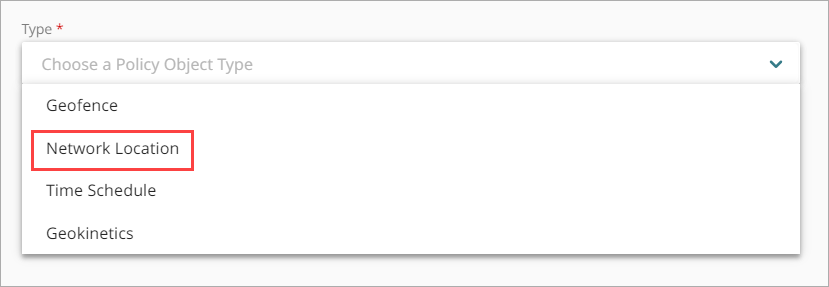
- From the Type drop-down list, select Network Location.
Additional fields appear. - In the Name text box, type a name to identify this network location condtion. This helps you identify the network location when you add it to Zero Trust policies.
- In the IP Mask text box, type a public IP address or netmask that defines the range of public IP addresses for this network location and press Enter or Return. You can specify multiple IP addresses and ranges for one network location.
Zero Trust only supports IPv4 addresses for network locations.
You cannot add the IP addresses 0.0.0.0 or 255.255.255.255 to a network location.
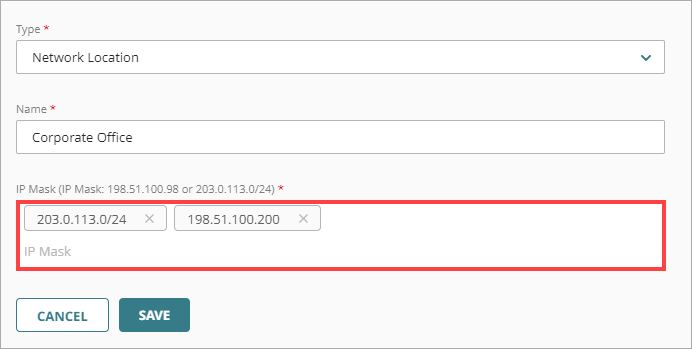
- Click Save.
To configure a time schedule condition in WatchGuard Cloud:
- Select Configure > Zero Trust.
- Select Conditions.
- Click Add Condition.
The Add Condition page appears.
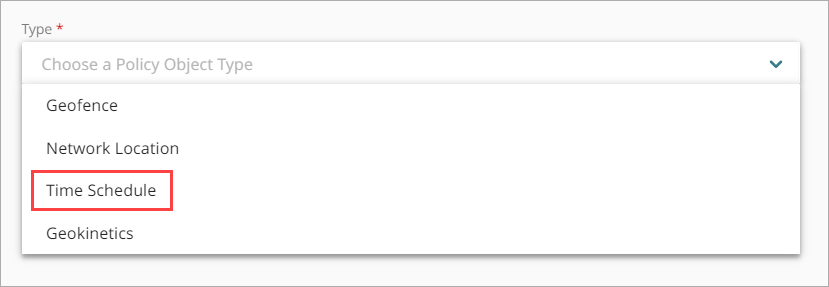
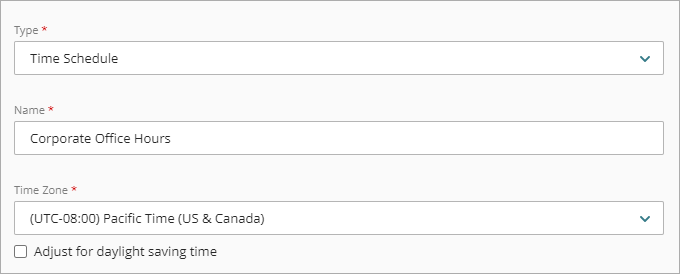
- From the Type drop-down list, select Time Schedule.
Additional fields appear. - In the Name text box, type a name for this time schedule condition. This helps you identify the time schedule when you add it to Zero Trust policies.
- From the Time Zone drop-down list, select the time zone that you want to use for this time schedule.
- If you want to adjust the selected time zone for daylight saving time, select the Adjust for daylight saving time check box. When you select this option, the time policy immediately adjusts the selected time zone by plus one hour. For example, a time schedule with the time zone set to Pacific Standard Time, which is UTC -8 hours, immediately adjusts to UTC -7 hours (-8 hours + 1 hour).
Zero Trust does not dynamically adjust for daylight saving time. You must select the Adjust for daylight saving time check box when daylight saving time applies, and clear the check box when daylight saving time does not apply.
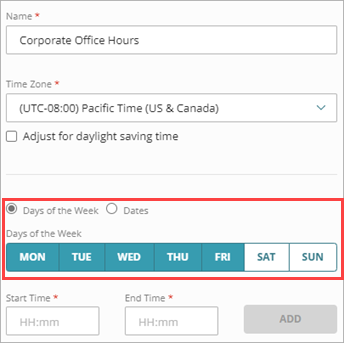
- Select an option to specify whether you want to add specific days of the week or a specific date to this time schedule.
- Days of the week — To add specific days of the week to the time schedule, select this option and select the days to include.
- Dates — To add a specific date to the time schedule, select this option and use the Date field to select the date. You can add only one date at a time.
You can add only one option at a time. To add multiple sets of weekdays and one or more dates to the same time schedule, you must add them separately.
- Enter the Start Time and End Time for when you want the time schedule to apply on the selected days or date. These values must be between 00:00 and 23:59, and the End Time must be later than the Start Time.
The time zone that you select in Step 6 applies to the start and end times for all schedules that you add to the condition.
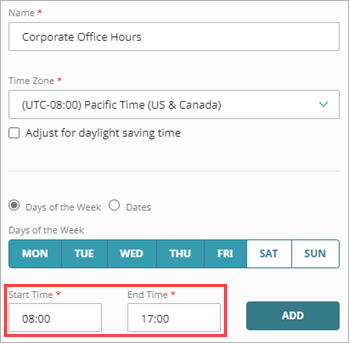
- To add the days and times to your time schedule, click Add. To add additional days or dates, or to specify additional time periods for the same days or dates, repeat Steps 8 — 10.
- Click Save.
To configure a geofence condition in WatchGuard Cloud:
- Select Configure > Zero Trust.
- Select Conditions.
- Click Add Condition.
The Add Condition page appears.
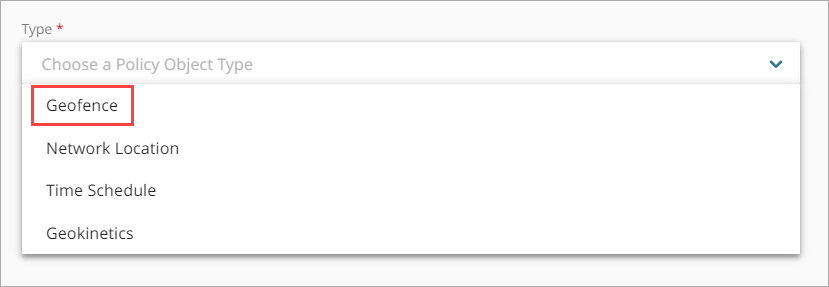
- From the Type drop-down list, select Geofence.
Additional fields appear. - In the Name text box, type a name to identify this geofence condition. This helps you identify the geofence when you add it to Zero Trust policies.
- From the Countries list, select one or more countries to add to this geofence. You can type text to narrow the available options.
- If you want this geofence to apply to user authentications with low accuracy location data, select the Allow location data with low accuracy check box. This option increases the margin for error that AuthPoint uses to validate location data. For example, if you configure a geofence that only applies to user authentications from Canada, but you allow location data with low accuracy, AuthPoint might accept an authentication from a user just beyond the border in the United States.
Location data with low accuracy is required for RDP connections, Firebox resources, Windows virtual machines (VMs), and authentications with location data based on IP address.
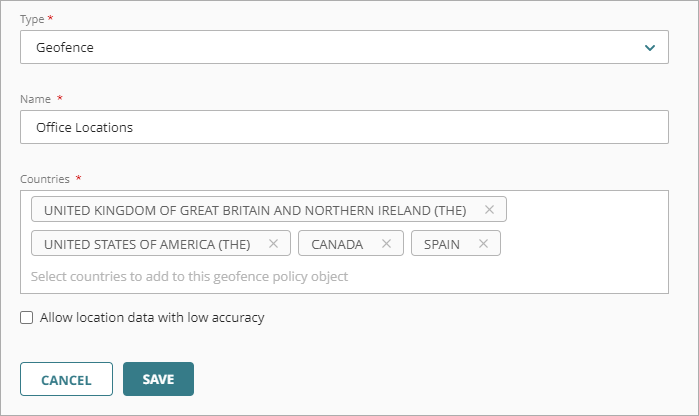
- Click Save
To configure a geokinetics condition in WatchGuard Cloud:
- Select Configure > Zero Trust.
- Select Conditions.
- Click Add Condition.
The Add Condition page appears.
- From the Type drop-down list, select Geokinetics.
Additional fields appear. - In the Name text box, type a name to identify this geokinetics condition. This helps you identify the geokinetics when you add it to Zero Trust policies.
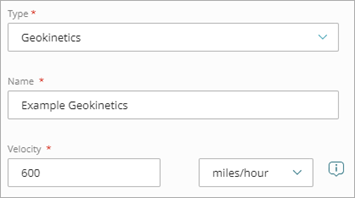
- In the Velocity text box and the adjacent drop-down list, specify a number and unit for AuthPoint to use for this geokinetics condition. AuthPoint denies authentications if the distance between the current authentication and the previous authentication cannot be travelled at this speed.
The default velocity is 600 miles per hour (the average speed of a commercial airplane).
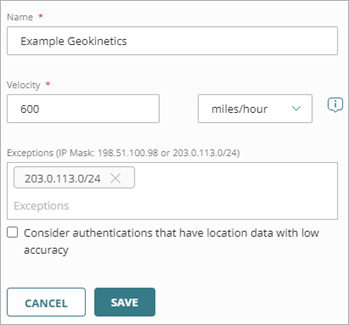
- (Optional) In the Exceptions text box, enter a public IP address or netmask that defines a range of public IP addresses that AuthPoint should ignore for this geokinetics condition, then press Enter or Return. You can specify multiple exceptions. You might do this so that the geokinetics condition does not deny authentications when users connect to a VPN.
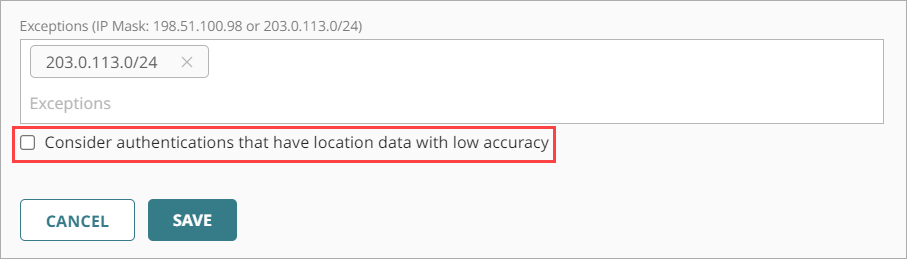
- If you want AuthPoint to consider authentications that have location data with low accuracy when this geokinetics condition is considered, select the Consider authentications that have location data with low accuracy check box.
If you do not select this check box, authentications that have location data with low accuracy are not evaluated against the geokinetics condition.
- Click Save.
After you add all your resources and groups in AuthPoint, you must configure Zero Trust authentication policies. Zero Trust policies specify which resources AuthPoint users can authenticate to and which authentication methods they can use (Push, QR code, and OTP).
When you configure a Zero Trust policy, you specify:
- Which user groups the policy applies to
- Which resources the policy applies to
- Which conditions apply to the authentications
- Whether the policy allows or denies authentications
- Which authentication methods are required
Users who do not belong to a group with a policy for a specific resource cannot authenticate to log in to that resource.
When you configure Zero Trust policies, make sure you follow these requirements and recommendations:
- You must have at least one group before you can configure policies.
- RADIUS
- For RADIUS authentication, policies that have a network location or geofence do not apply because AuthPoint does not have the IP address of the end user or the origin IP address.
- RADIUS resources do not support QR code authentication.
- If you enable the push and OTP authentication methods for a policy, RADIUS resources associated with that policy use push notifications to authenticate users.
- You must enable the push authentication method for policies with MS-CHAPv2 RADIUS resources.
- Logon app
- We recommend that the policy for the Logon app includes the QR code or OTP authentication options so users can authenticate when they are not connected to the Internet.
- Only the Logon app resource supports offline authentication.
- Conditions
- When you add conditions to an policy, the policy only applies to user authentications that match those conditions. Users who only have a policy that includes a condition do not get access to the resource when the authentication does not meet the settings specified in the condition. This is because they do not have a policy that applies, not because authentication is denied.
- Policies with network locations only apply to user authentications that come from that network location. Users who only have a policy that includes a network location cannot access the resource when they authenticate outside of that network location.
- Policies with geofences only apply to user authentications that come from a country specified in the geofence condition. Users who only have a policy that includes a geofence cannot get access to the resource when they authenticate outside of the specified countries.
- Policies with time schedules only apply to user authentications during the specified time schedule. Users who only have a policy that includes a time schedule cannot access the resource when they authenticate outside the hours of that time schedule.
- Geokinetics do not affect the circumstances of an authentication.
- If you add conditions to a policy, we recommend that you create a second policy for the same groups and resources without the conditions. Assign a higher priority to the policy with the conditions.
Geokinetics conditions work differently than other conditions because they apply after an authentication is complete. When you add a geokinetics condition to a policy, you do not have to create a second policy without the geokinetics.
- Geokinetics conditions are not applied for Logon app, RD Web, and ADFS resources if the authentication policy requires only a password (no MFA). This is because AuthPoint validates geokinetics after the authentication. In scenarios where AuthPoint does not validate the password, no authentication request is sent to AuthPoint.
- When you add conditions to an policy, the policy only applies to user authentications that match those conditions. Users who only have a policy that includes a condition do not get access to the resource when the authentication does not meet the settings specified in the condition. This is because they do not have a policy that applies, not because authentication is denied.
To configure an authentication policy:
- Go to Configure > Zero Trust.
- Click Add Policy.
- Enter a name to identify your policy.
- In the Target section, from the Content drop-down list select which groups this policy applies to. You can make multiple selections to add multiple groups
- In the Resources section, select which AuthPoint resources this policy applies to.
- In the Conditions section, select which conditions apply to this policy. When you add a condition to an authentication policy, the policy only applies to user authentications that match the policy and the policy conditions. For example, if you add a specific network location to a policy, the policy only applies to user authentications that come from that network location.
- (Optional) In the Conditions section, to create a new condition you can click Add New Condition. After you create a new condition, you must still add the condition to the policy.
- From the Type drop-down list, select the type of condition to add to the policy. When you add a condition to an authentication policy, the policy only applies to user authentications that match the policy and the policy conditions. For example, if you add a specific network location to a policy, the policy only applies to user authentications that come from that network location. For more information about conditions, go to About Zero Trust Conditions.
If you add conditions to a policy, we recommend that you create a second policy for the same groups and resources without the conditions. Assign a higher priority to the policy with the conditions.
- From the Name drop-down list, select which condition of the chosen type to add to the policy.
- To add more conditions, repeat Steps 8-9.
- In the Action section, select an option to specify whether to require MFA or to deny authentications for the resources in this policy.
- Allow — Allow user groups in this policy access to the resources associated with this policy.
- Deny — Deny authentications when users in the groups associated with this policy try to authenticate to the resources associated with this policy
- If you allow access with this policy, select the check box for each authentication option users can select from when they authenticate to resources in this policy with MFA.
- Click Save.
Your policy is created and added to the end of the policy list. - Review the order of your policies.
To sync users from an LDAP database, you must create a query for the external identity that you added. The queries you add to an external identity specify which users to sync from your Active Directory or LDAP database. They pull user information from the database and create AuthPoint users for the users that match the query.
There are two ways to query users:
- Group Sync — Select the LDAP groups you want to sync users from and AuthPoint creates the query for you.
- Advanced Queries — Create your own LDAP queries to specify which groups or users to sync.
In this example, we show the steps to use the group sync feature.
Before you continue, make sure that each user account has a valid email address. If the email address for a user account is not correct, the user cannot receive the email message to set a password and activate a token.
Before you continue, be aware of these requirements:
- If the selected LDAP groups have more users than you have available AuthPoint licenses for, the sync only creates as many users as your license supports
- LDAP users that do not have a first name, user name, or email address are not included in the synchronization
- If the email address for a user account is not correct, the user cannot receive the email message to set a password and activate a token
- We recommend that you do not add the same LDAP group to multiple group syncs or create multiple group syncs that include the same LDAP user
To sync LDAP users:
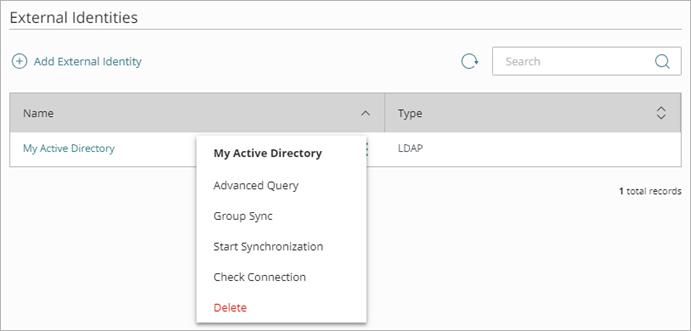
- Select External Identities.
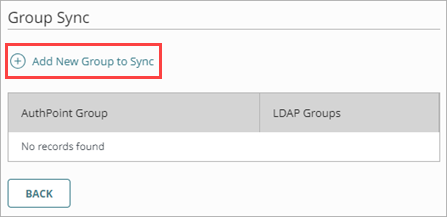
- Next to your external identity, click and select Group Sync.
- On the Group Sync page, click Add New Group to Sync.
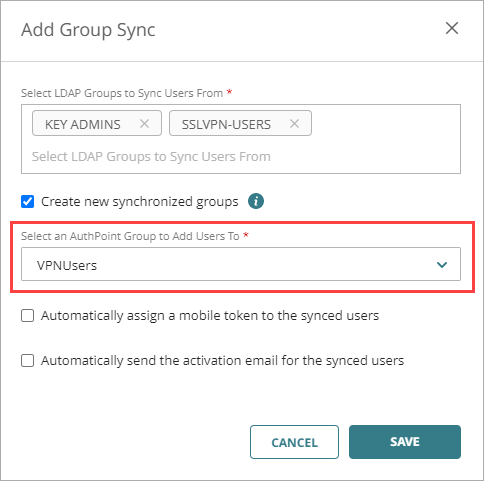
- In the Add Group Sync window, from the Select LDAP Groups to Sync Users From drop-down list, select the LDAP groups you want to sync users from. You can select multiple groups.

- To create new groups in AuthPoint based on the Active Directory groups that you sync users from, enable the Create new synchronized groups toggle. If you enable this option, users sync to the new groups based on group membership in the LDAP database, in addition to the selected AuthPoint group. Do not add the same LDAP group to multiple group syncs or create multiple group syncs that include the same LDAP user.
This option is only available for Active Directory and Entra ID LDAP databases. To use this feature, you must install version 6.1 or higher of the AuthPoint Gateway.
The option to create new synchronized groups in AuthPoint does not include Active Directory groups that are not specified in the group sync. If a synced user is a member of an Active Directory group that is not specified in the group sync, that Active Directory group will not be created in AuthPoint.
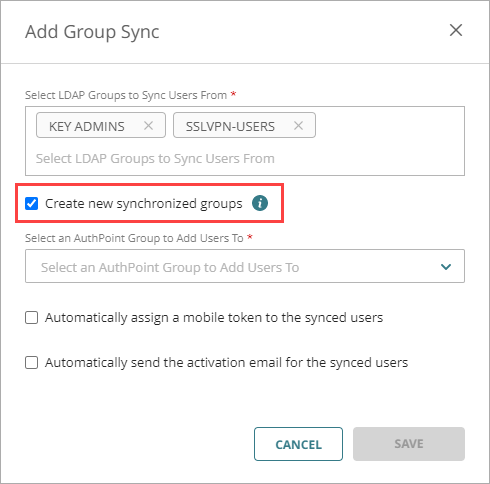
- From the Select an AuthPoint Group to Add Users To drop-down list, select the AuthPoint group to add the users to.
For each group sync, all users are added to the same AuthPoint group. To add LDAP users to multiple groups, we recommend that you enable the Create new synchronized groups toggle and use your Active Directory group structure to manage your users.
-
If you do not want AuthPoint to create mobile tokens for these user accounts or send an email to the users to activate their mobile tokens, clear the Automatically assign a mobile token to the synced users and Automatically send the activation email for the synced users check boxes.
You cannot change these settings after you sync the user accounts. To assign a token to a user that does not have these options selected, you must resend the Token Activation email. For more information, go to Resend Activation Email.
- Click Save.
The Add Group Sync window closes.
After you add a query to find your users (manually or with group sync), AuthPoint syncs with your Active Directory or LDAP database at the next synchronization interval and creates an AuthPoint user account for each user identified by the query.
To start a sync immediately, on the External Identities page, next to the your external identity, click ![]() and select Start Synchronization.
and select Start Synchronization.
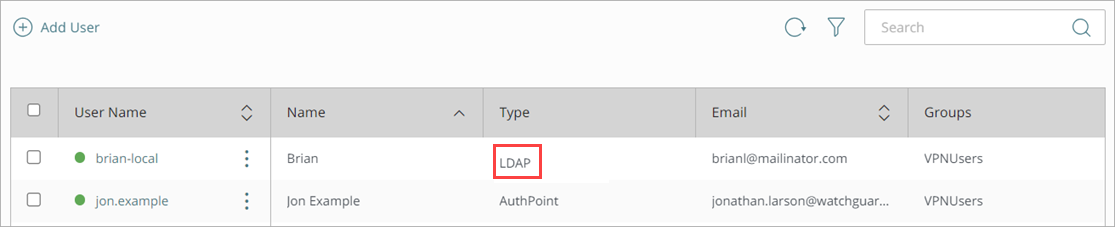
The created user accounts appear on the Users page with a green Activated status icon next to the user name. The Activated status icon indicates that the user has been created and is currently active (not blocked). You can identify users synced from an external identity by the LDAP tag in the Type column in the list of users.
Each user receives an email that they use to activate their token in the AuthPoint mobile app. When a user activates their token, their token information is shown in the Token column with a green Activated status icon next to the token.
Users synced from an external identity use their existing password for authentication. They do not receive the email to set an AuthPoint password.
If you enabled the Create new synchronized groups toggle, the synced groups are created in AuthPoint. The newly created groups appear on the Groups page. You can identify synced groups from Active Directory by the LDAP tag in the Type column in the list of groups.
If you change the name of a synced group in Active Directory, the name of the synced group in AuthPoint updates automatically to match. You cannot edit the synced groups in AuthPoint.
If you delete the group in Active Directory, or if you delete the group sync, the synced group is not deleted in AuthPoint. You must manually delete the synced group in AuthPoint.
You can share a direct link to a specific website in the IdP portal with specific user groups. You might do this for websites or applications that do not support SAML or that are not managed by your company. For example, you might provide users with a link in the IdP portal to the website they use to manage their 401k accounts.
Application portal links are available in the IdP portal for users who are members of the groups that the link is shared with. I
To add application portal links:
- Select Application Portal Links.
The Application Portal Links page opens.
- Click Add Application Portal Link.
The Add Application Portal Link page opens.
- In the Name text box, enter a name to identify this link to users in the IdP portal.
- In the URL text box, enter the URL for the application or service. If you do not specify a protocol in the URL, AuthPoint uses HTTPS by default.
- To upload an image to identify the link in the IdP portal, drag an image file from your computer to the Image box, or click Select a file to import and select an image file.
- From the Groups list, select the groups this link is available to.
You can select more than one group. To make this link available to all groups, select All Groups. - Click Save.
The Application Portal Links page opens.
After you save the link, a new tile shows in the IdP portal for users who are members of the groups that you shared the link with. Users can click this tile to go to the URL you specified.
AuthPoint Total Identity Security includes a Dark Web Credential Monitoring feature to help you protect thecredentials of your users. With Dark Web Credential Monitoring, WatchGuard actively monitors credential breaches for your users. If a credential breach includes the email addresses or passwords of your users, the affected users receive an email notification. You can also specify additional email addresses that you want to notify about the breach.
To configure Dark Web Credential Monitoring, you must:
- Enable Dark Web Credential Monitoring for users
- Specify which email addresses receive email notifications about credential breaches
To enable Dark Web Credential Monitoring for a user, from the WatchGuard Cloud UI:
- Select Configure > AuthPoint > Users.
The Users page opens.
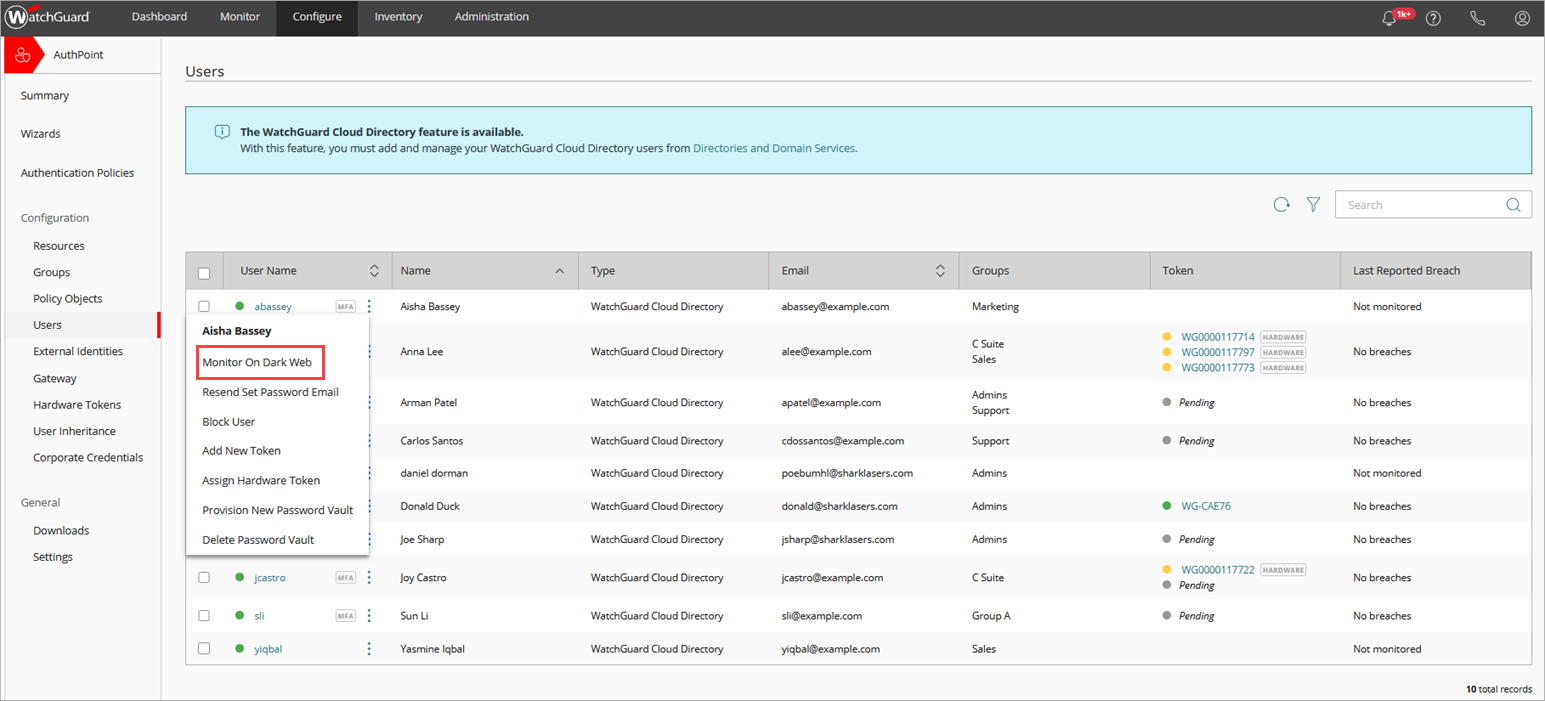
- For the user you want to enable credential monitoring for, click and select Monitor on Dark Web.
WatchGuard starts to monitor the credentials for that user on the dark web.
To configure the email addresses to receive email notifications for credential breaches, from the WatchGuard Cloud UI:
- Select Configure > AuthPoint > Settings.
The AuthPoint settings page opens.
- From the Dark Web Credential Monitoring section:
- If you do not want to send email notifications to users affected by credential breaches, clear the Breached Users check box.
- In the Additional Email Addresses text box, specify the email addresses that you want to receive notifications for credential breaches.
The maximum number of additional email addresses you can specify is 30.
- Click Save.
You have now added your resources to AuthPoint, defined authentication policies for those resources, and synced your users. Before your users can authenticate with AuthPoint, they activate a token.
A token is something that contains information used to prove identity, like a digital signature or fingerprint. Users activate or install a token on a device used for authentication (known as an authenticator). This device is then used to gain access to protected resources that require MFA. To confirm your identity when you authenticate, you must prove that you have possession of the authenticator, or token, assigned to you.
AuthPoint can use two types of tokens:
Software Tokens
A software token is a token that you activate and install with the AuthPoint app on your mobile device.
When you create a user in AuthPoint, a software token is automatically created for them. The user receives an email with instructions to download the AuthPoint mobile app and activate the token on a mobile device. For more information, see Activate a Token and Add New Software Tokens.
Hardware Tokens
A hardware token is a physical device with a built-in token. You can purchase hardware tokens from WatchGuard or a third-party vendor that sells supported hardware tokens. For more information, see Hardware Tokens.
To learn how to get started with AuthPoint as a user, see AuthPoint for End-Users.
Quick Start — Set Up AuthPoint