Applies To: Locally-managed Fireboxes
A Device Configuration Template is a collection of configuration settings that multiple Fireboxes can use. When you manage your Fireboxes with the WatchGuard Management Server, you can create Device Configuration Templates that are stored on the Management Server. You can then use these templates with your managed Fireboxes.
You can apply a template to a single managed Firebox, to a device folder, or to a Management Group folder. If you apply a template to a folder, the template is only applied to the compatible devices in the folder (devices with the same Fireware version range as the template).
For more information about Management Groups, go to Configure Management Groups.
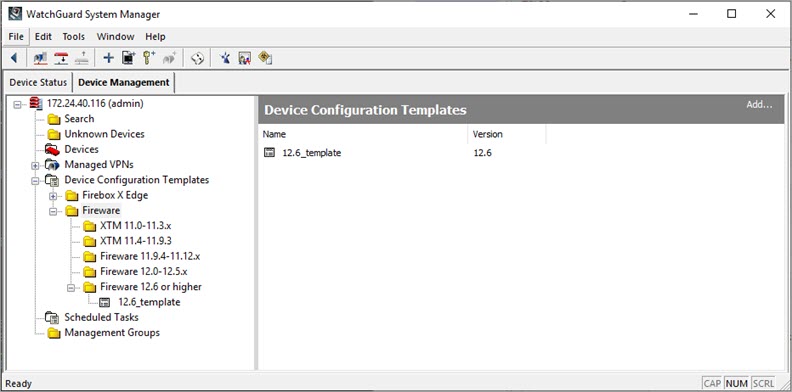
The templates that you create on the Management Server are located in the Device Configuration Templates tree. You can use Device Configuration Templates to easily configure standard firewall filters, change the configuration of your licensed Subscription Services, configure logging settings, or apply other policy settings to one or more fully managed devices. There are two different scenarios for how to use templates:
- Create complete Device Configuration Templates, which include all the settings for your Fireboxes.
- Create multiple Device Configuration Templates, each with specific settings that you apply in layers to your Fireboxes, as appropriate for each Firebox.
For example, you could create a template that includes only the SMTP proxy settings for a group of Fireboxes deployed in the northern region of your territory.
To help you easily identify the contents of each template you create, make sure to specify a unique, descriptive name for each template.
When you configure a template, you can also specify whether settings in the template take precedence over settings in an individual device configuration file. By default, template settings automatically override settings in an individual configuration file.
- Fireware v12.0 - v12.5.x templates can only be applied to devices that run Fireware versions 12.0-12.5.x
- Fireware v12.6 or higher templates can only be applied to devices that run Fireware versions 12.6 and higher
- Fireboxes
- Fireware v12.6 or higher
- Fireware v12.0-12.5.x
You can make changes to a Device Configuration Template at any time. When you make a change to a configuration template, the Management Server saves the change in the template configuration history, but the Fireboxes that use that template are not automatically updated. You must reapply the template to your Fireboxes for the template changes to appear in the configuration file for your Fireboxes.
After a Device Configuration Template is applied to a Firebox, you can open Policy Manager from the Management Server to connect directly to the Firebox and change the policies and settings in the device configuration file. The Management Server saves the changes you make in the configuration history for the Firebox.
For more information about the device configuration history, see About Configuration History and Template Application History.
Create a New Device Configuration Template
You can create a new Device Configuration template from the Management Server in WatchGuard System Manager.
To create a new Device Configuration Template:
- Open WatchGuard System Manager and connect to your Management Server.
- Select the Device Management tab.
The Management Server page appears. - In the left navigation menu, select Device Configuration Templates.
The Device Configuration Templates page appears with the list of currently available templates.
- To see the available templates, expand the Device Configuration Templates list.
- Right-click Device Configuration Templates or any template folder, and select Insert Device Configuration Template.
Or, click Add at the top right of the Device Configuration Templates page.
The Product Version dialog box appears. - Select the product line and version from the drop-down list. Click OK.
- Specify a name for the template. Click OK.
The new template is added to the template subfolder. Policy Manager opens with a blank configuration file. - Complete the procedures in the next sections to configure the template.
Configure a Template for a Device
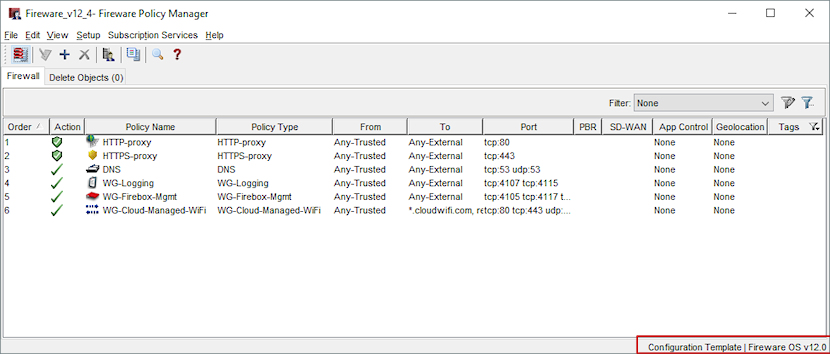
To define settings in a device configuration template you use a streamlined version of Policy Manager.

To configure global DNS, QoS, and the WebBlocker Warn action in Fireware v12.0-12.5.x configuration templates, you must use Policy Manager v12.4 or higher.
In a Device Configuration template, you can:
- Add, modify, and delete policies and policy types
- Set up policy highlighting
- Set up feature key synchronization and feature key expiration alarms
- Set up aliases Tip
- Configure settings for logging in a policy and global device logging settings
- Configure default packet handling settings
- Configure diagnostic log level settings
- Configure DNS/WINS settings
- Configure NTP server settings
- Configure SNMP Settings
- Configure per-policy QoS settings
- Configure policy-based Dynamic NAT
- Configure policy-based 1-to-1 NAT
- Configure authentication settings:
- Set up automatic updates of trusted CA certificates
- Set up actions for:
- Traffic Management
- Proxies
- Content
- TLS Profiles Tip
- WebBlocker
- Schedules
- SNAT
- Quotas
- SD-WAN (Fireware v12.8 or higher)
The template only contains a partial SD-WAN action definition because SD-WAN is configured on a Firebox for specific network interfaces. An SD-WAN action with the same name must already exist on the Firebox when you apply the template. If a matching SD-WAN action does not exist on the Firebox, the SD-WAN action is not applied from the template. If the template has a policy that uses an SD-WAN action that does not exist on the Firebox, the policy is applied without the SD-WAN action.
- Configure Technology Integrations for:
- Configure Subscription Services settings:
- Application Control
- APT Blocker
- Botnet Detection
- Data Loss Prevention
- DNSWatch Tip
- Gateway AntiVirus
- Geolocation
- IntelligentAV
- Intrusion Prevention
- Quarantine Server
- Reputation Enabled Defense
- spamBlocker
- WebBlocker
The web reputation authority service provided by Reputation Enabled Defense (RED) is deprecated. For more information, go to this Partner Blog post.
If a template includes a WebBlocker action that specifies the Warn action, you can apply the template only to Fireboxes that run Fireware v12.4 or higher.
- Configure Global Settings for your devices
- Configure Inheritance Settings for your devices
- Configure objects to be deleted from your device configuration files
You cannot use a Device Configuration template to modify default policies, such as the WatchGuard and WatchGuard Web UI Firebox management policies. Instead, you can add another policy of the same type as the default policy to the template.
After you apply a template to a Firebox, you can make changes to the aliases in your device configuration file to correctly define the value of the aliases for your Firebox.
If you apply a template to a Firebox, and the template includes an alias name that is already used by an interface on the Firebox, the alias name does not appear correctly in the Aliases list after the template is applied. This is because a configuration file cannot contain duplicate alias names.
Because you can apply a template to more than one fully managed device, it is helpful to be able to automatically delete certain settings from a device configuration file when the template is applied. You can configure the deletion settings when you set up your template configuration file. You can delete policies, services, aliases, proxy actions, WebBlocker actions, Application Control settings, and schedules. You cannot delete tunnels or license keys, which are stored on the Management Server.
To quickly determine if a template is restricted for use with only certain Fireware models, look at the template information that appears at the bottom of the template in Policy Manager. If (Model Restriction) appears, the template can only be applied to certain devices.
For more information about how to configure WebBlocker servers, go to Configure WebBlocker and Configure WebBlocker Servers.
Add Policies to a Template
You can add Firewall policies to a configuration template just as you would add them to the configuration of an individual Firebox.
To add policies to a configuration template:
- Select the Firewall tab.
- Click
 .
.
Or, select Edit > Add Policy.
The Add Policies dialog box appears. - Expand the folder for the type of policy you want to add.
A list of the selected policies appears. - Select a policy.
- Click Add.
The New Policy Properties dialog box appears. - Configure the policy.
For more information about how to configure a new policy, go to Add a Proxy Policy to Your Configuration. - Repeat Steps 3–6 to add more policies to your configuration.
Configure Policy Precedence
After you add policies to a template, you can change to manual-order mode and set the policy precedence for your template. When you apply the template to a Firebox, the order you specify for the policies in the template is maintained only if the configuration file of the Firebox is also set to manual-order mode.
To configure policy precedence, from Policy Manager:
- Select View > Auto-Order Mode.
The check mark disappears and a confirmation message appears. - Click Yes to confirm that you want to switch to manual-order mode.
When you switch to manual-order mode, the Policy Manager window changes to the Details view. You cannot change the order of policies if you are in Large Icons view. - To change the order of a policy, select it and drag it to the new location.
- Click
 .
. - Open the device configuration file in Policy Manager.
- If the file is in auto-order mode, repeat Steps 1–4 to change the device to manual-order mode.
- Close Policy Manager for the device.
- Apply the Device Configuration Template to your device.
- Open the device configuration file in Policy Manager and review the policy order.
The policies from the Device Configuration Template have the same order in the device configuration file that you specified in the template.
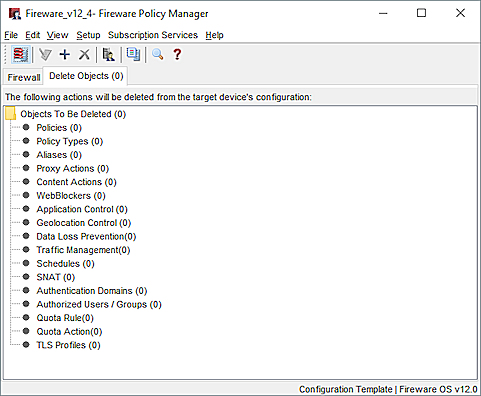
Specify Objects to Delete
When you apply a template to a device, you can specify some settings to be deleted in the device configuration file. This enables you to make sure that the device configuration does not contain duplicate items after the template is applied.
You can select to add items in these categories to the Objects To Be Deleted list:
- Policies
- Policy Types
- Aliases
- Proxy Actions
- Content Actions
- WebBlocker
- Application Control
- Geolocation Control
- Data Loss Prevention
- Traffic Management
- Schedules
- SNAT
- Authentication Domains
- Authorized Users / Groups
- Quota Rule
- Quota Action
- TLS Profiles
Because Mobile VPN policies include two policies that appear as one policy (an .in policy and an .out policy), we recommend that you do not add Mobile VPN policies to this list. If you must specify in your template a Mobile VPN policy to be deleted, make sure to add both the .in policy and the .out policy. For example, for a Mobile VPN policy named MVPN-North, add the MVPN-North.in and MVPN-North.out policies to the Objects To Be Deleted list.
If you specify objects for deletion that are linked to items that remain in your configuration file after the template is applied, the link to the deleted items is removed from the items that remain. For example, if you specify an alias to be deleted and that alias is used in a policy that is not specified for deletion, when the template is applied to the device, the policy is not removed but the alias is removed from the policy. Make sure to verify that the items you specify for deletion do not create errors in your configuration files, such as a policy without a From or To address.
To specify objects to be deleted from the device configuration file when the template is applied:
- Select the Delete Objects tab.
- From the Objects To Be Deleted tree, select the type of object to delete from the device configuration file.
- Right-click the object and select Add Object.
The Add Object dialog box appears.
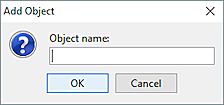
- In the Object Name text box, type the name of the object to delete.
For example, to delete the FTP-Proxy policy, type FTP-proxy. - Click OK.
The object you specified appears in the list for the type of object you selected.
Specify an Object to Delete when you Delete or Rename an Object
When you remove or rename objects in a configuration template, Policy Manager asks whether you want to add the object or policy to the Objects to be Deleted list. This option appears when you delete an object, such as a proxy action or WebBlocker action, or when you rename an existing policy. If you add an object to the list, when you apply the template to a Firebox, the objects you specify are removed from the Firebox device configuration. If you add the name of a renamed policy to the list, the policy with the new name is added to the configuration file and the original policy is removed.
To delete an object from the template when you delete or rename an object:
- Delete an object from the template or change the name of a policy.
The Delete Object(s) dialog box appears.
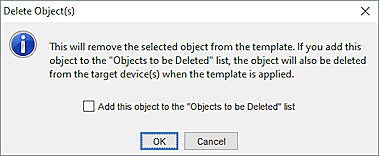
- To remove the object or policy name from the device configuration file when the configuration template is applied to the Firebox, select the Add this object to the "Objects to be Deleted" list check box.
To delete the object from the template, but not add it to the Objects to be Deleted list, do not select the Add this object to the "Objects to be Deleted" list check box. - Click OK.
Configure Network DNS and WINS Servers
You must configure network (global) DNS and WINS servers on the Firebox for some features to work. Network DNS and WINS servers are also known as global DNS and WINS servers.
DNS/WINS server configuration is supported in templates for Fireware v12.0 and higher.
- Open the configuration template in Policy Manager.
- Select Setup > DNS/WINS.
The DNS/WINS dialog box appears.
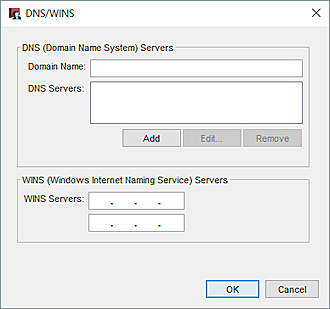
- Configure the network DNS and WINS server settings. For more information about these settings, go to Configure Network DNS and WINS Servers.
Configure Global Settings
When you create a new configuration template, you can configure these global settings:
By default, the template is configured to enable your Firebox to send feedback to WatchGuard. Device feedback helps WatchGuard to improve products and features. For more information about device feedback your Firebox sends to WatchGuard, go to Device Feedback.
Your Firebox collects and stores information about the faults that occur on your device and generates diagnostic reports of the fault. Faults are collected for these categories:
- Failed assertions
- Program crashes
- Kernel exceptions
- Hardware problems
When you enable the Fault Reports feature, information about the faults is sent to WatchGuard once each day. WatchGuard uses this information to improve the device OS and hardware. You can also review the list of Fault Reports, manually send the reports to WatchGuard, and remove Fault Reports from your Firebox.
For performance testing or network debugging purposes, you can enable all the traffic management and QoS features on your Fireboxes.
To enable configuration of traffic management or QoS in policies, you must enable the global setting
In Fireware v12.2 or higher, you can configure policies to control traffic generated by the Firebox. This kind of traffic is also known as self-generated traffic or self-originated traffic.
Before you can create policies to control Firebox-generated traffic, you must select the Enable configuration of policies for traffic generated by the Firebox check box. It is important to understand the changes that occur when you enable this option. When this option is enabled:
- You can add new policies that apply to Firebox-generated traffic.
- The previously hidden Any-From-Firebox policy appears in the list of policies.
This policy cannot be modified or removed. - The Firebox no longer sets the source IP address for Firebox-generated traffic to match a BOVPN tunnel route. This means that if your configuration includes a BOVPN tunnel, Firebox-generated traffic uses a WAN interface instead of the BOVPN tunnel.
If auto-order mode is enabled for the Policies list, these changes occur:
- Policy order number changes for existing policies.
This occurs because the previously hidden Any-From-Firebox policy now appears. - Policies that control Firebox-generated traffic appear before all other policies.
If no other policies exist that control Firebox-generated traffic, the Any-From-Firebox is first in the list and is numbered 1. - Policies that you add for Firebox-generated traffic appear before the Any-From-Firebox policy because they are more granular.
For more information about this setting and policies that control Firebox-generated traffic, go to About Policies for Firebox-Generated Traffic.
To configure policies for Firebox-generated traffic, go to Configure Policies for Firebox-Generated Traffic.
For configuration examples, go to Configuration Examples for Control of Firebox-Generated Traffic.
To configure the global settings in the template:
- Select Setup > Global Settings.
The Global Settings dialog box appears.
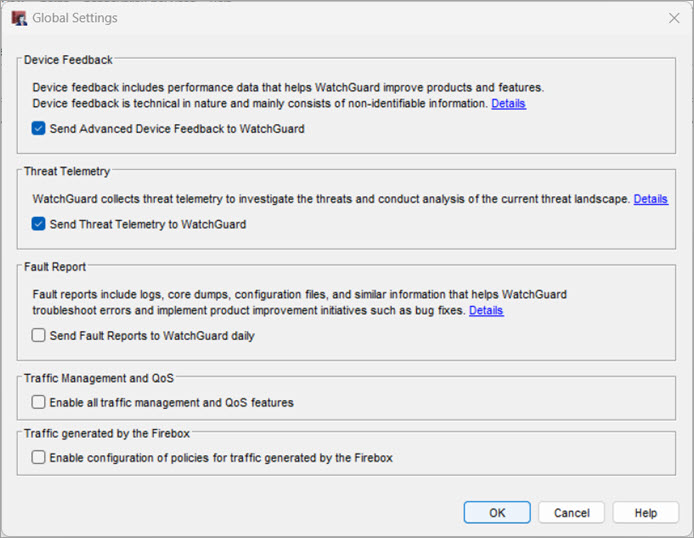
- To disable the Device Feedback feature, clear the Send advanced device feedback to WatchGuard check box.
- In Fireware v12.11 and higher, to disable the Threat Telemetry feature, clear the Send Threat Telemetry to WatchGuard check box.
- To enable the Fault Reports feature, select the Send Fault Reports to WatchGuard daily check box.
- To enable the Traffic Management and QoS features, select the Enable all traffic management and QoS features check box.
- To enable configuration of policies for traffic generated by the Firebox, select the Enable configuration of policies for traffic generated by the Firebox check box.
Configure Inheritance Settings
If you apply a template to a Firebox with a configuration file that already includes the same policies and settings as the template, you can control if the template settings override the Firebox configuration settings, depending on the template's inheritance settings.
If you change the name of a policy or another object in the template, when you apply the template to your Firebox, the new policy or object is added to the Firebox configuration and does not replace the older policy or object that you renamed. If you do not want to keep the older policy or object in your configuration file, you must manually delete it.
For Inheritance Settings to work correctly, the policies and settings in the template must have exactly the same name and use the same configuration options as the policies and settings in the device configuration file. For example, in the Authorized Users and Groups settings, if you add an authorized user with the name Admin 1 to your template and apply the template to a Firebox with an authorized group named Admin 1, the Inheritance Settings do not apply because the template instance of Admin 1 is a group and the Firebox instance is a user.
In the template inheritance settings, you can specify which settings in the device configuration file take precedence over the template settings. Each category of settings appears on a different page:
- Policies
- Policy Types
- Schedules
- Aliases
- Proxy Actions
- Content Actions
- TLS Profiles
- HTTPS Exception Overrides
- Application Control
- Geolocation Control
- Data Loss Prevention
- WebBlocker
- Traffic Management
- SNAT
- Authentication Servers
- Authorized Users / Groups
- Quotas Rule
- Quotas Action
- Other
There are two exceptions to the default Inheritance settings behavior: most options on the Other page and specific aliases for wireless devices. By default, the Allow Override check box is selected for most of the options on the Other page (except for Policy Tags, Policy Filters), and for the specific wireless aliases. This is to make sure that the settings configured on the Firebox automatically override the settings in the template.
Options on the Other list include:
| Settings | Fireware Version | Comment |
|---|---|---|
| Account settings for Firebox authentication | v11.12.2 or higher | |
| APT Blocker settings | This option controls inheritance only for APT Blocker settings. It does not affect inheritance of APT Blocker settings within a proxy action. Configure inheritance for proxy actions in Proxy Actions inheritance settings. | |
| Automatic feature key synchronization setting | ||
| Autotask Settings | v12.0.1 and higher | |
| Botnet Detection | v11.11 and higher | |
| ConnectWise Settings | v11.12 and higher | |
| Control of Firebox Generated Traffic | v12.2 and higher | |
| Device Administrator Connections setting | v11.10.1 and higher | |
| Device Feedback setting | ||
| Diagnostic Log Level | ||
| DLP Global Settings | ||
| Enable automatic update of trusted CA certificates | v11.10 and higher | |
| Enable feature keys expired notification | v11.10.1 and higher | |
| Fault Report setting | ||
| File Exceptions | v12.2 and higher | |
| Gateway AntiVirus decompression settings | ||
| Geolocation | v11.12 and higher | |
| Global Firewall Authentication settings | ||
| IntelligentAV settings | v12.2 and higher | |
| Intrusion Prevention settings | ||
| NTP Settings | ||
| Policy Filters | Not selected by default | |
| Policy Tags | Not selected by default | |
| Quarantine Server settings | ||
| Quotas Settings | v11.10 and higher | |
| Reputation Enabled Defense feedback settings | ||
| Send log messages to Firebox internal storage | ||
| Send log messages when the configuration for this device has changed | ||
| Signature Update settings | ||
| Single Sign-On settings | ||
| SD-WAN Actions | v12.8 and higher | |
| SNMP Settings | ||
| spamBlocker settings | ||
| Syslog Server | ||
| System DNS/WINS settings | v12.0 and higher | |
| Terminal Services settings | ||
| Tigerpaw settings | v12.3 and higher | |
| Traffic Management and QoS settings | ||
| WatchGuard Log Server settings | ||
| WebBlocker Settings | v11.12 and higher |
When you configure the settings for options on the Other page, a message might appear that asks you if you want to change the Inheritance Settings selection for that option. If you click Yes, the Allow Override check box for that option is cleared. When the Allow Override option is not enabled, when you apply the template to your Fireboxes, the setting configured on each Firebox does not override the setting configured in the template.
The aliases for wireless devices that are overridden by default are:
- WG-Wireless-Guest
- WG-Wireless-Access-Point1
- WG-Wireless-Access-Point2
- WG-Wireless-Client
Because proxy actions and Subscription Services have some related settings, the Inheritance Settings for proxy actions and Subscription Services can affect each other and cause unexpected results when you apply a template to your Fireboxes. To avoid this problem, when you configure the Inheritance Settings for either proxy actions or a Subscription Service, check the Inheritance Settings for the related Subscription Service or proxy action and make sure there are no conflicts in the settings.
To configure Inheritance Settings for a Device Configuration Template:
- Select View > Inheritance Settings.
The Inheritance Settings dialog box appears, with the Policies category selected by default.
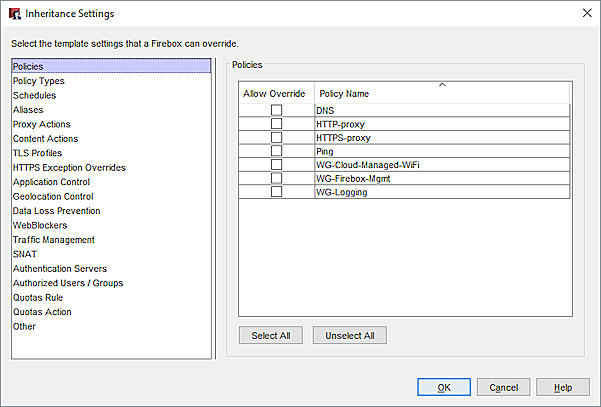
- Select a category.
The settings configured in the template for the selected category appear. - To allow a Firebox setting to override a template setting, select the Allow Override check box for that setting.
Most of the check boxes for settings in the Other category are selected by default. - Repeat Steps 2–3 to specify additional override settings.
- Click OK.
Save the Template
- Click .
Or, select File > Save > To Management Server.
The Schedule Template Update Wizard appears. - Click Next to start the wizard.
The Select the Time and Date page appears. - Select an option: Update the template immediately or Schedule template update.
- If you selected Schedule template update, select the Date and Time that you want the update to occur.
- Click Next.
The Schedule Template Update Wizard is complete page appears. - Click Finish to exit the wizard.
If your Management Server configuration requires that you add a comment when you save your configuration, the Save Comment dialog box appears. - If the Save Comment dialog box appears, type a comment about your configuration changes.
- Click OK.
The new template appears in the Device Configuration Templates list.
Review Template Settings
After you have configured all the settings for your Device Configuration Template, select the template in the Device Configuration Templates list. The Template Settings page for the template appears with all the settings you configured.
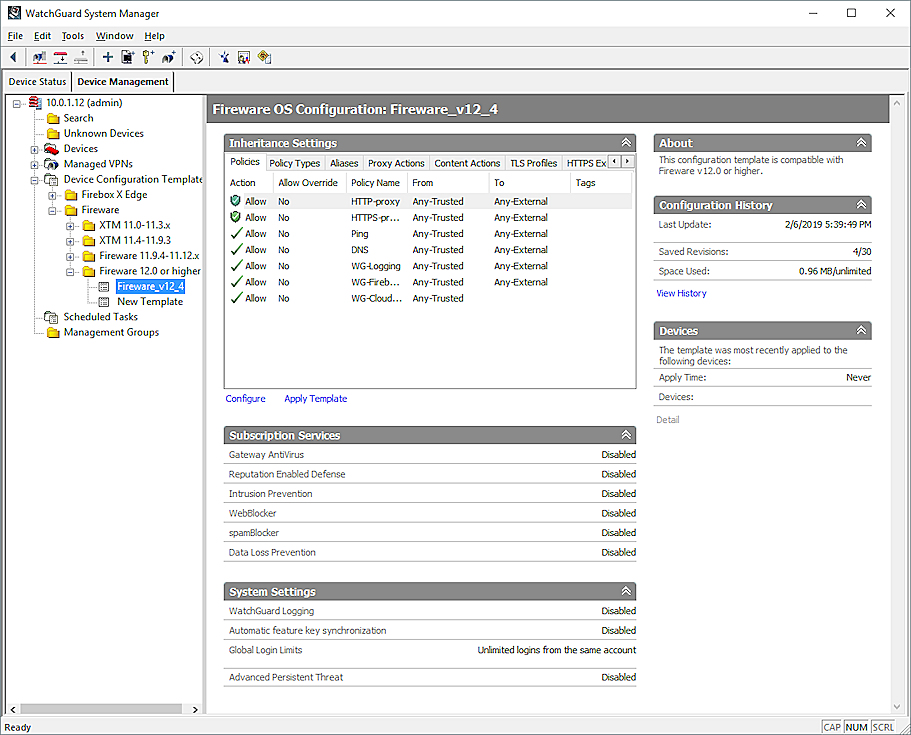
From this page, you can review the template settings, apply the template to a Firebox, and view the configuration history of the template.
The available template settings include:
Inheritance Settings
In the Inheritance Settings section, select a tab to review the settings for these options:
- Policies
- Policy Types
- Aliases
- Proxy Actions
- Content Actions
- TLS Profiles
- HTTPS Exception Overrides
- WebBlocker
- Application Control
- Geolocation Control
- Traffic Management
- Data Loss Prevention
- Schedules
- SNAT
- Authentication Servers
- Authorized Users / Groups
- Quota Rules
- Quota Actions
- Delete Objects
Subscription Services
The Subscription Services section includes the status and general configuration details for each available service.
System Settings
The System Settings section includes the current settings in the template for:
- WatchGuard Logging — The IP address of the Dimension instance or WSM Log Server, or Disabled.
- Automatic feature key synchronization — Enabled or Disabled
- Global Login Limits — Maximum number of firewall authentication logins from the same account
- Advanced Persistent Threat — Enabled or Disabled
About
The About section includes Firebox compatibility information for this template.
Configuration History
The Configuration History section includes details about when the template was last updated, how many revisions the Management Server currently has saved for the template, and the amount of space the revisions have used on the Management Server.
To see more details in the configuration history for a template, click View History.
Devices
The Devices section includes the time the template was most recently applied to a device, and a list of Fireboxes that the template was applied to.
To see more information about the template application history, click Detail.
You cannot make changes to the settings on the Template Settings page, but you can open Policy Manager from this page to change a Device Configuration Template. For more information, go to the Create a New Device Configuration Template section.
To apply the template to a Firebox, run the Apply Template Wizard. For more information, go to the Apply a Template to a Firebox section.
To view the configuration history of the template, open the Configuration History dialog box. For more information, go to About Configuration History and Template Application History.
Apply a Template to a Firebox
After you have completed the configuration for your Device Configuration Template, you can apply it to your fully managed devices of the same OS version range. For more information about how to apply a template to a Firebox, go to Apply Device Configuration Templates to Managed Devices.
Change a Configuration Template
To modify a setting in a Device Configuration Template:
- From the left navigation menu, select the template.
The Template settings page appears. - In the Inheritance Settings section, click Configure.
The selected template configuration file opens in Policy Manager. - To modify a policy, select the policy and click
 .
.
Or, select Edit > Modify Policy.
The Edit Policy Properties dialog box appears. - Configure the policy.
For more information about how to modify a policy, go to About Policy Properties or Add a Proxy Policy to Your Configuration. - Make any other changes to settings in the template.
- Click .
Or, select File > Save > To Management Server.
The template changes are saved to the Management Server.
For your changes to take effect in your individual device configuration files, you must apply your template changes to your Fireboxes with the Apply Template Wizard.
About Centralized Management Modes
Clone a Device Configuration Template