Applies To: Locally-managed Fireboxes
You can configure your Firebox to integrate with Tigerpaw, a professional service automation tool. This integration enables service providers to automatically synchronize customer asset information for more efficient device management and monitoring.
Fireware Version Compatibility
- Auto Synchronization of Asset Information — Automatically synchronizes your Firebox asset information and the status of your security service subscription, including subscription start and end dates, device serial numbers, and OS versions.
- Closed-Loop Service Order System, Security, and Subscription Events — Configure event thresholds for a wide range of parameters to automatically trigger the creation and closure of service orders, such as security services, device statistics, and subscription statuses. This feature eliminates service order flooding and false alarms, and automatically closes service orders when issues are resolved. If an event occurs again, the same service order is reopened so that you can track repeated occurrences of the same event. You can also configure the default priority of service orders. For more information, see Event Monitoring.
Before You Begin
You can use a Tigerpaw One Hosted server, or a local on-premise Tigerpaw One server with the Firebox integration.
To use a local on-premise Tigerpaw server for Firebox integration, you must install a required API package to facilitate communications between the Tigerpaw server and the Firebox. For detailed information on how to install this API package, see the Tigerpaw API Installation Checklist.
For support issues with the Tigerpaw API installation, you must contact Tigerpaw support.
Define an External Product in Tigerpaw
Before you configure your Firebox integration settings, you must create an External Product entry for your Tigerpaw account. The External Product entry indicates that Firebox assets are managed by an external product (the Tigerpaw integration on the Firebox). You will define an External Account ID that you will use in the integration configuration settings on the Firebox.
To create an External Product and configure an External Account ID:
- Open the Tigerpaw Windows client.
You can download the client from www.tigerpaw.com. - Type the username and password for your Tigerpaw account.
- Select Status and Setup > Master Tables.
The Table Maintenance Window appears. - From the Table Maintenance window, select Account > External Products.
- Select File > New, or click
 .
.
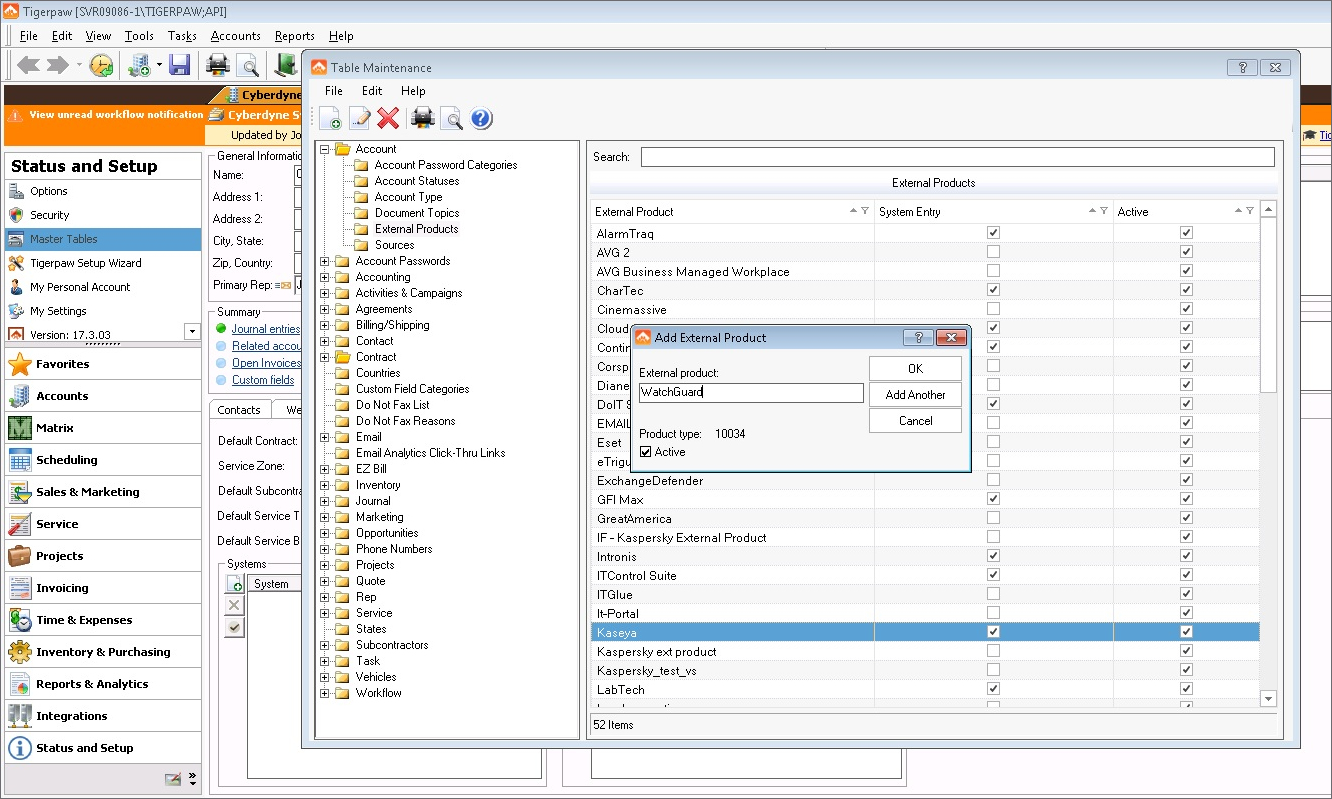
- In the External Product text box, type the name of the External Product. For example, WatchGuard.
- Make sure the Active check box is selected, then click OK.
Add the External Product to an Account
To add the External Product to an account and define an External Account ID:
- Select the Tigerpaw account that will contain the Firebox assets.
- Select the Service Defaults tab.
- In the Associated External Products section, click the button to create a new entry.
The Add External ID window appears.

- From the External Product drop-down list, select the External Product you created. For example, WatchGuard.
- In the External Account ID text box, type an account ID value to associate with this external product. For example, WatchGuard-1.
You will use this account ID in your Firebox settings for Tigerpaw integration. - Leave the External System ID text box blank.
- Click OK.
For more information on how to manage and configure your Tigerpaw account, see Tigerpaw Management.
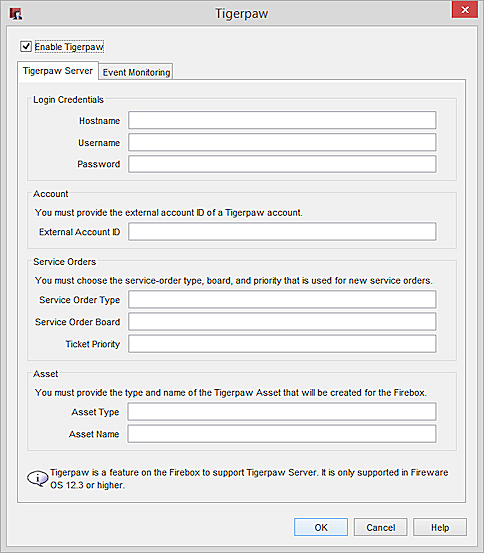
Configure the Tigerpaw Settings on Your Firebox
You can configure the Tigerpaw integration settings from Fireware Web UI or Policy Manager.
- Select System > Technology Integrations.
- Click Tigerpaw > Configure.
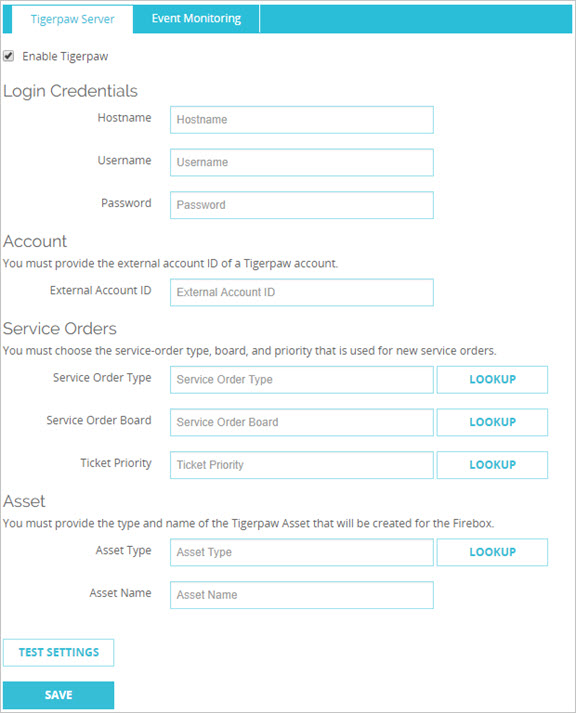
- Select the Enable Tigerpaw check box.
- In the Login Credentials section:
- Hostname — Type the hostname or IP address for your Tigerpaw One Hosted server, or a local on-premise Tigerpaw One server.
- Username — Type the username for your Tigerpaw account.
- Password — Type the corresponding password for your Tigerpaw account.
- In the External Account ID text box, type in the account ID you configured for the External Product entry in your Tigerpaw account. For more information, see Define an External Product in Tigerpaw.
- In the Service Orders section:
- Service Order Type — Type the service order type that you would like to have new service orders associated with. Click Lookup to select the service board type from the available list in Tigerpaw. If no service board type is defined, then the Firebox will use the default service board type that you have configured in Tigerpaw.
- Service Order Board — Type the service order board that you would like to have new service orders associated with. Click Lookup to select the service board from the available list in Tigerpaw. If no service board is defined, then the Firebox will use the default service board that you have configured in Tigerpaw.
- Ticket Priority — Type the priority that you would like to assign to any service orders created by the Firebox. Click Lookup to select the priority from the available list in Tigerpaw. If no priority is defined, then the Firebox will use the default priority that you have configured in Tigerpaw.
- In the Asset section:
- Asset Type — Type the asset type that is created for the Firebox. Click Lookup to select the asset type from the available list in Tigerpaw. If no asset type is defined, then the Firebox will use the default asset type that you have configured in Tigerpaw.
- Asset Name — Type the asset name to assign to this Firebox. If you want to use an existing asset previously created in Tigerpaw for the Firebox, type in the existing asset name. You can use the variables {name} and {serial} to automatically use the Firebox name and serial number. For example, {name}-{serial}.
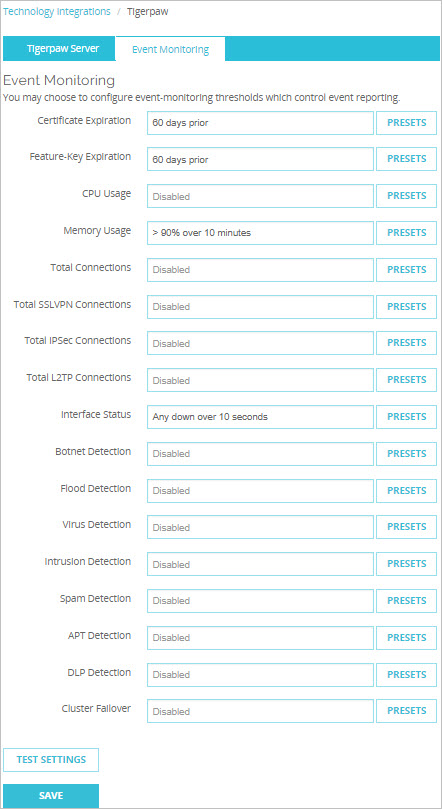
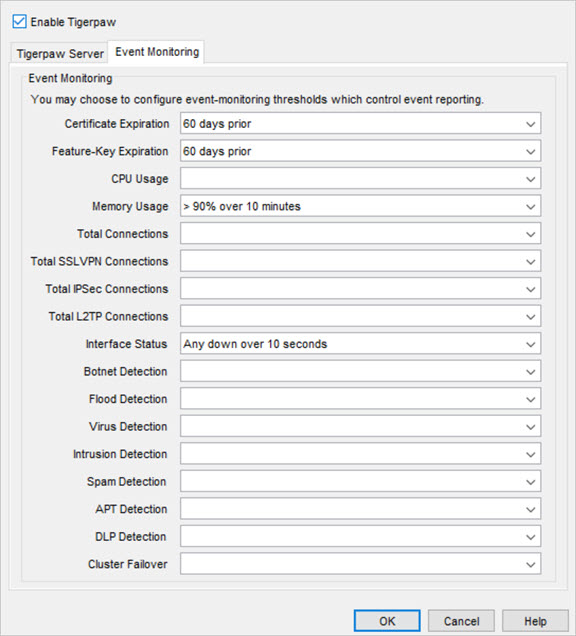
- Select the Event Monitoring tab to customize the events that generate service orders in Tigerpaw. From the Presets drop-down lists, select a threshold for each Firebox system event, or type a custom threshold in the text box. For more information, see Event Monitoring.
You can choose an existing value in the Presets drop-down list for each monitor threshold, or you can type a custom setting. You must use the same syntax as the existing values. If you create a threshold with an invalid syntax, the Tigerpaw UI does not warn you. However, errors appear in the Firebox logs.
- Click Test Settings to test your connectivity to Tigerpaw and to validate the integration settings you have configured.
- Click Save.
- Select Setup > Technology Integrations > Tigerpaw.
- Select the Tigerpaw tab.
- Select the Enable Tigerpaw check box.
- In the Login Credentials section:
- Hostname — Type the hostname or IP address for your Tigerpaw One Hosted server, or a local on-premise Tigerpaw One server.
- Username — Type the username for your Tigerpaw account.
- Password — Type the corresponding password for your Tigerpaw account.
- In the External Account ID text box, type in the account ID you configured for the External Product entry in your Tigerpaw account. For more information, see Define an External Product in Tigerpaw.
- In the Service Orders section:
- Service Order Type — Type the service order type that you would like to have new service orders associated with. Click Lookup to select the service board type from the available list in Tigerpaw. If no service board type is defined, then the Firebox will use the default service board type that you have configured in Tigerpaw.
- Service Order Board — Type the service order board that you would like to have new service orders associated with. Click Lookup to select the service board from the available list in Tigerpaw. If no service board is defined, then the Firebox will use the default service board that you have configured in Tigerpaw.
- Ticket Priority — Type the priority that you would like to assign to any service orders created by the Firebox. Click Lookup to select the priority from the available list in Tigerpaw. If no priority is defined, then the Firebox will use the default priority that you have configured in Tigerpaw.
- In the Asset section:
- Asset Type — Type the asset type that is created for the Firebox. Click Lookup to select the asset type from the available list in Tigerpaw. If no asset type is defined, then the Firebox will use the default asset type that you have configured in Tigerpaw.
- Asset Name — Type the asset name to assign to this Firebox. If you want to use an existing asset previously created in Tigerpaw for the Firebox, type in the existing asset name. You can use the variables {name} and {serial} to automatically use the Firebox name and serial number. For example, {name}-{serial}.
- In the Event Monitoring section, customize the events that generate service orders in Tigerpaw. From the drop-down list for each Firebox system event, select the threshold or type a custom threshold. For more information, see Event Monitoring.
You can choose an existing value in the drop-down list for each monitor threshold, or you can type a custom setting. You must use the same syntax as the existing values. If you create a threshold with an invalid syntax, the Tigerpaw UI does not warn you. However, errors appear in the Firebox logs.
- Click OK.
- Save the configuration to the Firebox.
Your Firebox sends traffic to Tigerpaw over HTTPS on TCP port 443. If the external link to the Internet is down, communication with Tigerpaw, including service order management activity, resumes automatically when external connectivity is restored.
Tigerpaw Management
To manage your Tigerpaw account, you must downloaded and install the Tigerpaw Windows client from www.tigerpaw.com.
View Firebox Asset Details in Tigerpaw
To see your Firebox in Tigerpaw:
- Open the Tigerpaw client.
- Type the username and password for your Tigerpaw account.
- From Accounts in the left sidebar, select the account to which you added the Firebox assets.
- Click the
 icon to see a list of assets for the account.
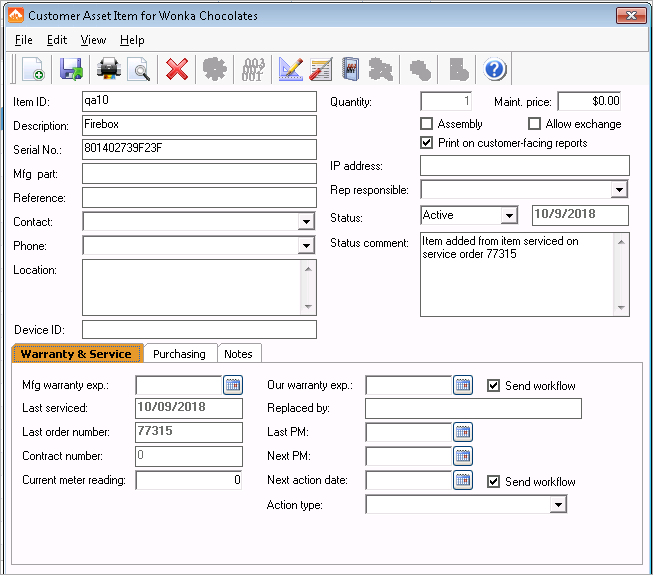
 - There are two types of assets: Customer Assets and Managed Assets.
A Customer Asset is an asset that was added manually to an account in Tigerpaw. A Managed Asset is an asset that was added automatically as part of the Firebox integration with Tigerpaw. A Firebox asset can appear in both lists if there was a service order created for the Firebox.

- Click a Firebox to see its details.
Information from the Firebox such as the serial number and feature key expiration date are automatically synchronized and appear in the list.
Event Monitoring
You can perform monitoring of events on your Firebox. You can configure thresholds for system events, and customize the events that generate service orders in Tigerpaw. The default Service Order Type, Service Order Board, and Service Order Priority are configured in your Tigerpaw integration.
If a system condition passes a configured threshold, a service order is created to notify you of the system event. If the event does not continue and passes below the threshold, the service order is automatically closed. If the event occurs again, the same service order is opened again so that you can track repeated occurrences of the same event.
Certificate Expiration
Monitors system certificates and generates a service order if any certificates will expire within the number of days you specify. You can select 10, 30, or 60 days prior to expiration.
Feature-Key Expiration
Monitors feature keys and generates a service order if any feature keys will expire within the number of days you specify. You can select 10, 30, or 60 days prior to expiration.
CPU Usage
Monitors CPU usage over a specified time period. For example, it can generate a service order if CPU usage is greater than 90% over 10 minutes.
Memory Usage
Monitors memory usage over a specified time period. For example, it can generate a service order if memory usage is greater than 90% for over 10 minutes.
Total Connections
Monitors the total number of concurrent connections over a specified time period compared to your system connection limits. For example, it can generate a service order if the total number of concurrent connections is greater than 90% of your system limit for over 10 minutes.
Total SSLVPN Connections
Monitors the total number of concurrent SSLVPN connections over a specified time period compared to your system connection limits. For example, it can generate a service order if the total number of concurrent SSLVPN connections is greater than 90% of your system limit for over 10 minutes.
Total IPSec Connections
Monitors the total number of concurrent IPSec connections over a specified time period compared to your system connection limits. For example, it can generate a service order if the total number of concurrent IPSec connections is greater than 90% of your system limit for over 10 minutes.
Total L2TP Connections
Monitors the total number of concurrent L2TP connections over a specified time period compared to your system connection limits. For example, it can generate a service order if the total number of concurrent L2TP connections is greater than 90% of your system limit for over 10 minutes.
Interface Status
Monitors whether any network interfaces have a link down status over a specified period of time. For example, it can generate a service order if an interface is down for longer than 5, 10, or 30 seconds.
Botnet Detection
Monitors botnet activity detected by Botnet Detection over a sustained period of time. For example, it can generate a service order if botnet activity is detected for over 10, 30, or 60 minutes.
Flood Detection
Monitors whether DoS flood attacks (such as SYN, ICMP, UDP, IPsec, IKE floods) have occurred over a specified period of time. For example, it can generate a service order if any flood attacks are detected over 10, 30, or 60 minutes.
Virus Detection
Notifies you if viruses have been detected by Gateway AntiVirus over a specified period of time. For example, it can generate a service order if 50 viruses were detected over 10 minutes.
Intrusion Detection
Monitors whether intrusion attempts have been detected by IPS over a specified period of time. For example, it can notify you if 50 intrusions were detected over 10 minutes.
Spam Detection
Notifies you if spam email messages have been detected by spamBlocker over a specified period of time. For example, it can notify you if 50 spam messages were detected over 10 minutes.
APT Detection
Monitors APTs detected by APT Blocker over a specified period of time. For example, it can notify you if 50 APTs were detected over 10 minutes.
DLP Detection
Monitors violations detected by Data Loss Prevention over a specified period of time. For example, it can generate a service order if 50 DLP violations were detected over 10 minutes.
Cluster Failover
Notifies you if a FireCluster failover has occurred. After a failover occurs, the new FireCluster master generates a service order. The service order information includes the member IDs of the new cluster master and the previous master. The service order is closed after five minutes of cluster stability.
Tigerpaw Service Order Management
The event monitoring thresholds you specify automatically trigger the creation and closure of service orders. This prevents service order flooding and false alarms, and enables service orders to be automatically closed when issues are resolved. If an event occurs again, the same service order is reopened so that you can track repeated occurrences of the same event.
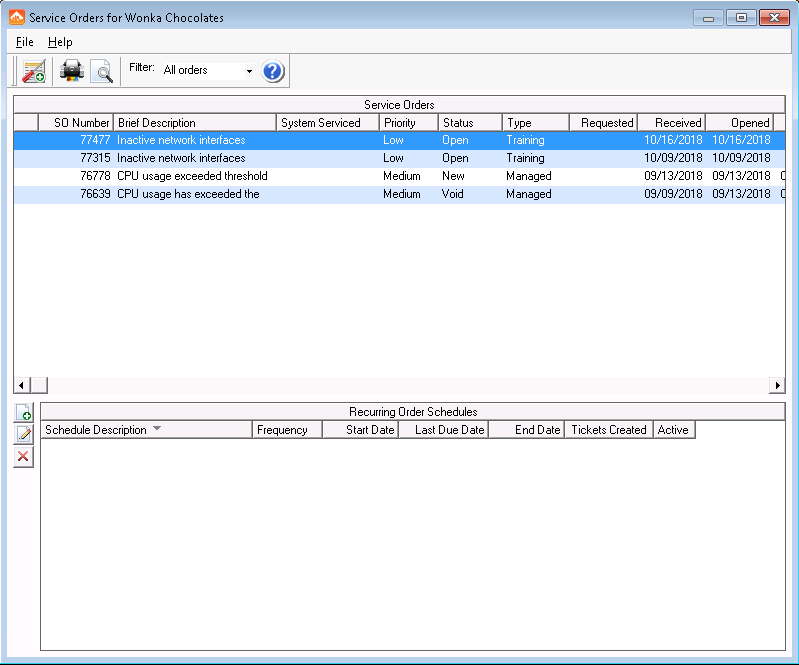
To see a summary of service orders associated with an account:
- From Accounts, select a specific account.
- Select the
 icon to view the service orders for the account.
A list of service orders appears.
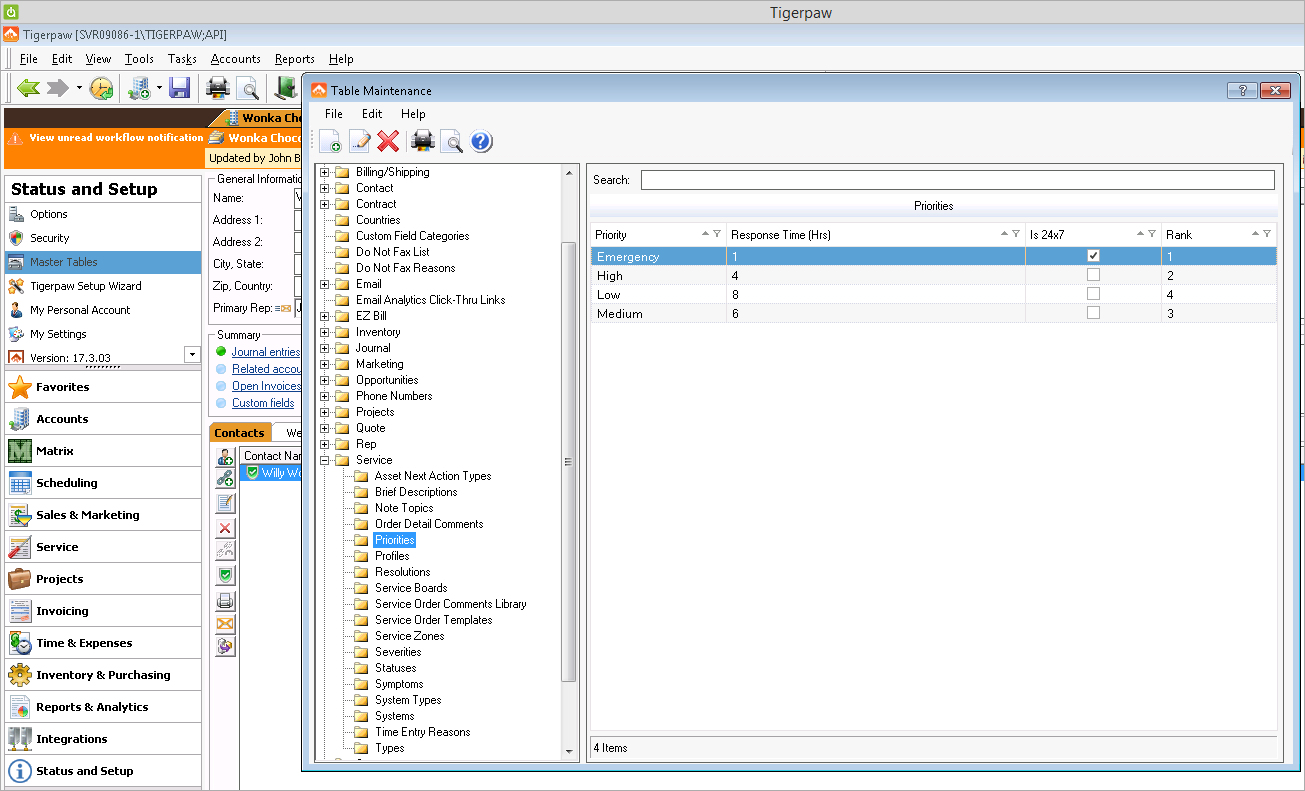
Service Boards and Service Order Priority Settings
You can customize your Tigerpaw service board and service types from the Tigerpaw client in Status and Setup > Master Tables in the Service > Service Boards folder or the Service > Types folder.

Similarly, you can customize your service order priority levels from the Tigerpaw client in Status and Setup > Master Tables in the Service > Priorities folder.