Applies To: Cloud-managed Fireboxes, Locally-managed Fireboxes
To set up your Firebox, you can use the Web Setup Wizard. The Web Setup Wizard starts automatically when you log in to a Firebox that starts with factory-default settings.
For the Quick Start version of this procedure, go to Quick Start — Set Up a New Firebox.
Before you start the Web Setup Wizard, make sure you:
- Activate your device on the WatchGuard website
- Save a copy of your Firebox feature key in a text file on your computer (optional, but recommended)
For a Firebox M5600 or M5800, make sure that an interface module is installed in slot A when you start the Firebox with factory-default settings. For more information, go to About Modular Interfaces.
Connect to Fireware Web UI
To run the Web Setup Wizard, you must first connect to the Firebox. When you connect your computer, the Firebox uses DHCP to assign an IP address to your computer.
- Use an Ethernet cable to connect interface 1 of your Firebox to your computer, or connect to the management interface.
- For a Firebox M5600 or M5800, connect your computer to the management interface, interface 32.
- For a Firebox M4800, connect your computer to the management interface, interface 24.
For wireless Firebox models that run Fireware v12.5.3 or higher, you can use Wi-Fi to connect to the Firebox for setup. Use these default Wi-Fi settings:
- SSID — Firebox model name and the last three octets of the wireless MAC address
(for example: T35-W-A1:B2:C3) - Password — Firebox serial number, including the dash. The Wi-Fi password is case-sensitive.
If your Firebox ships with Wi-Fi enabled, the default Wi-Fi settings are on an attached sticker. To make a Wi-Fi connection, scan the QR code or use the printed SSID and Wi-Fi key.
- Use an Ethernet cable to connect interface 0 to a router or network that provides Internet access. This is the external interface. The external interface uses DHCP to request an IP address on the network it connects to.
- Connect the Firebox to an electrical outlet.
- Start the Firebox in factory-default mode. A new Firebox automatically starts in this mode.
For more information, go to Reset a Firebox. - Make sure your computer is configured to accept a DHCP-assigned IP address, or has a static IP address on the 10.0.1.0/24 subnet.
For information about how to review and change your network settings, go to:
- If your browser uses an HTTP proxy server, you must temporarily disable the HTTP proxy setting in your browser.
For more information, go to Disable the HTTP Proxy in the Browser.
- Open your web browser and go to https://10.0.1.1:8080.
For a Firebox M5600 or M5800, go to https://10.0.32.1:8080.
For a Firebox M4800, go to https://10.0.24.1:8080.
A security certificate notification appears in the browser.
- When you see the certificate warning, click Continue. Add an exception if your browser requires it.
The certificate warning appears because the Firebox uses a certificate signed by the WatchGuard Certificate Authority, which is not in the list of trusted authorities on your browser.
This warning appears each time you connect to the Firebox unless you permanently accept the certificate, or generate and import a certificate for the device to use. For more information, go to About Certificates.
- Log in with the default administrator account credentials:
User Name— admin
Passphrase — readwrite
The Web Setup Wizard welcome page opens. - Select a configuration method.

- Cloud-Managed (Recommended) — Configure temporary network settings for interface 0 to enable the Firebox to connect to WatchGuard Cloud and download a configuration file. After the Firebox downloads the configuration, interface 0 uses the network settings configured in WatchGuard Cloud. Before you select this option, you must add the Firebox to WatchGuard Cloud as a cloud-managed device. The default configuration for cloud-managed Fireboxes automatically enables secure default firewall policies and your licensed subscription services. For more information, go to Add a Cloud-Managed Firebox to WatchGuard Cloud.
- Locally-Managed (Create New Configuration) — Create a new configuration that you can locally manage with Fireware Web UI or WatchGuard System Manager (WSM). With this option, you use the wizard to configure external and trusted interface settings. The wizard automatically enables default firewall policies and licensed subscription services.
- RapidDeploy — (Fireware v12.5.3 or higher) Configure network settings for interface 0 to enable the Firebox to connect to WatchGuard and download a configuration file you created for RapidDeploy. Before you select this option, you must upload a configuration file for RapidDeploy. For more information, go to Deploy Your Firebox with RapidDeploy.
- Restore from Backup Image — For a Firebox reset to factory default settings, use this option to restore an exported backup image, or restore a backup image from a USB drive connected to the Firebox. For more information, go to Restore a Firebox Backup Image.
- Accept the license agreement. Click Next.
- Follow the steps in the setup wizard to complete the configuration.
Complete the Web Setup Wizard
The steps in the Web Setup Wizard depend on the configuration option you choose.
Before you select this option, you must add the Firebox to WatchGuard Cloud as a cloud-managed device. WatchGuard Cloud creates a configuration file for the Firebox to download. For more information, go to Add a Cloud-Managed Firebox to WatchGuard Cloud.
For a cloud-managed Firebox, you configure and manage all Firebox settings, such as policies, services, and network settings from your WatchGuard Cloud account.
For a cloud-managed Firebox you use the Web Setup Wizard only to configure temporary network settings so that the Firebox can connect to download the configuration file from WatchGuard Cloud.
When you use the Web Setup Wizard to create a new configuration, the wizard helps you configure network settings, device information, and administrative passphrases. It also automatically configures policies and services with recommended settings.
Select and Configure the External interface
Select the network interface that you want to use as the external interface.
You can also enable and specify a VLAN for the external interface if required by your provider.
Configure the method you want your device to use to set an external IP address. For more information about these settings, go to Configure an External Interface.
The choices are:
- DHCP — Type the DHCP identification as supplied by your ISP.
- PPPoE — Type the PPPoE information as supplied by your ISP.
- Static — Type the static IP address and gateway IP address, as supplied by your ISP.
If you have a Firebox with a 4G LTE interface module or integrated 5G modem, you can enable the cellular connection. To establish a connection for a cellular modem, some wireless service providers require an Access Point Name (APN). To determine the requirements to configure your cellular modem, verify with your provider if an Access Point Name (APN) is required to connect.
Configure DNS and WINS servers (Optional)
Configure the Domain DNS and WINS server addresses you want the Firebox to use.
Configure the Trusted interface
Type the IP address of the trusted interface. (Optional) If you want the Firebox to assign IP addresses to computers that connect to the trusted network, you can enable the DHCP server and assign a range of IP addresses on the same subnet as the interface IP address.
Enable the Wireless Access Point (wireless models only)
For wireless Firebox models, you can enable the built-in wireless access point to enable Wi-Fi access to the trusted network. You set the SSID and passphrase for Wi-Fi connections to the trusted network. The setup wizard configures a network bridge between the wireless access point and the trusted interface.
Wireless configuration in the Web Setup Wizard is supported in Fireware v12.5.3 and higher.
Create Passphrases for your Firebox
Set new passphrases for the status (read-only) and admin (read/write) built-in user accounts. Both passphrases must be at least 8 characters long, and they must be different from each other.
Enable Remote Management (Optional)
Enable remote management if you want to manage this Firebox through the external interface.
Add Contact Information
You can type a device name, location, and contact information to save management information for this device. By default, the device name is set to the model number of your Firebox. We recommend that you choose a unique name that you can use to easily identify this Firebox, especially if you use remote management. The location and contact information are optional.
Enable Device Feedback
Device feedback helps WatchGuard improve products and features. The feedback that your Firebox sends to WatchGuard includes information about how your Firebox is used, but does not include identifying information about your company or your company data. For more information, go to Define Firebox Global Settings.
Enable Threat Telemetry
WatchGuard collects threat telemetry to investigate the threats the Firebox detects and conduct analysis of the current threat landscape. For more information, go to Define Firebox Global Settings.
Set the Time Zone
Select the time zone where the Firebox is located.
Add the Feature Key
If the Firebox cannot connect to WatchGuard to download the Firebox feature key, you can paste it into the Web Setup Wizard. You can get the feature key on the Product Details page for your Firebox. For more information, go to About the Product Details Page.
If you do not add the feature key, the Web Setup Wizard cannot configure Standard Support or licensed subscription services. Without a feature key, the Firebox allows only one outbound connection from the trusted network to the Internet.
Configure Subscription Services
The setup wizard shows a list of licensed services from the feature key. The setup wizard automatically enables the listed services with recommended settings. For WebBlocker, the setup wizard recommends content categories to block, and you can change these settings in the setup wizard.
Review the Configuration
After you review the configuration summary, the setup wizard saves the configuration to the Firebox.
After you finish the setup wizard, the Firebox is set up with a basic configuration that allows outbound TCP, UDP, and ping traffic, and blocks all unrequested traffic from the external network. It also uses the interface IP addresses and administrative passphrases you specified. For details about the default policies and services, go to Setup Wizard Default Policies and Settings.
If you change the IP address of the trusted interface, you must make sure your IP address matches the subnet of the trusted network before you connect to the device. For more information, go to Enable Your Computer to Connect to Fireware Web UI.
After you finish initial setup, you can edit the configuration to customize the settings.
- For information about how to complete the installation of your device after the Web Setup Wizard is finished, go to Complete Your Installation.
- For information about how to start WatchGuard System Manager, go to Start WatchGuard System Manager.
- For information about how to connect to Fireware Web UI, go to Connect to Fireware Web UI.
Before you use the RapidDeploy, you must create and upload a configuration file for RapidDeploy. For more information, go to Deploy Your Firebox with RapidDeploy.
When a Firebox starts with factory-default settings, it automatically attempts to connect to WatchGuard to check whether a RapidDeploy configuration is available. If RapidDeploy succeeds, the Firebox downloads and applies the RapidDeploy configuration file, and the Web Setup Wizard does not appear.
If the Firebox cannot connect to WatchGuard to download the RapidDeploy configuration file, you can use the Web Setup Wizard to configure network settings for your Firebox to connect. For example, if the Firebox is connected to a network that uses PPPoE, you can use the Web Setup Wizard to configure the settings necessary for the Firebox to connect to WatchGuard for RapidDeploy.
To configure the Firebox to connect for RapidDeploy:
Configure settings to enable the Firebox to connect to WatchGuard through interface 0. The connection setting you configure in the wizard override interface 0 settings in the RapidDeploy configuration file.
The choices are:
- DHCP — Type the DHCP identification as supplied by your ISP.
- PPPoE — Type the PPPoE information as supplied by your ISP.
- Static — Type the static IP address and gateway IP address, as supplied by your ISP.
For more information about these settings, go to Configure an External Interface.
In the DNS Server settings, add a Domain Name System (DNS) server that can resolve public DNS names such as watchguard.com.
Change the NIC Settings only if required for your network (this is not common).
The Firebox uses the configured network settings to connect to WatchGuard to download the RapidDeploy configuration.
If the deployment is not successful, make sure that the Firebox can connect to the Internet, and that a RapidDeploy file is ready for the Firebox to download. For more information, go to Troubleshoot RapidDeploy.
Before you restore a backup, make sure that you know the admin passphrase configured on the Firebox at the time the backup image was created. If you do not know the admin passphrase, you will not be able to log in to the Firebox after you restore the backup image.
You can restore a backup image previously exported to a file, or a backup image stored on the Firebox or a connected USB drive. For more information, go to Restore a Firebox Backup Image.
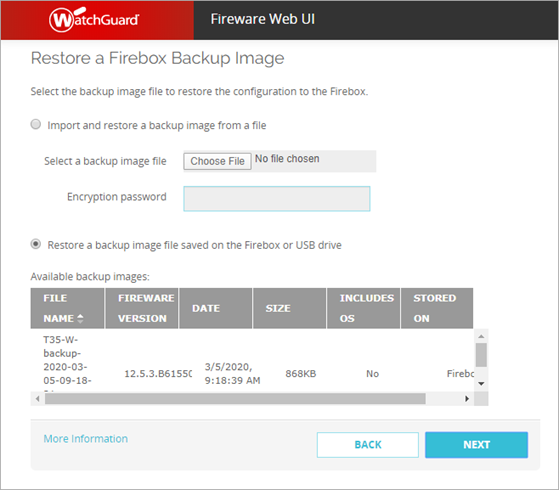
Select one of these options:
Import and restore a backup image from a file
Select a backup image file saved on your computer or network, and type the password used to encrypt the file.
Restore a backup image file saved on the Firebox or USB drive
Select a backup image file that is saved on the Firebox (Fireware 12.2.1 and higher only) or a backup image stored on the USB drive that is connected to the Firebox (Fireware 12.3 and higher only). If you select a backup image stored on the USB drive, type the password that was used to encrypt the file.
Backup images saved on the Firebox appear in the Available backup images list only if you used the CLI command restore factory-default without the all option to reset the Firebox. All other methods used to reset the Firebox automatically delete all backup images saved on the Firebox.
After the restore is complete, the Firebox restarts with the new configuration.
Troubleshoot Web Setup Wizard Issues
If you leave the Web Setup Wizard idle for 15 minutes or more, the setup wizard times out, and you must use the same steps to log in and start it again.
For other problems with the setup wizard, it can help to clear the browser cache before you try again.