Define Firebox Global Settings
Applies To: Locally-managed Fireboxes
In the global settings for your Firebox, you can specify the settings that control the actions of many of the features available on your Firebox. You can also enable more than one Device Administrator to log in to your Firebox at the same time.
You can configure the basic parameters for:
- Web UI port
- Automatic reboot
- Device feedback
- Fault reports
- Device administrator connections
- Traffic generated by the Firebox
- ICMP error handling
- TCP SYN packet and connection state verification
- TCP connection idle timeout
- TCP maximum segment size (MSS) adjustment
- Traffic management and QoS
- Select System > Global Settings.
The Global Settings dialog box opens. - Select the General tab and configure settings for these global categories, as described in these sections:
- Select the Networking tab and configure settings for these global categories, as described in these sections:
- Click Save.
- Select Setup > Global Settings.
The Global Settings dialog box opens. - Select the General tab and configure settings for these global categories, as described in these sections:
- Select the Networking tab and configure settings for these global categories, as described in these sections:
- Select the Logon Disclaimer tab and configure the settings for the Logon Disclaimer page, as described in the Configure the Logon Disclaimer section.
- Click OK.
- Save the configuration file to your Firebox.
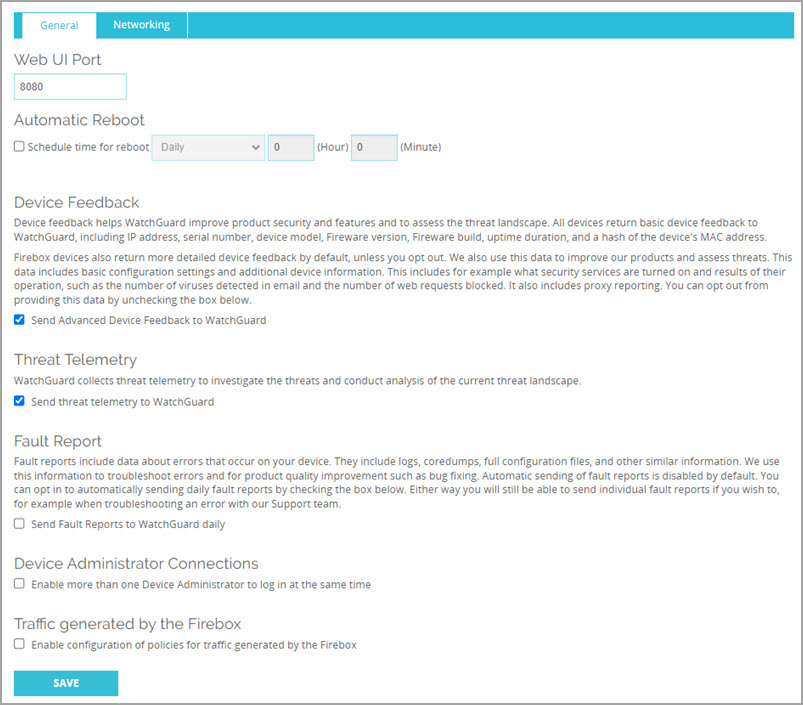
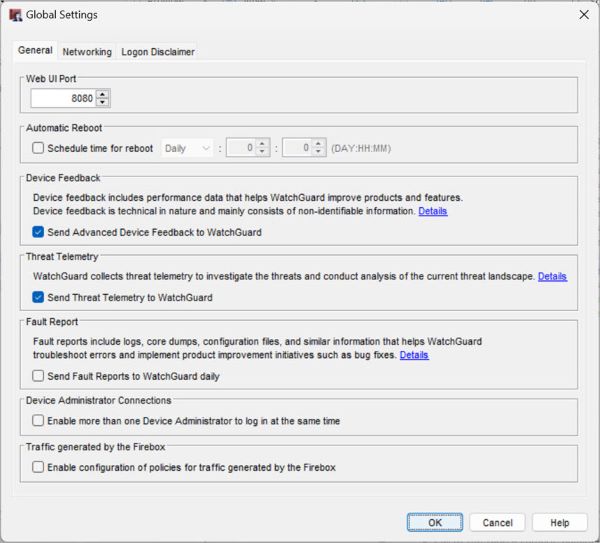
Change the Web UI Port
By default, Fireware Web UI uses port 8080.
To change the default port:
- In the Web UI Port text box, type or select a different port number.
- Use the new port to connect to Fireware Web UI and test the connection with the new port.
Automatic Reboot
You can schedule your Firebox to automatically reboot at the day and time you specify.
To schedule a reboot for a Firebox managed by a WatchGuard Management Server, go to Schedule Reboot.
To schedule an automatic reboot for your Firebox:
- Select the Schedule time for reboot check box.
- In the adjacent drop-down list, select Daily to reboot at the same time every day or select a day of the week for a weekly reboot.
- In the adjacent text boxes, type or select the hour and minute of the day (in 24-hour time format) that you want the reboot to start.
Device Feedback
Device feedback helps WatchGuard to troubleshoot and secure our services, assess the threat landscape, and comply with our legal obligations (such as export control rules). It is also used to improve our products and features. It can include information about how your Firebox is used and issues you encounter with your Firebox, but does not include any information about your company or any company data that is sent through the Firebox. Because of this, device feedback is technical in nature and mainly consists of non-identifiable information. All device feedback that the Firebox sends to WatchGuard is encrypted.
The Firebox sends three types of device feedback data to WatchGuard:
Basic Device Feedback
Your Firebox sends this basic device feedback data to WatchGuard each time the device reboots:
- Firebox serial number
- Firebox device model
- IP address
- Country
- Fireware version
- Fireware build number
- Firebox uptime since the last restart
- Hash of the device MAC address
- Whether advanced device feedback is enabled (Fireware v12.4 or higher)
- Trusted Platform Module (TPM) public key data (Fireware v12.11.3 or higher)
You cannot disable basic device feedback. If you clear the Send Advanced Device Feedback to WatchGuard check box, the Firebox continues to send basic device feedback data to WatchGuard.
Firebox Cloud devices do not send basic device feedback data to WatchGuard unless advanced device feedback is enabled.
Advanced Device Feedback (Optional)
When you create a new configuration file for your Firebox, your Firebox is configured to send advanced device feedback to WatchGuard.
If you do not want to send advanced device feedback to WatchGuard, you can disable it at any time. To disable advanced device feedback on your Firebox, clear the Send Advanced Device Feedback to WatchGuard check box.

When the Send Advanced Device Feedback to WatchGuard check box is enabled, the Firebox sends advanced feedback data to WatchGuard in a compressed file once every six days and each time the device reboots. To conserve space on the Firebox, the advanced feedback data is removed from the Firebox after it is sent to WatchGuard.
Advanced device feedback data includes the following information:
- Information listed in the Basic Device Feedback section
- Start and end time stamps for the feedback data sent to WatchGuard
- Count of policies
- Number of enabled interfaces
- Number of VLANs
- Configuration file size
- Maximum number of concurrent sessions
- Maximum number of proxy connections
- Maximum CPU usage
- Maximum memory usage
- Whether the Firebox is under Centralized Management and the management mode for the Firebox
- Number of Access Points (AP) configured on the Firebox
- Authentication options configured on the Firebox
- Whether the Firebox is a member of a FireCluster and in Active/Active or Active/Passive mode
- Whether VoIP security feature is enabled
- Whether Intrusion Prevention Service (IPS) is enabled
- Logging options configured on the Firebox
- Number of proxy actions with Subscription Services enabled in the configuration, and number of connections handled by the proxy actions
For each service, the details include whether the service is enabled and counts of the number of events for each service enabled on the Firebox.
- APT Blocker
- Data Loss Prevention (DLP)
- Default Threat Protection
- File Exceptions
- Gateway AntiVirus
- IntelligentAV
- Intrusion Prevention Service (IPS)
- Reputation Enabled Defense (RED)
- spamBlocker
- WebBlocker
- Whether the Gateway Wireless Controller is enabled
- Number of access point devices configured on the Firebox
- Number of SSIDs configured on the Firebox
- Whether the Wireless Hotspot is enabled
- Access point license status details (Fireware 12.5.1 and higher)
- Whether Access Portal is enabled
- Maximum number of users signed in
- Maximum number of RDP connections launched by users
- Maximum number of SSH connections launched by users
- Identity provider (IdP) metadata (when SAML authentication is enabled)
- Whether reverse proxy is enabled
- Whether Active Directory single sign-on is enabled
- Number of SSO agents
- SSO agent details (IP address, version, description, last connection time, and connection status)
- Whether AuthPoint is enabled (cloud-managed devices)
- Whether Mobile VPN with SSL is enabled and uses AuthPoint as an authentication domain
- Whether Mobile VPN with IKEv2 is enabled and uses AuthPoint as an authentication domain
- Whether Autotask is enabled
- Number of successful and unsuccessful attempts to save a backup image to the Firebox, a USB Drive, and a computer.
- Number of successful and unsuccessful attempts to restore a backup image from the Firebox, a USB Drive, and a computer.
- Whether the Firebox has ever been reset to factory-defaults.
- Whether Botnet Detection is enabled
- How many traffic source addresses have been tested
- How many traffic source addresses were from botnets and were dropped
- How many traffic destination addresses were tested
- How many traffic destination addresses that were sent to botnets were dropped
- Whether Connectwise is enabled
- How much data is written to the Firebox storage
- Whether DNS forwarding is enabled
- Number of DNS forwarding rules defined
- Whether DNSWatch is enabled
- Whether dynamic routing is enabled on a firewall for a specific dynamic routing protocol
- Whether dynamic routing is enabled for Routing Information Protocol (RIP)
- Whether dynamic routing is enabled for Routing Information Protocol Next Generation (RIPng)
- Whether dynamic routing is enabled for Open Shortest Path First (OSPF) protocol
- Whether dynamic routing is enabled for Border Gateway Protocol (BGP)
- Whether dynamic routing is enabled for Open Shortest Path First protocol version 3 (OSPFv3)
- Whether Endpoint Policy is enabled
- Number of connected endpoints
- Number of connected Android devices
- Number of connected iOS devices
- Number of connected devices that use VPN
- Whether TDR is enabled
- Whether network access enforcement is enabled
- Whether FQDN is used in the configuration
- Number of FQDNs configured
- Number of FQDNs that use specific domain names
- Number of wildcard domain names configured in the system
- Number of times FQDNs are used in the From or To field of a policy
- Number of FQDNs configured in the Blocked Sites list
- Number of FQDNs configured in the Blocked Sites Exceptions list
- Number of FQDNs configured in quota exceptions
- Number of policies that have FQDNs in the From or To fields
- Whether an FQDN is configured in at least one static NAT object that is used by a policy
- Number of policies configured with FQDN static NAT
- Number of FQDNs configured in static NAT objects that are used by policies
- Number of sanctioned DNS servers are in use
- Whether Geolocation is enabled
- Number of Geolocation actions configured
- Number of source and destination IP addresses checked against the Geolocation database
- Number of source and destination IP addresses detected from blocked countries
- Whether LDAP over SSL is enabled
- Whether the LDAP client certificate is used
- The number of management accounts and Firebox-DB accounts
The Firebox sends management details to WatchGuard in Fireware v2026.1 or higher, or Fireware v12.12 or higher.
- Number of logins through WatchGuard System Manager (WSM)
- Number of logins through Fireware Web UI
- Number of logins through the CLI
- Number of times a cloud-managed Firebox is removed from WatchGuard Cloud
- Number of times a cloud-managed Firebox is switched to Visibility Only mode
These counters reset after the Firebox sends weekly data to WatchGuard.
- Number of references to the Microsoft 365 alias
- Whether Mobile Security is enabled
- How many mobile devices are connected
- How many Android devices are connected
- How many iOS devices are connected
- How many mobile devices are connected through a VPN
- How many policies include a Mobile Security device group
- How many connections were denied by a policy with Mobile Security enabled
- Whether multicast routing is enabled
- Whether NetFlow is enabled
- NetFlow protocol version that is enabled
- How many interfaces have Active Scan enabled
- The schedule interval configured for Active Scan
- How many devices were found on your network
- How many devices were found by Active Scan
- How many devices were found by Mobile Security
- How many devices were found by Exchange Monitor
- How many devices were found by the FireClient service
- How many devices were found by HTTP detection
- How many devices were found by the iked process
- How many devices were found by the SSL VPN process
- Last active scan performance details (how many devices were found, how many active devices were found, how long the scan took to complete)
- Whether quotas are configured on the Firebox
- How many quota rules are configured
- How many quota actions are configured
- How many quota exceptions are configured
- Whether RADIUS SSO is configured
- Whether quota statistics are configured for RADIUS SSO
- Method used for global multi-WAN
- Number of WAN interfaces configured on the Firebox
- Number of SD-WAN actions configured on the Firebox
- Number of round-robin SD-WAN actions configured on the Firebox
- Number of failover SD-WAN actions configured on the Firebox
- Whether Spanning Tree Protocol is enabled
- Whether Tigerpaw is enabled
- Whether the TOR Exit Node Blocking service is enabled
- Total number of source IP addresses scanned
- Total number of source IP addresses blocked
- Whether Traffic Management and QoS marking is enabled
- Number of policies that use a Traffic Management action
- Number of policies with QoS marking enabled
- Number of Application Control actions that use a Traffic Management action
- Number of regular (policy-based) BOVPN gateways configured
- Number of regular (policy-based) BOVPN tunnel routes configured
- Number of regular (policy-based) BOVPN gateways with multi-wan VPN failover and failback enabled
- Number of regular (policy-based) BOVPN gateways that use certificate as the authentication method
- Number of regular (policy-based) BOVPN gateways that use IKEv1
- Number of regular (policy-based) BOVPN gateways that use IKEv2
- Number of BOVPN virtual interfaces (route-based BOVPN) configured
- Number of BOVPN virtual interfaces (route-based BOVPN) with multi-wan VPN failover and failback enabled
- Number of BOVPN virtual interfaces (route-based BOVPN) that use certificate as the authentication method
- Number of BOVPN virtual interfaces (route-based BOVPN) configured with an optional local IP address
- Number of BOVPN virtual interfaces (route-based BOVPN) configured with an optional peer IP address
- Number of BOVPN virtual interfaces (route-based BOVPN) configured with an optional netmask
- Number of BOVPN virtual interfaces (route-based BOVPN) configured that use IKEv1
- Number of BOVPN virtual interfaces (route-based BOVPN) configured that use IKEv2
- Number of BOVPN virtual interfaces (route-based BOVPN) configured with a remote endpoint type of Firebox (use the GRE driver)
- Number of BOVPN virtual interfaces (route-based BOVPN) configured with a remote endpoint type of cloud VPN (use the WGTVI driver)
- Number of BOVPN virtual interfaces (route-based BOVPN) configured that use the dynamic peer gateway IP
- Whether Mobile VPN with IPSec is enabled
- Whether Mobile VPN with IKEv2 is enabled
- Whether Mobile VPN with LT2P is enabled
- Maximum number of active BOVPN tunnels allowed by the Firebox license
- Current number of active BOVPN tunnels
- Maximum number of mobile VPN users allowed by the Firebox license for Mobile VPN with IPSec and Mobile VPN with IKEv2
- Current number of active or connected mobile VPN users for Mobile VPN with IPSec and Mobile VPN with IKEv2
- Whether BOVPN virtual interfaces (route-based BOVPN) and FireCluster are enabled
- Whether Mobile VPN with SSL is enabled
- Whether management tunnel over SSL is enabled
- Whether BOVPN over TLS is enabled and the Firebox is configured in Server mode
- Number of configured clients when the local Firebox is configured in Server mode
- Whether BOVPN over TLS is enabled and the Firebox is configured in Client mode
- Number of configured servers when the local Firebox is configured in Client mode
- Number of the configured servers that use the native OpenVPN configuration file (.ovpn)
- Whether WatchGuard Cloud is enabled
Threat Telemetry (Optional)
When you create a new configuration file for your Firebox or upgrade your Firebox to Fireware v12.11 or higher, by default, your Firebox is configured to send threat telemetry data to WatchGuard. The WatchGuard security team uses that threat telemetry data to research and investigate the threats the Firebox detects and analyze the current threat landscape. WatchGuard then uses the anonymous aggregated data to showcase threat detection trends in the WatchGuard quarterly Internet Security Report and on the WatchGuard Cybersecurity Hub page.
This feature is only available for Fireboxes that run Fireware v12.11 or higher.
If you do not want to send threat telemetry data to WatchGuard, you can disable this feature. To disable threat telemetry feedback on your Firebox, clear the Send Threat Telemetry to WatchGuard check box.

When the Send Threat Telemetry to WatchGuard check box is enabled, the Firebox sends threat telemetry data to WatchGuard in a compressed file daily and each time the device reboots. To conserve space on the Firebox, threat telemetry data is removed from the Firebox after it is sent to WatchGuard.
Threat telemetry data can include the following information for threats detected by the security services enabled on the Firebox:
- Incident time
- Security service that detected the incident
- Proxy policy that handled the traffic
- Source IP address
- Destination IP address
- Type of virus detected
- Threat level
- Signature ID
- MD5 value
The threat telemetry data sent to WatchGuard depends on the security service that detected the threat.
Fault Reports
Your Firebox collects and stores information about the faults that occur on your Firebox and generates diagnostic reports of the fault. Faults are collected for these categories:
- Failed assertions
- Program crashes
- Kernel exceptions
- Hardware problems
When you enable the Fault Reports feature, information about the faults is sent to WatchGuard once each day. WatchGuard uses this information to improve the Fireware OS and Firebox hardware. You can review the list of fault reports, manually send the reports to WatchGuard, and remove fault reports from your Firebox.
To enable fault reports on your Firebox, select the Send Fault Reports to WatchGuard Daily check box.
For information about how to manage fault reports, go to Manage Fault Reports.
Device Administrator Connections
You can allow more than one user with Device Administrator credentials to log in to your Firebox at the same time to monitor and manage your Firebox. When you enable this option, users who log in to your Firebox with Device Administrator credentials must unlock the device configuration file before they can change the settings.
To enable more than one Device Administrator to log in to your Firebox at the same time, select the Enable more than one Device Administrator to log in at the same time check box.
Lock and Unlock a Configuration File
(Fireware Web UI Only)
When you enable more than one Device Administrator to connect to your Firebox at the same time, in Fireware Web UI, before a Device Administrator can change the configuration settings in the Firebox device configuration file, that user must unlock the configuration file. When the configuration file is unlocked by a Device Administrator to make changes, the configuration file is locked for all other users with Device Administrator credentials, until the Device Administrator who unlocked the configuration file either locks the configuration file again or logs out.
For information about how to enable more than one Device Administrator to log in to your Firebox at the same time, go to Define Firebox Global Settings.
To unlock a configuration file, from Fireware Web UI:
Below the page title, click ![]() .
.
To lock a configuration file, from Fireware Web UI:
Below the page title, click ![]() .
.
Traffic Generated by the Firebox
In Fireware v12.2 or higher, you can configure policies to control traffic generated by the Firebox. This kind of traffic is also known as self-generated traffic or self-originated traffic.
Before you can create policies to control Firebox-generated traffic, you must select the Enable configuration of policies for traffic generated by the Firebox check box. It is important to understand the changes that occur when you enable this option. When this option is enabled:
- You can add new policies that apply to Firebox-generated traffic.
- The previously hidden Any-From-Firebox policy appears in the list of policies.
This policy cannot be modified or removed. - The Firebox no longer sets the source IP address for Firebox-generated traffic to match a BOVPN tunnel route. This means that if your configuration includes a BOVPN tunnel, Firebox-generated traffic uses a WAN interface instead of the BOVPN tunnel.
If auto-order mode is enabled for the Policies list, these changes occur:
- Policy order number changes for existing policies.
This occurs because the previously hidden Any-From-Firebox policy now appears. - Policies that control Firebox-generated traffic appear before all other policies.
If no other policies exist that control Firebox-generated traffic, the Any-From-Firebox is first in the list and is numbered 1. - Policies that you add for Firebox-generated traffic appear before the Any-From-Firebox policy because they are more granular.
For more information about this setting and policies that control Firebox-generated traffic, go to About Policies for Firebox-Generated Traffic.
To configure policies for Firebox-generated traffic, go to Configure Policies for Firebox-Generated Traffic.
For configuration examples, go to Configuration Examples for Control of Firebox-Generated Traffic.
Define ICMP Error Handling Global Settings
Internet Control Message Protocol (ICMP) settings control errors in connections. You can use it to:
- Inform client hosts about error conditions
- Probe a network to find general characteristics about the network
The Firebox sends an ICMP error message each time an event occurs that matches one of the parameters you selected. These messages are good tools to use when you troubleshoot problems, but can also decrease security because they expose information about your network. If you deny these ICMP messages, you can increase security if you prevent network probes, but this can also cause timeout delays for incomplete connections that can cause application problems.
Settings for global ICMP error handling are:
Fragmentation Req (PMTU)
Select this check box to allow ICMP Fragmentation Req messages. The Firebox uses these messages to find the MTU path.
Time Exceeded
Select this check box to allow ICMP Time Exceeded messages. A router usually sends these messages when a route loop occurs.
Network Unreachable
Select this check box to allow ICMP Network Unreachable messages. A router usually sends these messages when a network link is broken.
Host Unreachable
Select this check box to allow ICMP Host Unreachable messages. Your network usually sends these messages when it cannot use a host or service.
Port Unreachable
Select this check box to allow ICMP Port Unreachable messages. A host or firewall usually sends these messages when a network service is not available or is not allowed.
Protocol Unreachable
Select this check box to allow ICMP Protocol Unreachable messages.
- Select Firewall > Firewall Policies.
- Double-click the policy to edit it.
The Policy Edit page opens. - Select the Advanced tab.
- Select the Use policy-based ICMP error handling check box.
- Select only the check boxes for the settings you want to enable.
- Click Save.
- On the Firewall tab, select the specific policy.
- Double-click the policy to edit it.
The Edit Policy Properties dialog box opens. - Select the Advanced tab.
- From the ICMP Error Handling drop-down list, select Specify setting.
- Click ICMP Setting.
The ICMP Error Handling Settings dialog box opens. - Select only the check boxes for the settings you want to enable.
- Click OK.
Configure TCP Settings
Enable TCP SYN packet and connection state verification
Select this option to enable your Firebox to verify that the first packet sent through a connection is a SYN packet, without RST, ACK, or FIN flags.
If you disable this option, the connection is allowed even if the first packet sent through the connection includes RST, ACK, or FIN flags.
If you experience stability issues with some connections (for example, connections over a VPN tunnel), you can disable this option.
TCP connection idle timeout
The amount of time that the TCP connection can be idle before a connection timeout occurs. Specify a value in seconds, minutes, hours, or days. The default setting in the Web UI is 1 hour. The default setting in Policy Manager is 3600 seconds (1 hour).
You can also configure a custom idle timeout for an individual policy. For more information, go to Set a Custom Idle Timeout.
If you configure the global idle timeout setting and also enable a custom idle timeout for a policy, the custom idle timeout setting is applied to the policy instead of the global timeout setting.
TCP maximum segment size control
The TCP segment can be set to a specified size for a connection that must have more TCP/IP layer 3 overhead (for example, PPPoE, ESP, or AH). If this size is not correctly configured, users cannot get access to some websites.
The global TCP maximum segment size adjustment options are:
- Auto Adjustment — This option enables the Firebox to examine all maximum segment size (MSS) negotiations and changes the MSS value to the applicable one.
- No Adjustment — The Firebox does not change the MSS value.
- Limit to — Type or select a size adjustment limit.
TCP MTU Probing
When you enable this global option, the Firebox can automatically change the size of its data packets to make sure that PMTU discovery succeeds and to avoid reduced performance caused by fragmentation.
For example, you might enable TCP MTU Probing in these cases:
- You have a slow PPPoE connection and require smaller packets to optimize performance.
- You want to make sure that clients on your network can access the Internet through a zero-route BOVPN tunnel on this Firebox even if the Path Maximum Transmission Unit (PMTU) discovery process cannot complete. For example, if a remote router drops a packet but does not send an ICMP Destination Unreachable or ICMP Fragmentation Needed response to the Firebox, an ICMP black hole occurs and the PMTU process cannot complete. If you enable TCP MTU probing, an ICMP black hole does not affect traffic through the zero-route BOVPN.
The TCP MTU Probing options are:
- Disabled — Default setting.
- Enabled Only When ICMP Network Issues Are Detected — Automatically enable TCP MTU Probing only when an ICMP error message is dropped and the PMTU discovery process cannot complete. TCP MTU Probing remains enabled for the current connection. For new connections, TCP MTU Probing is disabled by default unless a network issue is detected for the new connection.
- Always Enabled
TCP window scale option
You can specify the TCP window scale option, as described in RFC 1323. To configure this global setting, you must use Fireware CLI.
The CLI command is global-setting tcp-window-scale.
Enable or Disable Traffic Management and QoS
For performance testing or network debugging purposes, you can disable the Traffic Management and QoS features.
To enable these features, select the Enable all traffic management and QoS features check box.
To disable these features, clear the Enable all traffic management and QoS features check box.
Manage Traffic Flow
By default, your Firebox does not close active connections when you modify a static NAT action used by a policy. You can override this default setting and enable your Firebox to close any active connections through a policy that uses an SNAT action that you modify.
To override the default Traffic Flow setting and enable this feature, in the Traffic Flow section, select the When an SNAT action changes, clear active connections that use that SNAT action check box.
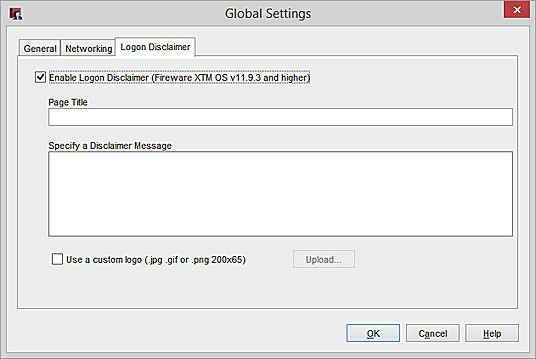
Configure the Logon Disclaimer
To force your users to agree to the terms and conditions you specify before they can log in to manage a Firebox, you can enable the Logon Disclaimer feature.
This section includes instructions to enable the Logon Disclaimer feature from Policy Manager. For instructions to enable this feature from Fireware Web UI, go to Configure the Logon Disclaimer.
When you configure the logon disclaimer settings, you can specify the title of the Logon Disclaimer page and the disclaimer message text. You can also select a custom logo for the Logon Disclaimer. The image file you select must be a JPG, GIF, or PNG file, no larger than 200 x 65 pixels.
To enable and configure the Logon Disclaimer feature, from Policy Manager:
- In the Global Settings dialog box, select the Logon Disclaimer tab.
The Logon Disclaimer settings appear. - Select the Enable Logon Disclaimer check box.
- In the Page Title text box, type the text for the title of the Logon Disclaimer page.
- In the Specify a Disclaimer Message text box, type or paste the text for the disclaimer message.
- To add a custom logo to the disclaimer message:
- Select the Use a custom logo check box.
- Click Upload and select the image file.
- Click OK.
With the Logon Disclaimer feature enabled, the Logon Disclaimer appears when a user logs in to the Firebox through Fireware Web UI or CLI. The user must agree to the Logon Disclaimer before they can log in to the Firebox.
Users must acknowledge the Logon Disclaimer to log in to the CLI in Fireware v12.6.2 and higher.
You can also configure a logon disclaimer for connections to your Management Server. For more information, go to Define Configuration History and Change Comment Settings.