Applies To: AuthPoint Multi-Factor Authentication, AuthPoint Total Identity Security
To sync users from Active Directory or a Lightweight Directory Access Protocol (LDAP) database, you must add an LDAP external identity and create one or more queries.
In AuthPoint, LDAP external identities represent external user databases. They connect to user databases to get user account information and validate passwords. The queries you add to an external identity specify which users to sync from your Active Directory or LDAP database. They pull user information from the database and create AuthPoint user accounts for the users.
There are two ways to query users:
- Group Sync — Select the LDAP groups you want to sync users from and AuthPoint creates the query for you.
- Advanced Queries — Create your own LDAP queries to specify which groups or users to sync.
When you configure a group sync to sync users from Active Directory, you can enable the Create new synchronized groups toggle to create new groups in AuthPoint based on the Active Directory groups that you sync users from. To add synced LDAP users to multiple groups, we recommend that you use this feature.
The option to create new synchronized groups is only available when you create a group sync. You cannot use this feature with advanced queries.
Before you begin, we recommend you familiarize yourself with some common LDAP objects:
- DC — Domain Component
- CN — Common/Canonical Name
- OU — Organizational Unit
- DN — Distinguished Name
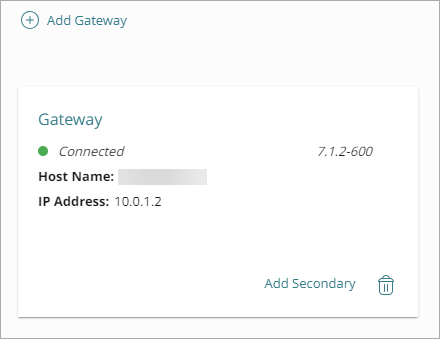
You must link LDAP external identities to a Gateway, and the AuthPoint Gateway must be installed on your corporate network in a location that has Internet access and that can connect to your LDAP server. The Gateway enables communication between WatchGuard Cloud and your Active Directory or LDAP database.
For high availability, we recommend that you configure:
- One external identity with a redundant address.
- One primary Gateway and up to five secondary Gateways (see About Gateways).
Do not configure multiple external identities for the same domain.
To delete an LDAP user in AuthPoint, the best practice is to remove the user from their Active Directory or LDAP group to give them the Quarantine status in AuthPoint, then delete the user in AuthPoint. For more information, see Quarantined Users.
Add an External Identity
- Select External Identities.
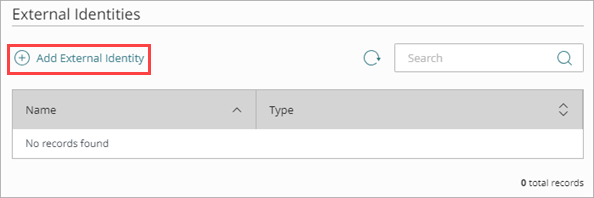
- Click Add External Identity.
The Add External Identity page opens.
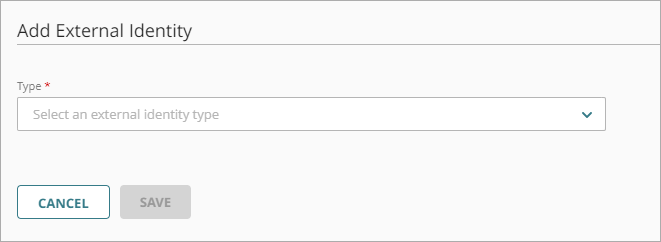
- From the Type drop-down list, select LDAP Configuration.
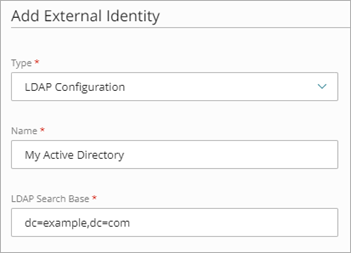
Additional fields are shown. - In the Name text box, type a descriptive name for the external identity.
- In the LDAP Search Base text box, type your LDAP database. In this example, the domain is example.com so we type dc=example,dc=com. Tip!
For more information about LDAP syntax and how to use a search base to limit the directories on the authentication server where the external identity can search for users, see Find Your Active Directory Search Base.
- In the System Account and Passphrase text boxes, type the credentials for a user that has permissions to perform LDAP searches and binds. If this user is not in the default Users folder, select the toggle and type the full distinguished name of the user. You can specify a passphrase up to 255 characters in length.Tip!
In this example, we have a user named administrator that is in an OU called AuthPoint (not the default Users folder). So, we must select the toggle and type the distinguished name of our user as CN=administrator,OU=AuthPoint,DC=example,DC=com. If this user was in the default Users folder, we would just type the user name administrator.
If the user is in the Users folder and the user name is different than the account name (sAMAccountName), you must type the account name in the System Account text box.
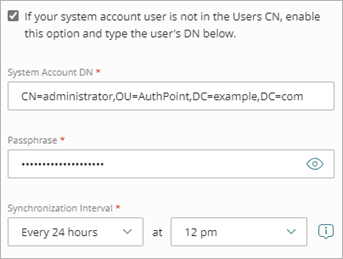
- From the Synchronization Interval drop-down list, specify how often you want to synchronize the LDAP database. If you select Every 24 hours, you must also specify what time the synchronization starts each day.
For LDAP external identities that you configure to sync once every 24 hours, the Synchronization Interval time uses the time zone of the LDAP server.
- For Type, select whether this is an Active Directory server or a different type of LDAP database. For other databases, you must specify each attribute value. You do not have to do this for Active Directory because the attribute values are known.
- In the Domain text box, type your LDAP domain name.
- If this not an Active Directory server, type a value for each attribute.
If your Active Directory users use ADFS, you must keep the default sAMAccountName value for the attribute related to user login.

-
In the Server Address text box, type the IP address of your LDAP server.
If your Active Directory instance does not use LDAPS, you must disable the LDAPS toggle for the external identity. When you do this, the default port changes from 636 to 389.
- In the Server Port text box, type the port for your server.
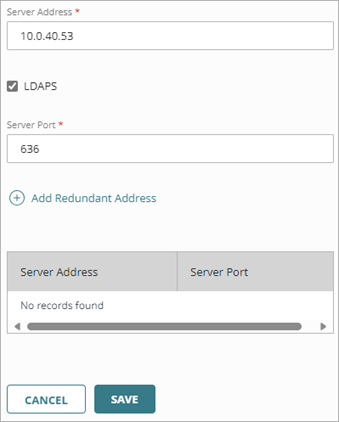
- (Optional) To add a redundant address for your external identity, click Add Redundant Address and type a different address and port for the same LDAP database.
- Click Save.
Add the External Identity to the Gateway Configuration
You must add the external identity to the configuration for a Gateway that is installed on your corporate network and has access to the LDAP server. After you do that, you can test the connection to your LDAP database.
If you do not have an existing Gateway, you must add one. For more information, see About Gateways.
To add an external identity to the configuration for a Gateway:
- From the navigation menu, select Gateway.
- Click the Name of your Gateway.
- In the LDAP section, in the Select an LDAP external identity list, select the external identity for your LDAP or Active Directory server.
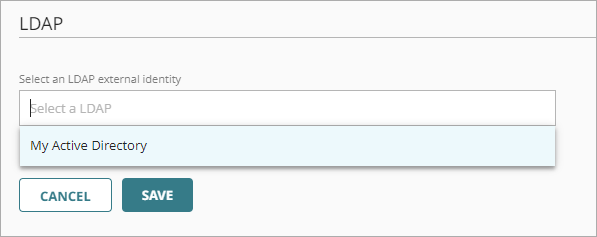
- Click Save.
Your external identity is now connected to your Gateway. This enables communication between WatchGuard Cloud and your Active Directory or LDAP database.
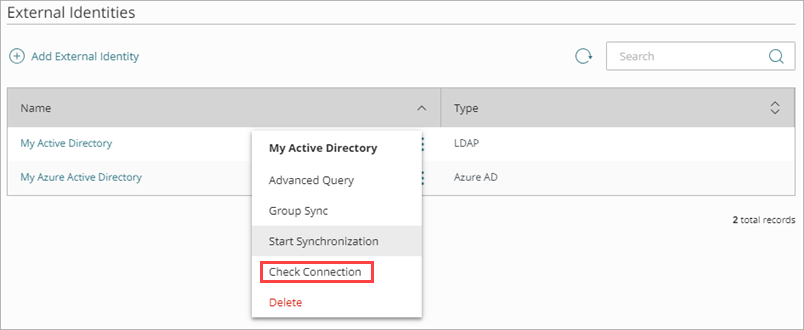
To test the connection to your external identity:
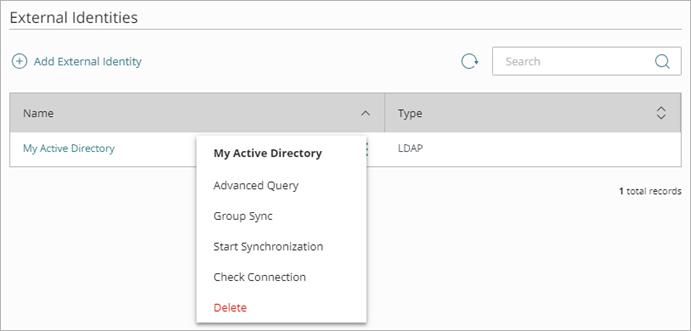
- From the navigation menu, select External Identities.
- Next to the external identity you added for your LDAP database, click
 and select Check Connection.
If your connection test fails and NPS is running on the Gateway server, change the RADIUS port that the AuthPoint Gateway uses.
If your connection test is successful but AuthPoint does not sync users, we recommend that you verify the credentials and permissions of the system account user. If your Active Directory instance does not use LDAPS, make sure you disable the LDAPS toggle for the external identity.
Sync Your Users
After you create an external identity for your LDAP database and connect the external identity to your Gateway configuration, you must specify which users to sync from your LDAP database.
There are two ways to query users:
- Use the group sync feature (recommended for most configurations)
- Add an advanced query (recommended if you have more than 2,000 LDAP groups)
When you create a query to find your users (manually or with group sync), you choose whether to have AuthPoint create a mobile token for the synced users and send an email to the synced users to activate their mobile token. AuthPoint does this by default. In most cases, we recommend that you assign a token to users and send them the Token Activation email. User accounts need a token to authenticate with AuthPoint. You might choose not to do this for users that use hardware tokens for authentication, or for service accounts that bypass MFA with basic authentication.
After you add a query, AuthPoint syncs with your Active Directory or LDAP database at the next synchronization interval and creates an AuthPoint user account for each user identified by the query. If your query returns more users than you have available AuthPoint licenses for, the sync only creates as many users as your license supports.
If a user identified by your query has the same email address as a different, existing AuthPoint user account, AuthPoint does not sync the external user.
AuthPoint only syncs with your Active Directory or LDAP database if changes have been made since the last synchronization.
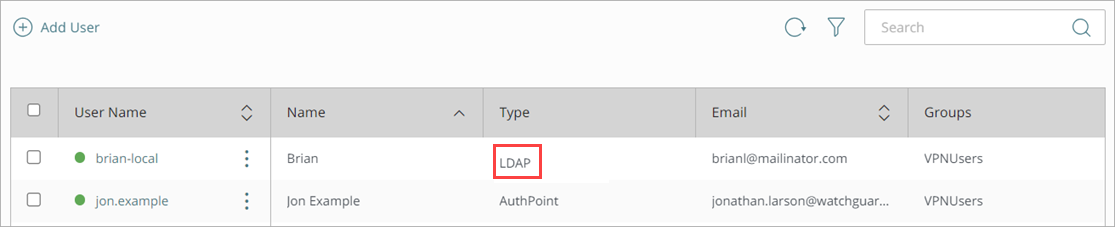
The created user accounts appear on the Users page with a green Activated status icon next to the user name. The Activated status icon indicates that the user has been created and is currently active (not blocked). You can identify users synced from an external identity by the LDAP label in the Type column in the list of users.
Each user receives an email that they use to activate their token in the AuthPoint mobile app. When a user activates their token, their token information is shown in the Token column with a green Activated status icon next to the token.
If a user does receive the token activation email, you can send the user a new activation email so that they can activate their token. If you chose not to automatically assign a mobile token to a user, you can use this option to create a token for them and send them the token activation email. For detailed steps to resend the activation email, see Resend Activation Email.
Before you sync users, make sure that each user account has a valid email address. If the email address for a user account is not correct, the user cannot receive the email message to activate a token.
When you create a group sync for Active Directory users, you can select the Create new synchronized groups check box to create new groups in AuthPoint based on the Active Directory groups that you sync users from. Users sync to the new groups based on group membership in Active Directory, in addition to the selected AuthPoint group. We recommend this option because it makes group management easier and only requires one group sync.
To add LDAP users to multiple groups in AuthPoint, enable the Create new synchronized groups toggle in your group sync and use your Active Directory group structure to manage your users.
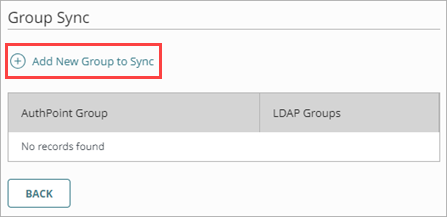
Group Sync
With group sync, you select the LDAP groups you want to sync users from and the AuthPoint group the users are added to. We recommend that you use group sync to sync your users because it creates a query for you.
Before you continue, be aware of these requirements:
- To sync external users to AuthPoint, you must have added at least one group to the WatchGuard Cloud Directory.
- If the selected LDAP groups have more users than you have available AuthPoint licenses for, the sync only creates as many users as your license supports.
- LDAP users that do not have a first name, user name, or email address are not included in the synchronization.
-
AuthPoint uses the memberOf attribute to identify which Active Directory groups LDAP users belong to. This attribute does not include the primary group of Active Directory users (typically the domain users group). We recommend that you do not include primary groups when you configure a group sync.
Caution: Do not add the same LDAP group to multiple group syncs or create multiple group syncs that include the same LDAP user. A user synced from an LDAP database cannot belong to more than one local AuthPoint group. If an LDAP user belongs to multiple group syncs, each time AuthPoint syncs with your LDAP database, the local AuthPoint group that the user belongs to might change. To add Active Directory users to multiple groups, enable the Create new synchronized groups toggle and use your Active Directory group structure to manage your users. For more information, see External Identities.
To sync LDAP groups:
- Select External Identities.
- Next to your external identity, click and select Group Sync.
- On the Group Sync page, click Add New Group to Sync.
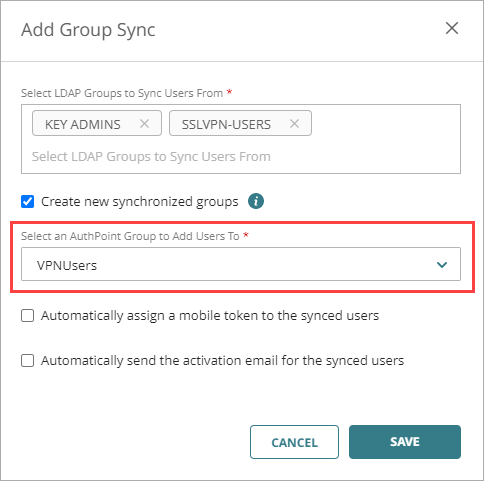
- In the Add Group Sync window, from the Select LDAP Groups to Sync Users From drop-down list, select the LDAP groups you want to sync users from. You can select multiple groups.

- To create new groups in AuthPoint based on the Active Directory groups that you sync users from, select the Create new synchronized groups check box. If you select this option, users sync to the new groups based on group membership in the LDAP database, in addition to the selected AuthPoint group. We recommend this option if you want to add LDAP users to multiple groups in AuthPoint.
This option is only available for Active Directory and Entra ID external identities. To use this feature, you must install version 6.1 or higher of the AuthPoint Gateway.
The option to create new synchronized groups in AuthPoint does not include Active Directory groups that are not specified in the group sync. If a synced user is a member of an Active Directory group that is not specified in the group sync, that Active Directory group will not be created in AuthPoint.
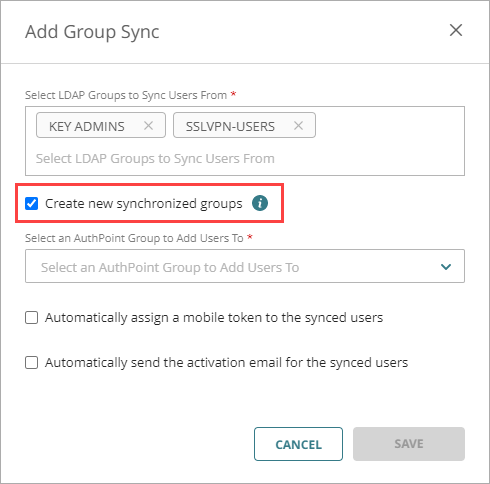
- From the Select an AuthPoint Group to Add Users To drop-down list, select the AuthPoint group to add the users to. Synced users must be added to an AuthPoint group. If you do not have an AuthPoint group, you must add a group to the WatchGuard Cloud Directory. For more information, go to About the WatchGuard Cloud Directory.
For each group sync, all users are added to the same AuthPoint group. To add LDAP users to multiple groups, we recommend that you enable the Create new synchronized groups toggle and use your Active Directory group structure to manage your users.
-
If you do not want AuthPoint to create mobile tokens for these user accounts or send an email to the users to activate their mobile tokens, clear the Automatically assign a mobile token to the synced users and Automatically send the activation email for the synced users check boxes.
You cannot change these settings after you sync the user accounts. To assign a token to a user that does not have these options selected, you must resend the Token Activation email. For more information, go to Resend Activation Email.
- Click Save.
The Add Group Sync window closes.
AuthPoint syncs with your Active Directory or LDAP database at the next synchronization interval and creates an AuthPoint user account for each user identified by the query.
To start a sync immediately, on the External Identities page, next to the external identity, click ![]() and select Start Synchronization.
and select Start Synchronization.
If a user is deleted in your Active Directory or LDAP database, the related AuthPoint user account is not deleted. Instead, the user is given the Quarantine status. For more information, see Quarantined Users.
If you enabled the Create new synchronized groups toggle, the synced groups are created in AuthPoint. The newly created groups appear on the Groups page. You can identify synced groups in the Groups list by the LDAP label in the Type column.
If you change the name of a synced group in Active Directory, the synced group in AuthPoint will automatically update to match. You cannot edit the synced groups in AuthPoint.
If you delete the group in Active Directory, or if you delete the group sync, the synced group is not deleted in AuthPoint. You must manually delete the synced group in AuthPoint.
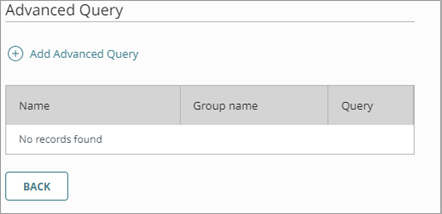
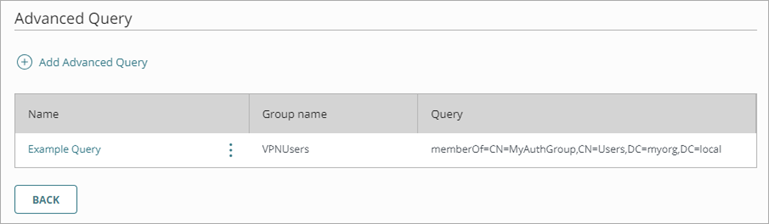
Add an Advanced Query
With advanced queries, you can create your own LDAP query to specify which groups or users to sync. When you add and validate an advanced query, AuthPoint user accounts are created for each user identified by the query.
Before you continue, be aware of these requirements:
- If your query returns more users than you have available licenses for, AuthPoint only creates as many users as your license supports
- LDAP users that do not have a first name, user name, or email address are not included in the synchronization
- To sync external users to AuthPoint, you must have added at least one group to the WatchGuard Cloud Directory.
To add an advanced query:
- Select External Identities.
- Next to the LDAP external identity you added, click and select Advanced Query.
- On the Advanced Query page, click Add Advanced Query.
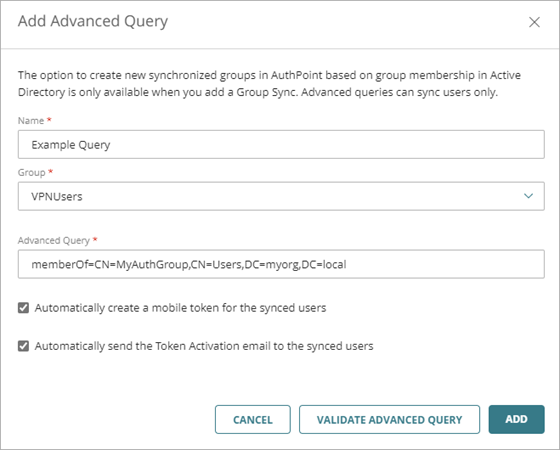
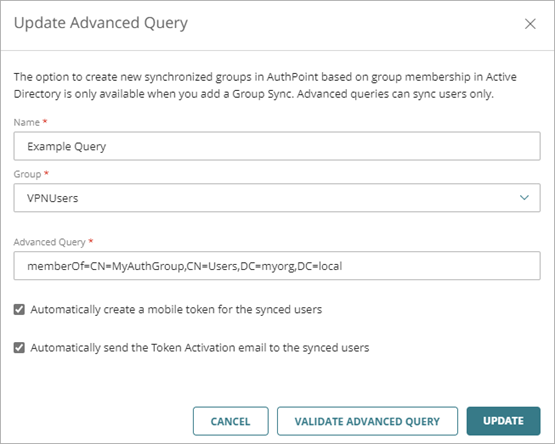
- In the Name text box, type a descriptive name for the query.
- From the Group drop-down list, select the AuthPoint group to add the users from this query to. Synced users must be added to an AuthPoint group. If you do not have an AuthPoint group, you must add a group to the WatchGuard Cloud Directory. For more information, go to About the WatchGuard Cloud Directory.
For each advanced query, all users are added to the same AuthPoint group. To add users from each LDAP group to separate AuthPoint groups, you must create a separate advanced query for each LDAP group.
- In the Advanced Query text box, type your query. In most cases, your query will be memberOf= followed by the distinguished name of the group you want to sync with the query. For example, if the distinguished name of your group is CN=MyAuthGroup,CN=Users,DC=myorg,DC=local, your query is memberOf=CN=MyAuthGroup,CN=Users,DC=myorg,DC=local.To find the distinguished name of an Active Directory group:

- Open Active Directory.
- Select View > Advanced Features.
- Right-click on the group you want to sync, and select Properties.
The Properties window opens. - In the Properties window, select the Attribute Editor.
- Select the distinguishedName value and click View.
- Copy the Value. If you append "memberOf=" to the front of this value, that is your advanced query.
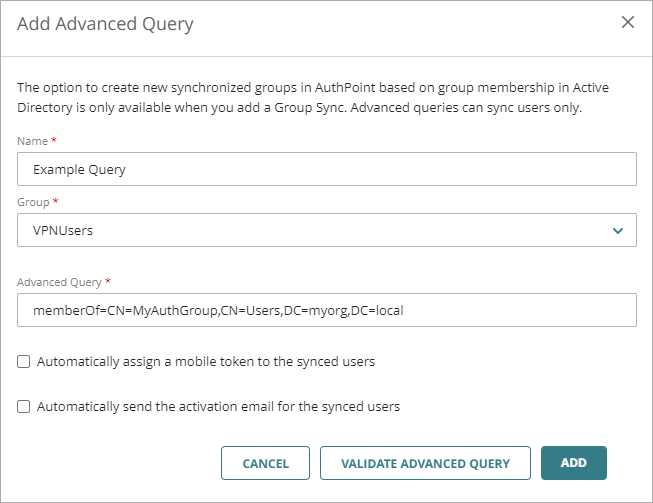
- If you do not want AuthPoint to create mobile tokens for these user accounts or send an email to the users to activate their mobile tokens, clear the Automatically assign a mobile token to the synced users and Automatically send the activation email for the synced users check boxes.
- To preview your query results, click Validate Advanced Query. You can see the number of users your query returns and a preview of the first 10 users.
No users are synced when you validate a query. Users are only synced after you add your query to the external identity and save the changes.
- To add your query to the external identity, click Add.
AuthPoint syncs with your Active Directory or LDAP database at the next synchronization interval and creates an AuthPoint user account for each user identified by the advanced query.
To start a sync immediately, on the External Identities page, next to the external identity, click ![]() and select Start Synchronization.
and select Start Synchronization.
If a user is deleted in your Active Directory or LDAP database, the related AuthPoint user account is not deleted. Instead, the user is given the Quarantine status. For more information, see Quarantined Users.
Edit an Advanced Query
- Select External Identities.
- Next to the LDAP external identity you added, click and select Advanced Query.
- On the Advanced Query page, from the queries list, click the Name of the query you want to edit.
- In the Update Advanced Query window, make your changes.
- Click Update.
Test the Connection to an LDAP External Identity