Applies To: WatchGuard Cloud
As a WatchGuard tier-1 Service Provider, you can configure WatchGuard Cloud to integrate with these third-party professional service automation (PSA) tools:
- ConnectWise Manage
- Autotask
- HaloPSA
PSA integrations help you to streamline account management, synchronize PSA services with WatchGuard products, and automate ticketing.
If you have an existing PSA integration for your cloud-managed Firebox or a locally-managed Firebox added to WatchGuard Cloud for reporting, we recommend you disable the integration in the Firebox configuration to prevent duplicate tickets or synchronization conflicts. For more information, go to About Firebox Technology Integrations (cloud-managed Fireboxes) or Technology Integrations (locally-managed Fireboxes).
To get started with PSA integration in WatchGuard Cloud, complete these high-level steps:
- Step 1 — Configure the PSA Tool Settings
- Step 2 — Connect WatchGuard Cloud to the PSA Tool
- Step 3 — Map Accounts
- Step 4 — Map Services
- Step 5 — Configure PSA Tool Usage Report Settings
- Step 6 — Configure PSA Ticketing Notification Rules
Your operator role determines what you can see and do in WatchGuard Cloud. You must be a tier-1 Service Provider and your role must have the Manage Integrations and Manage Tenants permissions to configure this feature. For more information, go to Manage WatchGuard Cloud Operators and Roles.
Step 1 — Configure the PSA Tool Settings
Before you integrate WatchGuard Cloud with your PSA tool, you must configure settings in the PSA tool to enable WatchGuard Cloud to communicate with the PSA tool server.
For more information about how to configure your PSA tool for integration with WatchGuard Cloud, go to ConnectWise Manage PSA Tool Integration Settings, Autotask PSA Tool Integration Settings, or HaloPSA Tool Integration Settings.
Step 2 — Connect WatchGuard Cloud to the PSA Tool
After you configure your PSA tool, you can set up the connection between the tool and WatchGuard Cloud.
A tier-1 Service Provider account can only integrate with only one PSA tool at a time.
To connect a PSA tool to WatchGuard Cloud:
- Select Administration > Integrations.
The PSA Integrations page opens.
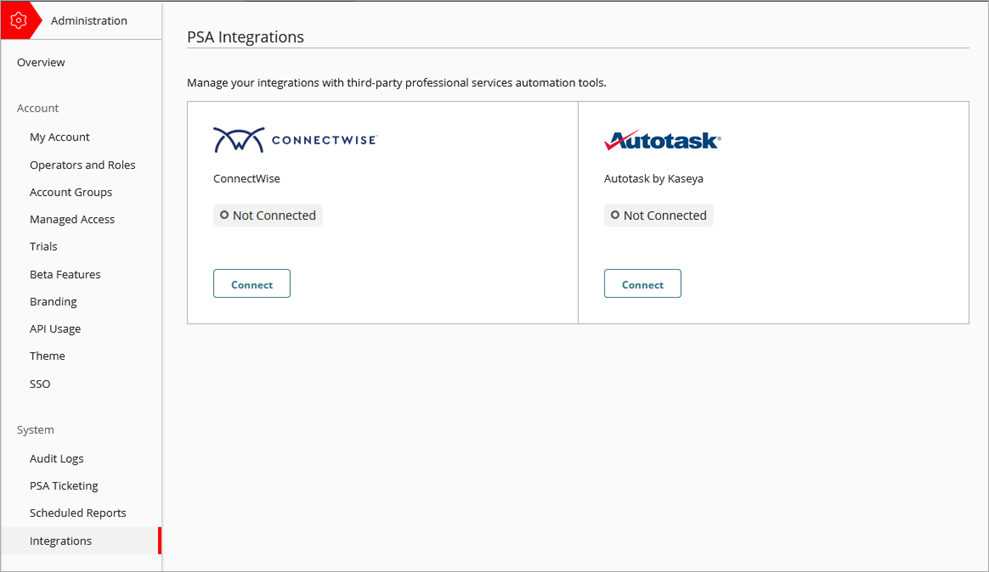
- From the PSA tile, click Connect.
- Enter the connection information for the PSA tool:
- For ConnectWise Manage, enter the Company ID, Public Key, Private Key, and Site. For information about how to find this information in ConnectWise Manage, go to ConnectWise Manage PSA Tool Integration Settings.
- For Autotask, enter the User Name and User Secret. For information about how to find this information in Autotask, go to Autotask PSA Tool Integration Settings.
- For HaloPSA, enter the Client ID, Client Secret, and Site. For information about how to find this information in HaloPSA, go to HaloPSA Tool Integration Settings.
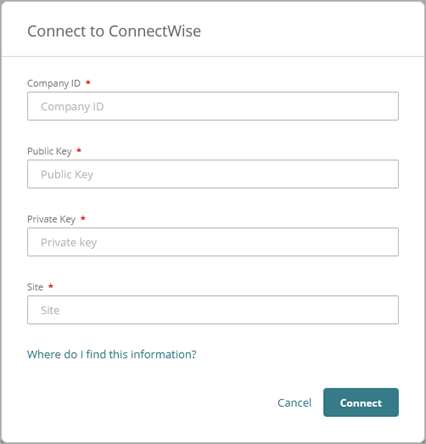
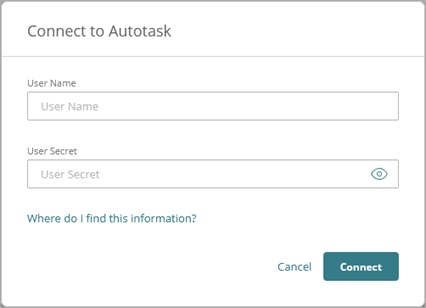

- Click Connect.
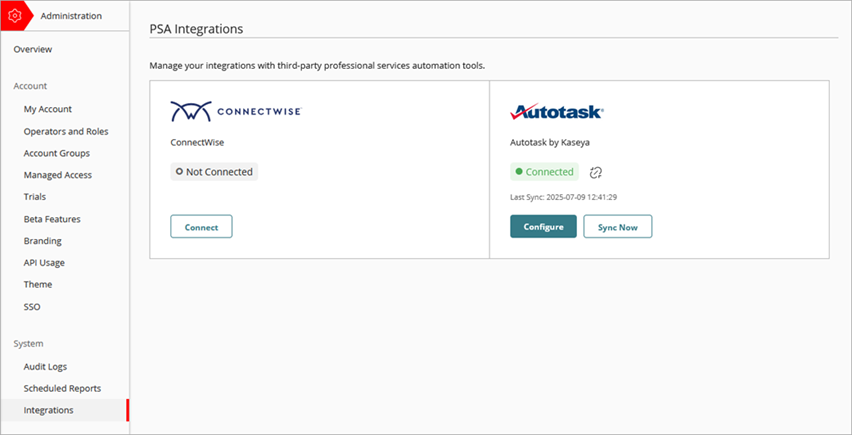
The tile shows the connection status.
For more information about how to connect to your PSA tool, go to Connect WatchGuard Cloud to a PSA Tool.
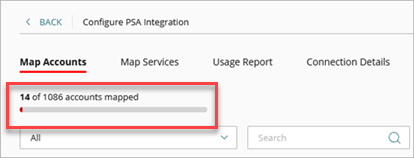
Step 3 — Map Accounts
After you connect WatchGuard Cloud to your PSA tool, your WatchGuard Cloud accounts automatically map with accounts in your PSA tool that have the same name. You can manually map accounts or change mapped accounts.
To map connected PSA tool and WatchGuard Cloud accounts, from WatchGuard Cloud:
- Select Administration > Integrations.
- From the PSA tile, click Configure.
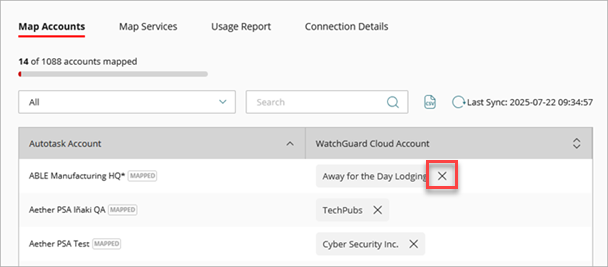
- Select the Map Accounts tab.
A progress bar shows the number of accounts mapped.
- From the PSA Account column for the WatchGuard Cloud account you want to map, click Map Account.
The Map Account dialog box opens.
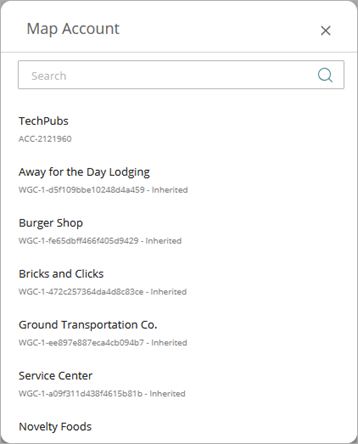
- From the list, select the PSA account you want to map with the WatchGuard Cloud account.
The Map Account dialog box closes.
To remove the mapping for an account, click the X next to the PSA account.
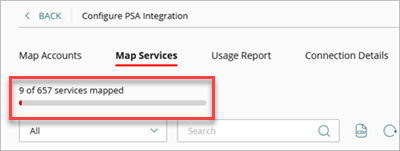
Step 4 — Map Services
After you connect WatchGuard Cloud to your PSA tool, you can map your PSA tool services with your WatchGuard Cloud products. This enables WatchGuard Cloud to send product license allocation and usage data to your PSA tool so you can automate customer billing.
To map connected PSA tool services and WatchGuard Cloud products:
- Select Administration > Integrations.
- From the PSA tile, click Configure.
- Select the Map Services tab.
A progress bar shows the number of services mapped.
- From the WatchGuard Cloud Product column for the service you want to map, click Map Service.
The Map Service dialog box opens.
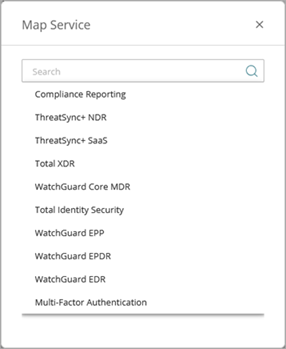
- From the list, select the WatchGuard Cloud product you want to map with the PSA service.
The Map Service dialog box closes.
To remove the mapping for a service, click the X next to the WatchGuard Cloud product.

Step 5 — Configure PSA Tool Usage Report Settings
To send WatchGuard Cloud product license usage and allocation data and device inventory data from WatchGuard Cloud to the PSA tool, you must configure usage report settings.
To configure PSA Tool usage report settings, from WatchGuard Cloud:
- Select Administration > Integrations.
- From the PSA tile, click Configure.
- Select the Usage Report tab.
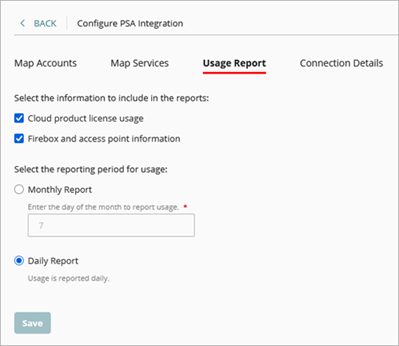
- To send WatchGuard Cloud product license usage data, select Cloud Product License Usage.
- To send device data, select Firebox and Access Point Information.
- Select the reporting period:
- To send data monthly, select Monthly Report and enter the day of the month to report usage.
- To send data daily, select Daily Report.
- Click Save.
For more information, go to Configure the Usage Report Setting for a PSA Integration.
Step 6 — Configure PSA Ticketing Notification Rules
You can configure notification rules across multiple Subscriber accounts from the PSA Ticketing page. Notification rules determine which events generate alerts that can open and close tickets in your connected PSA tool.
ThreatSync, Endpoint Security, Firebox, license alert, and WatchGuard Cloud notification rules support closed-loop ticketing. For AuthPoint, access points, WatchGuard NDR, and WatchGuard SaaS DR, you must manually close the tickets in your PSA tool. For more information about closed-loop ticketing, go to About Closed-Loop Ticketing with PSA Integration.
To use closed-loop ticketing with Firebox devices, you must have a cloud-managed Firebox or a locally-managed Firebox added to WatchGuard Cloud. Your Firebox must run Fireware v12.11.3 or higher.
To configure notification rules for PSA ticketing, from WatchGuard Cloud:
- Select Administration > PSA Ticketing.
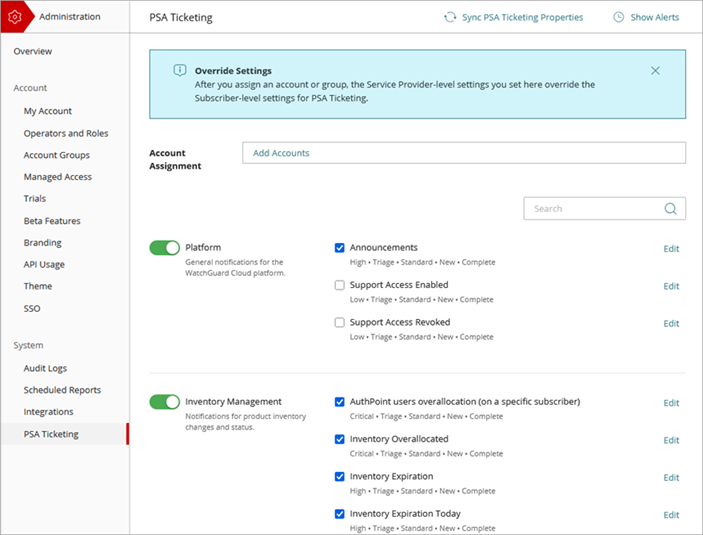
- To get the latest static ticket data from the PSA tool, click Sync PSA Ticket Properties.
- In the Account Assignment text box, click Add Accounts.
- From the list of accounts, select each account and account group you want to configure the notification rules for. Click Add.
- Enable the toggle for the notification category you want to configure.
- Next to each rule you want to configure, click Edit.
To allow WatchGuard Cloud to create the ticket, in Autotask you must edit the Ticket Category and set the default value for Due Date > # of Days From Application to 1 and set the default value for Due Time > # Hours From Application to 0.
For more information, go to:
- Configure PSA Ticketing Notification Rules
- Configure Platform PSA Ticketing Notifications
- Configure Device PSA Ticketing Notifications
- Configure ThreatSync PSA Ticketing Notifications
- Configure AuthPoint PSA Ticketing Notifications
- Configure Endpoint Security PSA Ticketing Notifications
- Configure FireCloud PSA Ticketing Notifications
Map PSA Tool Accounts and WatchGuard Cloud Accounts
Map PSA Tool Services and WatchGuard Cloud Products