Applies To: WatchGuard Cloud
WatchGuard Cloud is a cloud-based security platform that enables you to monitor and manage your WatchGuard products in one place. This topic provides new users with an overview of the cloud platform and introduces platform features. For partners that want to migrate locally-managed Fireboxes to cloud management, it also provides the basic steps to set up accounts in WatchGuard Cloud to manage the migrated Fireboxes.
Before You Begin
Before you begin, make sure you have a basic understanding of accounts, operators, and roles in WatchGuard Cloud. You can review this information here.
Accounts
There are two types of WatchGuard Cloud accounts — Service Provider and Subscriber. Your account type determines whether you can manage other WatchGuard Cloud accounts, which operator roles you can assign to users in your account, and how you manage operators for your account.
Service Provider Accounts
Service Provider accounts are for WatchGuard partners and resellers. If you are a WatchGuard partner, your WatchGuard Cloud account is automatically created as a tier-1 Service Provider account.
If you manage customer accounts in WatchGuard Cloud, your WatchGuard Cloud account is a Service Provider account. From WatchGuard Cloud, you can manage products licenses and inventory. Depending on the licenses you purchase, you can allocate devices, endpoints, and users to your managed accounts. You can also manage the products for your own account and for all customer accounts that you manage. Service Provider accounts are sometimes referred to as IT providers, administrators, or managed service providers (MSPs or MSSPs).
Subscriber Accounts
Subscriber accounts are sometimes referred to as clients or customers. If you manage and use products such as AuthPoint, Endpoint Security, or NDR, but do not manage other accounts, your WatchGuard Cloud account is a Subscriber account. From WatchGuard Cloud, you can configure your own products and see related metrics and reports.
If you have a Service Provider account, it includes a built-in Subscriber account called My Account.
For more information, go to About WatchGuard Cloud Account Types.
Account Management
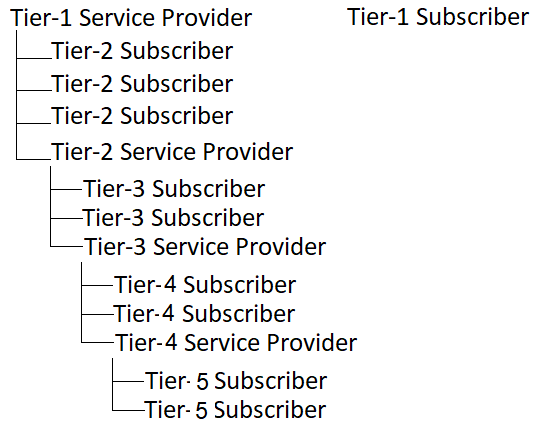
WatchGuard Cloud is a multi-tenant, multi-tier system. WatchGuard uses the terms tier-1 and tier-n to distinguish the different levels of Service Provider and Subscriber accounts in the account structure.
Tier-1 Account
A WatchGuard Cloud account that is associated with a company account on the WatchGuard website is a tier-1 account. If you activate WatchGuard products and services in your own WatchGuard account, your WatchGuard Cloud account is a tier-1 account.
A tier-1 account can be a Service Provider or Subscriber account. If you are a WatchGuard Partner, your WatchGuard Cloud account is automatically created as a tier-1 Service Provider account.
Tier-n Accounts (Tier-2 to Tier-5)
Accounts that are not tier-1 are tier-n accounts. A tier-n account can be a Service Provider or Subscriber. Tier-n accounts that are Service Providers have their own tier-n Subscriber account (My Account).
Service Providers can create WatchGuard Cloud accounts in up to five tiers. For example:
Delegated Access
WatchGuard customers can search for a WatchGuard Service Provider to help them manage their account. They might need long-term help with the management of their account, products, and inventory (tier-1 Subscriber accounts only), or they might need a Service Provider to manage their account for only a short period of time. As a Service Provider you can request delegation access to an account that needs a Service Provider.
Any WatchGuard Cloud account can be delegated to another account in the same cloud region. Delegation continues until either account revokes it. Account delegation does not provide access to all WatchGuard Cloud features or to the accounts managed by the delegated account.
If the account that requires help is a Service Provider account, they can delegate management of their Subscriber account and product configuration. If the delegated Subscriber account has a WatchGuard login, then the account with delegated access can also manage their inventory.
For more information on delegated inventory, go to Inventory Management for Delegated Accounts.
Operators and Roles
Users who can log in to WatchGuard Cloud to view and manage account information and configure services are called operators. Your operator role determines what information you can see and what actions you can take in your own account and managed accounts.
There are different operator roles for Subscriber and Service Provider accounts. Every account must have an Owner or Administrator operator with full privileges.
Built-in Subscriber Operator Roles
There are three built-in operator roles for Subscriber accounts:
- Administrator — Administrators have full permissions within their Subscriber account and managed services.
- Analyst — Analysts have full permissions to configure services and read-only permission everywhere else.
- Observer — Observers have read-only permission throughout their account.
Built-in Service Provider Operator Roles
There are four built-in operator roles for Service Provider accounts:
- Owner — Owners have full permissions within their Service Provider account and managed services.
- Sales — Sales operators have full permissions for inventory and account management, but read-only permission for configure services and operators.
- Helpdesk — Helpdesk operators have full permissions to configure services and read-only permission everywhere else.
- Auditor — Auditors have read-only permission throughout their Service Provider account.
For more information on the built-in roles, go to Manage WatchGuard Cloud Operators and Roles.
Account Groups
You can set up account groups so that you can assign operator permissions and endpoint policies to a group of accounts.
Service Providers can use account groups to control account access in WatchGuard Cloud. For example, operators with Auditor or Helpdesk roles can view accounts in their account group. Operators with the Sales role have access to all accounts in account groups but cannot change the group members. Operators with the Owner role always have full access.
For more information, go to Add Operators to Managed Accounts.
If you are a Service Provider, your Subscriber account (My Account) is where you configure and manage your own products. This account cannot be added to an account group. Only operators with the Owner role can see activity on this account.
Custom Operator Roles
To implement granular role-based access control (RBAC) over functional areas of the WatchGuard Cloud user interface, Owner and Administrator operators can create custom roles within their accounts. On the Roles page, you can create a custom role that is based on a built-in role. You can enable or disable read/write or read-only permissions for different features in WatchGuard Cloud.
For more information, go to Manage Custom Operator Roles.
For a list of the default permissions available with built-in roles, go to Default Permissions for Built-in Roles.
Get Started
To get started with WatchGuard Cloud, complete these steps:
- Step 1: Log In to WatchGuard Cloud.
- Step 2: Explore the WatchGuard Cloud User Interface.
- Step 3: Add Managed Accounts and Operators.
To monitor or manage devices from WatchGuard Cloud, you add the Firebox or access point to your WatchGuard Cloud account. For more information, go to Get Started — Add a Device to WatchGuard Cloud.
Step 1: Log In to WatchGuard Cloud
Log in to WatchGuard Cloud to start a new session and log out when you want to end the session. Your login credentials tell WatchGuard Cloud who you are and what permissions you have. In a tier-1 WatchGuard Cloud account, operators use the same user account credentials to log in to WatchGuard Cloud as they use to log in to the WatchGuard website (www.watchguard.com).
If you are new to WatchGuard and want to activate a product for use in WatchGuard Cloud, you must first create a WatchGuard account. You can create an account from the WatchGuard login page. (external link)
To log in to WatchGuard Cloud:
- Go to cloud.watchguard.com.
- Enter your WatchGuard User Name and Password.
- Click Log In.
For increased security, operator accounts might have multi-factor authentication (MFA) enabled. If your administrator enabled MFA for your account, you must also authenticate with a token in the AuthPoint mobile app.
For more information on MFA, go to Enable MFA for WatchGuard Cloud Operators.
For users and endpoints to connect to WatchGuard Cloud, your network must allow connections to the URLs and IP ranges used by WatchGuard Cloud products and services. For more information, go to WatchGuard Cloud URLs and Network Access Requirements.
Step 2: Explore the WatchGuard Cloud User Interface
With WatchGuard Cloud, you can see and manage your products and services in one place. Different areas of the WatchGuard Cloud user interface provide information on your products and services.
WatchGuard Cloud supports the most recent version of these web browsers: Google Chrome, Microsoft Edge, Mozilla Firefox, and Safari.

From the left pane of the user interface, Service Provider operators use Account Manager to navigate their managed accounts and devices. Subscriber operators use Device Manager to see and manage their devices.
Dashboards
From the top menu, when you select Dashboard, the Home dashboard shows content specific to the account, folder, or device selected in the left pane.
There are different dashboards for Service Providers and Subscribers:
Service Provider Dashboards
For Service Provider accounts, the dashboards show a quick overview of your Service Provider account and your managed Service Provider and Subscriber accounts.
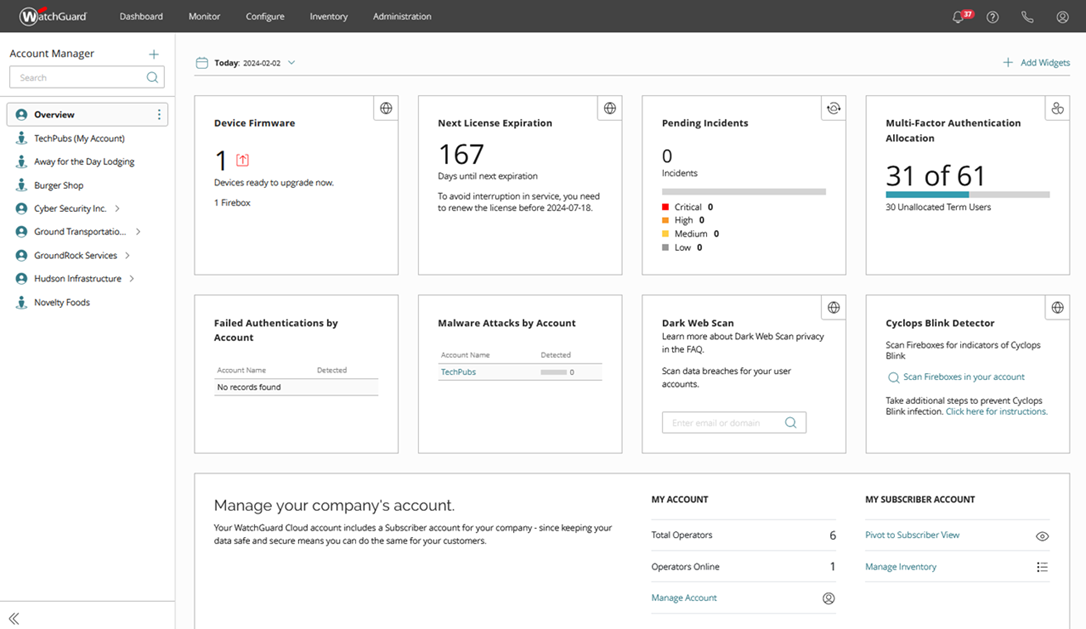
The Home dashboard provides a quick status view of the products, endpoints, and users in your account and accounts you manage. To open the Subscriber version of the Home dashboard for your account, in Account Manager, select My Account. On the Home dashboard, several widgets show important information and provide useful links. For more information, go to About the Home Dashboard for Service Providers.
The Threats dashboard provides an overview of incident activity in your account and the accounts you manage. An incident is activity that is confirmed to be malicious, and can be as simple as an indicator of compromise, or as complex as an indicator of attack that sequences behaviors to determine malicious intent. On the Threats dashboard, several widgets show important information and provide useful links. For more information, go to About the Threats Dashboard.
For more information, go to About Service Provider Dashboards.
Subscriber Dashboards
For Subscriber accounts, the dashboards show aggregated information to give you a quick overview of a single account. Several widgets on the page display key metrics and important information. Click the title of any widget to see more detailed information.
For more information, go to About the Dashboards for Subscriber Accounts.
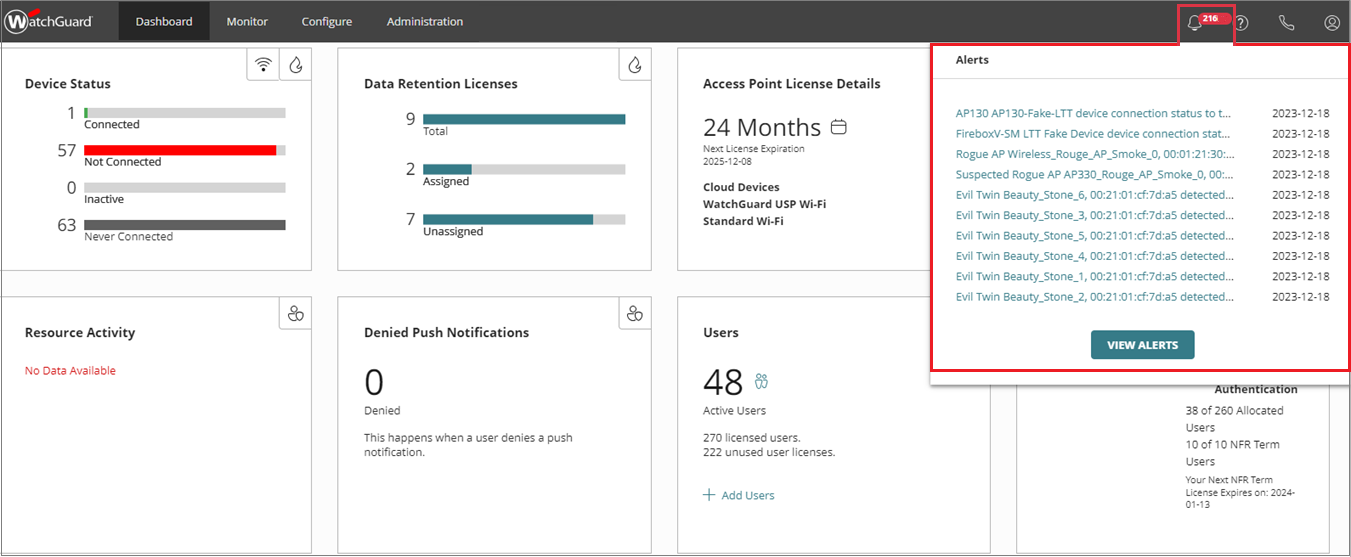
Alerts
Alerts are notifications about your account or about specific events that occur in WatchGuard Cloud, products, or devices. For example, you can receive an alert for events such as when you successfully delegate your account or when a Firebox feature key will expire. Alerts make sure that you are aware of any significant changes that affect your account, licenses, products, or devices.
For more information, go to Manage WatchGuard Cloud Alerts for Subscribers.
In the top menu, if there are active alerts for your account, you see a red indicator next to the alerts icon (![]() ) located in the top, right corner. This shows the number of active alerts.
) located in the top, right corner. This shows the number of active alerts.
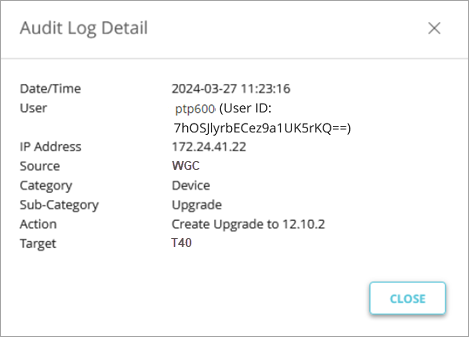
Audit Logs
Audit logs provide a historical record of all logins and changes made in WatchGuard Cloud. WatchGuard Cloud generates audit logs for events that occur in WatchGuard Cloud. WatchGuard Cloud generates audit logs when operators log in or log out or change settings. To review audit logs, select Administration > Audit Logs.
For more information, go to See Audit Logs.
Monitor and Configure Products and Services
The Monitor and Configure menus provide direct access to your WatchGuard products. The options available in each menu depend on the account, folder, or device selected in the left pane.
From the Monitor menu, you can monitor ThreatSync, Fireboxes, access points, and products such as AuthPoint, Endpoint Security, FireCloud, NDR, Managed Services, and CloudDR. You can monitor the live status and activity of all connected devices (Fireboxes and access points).
From the Configure menu, you can manage and configure ThreatSync, devices, products such as AuthPoint, Endpoint Security, FireCloud, NDR, Managed Services, and CloudDR, and shared configurations such as access point sites, directories and domain services, Firebox templates, splash pages, WatchGuard Agent deployment, and VPNs.
Inventory
Product or service licenses activated at www.watchguard.com show in your WatchGuard Cloud inventory.
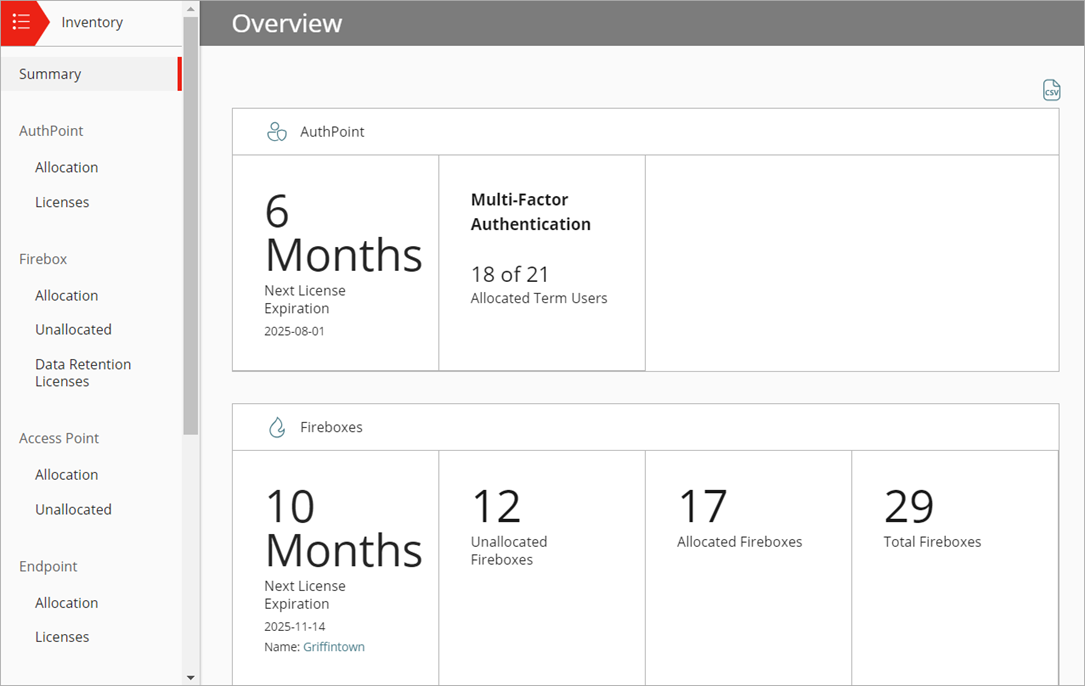
From the Inventory menu, Service Providers can review inventory summaries, allocated and unallocated devices and products, as well as license information. They can allocate users and endpoints from available licenses and specify the license expiration date. The options available depend on the account, folder, or device selected in the left pane.
For more information, go to Inventory Management.
Account Administration
From the Administration menu, you can configure settings for your WatchGuard Cloud account, and see license information about the products you manage in WatchGuard Cloud.

You can also configure account-level features for:
- Managed access — On the Managed Access page, you manage external access to your WatchGuard Cloud account and services.
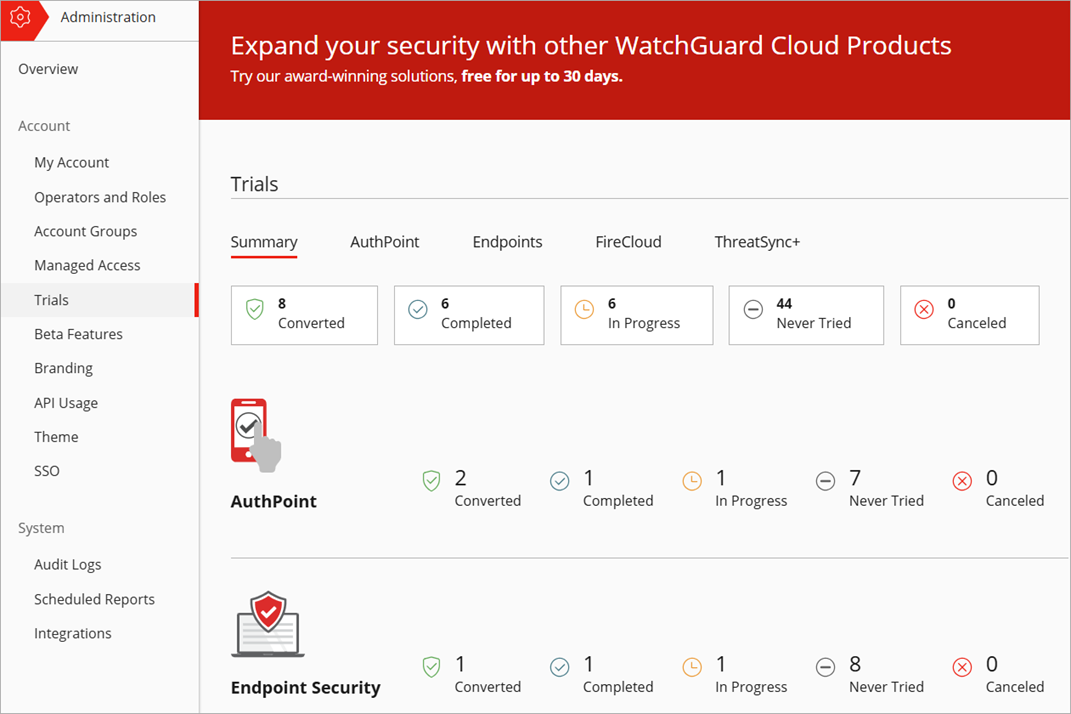
- Trials — On the Trials page, Service Providers can start free 30-day product trials for their account and accounts they manage.
- Beta features — On the Beta Features page, you can preview new functionality and applications.
- Custom branding — On the Custom Branding page, you can brand WatchGuard Cloud with your own logos and images to communicate with clients and users and make sure they know who to contact in the event of service issues.
- API usage — On the API Usage page, you monitor WatchGuard public API usage statistics for your account.
- Certificates — On the Certificates page, you manage your account level certificates.
- Audit logs, notifications, and scheduled reports — On the Audit Logs, Notifications, and Scheduled Reports pages, you can monitor your account, products, and services. You can view announcements, and add and download scheduled reports.
For more information, go to WatchGuard Cloud Administration.
Scheduled Reports
WatchGuard Cloud includes scheduled and on-demand reports to help you monitor your WatchGuard products. From the Administration menu, select Scheduled Reports to run reports daily, weekly, monthly, or immediately and to send the generated reports to specified email recipients. You can also download scheduled reports from WatchGuard Cloud.
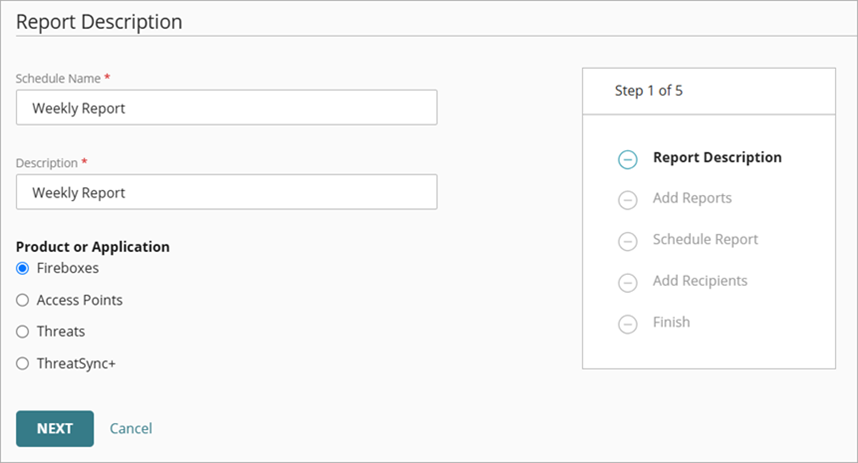
For more information on scheduled reports, go to Scheduled Reports.
Step 3: Add Managed Accounts and Operators
This section provides basic steps to set up accounts and operators in three scenarios:
- MSP with Subscribers Only
- MSP with Managed Service Providers
- MSP with Delegated Tier-1 Subscriber Account
For simplicity, the scenarios refer to Managed Service Providers (MSPs). MSP could include both WatchGuard partners and Managed Security Service Providers (MSSPs).
If you add an operator to a tier-1 Subscriber account, or a tier-n Service Provider or Subscriber account, the new operator can log in to WatchGuard Cloud (cloud.watchguard.com), but cannot log in to Support Center at www.watchguard.com.
MSP with Subscribers Only
In this scenario, an MSP has a number of customers they want to manage. To do this in WatchGuard Cloud, add each customer as a separate Subscriber account.
We recommend that you create a new Subscriber account for each new customer. This enables separate reporting for each customer account, as well as separate configurations for products like AuthPoint.
Complete these steps:
1. Add a Subscriber Account for Each Customer.
2. Add Operators to Your Account.
1. Add a Subscriber Account for Each Customer
Account Manager provides a unified view to manage your Subscriber accounts. To manage customers in WatchGuard Cloud, consider these best practices:
- Add a Subscriber account below your account for each customer you manage.
- Do not create folders for each customer below My Account to organize devices and customers.
- Use My Account and the folders below it to manage your own devices and perform internal tests.
To add a managed Subscriber account, from Account Manager:
- In the upper, right corner of Account Manager, click
 .
.
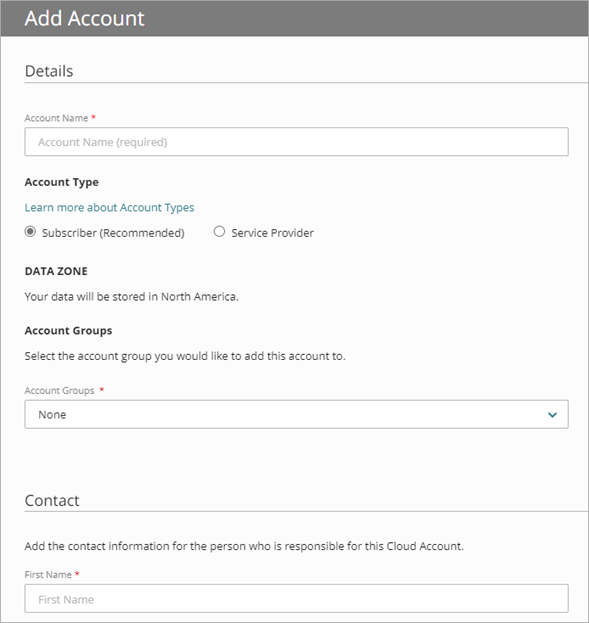
- In the Account Name text box, type the name of the customer account.
- In the Account Type section, select Subscriber.
- In the Contact section, add the contact information for the customer contact.
In the Email text box, enter an email address that WatchGuard or you could use to contact the person responsible for the account. - Add the Mailing Address and Billing Address.
- Click Save.
- Repeat these steps for each customer account.
2. Add Operators to Your Account
Operators are users who can log in to WatchGuard Cloud to view and manage account information, configure products, and see reports. Each account could have operators with different permissions and access. For managed accounts, you do not have to add operators if you intend to configure and manage the account and services on behalf of your customer.
Add operators to your account, and if required, add operators to your customer accounts so that they can create and manage their own account.
Your operator role determines what you can see and do in WatchGuard Cloud. Your role must have the Manage Tenants permission to add operators to a managed account. For more information, go to Manage WatchGuard Cloud Operators and Roles.
To add an operator to an account:
- From Account Manager, select the account you want to add an operator to.
To add operators to your account, select Overview or My Account. If you select My Account, you will add operators to your Subscriber account. - Select Administration > Operators and Roles.
- On the Operators page, click Add Operator.
- In the User Name text box, type a user name.
- In the Email text box, type the email address of the operator.
- In the First Name and Last Name text boxes, type the first and last name of the operator.
- To assign permissions to the operator, from the Select Role drop-down list, select an operator role. For information on custom operator roles, go to Manage Custom Operator Roles.
- To require the operator to authenticate with the AuthPoint app, enable the Multi-Factor Authentication toggle. For more information, go to Enable MFA for WatchGuard Cloud Operators.
The Confirm Email Address dialog box opens. - Click Confirm Email.
- Click Save.
WatchGuard Cloud sends an email message to the new operator with a link to set a password. - Repeat these steps for each operator you want to add.

MSP with Managed Service Providers
In this scenario, an MSP manages Service Providers who manage other Service Provider or Subscriber accounts. WatchGuard Cloud is a multi-tenant, multi-tier system. Both the MSP and their managed Service Provider accounts can manage other Service Provider and Subscriber accounts. The hierarchy in Account Manager can include up to five tiers of accounts (for example, tier-1 Service Provider > tier-2 Service Provider > tier-3 Service Provider > tier-4 Service Provider > tier-5 Subscriber).
Complete these steps:
1. Add a Managed Service Provider Account.
2. Add a Subscriber Account to the Managed Service Provider Account.
3. Add Operators to the Managed Service Provider Account.
1. Add a Managed Service Provider Account
MSPs can manage inventory and allocate devices, licenses, and users or endpoints to managed Subscriber and Service Provider accounts. You can manage products in your own account and for all accounts you manage. In this scenario, you add a Service Provider account to manage their own Subscriber accounts.
As an MSP, you can allocate inventory (devices, users, or endpoints) to any Service Provider or Subscriber account you manage. When you manage another Service Provider, make sure there is agreement on who can allocate inventory to the managed Subscriber accounts. For example, maybe as the MSP or tier-1 Service Provider, you will only allocate inventory to the tier-2 Service Provider. The tier-2 Service Provider is then responsible for the allocation of inventory to their managed accounts.
To add a managed Service Provider account, from Account Manager:
- In the upper, right corner of Account Manager, click .
- In the Account Name text box, type the customer name for the Service Provider account.
- In the Account Type section, select Service Provider.
- In the Contact section, add the contact information for the account owner.
In the Email text box, enter an email address that WatchGuard or you could use to contact the person responsible for the account. - Add the Mailing Address and Billing Address, if required.
- Click Save.
- Repeat these steps for each Service Provider account you want to add.
2. Add a Subscriber Account to the Managed Service Provider Account
You can add Subscriber accounts below your tier-1 Service Provider account and below your managed tier-n Service Provider accounts. Each Subscriber account represents a customer account.
To add a Subscriber account to a managed tier-n Service Provider account, from Account Manager:
- Select the Service Provider account where you want to add the Subscriber account.
- In the upper, right corner of Account Manager, click .
- In the Account Name text box, type the customer name for the Subscriber account.
- In the Account Type section, select Subscriber.
- In the Contact section, add the contact information for the account owner.
In the Email text box, enter an email address that WatchGuard or you could use to contact the person responsible for the account. - Add the Mailing Address and Billing Address, if required.
- Click Save.
- Repeat these steps for each Subscriber account you want to add.
3. Add Operators to the Managed Service Provider Account
Add operators to the managed tier-n Service Provider account so that they can create and manage their own operators. Managed tier-n Service Provider accounts must have at least one Owner operator. You can use a custom operator role to control what permissions the operators in your tier-n Service Provider accounts have. This can be useful to limit management tasks that each operator can perform or to enable or disable specific permissions in feature areas and products.
For more information, go to Manage Custom Operator Roles.
Your operator role determines what you can see and do in WatchGuard Cloud. Your role must have the Manage Tenants permission to add operators to a managed account. For more information, go to Manage WatchGuard Cloud Operators and Roles.
Add operators to your account, and then add operators to the tier-n Service Provider accounts you manage so that they can create and manage their own account and accounts they manage. As the MSP (tier-1 Service Provider), you can see and manage any operators created by tier-n Service Provider accounts that you manage.
To add an operator to a managed account:
- From Account Manager, select the account you want to add an operator to.
To add operators to your account, select Overview or My Account. If you select My Account, you will add operators to your Subscriber account. - Select Administration > Operators and Roles.
- On the Operators page, click Add Operator.
- In the User Name text box, type a user name.
- In the Email text box, type the email address of the operator.
- In the First Name and Last Name text boxes, type the first and last name of the operator.
- To assign permissions to the operator, from the Select Role drop-down list, select an operator role. For information on custom operator roles, go to Manage Custom Operator Roles.
- To require the operator to authenticate with the AuthPoint app, enable the Multi-Factor Authentication toggle. For more information, go to Enable MFA for WatchGuard Cloud Operators.
The Confirm Email Address dialog box opens. - Click Confirm Email.
- Click Save.
WatchGuard Cloud sends an email message to the new operator with a link to set a password. - Repeat these steps for each operator you want to add.

MSP with Delegated Tier-1 Subscriber Account
In this scenario, the MSP has a customer (tier-1 Subscriber) that owns a Firebox. As a tier-1 Subscriber, the customer can activate WatchGuard Fireboxes and products in their own WatchGuard account. The tier-1 Subscriber account wants to delegate their account management to the MSP. The MSP can then manage the tier-1 Subscriber account, as well as the products, trials, and inventory for the account.
When delegation is complete, the MSP can allocate products to the tier-1 Subscriber account. The MSP can also view and edit products purchased and managed by the tier-1 Subscriber account. In this scenario, the MSP allocates a Firebox device to the delegated account.
For more information, go to Inventory Management for Delegated Accounts.
MSPs can also view and edit Firebox configurations and templates for the delegated tier-1 Subscriber account. This type of Firebox co-management is useful when a customer has purchased their own Firebox but needs assistance with configuration.
Complete these steps:
1. Request Account Delegation from a Tier-1 Subscriber Account.
1. Request Account Delegation from a Tier-1 Subscriber Account
To manage a tier-1 Subscriber account, the MSP generates a verification code and sends it to the owner or administrator of the tier-1 Subscriber account. The recipient uses the verification code to approve the access request and delegates management of their account to the MSP.
For more information on account delegation, go to Manage Delegated Account Access — Service Providers.
To request account access:
- From Account Manager, select the account you want to request access for.
- Select Administration > Overview.
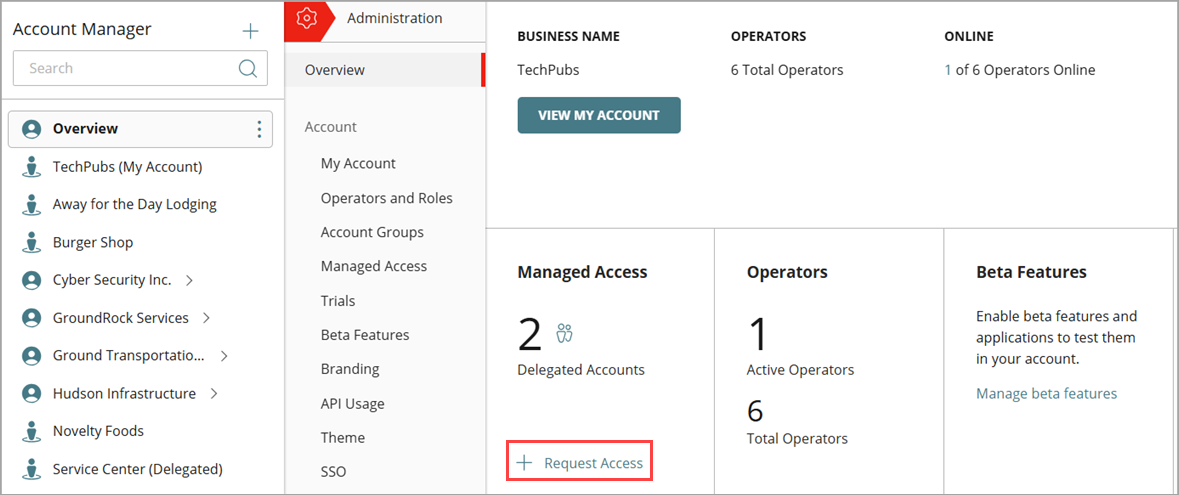
- Click Request Access to an Account or Request Access (if you already manage delegated accounts, the Managed Access widget is different).
- On the Managed Access page, click Request Account Access.

- To generate the verification code, click Next.
- Click Copy to Clipboard to copy the verification code shown on the page.

- Send the verification code to the owner of the account you want to access. We recommend that you use the provided text as a template.
2. Provide Account Access
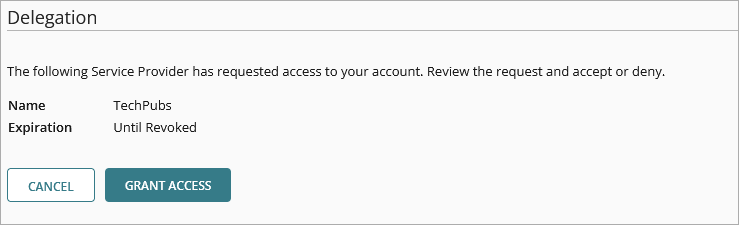
To start the account delegation process, the MSP sends the verification code to the owner of the tier-1 Subscriber account. The owner of the tier-1 Subscriber account uses this verification code to accept the request and provide account access. This procedure is completed by the owner of the tier-1 Subscriber account.
To provide account access and delegate your tier-1 Subscriber account:
- Log in to WatchGuard Cloud.
- Select Administration > Managed Access.
The Managed Access page opens. - On the Managed Access page, in the Verification Code text box, paste or type the verification code the Service Provider sent to you.

- Click Submit.
- Review the details of the request. To approve the account access request, click Grant Access .
If you cancel, you can still review and approve the access request later. You have 14 days before the verification code expires.
By default, account delegation continues until you or the delegated account remove access.
To support partner business models, tier-1 Service Providers can allocate product licenses and trials to delegated tier-1 Subscriber accounts (for example, Fireboxes, access points, AuthPoint users, and endpoint products and modules). Service Providers can allocate inventory to tier-1 Subscriber accounts as a term or subscription allocation type. This includes term licenses purchased with MSSP Points.
What's Next?
After you create your account structure in WatchGuard Cloud, you can allocate users and endpoints from product license you have activated. For information on how to manage inventory in WatchGuard Cloud, go to Allocate Devices, Users and Endpoints in WatchGuard Cloud.
You might also want to:
- Add Fireboxes to WatchGuard Cloud
- Add Device Folders in Account Manager
- Explore Firebox Templates
- Try New Products and Features
For more information on WatchGuard Cloud for Service Providers, review this topic, Best Practices for Service Providers in WatchGuard Cloud.
Add Fireboxes to WatchGuard Cloud
To monitor or manage devices from WatchGuard Cloud, you can add the Firebox to your WatchGuard Cloud account. For more information, go to Get Started — Add a Device to WatchGuard Cloud.
For best practices on how to change your locally-managed Firebox to cloud management, go to the Firebox Migration to Cloud Management Guide.
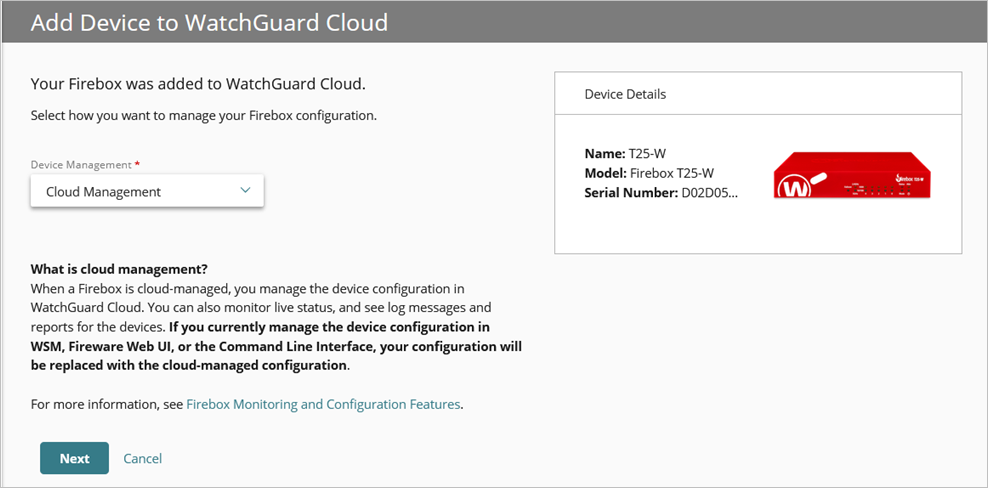
When you add a Firebox to WatchGuard Cloud, you select how you want to manage the Firebox:
Cloud Management
With this option, you use WatchGuard Cloud for all Firebox configuration management, monitoring, and reporting. You can also set up your devices and configure and manage security and networking policies across multiple Fireboxes with flexible templates.
Local Management
With this option, you use WatchGuard Cloud for monitoring and reporting, and you use Fireware Web UI or WatchGuard System Manager to manage the device configuration.
Add Device Folders in Account Manager
In Account Manager, you can group devices in folders.
- Folders help you to view the status and summarized data for groups of devices.
- When you select a folder, the right side of the window shows information about the devices in the folder.
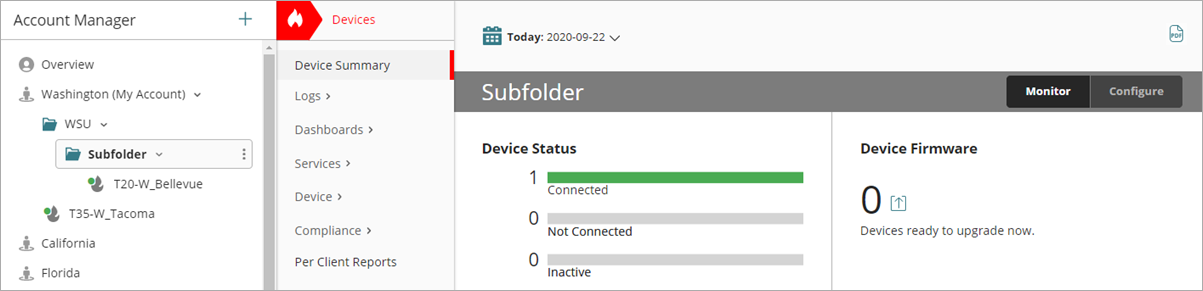
- This enables you to open a folder to view only the devices at that location, and to view summary status and aggregated reports for those devices. For example, you can view the status and reports for a folder of several Fireboxes or access points.
- Each folder can contain devices or other folders. You can create up to ten levels of folders to organize your devices.
|
Service Provider Account — Folder Structure in Account Manager |
Subscriber Account — Folder Structure in Device Manager |
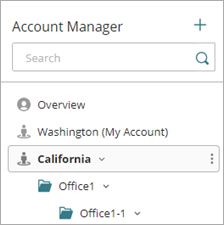

You can organize your device folders in several ways, for example:
- You could organize devices at different office locations into separate folders, such as by geographic location (Seattle, Los Angeles, Toronto) or different buildings (Headquarters, 5th Street Warehouse), or floors within a building (5th Floor, 9th Floor, Basement)
- You could organize devices by operational departments such as IT, Sales, Marketing, Development, QA, and so on.
For more information, go to Device Folders.
Explore Firebox Templates
Firebox templates provide a way to manage shared configuration settings for multiple cloud-managed Fireboxes. Firebox templates can become a "golden configuration" with standard settings that you want to assign to all of your devices.
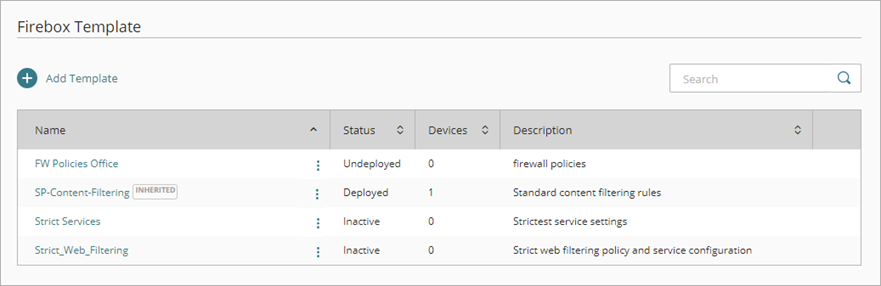
In a Firebox template, you can configure firewall policies and services just as you would for an individual Firebox. Your cloud-managed Fireboxes can then subscribe to the template. When tier-1 Service Providers create a template, it is available to their managed and delegated accounts and to devices in all accounts below them.
For more information, go to About Firebox Templates.
To use Firebox templates to configure Fireboxes, you must:
- Add the template — Add the template and configure the shared settings. For more information, go to Manage Firebox Templates.
- Deploy the template — Deploy the template so that settings deploy to devices that subscribe the template now or that subscribe to it in the future. For more information, go to Deploy Firebox Templates.
- Subscribe devices to the template — After you add and deploy a template, Fireboxes in your account can subscribe to the template. Service Provider accounts that you manage or have delegated access to can inherit the template. Devices allocated to accounts below more than one Service Provider can subscribe to templates from any tier above them. For more information, go to Subscribe a Firebox to a Template.
Try New Products and Features
You can enhance your experience of WatchGuard Cloud's unified platform with free 30-day product trials. You can also try new features when they become available for beta test.
Free Product Trials
Service Providers can start trials for their account and accounts they manage.
You can start free trials for these products in WatchGuard Cloud:
- AuthPoint
- Compliance Reporting
- CloudDR
- Endpoint Security products and modules
- FireCloud
- WatchGuard NDR
- WatchGuard SaaS DR
For more information on trials, go to About Trials in WatchGuard Cloud.
ThreatSync
ThreatSync is a WatchGuard Cloud service that provides eXtended Detection and Response (XDR) technology for WatchGuard products. ThreatSync provides extended detection capabilities through the correlation of data from different WatchGuard security products that indicates the presence of threats.

You can enable ThreatSync for your account and any account you manage. For more information, go to Quick Start — Set Up ThreatSync.
WatchGuard NDR extends the existing ThreatSync functionality in WatchGuard Cloud and offers enhanced network detection and response, network device identification, and advanced reporting for Fireboxes, third-party firewalls, and LAN infrastructure. To learn more, go to About WatchGuard NDR in WatchGuard Cloud Help.
WatchGuard SaaS DR enables you to monitor, detect, and report on activity from third-party SaaS and cloud environments, such as Microsoft 365 and Google Workspace. To learn more, go to About WatchGuard SaaS DR Integration — Microsoft 365 and About WatchGuard SaaS DR Cloud Integration — Google Workspace in WatchGuard Cloud Help.
Beta Features
The Beta Features page shows beta features and applications that you can preview and test. Only operators with Administrator or Owner permissions can enable or disable a beta feature. You cannot enable beta features for a delegated account, unless it is a delegated tier-1 Subscriber account.
For more information, go to Enable Beta Features and Applications.
Questions?
WatchGuard Support is available to answer any questions and provide the information you need to get the most out of WatchGuard Cloud. When you contact WatchGuard Support, your Support representative might ask you to enable support access in WatchGuard Cloud. For Service Providers, when you enable access to Support (Auditor or Owner roles), they have access to your account and any accounts you manage. For more information, go to Support Access to WatchGuard Cloud Accounts.