Deploy FireboxV or XTMv on Hyper-V
This installation procedure describes how to deploy and configure a FireboxV virtual machine on Microsoft Windows Server with a Hyper-V role. The installation steps are similar for other Hyper-V environments.
WatchGuard FireboxV Hyper-V system requirements:
- For information about Hyper-V for Microsoft Windows Server and Hyper-V Server system requirements, go to the FireboxV System Requirements section of the Fireware Release Notes.
WatchGuard XTMv Hyper-V system requirements:
- Windows Server or Hyper-V Server 2012 R2, or 2016
FireCluster is not supported for FireboxV or XTMv on Hyper-V.
Installation Prerequisites
The Microsoft Hyper-V environment must meet these requirements:
Hyper-V
- To create and run virtual machines on Windows Server, you must install the Hyper-V role.
- Make sure your Windows Server or Hyper-V Server software is updated to the latest patch level.
- The procedures in this document use the Hyper-V Manager on Windows Server 2022 to deploy, configure, and provision the FireboxV virtual machine in the Hyper-V environment. You can also use System Center Virtual Machine Manager (VMM) interface, or a Hyper-V role on a client computer instead of Hyper-V Manager.
Hardware and System Resources
- Hardware: Any hardware that meets the requirements for Hyper-V Server or Windows Server
- Each FireboxV virtual machine requires 5 GB of disk space
- Other system resources vary by FireboxV or XTMv model
| FireboxV Model | Minimum Total Memory | Recommended Memory | Maximum vCPUs |
|---|---|---|---|
| Micro | 2048 MB* | 4096 MB | 2 |
| Small | 2048 MB* | 4096 MB | 2 |
| Medium | 4096 MB | 4096 MB | 4 |
| Large | 4096 MB | 8192 MB | 8 |
| Extra Large | 4096 MB | 16384 MB | 16 |
* 4096 MB memory is required to enable Access Portal and IntelligentAV, and to use the Full signature set for IPS/Application Control
| XTMv Model | Memory | Recommended vCPUs |
|---|---|---|
| Small Office Edition | 2048 MB | 1 |
| Medium Office Edition | 4096 MB | 2 |
| Large Office Edition | 4096 MB | 3 |
| Datacenter Edition | 4096 MB | 8 |
All FireboxV and XTMv models support a maximum of 10 interfaces. Because you cannot use legacy network adapters with a FireboxV or XTMv virtual machine, the practical limit for FireboxV or XTMv in a Hyper-V environment is eight.
Before You Begin
To prepare for your installation, make sure you have:
- Hyper-V installed on Windows Server or Hyper-V Server.
- FireboxV or XTMv serial number.
You receive the serial number when you purchase the FireboxV virtual device. - FireboxV or XTMv feature key
The feature key contains the device serial number and licensed features. - WatchGuard FireboxV virtual hard disk (.VHD) file
The file name is fireboxv_<version>.vhd, where <version> is the Fireware version. - WatchGuard System Manager (optional)
The WSM version must be the same version or higher than the Fireware version
To get the feature key:
- Go to https://myproducts.watchguard.com/activate and activate the device serial number.
The activation process creates a feature key for the Firebox. - Copy the feature key to a local text file.
To download the installation file and other software to use with your Firebox:
- Go to software.watchguard.com and select FireboxV or XTMv for Hyper-V.
- Download the FireboxV or XTMv .ZIP file.
- Download WatchGuard System Manager (optional).
Extract the .VHD file from the .ZIP file to a location on the Windows server where Hyper-V is installed. You might want to extract the .VHD file to the default location where Hyper-V stores virtual hard disks. On Windows Server 2022, the default location is C:\Users\Public\Documents\Hyper-V\Virtual Hard Disks.
Because a .VHD file is a virtual hard drive, it cannot be used for more than one powered on virtual machine at the same time. To deploy additional FireboxV virtual machines, make sure that you save a copy of the unzipped .VHD file with a unique name for each virtual machine. Then, when you add the virtual machine, make sure you select the .VHD file to use with that virtual machine.
Installation Overview
To complete initial installation:
- Create the FireboxV virtual machine and select the .VHD file to use.
- Assign network adapters, and power on the FireboxV or XTMv virtual machine.
- Connect to the FireboxV or XTMv virtual machine and run the Web Setup Wizard.
- Allocate additional resources to the FireboxV or XTMv virtual machine.
This guide describes how to use the Web Setup Wizard to create your initial configuration. If you have installed WatchGuard System Manager on a computer on the FireboxV or XTMv trusted network, instead of the Web Setup Wizard, you can use the Quick Setup Wizard in WatchGuard System Manager to discover the FireboxV or XTMv virtual machine and set up the basic configuration.
To activate your device in the Web Setup Wizard, you must have the device serial number. You cannot use a serial number that ends with 000000000, which is the serial number for an unactivated device.
Network Considerations
When you create the FireboxV virtual appliance, it is initially configured with two active interfaces.
External interface
The external interface, Interface 0, is set up by default to request an IP address from a DHCP server. To connect to this interface for the initial device configuration, you must map this interface to a destination network that has a DHCP server.
Trusted interface
The trusted interface, Interface 1, has a default IP address of 10.0.1.1.
When you create the FireboxV virtual machine in the Hyper-V environment, before you run the Web Setup Wizard for the FireboxV device, you must add at least two network adapters (not legacy network adapters) to the virtual machine for the external and trusted interfaces.
After you create the FireboxV virtual machine, you can enable and configure additional FireboxV network interfaces. For additional interfaces to operate, you must configure the FireboxV virtual machine in the Hyper-V Manager or System Center VMM to add the number of network adapters you want to enable in the FireboxV configuration.
Create the FireboxV or XTMv Virtual Machine
You can use Hyper-V Manager or System Center VMM to create the FireboxV virtual machine. The FireboxV .VHD file installs as a 64-bit virtual machine.
To use Hyper-V Manager:
- On your Windows or Hyper-V Server, launch Hyper-V Manager.
- Select Action > New > Virtual Machine.
The New Virtual Machine Wizard starts. - If the Before You Begin page opens, click Next.
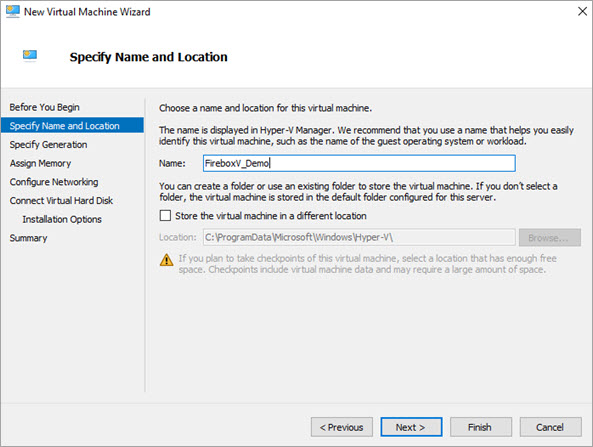
The Specify Name and Location page opens.
-
In the Name text box, type a name for this virtual machine.
-
To store the virtual machine in a folder other than the default folder, select the Store the virtual machine in a different location check box. Click Browse and select the location to store the virtual machine. Click Next.
The Specify Generation page opens. -
On the Specify Generation page, select Generation 1. Click Next.
-
On the Assign Memory page, in the Startup memory text box, type the amount of memory to allocate based on your FireboxV model:
- Small — 2048 MB
- Medium — 4096 MB
- Large or Extra Large — 4096 MB
-
Click Next.
The Configure Networking page opens. -
From the Connection drop-down list, select the virtual network adapter to use for the external interface, Eth0. Do not choose a legacy network adapter.
- Click Next.
- Select Use an existing virtual hard disk.
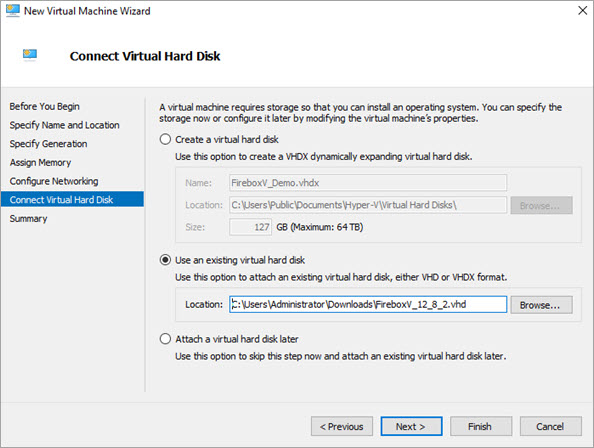
- Click Browse and select the location where you saved the WatchGuard FireboxV .VHD file. Click Next.
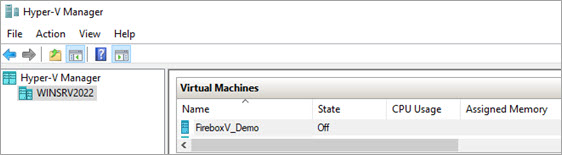
- Review the summary. Click Finish.
The FireboxV virtual machine shows in the Hyper-V Manager Virtual Machines pane.
Add Network Adapters
Before you can configure Fireware on your FireboxV virtual machine, you must add two virtual network adapters to it. The first one you select is for the external interface, Eth0. The second one is for the trusted interface, Eth1. The virtual network adapters you use for your FireboxV device must be a network adapter, not a legacy network adapter.
In the New Virtual Machine Wizard, you selected the first virtual network adapter. Next, you must add the virtual network adapter to use for the FireboxV virtual machine trusted interface, Eth1. You must do this while the virtual machine is not started.
- In the Hyper-V Manager Virtual Machines pane, select the FireboxV virtual machine you just added.
- From the Actions list, select Settings.
- From the Hardware list, select Add Hardware.
- Select Network Adapter and click Add.
Do not select Legacy Network Adapter. FireboxV does not support legacy network adapters. - From the Virtual switch drop-down list, select the virtual switch to use for the FireboxV device trusted interface (Eth1). Click Apply.
- Verify that both network adapters show in the Hardware list. Click OK.
If you want to add virtual CPUs or interfaces to this virtual machine, you can allocate those resources now, before you start the virtual machine. Or, you can complete this step later.
To add a virtual processor, in Hyper-V Manager:
- In the Virtual Machines pane, select the FireboxV virtual machine.
- If the virtual machine state is not Off, right-click the virtual machine and select Turn Off.
- From the Actions list, select Settings.
- From the Hardware list, select Processor.
- In the Number of virtual processors text box type or select the number of processors to allocate.
- Click Apply.
For more information about how to allocate additional resources, go to Configure Resources in Hyper-V.
Start the FireboxV Virtual Machine
Next, you start the FireboxV virtual machine. When you initially power on the FireboxV virtual machine, it automatically sends a DHCP broadcast to request an IP address for the external interface. If a DHCP server is configured on the external network, the FireboxV external interface receives an IP address.
To power on the FireboxV virtual machine:
- In the Hyper-V Manager Virtual Machines pane, select the FireboxV virtual machine.
- From the Actions list, click Start.
Or, select Action > Start.
The FireboxV virtual machine is powered on with factory default settings. The device state is Running.
FireboxV and XTMv Factory Default Settings
When you power on a FireboxV or XTMv virtual machine for the first time, before you run the setup wizard, it starts with these factory default settings:
- There are two active interfaces: external and trusted.
- The trusted interface has the IP address 10.0.1.1.
- The external interface is configured to receive an IP address through DHCP.
- The trusted interface is not configured to assign IP addresses with DHCP.
This is different than the default setting for other Fireboxes. - Both the trusted and external interfaces accept management connections.
This is different than the default setting for other Fireboxes. - The admin account passphrase is readwrite.
- The serial number for an unactivated FireboxV or XTMv device ends with 000000000.
You assign the actual serial number during device activation.
Find the External IP Address
If the external network has a DHCP server, the FireboxV device external interface is automatically assigned an IP address. If you want to use this IP address to connect to the device, you can use the Fireware Command Line Interface to see what IP address has been assigned to the external interface.
To use the CLI to see the IP addresses assigned to an active FireboxV device:
- In the Hyper-V Manager Virtual Machines pane, select the FireboxV virtual machine.
- From the Actions list, select Connect.
- At the login prompt, type status.
- At the password prompt, type readonly.
This is the default status account passphrase. - Type show interface.
The command output shows the IP addresses and status for the External and Trusted interfaces.

- To log out of the Fireware CLI, type exit.
Use the Web Setup Wizard to Create a Basic Configuration
The Fireware Web Setup Wizard is almost the same for FireboxV as it is for any other Firebox. One difference is that, for a FireboxV virtual machine, you can connect to either the trusted interface or the external interface to run the Web Setup Wizard. Another difference is that the virtual machine reboots after the wizard is complete, so that the virtual machine can restart with the new serial number.
If you do not complete all of the Web Setup Wizard steps within 15 minutes, the wizard does not save any of your settings. You must log in and start again.
The Web Setup Wizard includes a step to activate your FireboxV device. You must activate the Firebox with a feature key to get the serial number and to enable all licensed features.
To set up the basic configuration on a FireboxV virtual machine:
- Open a web browser and connect to Fireware Web UI on either the external or trusted interface.
- Connect to the external interface — From any computer on the FireboxV external network, connect to:
https://<External_IP_Address>:8080
For <External_IP_Address>, use the IP address assigned to the external interface. - Connect to the trusted interface — From any computer on the FireboxV trusted network, connect to:
https://10.0.1.1:8080
- Log in to Fireware Web UI with the default administrator account credentials.
- Username — admin
- Passphrase — readwrite
- Select New Configuration.
- Complete the steps in the Web Setup Wizard.
The Web Setup Wizard helps you to complete these steps:
Configure the External interface
Select and configure the method you want your device to use to set an external IP address. The choices are:
- DHCP — Type the DHCP identification as supplied by your ISP.
- PPPoE — Type the PPPoE information as supplied by your ISP.
- Static — Type the static IP address and gateway IP address, as supplied by your ISP.
For more information about these methods, go to Configure an External Interface.
Configure DNS and WINS servers (Optional)
Configure the DNS and WINS server addresses you want the Firebox to use.
Configure the Trusted interface
Type the IP address of the trusted interface. (Optional) If you want the Firebox to assign IP addresses to computers that connect to the trusted network, you can enable the DHCP server and assign a range of IP addresses on the same subnet as the interface IP address.
Create passphrases for your device
Set new passphrases for the status (read-only) and admin (read/write) built-in user accounts.
Enable remote management (Optional)
Enable remote management if you want to manage this Firebox through the external interface.
Add device information
You can type a device name, location, and contact information to save management information for this device. By default, the device name is the model number of your Firebox. We recommend that you choose a unique name that you can use to easily identify this Firebox, especially if you use remote management. The location and contact information are optional.
Set the Time Zone
Select the time zone where the Firebox is located.
Add the feature key
Paste the text of the feature key into the setup wizard.
If you did not copy the feature key when you activated your Firebox serial number, you can get it on the Product Details page for your Firebox. For more information, go to About the Product Details Page.
Configure subscription services
The setup wizard shows a list of licensed services from the feature key. The setup wizard automatically enables the listed services with recommended settings. For WebBlocker, the setup wizard recommends content categories to block, and you can change these settings in the setup wizard.
Review the Configuration
After you review the configuration settings, the setup wizard saves the configuration to the Firebox.
After the Setup Wizard Finishes
After you complete the wizard, the FireboxV or XTMv virtual machine reboots with the new serial number. The setup wizard creates a basic configuration that allows outbound TCP, UDP, and ping, traffic, and blocks all unrequested traffic from the external network. It also uses the interface IP addresses and administrative passphrases you specified. The wizard automatically enabled default policies and services with recommended settings. For details about the default policies and services, go to Setup Wizard Default Policies and Settings.
If you changed the IP address of the interface you used to connect to the Fireware Web Setup Wizard, you must use the new address to connect and manage the device.
Management Connections to FireboxV and XTMv
For a FireboxV or XTMv virtual machine, the default WatchGuard and WatchGuard Web UI policies allow management connections from any computer on the trusted, optional, or external networks. This is different from the default configuration for other WatchGuard devices, which do not allow management connections from the external network by default.
We strongly recommend that you do not allow management connections from the external network, and that you edit the WatchGuard and WatchGuard Web UI policies to remove the Any-External alias from the From list after you complete initial configuration.
To allow management from only a specific computer on the external network, you can add the address of that management computer to the From list in these policies.
You can use Fireware Web UI, WatchGuard System Manager, or the Fireware Command Line Interface (CLI) to change the configuration for your FireboxV or XTMv virtual machine. You can connect to either the trusted or external interface from any computer on the same network.
For more information, go to:
If you need to reset a FireboxV or XTMv device to factory-default settings, you can use the Fireware Command Line interface. For more information, go to Reset FireboxV or XTMv to Factory-Default Settings.