Applies To: Endpoint Security Elite, Endpoint Security 360, Endpoint Security Prime, WatchGuard EDR, Endpoint Security Basic
In the Web Access Control settings of a workstations and servers settings profile, you can limit access to specific web content categories and configure a list of URLs to allow and deny access to. However, Web Access Control might not always block access or allow access to web pages as you expect. This help topic provides information on possible causes and solutions.
Browsers and the QUIC Protocol
HTTP/3 (QUIC) is a transport layer network protocol. Web Access Control in older versions of Endpoint Security is not compatible with the QUIC protocol. Web Access Control in Endpoint Security versions 8.00.25.0001 and higher is compatible with the QUIC protocol.
To get the most recent updates and make sure that your network has the best protection, migrate all the endpoints on your network to the latest version of the protection software. This should include your servers, environments with gold images, and virtual systems.
You can add a firewall connection rule to make sure that you can use Web Access Control. For information about how to add a rule in older versions of Endpoint Security, go to the Add a Connection Rule to Block Traffic on Port 80, Port 8080, and Port 443 section of the Disable the HTTP/3 (QUIC) Protocol topic.
Browsers and DNS Over HTTPS
Known issues exist with Web Access Control and DNS over HTTPS. If Web Access Control does not block or categorize an URL as expected, and you notice that Web Access Control blocks IP addresses but not domains, verify whether DNS over HTTPS is enabled in the browser. If enabled, disable it. For information about how to disable this functionality in various browsers, go to Disable DNS over HTTPS on enterprise browsers ![]()
Browsers and DNS Over TCP
Known issues exist with Web Access Control and DNS over TCP. If Web Access Control does not block or categorize an URL as expected, and you notice that Web Access Control blocks IP addresses but not domains, you can block DNS over TCP traffic with a connection rule.
If the affected computer serves as a domain controller with DNS server functionality, do not create this rule.
To add a connection rule to block DNS over TCP traffic on port 53 (DNS):
- In WatchGuard Cloud, select Configure > Endpoints.
- Select Settings.
- Select Workstations and Servers.
- Select an existing security settings profile to edit, copy an existing profile, or in the upper-right corner of the window, click Add to create a new profile.
The Add Settings or Edit Settings page opens. - Enter a Name and Description for the profile, if required.
- Select Firewall (Windows computers).
- Enable the firewall.
- In Connection Rules section, enable WatchGuard rules.
- To add a new connection rule, click
 .
. - In the Name text box, type a name for the rule.
- In the Description text box, type a description of the traffic filtered by the rule.
- From the Action list, select Deny.
- From the Direction list, select Outbound.
- From the Zone list, select the network type for the block rules you want to apply to the user computer.
- Public Network: Networks in public places such as airports, Internet cafés, and universities. Computers are not visible to other users on the network and some programs have limited access to the network. Protected computers require limitations around use and access, including resource and directory sharing. Endpoint Security rules are enabled or disabled according to the administrator’s criteria.
- Trusted Network: Home or office networks when you know and trust the other users and devices on the network. Computers are visible to other computers and devices on the network. Endpoint Security rules are not applied, so there are no restrictions on sharing files, resources, or directories.
- Detect Automatically: The network type (public or trusted) is selected automatically based on the rules specified. Click Configure rules to determine when a computer is connected to a trusted network.
- From the Protocol list, select TCP.
- From the Remote Ports list, select Custom.
- In the Custom text box, add port 53.
- Click OK.
- Click Save.
- Select the profile and assign recipients, if required.
For more information, see Assign a Settings Profile.
Collect Information
Before you collect the information in this section for Support, you must first clear the cache of your browser and then close the browser. This makes sure that there is no cached information that could affect the Support case analysis. When you reproduce the issue, collect the information simultaneously.
If you contact Support:
- Provide a description of the issue.
- Use the Pserrortrace tool to generate a diagnostic file.
- Use the PSInfo tool to generate support-related information.
- Use the Urlviewer tool to generate URL support-related information.
- Use the NNSDiag tool to generate a diagnostic file.
- Enable Support Access to your WatchGuard Cloud account.
To use the Urlviewer tool:
- Download the Urlviewer tool.
- If your WatchGuard Endpoint Security software is 8.00.17 or earlier, download urlviewer_cyren.zip

- If your WatchGuard Endpoint Security software is 8.00.18 or later, download urlviewer_forcepoint.zip
- If your WatchGuard Endpoint Security software is 8.00.17 or earlier, download urlviewer_cyren.zip
- Unpack the .EXE file to a location of your choice.
When prompted, the password is 'panda'. - Open a command window with administrator privileges.
- From the command prompt, browse to the location of your install.
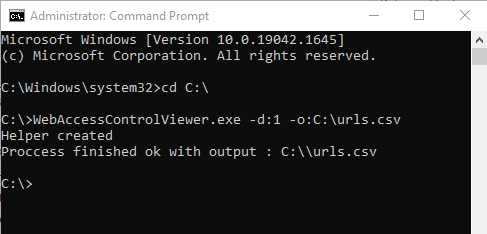
- Type this command:
WebAccessControlViewer.exe -d:1 -o:C:\urls.csv - Wait for the tool to complete.
When done, the tool generates a .CSV file at the specified path.
- Send the .CSV file to Support.
You can use the NNSDiag tool to generate a diagnostic file when Web Access Control unexpectedly blocks one or more URLs. You can also use the tool to diagnose compatibility issues when you use an application other than Web Access Control to block URLs.
If Web Access Control unexpectedly cannot block one or more URLs, you can generate a diagnostic file with the NNSDiag tool and simultaneously generate a capture file with the third-party Wireshark application. For more information, go to the Wireshark section.
- Download the NNSDiag tool: NNSDiag install package
Use the password 'panda' to open the archive. - In the C:\ drive of your system, create a NNSDiag folder.
- Unpack the NNSDiag.exe file, then place it in the NNSDiag folder.
When prompted, the password is 'panda'. - Open a Command Prompt window with administrator privileges.
- From the command prompt, browse to C:\NNSDiag.
- Type and run this command:
NNSDiag.exe c:\NNSDiag 5 - Open a web browser, then recreate the issue.
- Wait for the tool to complete.
When done, the tool generates a NNSDiagResults.zip file at the specified path. - Send the .ZIP file to Support.
To use the Wireshark and NNSDiag tools:
- If you have not already done so, download and install the NNSDiag tool.
- Download and install the Wireshark application from https://www.wireshark.org/download.html
- Start the Wireshark application.
- Open a Command Prompt window with administrator privileges.
- From the command prompt, browse to C:\NNSDiag.
- To start and run the NNSDiag tool for 5 minutes, type this command:
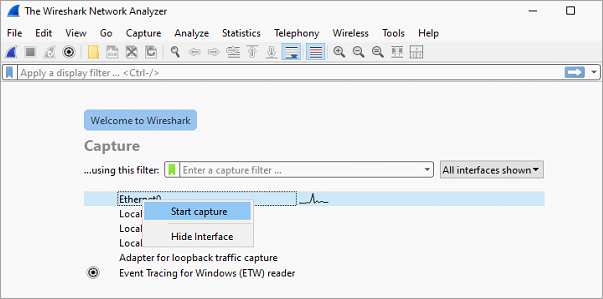
NNSDiag.exe c:\NNSDiag 5 - From Wireshark, right-click the network interface and select Start Capture.
- Open a web browser and recreate the issue. You must recreate the issue within 5 minutes of when you ran the NNSDiag command in Step 6.
- Wait for the NNSDiag tool to complete.
When complete, the tool generates a NNSDiagResults.zip archive at the path you specify. - From the Wireshark application, to stop the capture, click the red square icon.

- From the Wireshark application, select File > Save As, and save the Wireshark capture as WireShark_KO.pcap.
- Send the NNSDiagResults.zip and WireShark_KO.pcap files to Support. Make sure to include any URLs that were used to reproduce the issue.