Applies To: Endpoint Security Elite, Endpoint Security 360, Endpoint Security Prime, Endpoint Security Basic
This topic applies to Endpoint Security releases prior to October 2025 that do not support browsers with the HTTP/3 (QUIC) protocol . The most recent version of Endpoint Security products support the HTTP/3 protocol.
To get the most recent updates and make sure that your network has the best protection, migrate all the endpoints on your network to the latest version of the protection software. This should include your servers, environments with gold images, and virtual systems.
To make sure that you can use Web Access Control, complete one of these procedures:
- Disable HTTP/3 (QUIC) Protocol in Browsers on User Devices
- Add a Connection Rule to Block Traffic on Port 80, Port 8080, and Port 443 (Windows computers)
Disable HTTP/3 (QUIC) Protocol in Browsers on User Devices
To disable HTTP/3 protocol on a user device, complete these steps in the relevant browser:
Browser settings can vary for different versions.
Google Chrome
In the browser address bar, type chrome://flags. Disable the Experimental QUIC protocol option.
Microsoft Edge
In the browser address bar, type edge://flags/. Disable the Experimental QUIC protocol option.
Mozilla Firefox
In the browser address bar, type about:config. Disable the network.http.http3.enable option.
Opera
In the browser address bar, type opera://flags/#enable-quic. From the Experimental QUIC protocol drop-down list, select Disabled.
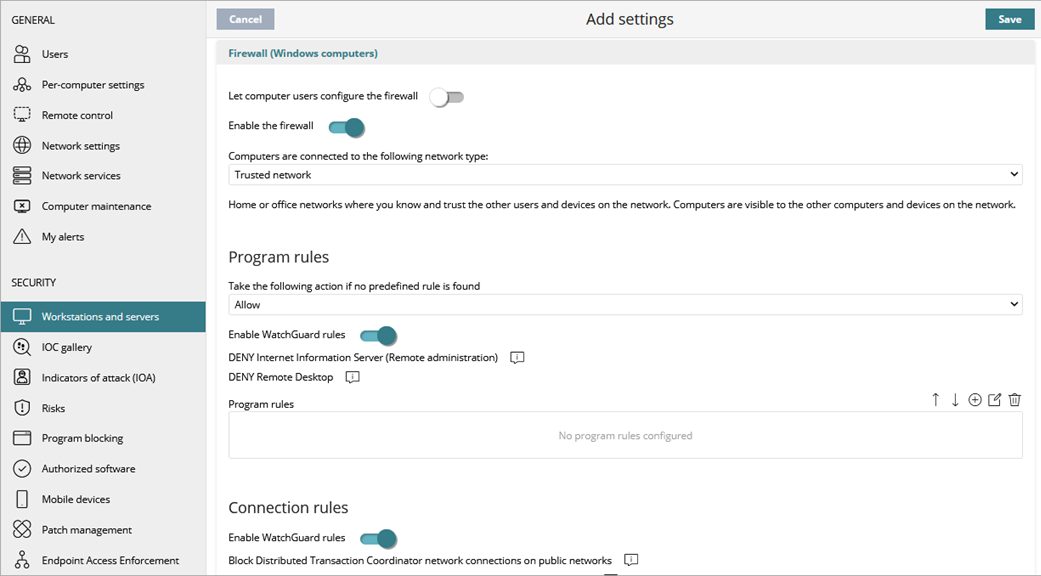
Add a Connection Rule to Block Traffic on Port 80, Port 8080, and Port 443 (Windows computers)
In this procedure, you create a firewall connection rule to block traffic that uses the UDP protocol on port 80, 8080, or 443. This forces the browser to send its requests with the TCP protocol on port 80, which corresponds to HTTP/2.
This procedure is effective on Windows devices only.
Your operator role determines what you can see and do in WatchGuard Cloud. Your role must have the Configure Security for Workstations and Servers permission to view or configure this feature. For more information, go to Manage WatchGuard Cloud Operators and Roles.
To add a connection rule to block traffic on port 80, port 8080, and port 443:
- In WatchGuard Cloud, select Configure > Endpoint Security.
- Select Settings.
- Select Workstations and Servers.
- Select an existing security settings profile to edit, copy an existing profile, or in the upper-right corner of the window, click Add to create a new profile.
The Add Settings or Edit Settings page opens. - Enter a Name and Description for the profile, if required.
- Select Firewall (Windows computers).
- Enable the firewall.
- In Connection Rules section, enable WatchGuard rules.
- To add a new connection rule, click
 .
. - In the Name text box, type a name for the rule.
- In the Description text box, type a description of the traffic filtered by the rule.
- From the Action list, select Deny.
- From the Direction list, select Outbound.
- From the Zone list, select the network type for the block rules you want to apply to the user computer.
- Public Network: Networks in public places such as airports, Internet cafés, and universities. Computers are not visible to other users on the network and some programs have limited access to the network. Protected computers require limitations around use and access, including resource and directory sharing. Endpoint Security rules are enabled or disabled according to the administrator’s criteria.
- Trusted Network: Home or office networks when you know and trust the other users and devices on the network. Computers are visible to other computers and devices on the network. Endpoint Security rules are not applied, so there are no restrictions on sharing files, resources, or directories.
- Detect Automatically: The network type (public or trusted) is selected automatically based on the rules specified. Click Configure rules to determine when a computer is connected to a trusted network.
- From the Protocol list, select UDP.
- From the Remote Ports list, select Custom.
- In the Custom text box, add port 80, port 8080, and port 443, separated by a comma.
- Click OK.
- Click Save.
- Select the profile and assign recipients, if required.
For more information, go to Assign a Settings Profile.