Applies To: PSInfo
After you install the PSInfo tool, you can send support-related information to Support to report a problem. PSInfo can also save the information locally as a .7Z file.
Install PSInfo
The latest version of PSInfo requires .NET. Version 5.0 of PSInfo is required for endpoints with Windows 10 operating systems and lower. To view your version of PSInfo, in the lower-right or upper-right corner, depending on your version, click the info icon.
To install PSInfo:
- To download the most recent version of PSInfo, enter this URL into the address bar of your browser:
https://www.watchguard.com/psinfo
Version 5.0 of PSInfo is required for endpoints with Windows 10 operating systems and lower. You can download this version here (external link). - Press Enter.
A .ZIP file downloads to your computer. If prompted, use the password 'panda' to open the archive. - Extract the PSInfo.exe file to any location on your computer.
Run PSInfo and Collect Information
To run PSInfo:
- Run PSInfo.exe on the endpoint where you want to collect information.
Support or a network administrator cannot run PSInfo remotely or through a CMD prompt.
The License Agreement page opens. - Select the I Accept the Terms of this Agreement check box.
- Click Accept.
The PSInfo window opens.
Complete these steps to collect information with PSInfo. Refer to the appropriate section for your version of PSInfo.
To collect information in the PSInfo v6.0.0. application:
- Select the Support Request tab.
- In the Account ID text box, if it is not already populated, enter your account ID number.
If you do not have an endpoint security product installed, the ID is not pre-populated and you must manually enter your account number. - From the Which product needs support drop-down list, select the product that you want to create a report for. If you are not sure, select Default.
- In the Support case number text box, enter the WatchGuard case number if you have one. A case number can help Support provide you with assistance.
- In the Contact email address text box, enter a contact email address for communication about the case.
- In the Support provider email text box, enter the email address of your support provider. To send PSInfo to WatchGuard Support, leave the text box blank.
- In the Summary of the issue text box, type a summary of the problem.
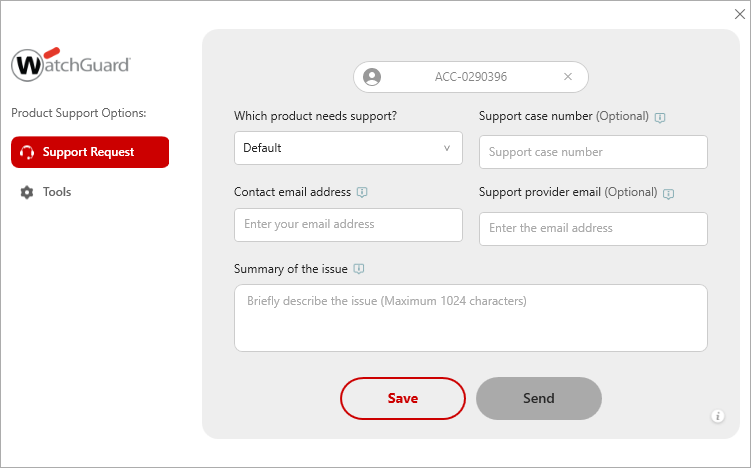
- Select whether to send the support-related information to a support provider or WatchGuard Support, or to save it locally.
- (Preferred) To send support-related information to Support, click Send.

This option creates support-related information and automatically sends it to the email address of the recipient.
PSInfo collects support-related information in the background. PSInfo collects support-related information in the background. This operation can take several minutes, depending on the amount of information to collect. The average time required is 15 to 20 minutes, but it could take longer.
A Collecting Data icon appears in the system tray of the computer while the collection is taking place. You will receive an email notification at the specified address when the support-related information has been processed and attached to the case. If it is not possible to send the email, a copy of the PSInfo results are stored locally.
- To save the support-related information locally, click Save.
If the upload is not possible, this option generates and saves the support-related information locally as a .7Z file.
- In the Save Collected Data text box, enter or browse to a save location.
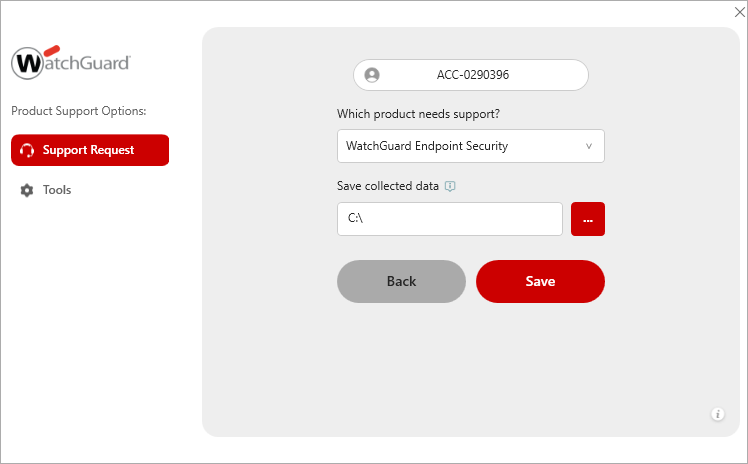
- Click Save.
PSInfo collects support-related information in the background. This operation can take several minutes, depending on the amount of information to collect. The average time is 10 to 15 minutes, but the duration could be longer.
A Collecting Data icon appears in the system tray of the computer while the collection is taking place. When the collection is complete, a finished message shows in the system tray. The support-related information is saved locally. Collected data is not automatically sent to a Service Provider or WatchGuard Support.
- In the Save Collected Data text box, enter or browse to a save location.
To collect information in the PSInfo legacy application:
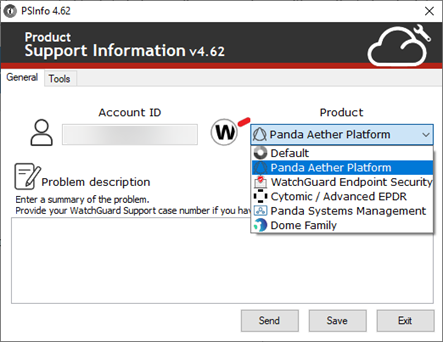
- Select the General tab.
- In the Account ID text box, if it is not already populated, enter your account ID number.
If you do not have an endpoint security product installed, the ID is not pre-populated and you must manually enter your account number. - From the Product drop-down list, select the product that you want to create a report for. If you are not sure, select Default.
- (Legacy Software only) In the Problem Description text box, type a summary of the problem. If you have a WatchGuard case number, add it in the text box. A case number can help Support provide you with assistance.
- Select whether to send the support-related information to a support provider or WatchGuard Support, or to save it locally.
- (Preferred) To send support-related information to Support, click Send.
This option creates support-related information and automatically sends it to the email address of the recipient.
- In the Contact Email Address text box, enter a contact email address for communication about the case.
- In the Recipient Email Address text box, enter the email address of your support provider. To send PSInfo to WatchGuard Support, leave the text box blank.
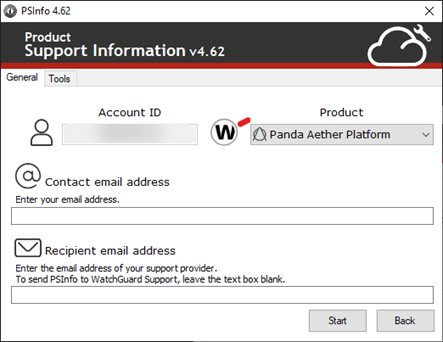
- Click Start.
PSInfo collects support-related information in the background. PSInfo collects support-related information in the background. This operation can take several minutes, depending on the amount of information to collect. The average time required is 15 to 20 minutes, but it could take longer.
A Collecting Data icon appears in the system tray of the computer while the collection is taking place. You will receive an email notification at the specified address when the support-related information has been processed and attached to the case. If it is not possible to send the email, a copy of the PSInfo results are stored locally.
- To save the support-related information locally, click Save.
If the upload is not possible, this option generates and saves the support-related information locally as a .7Z file.
- In the Save Collected Data text box, enter or browse to a save location.

- Click Start.
PSInfo collects support-related information in the background. This operation can take several minutes, depending on the amount of information to collect. The average time is 10 to 15 minutes, but the duration could be longer.
A Collecting Data icon appears in the system tray of the computer while the collection is taking place. When the collection is complete, a finished message shows in the system tray. The support-related information is saved locally. Collected data is not automatically sent to a Service Provider or WatchGuard Support.
- In the Save Collected Data text box, enter or browse to a save location.
You can use WatchGuard Endpoint Product Support Info Viewer (PSInfoViewer) to review the contents of the .7Z file locally. For more information, go to About PSInfoViewer.
PSInfo Tool Release Notes (external link)