Configure Device Settings
Applies To: Wi-Fi Cloud-managed Access Points (AP125, AP225W, AP325, AP327X, AP420)
Device settings apply to all radios of an AP. Tri-radio APs (AP225W, AP325, and AP420) use two radios for 2.4 and 5 GHz Wi-Fi communications, and the third radio is a dedicated WIPS sensor.
Dual-radio APs can operate as a Wi-Fi access point on the 2.4 GHz and 5 GHz radios, or as dedicated WIPS sensor where both radios are dedicated to WIPS scanning.
If you configure a tri-radio AP as a dedicated WIPS sensor, the 2.4 GHz and 5 GHz radios will be dedicated to WIPS scanning, while the third radio is disabled.
Device settings applied to APs in a location are automatically inherited by location subfolders. You can customize the device settings of a subfolder location so that they are different from the inherited settings, or you can use AP Groups to apply device settings to APs in separate location folders.
Device Settings
To configure device settings in Discover:
- Open Discover.
- Open the Navigator, and select a location where to apply device settings.
- Select Configure > Device > Access Points.
General
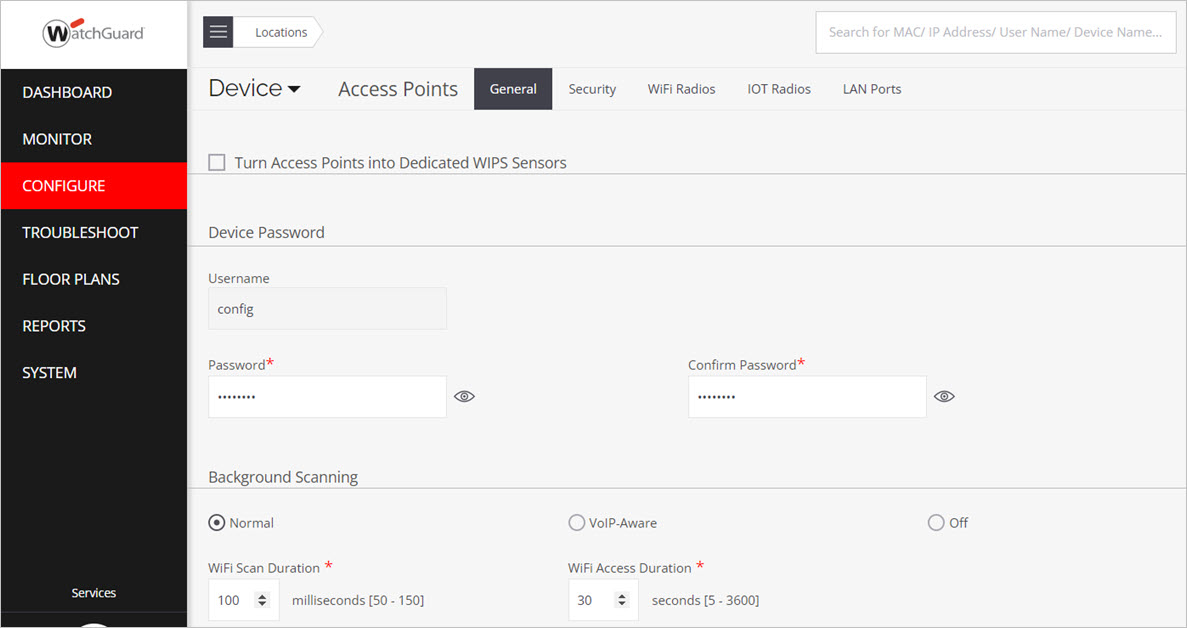
Select this check box to configure Wi-Fi access points in the selected folder as dedicated WIPS sensors. These APs no longer broadcast Wi-Fi and the 2.4 GHz and 5 GHz radios are dedicated to WIPS security scanning.
If you configure a tri-radio AP (AP225W, AP325, and AP420) into a dedicated WIPS sensor, the 2.4 GHz and 5 GHz radios are dedicated to WIPS security scanning, while the third scanning radio is disabled.
You can manage the password for your APs. You can manage the password for a group of APs instead of for each AP separately. The password must be at least six characters long and cannot contain spaces or your login ID.
Select the scanning mode for APs. For more information, see AP Scan Modes.
Normal
Background scanning enables a radio to provide Wi-Fi access service and scans off-service channels intermittently. If you want to enable WIPS security features with background scanning, you must also enable the WiFi Security Features option in the Background Scan settings. You can configure the scan times. By default, the scan duration is 100 ms and the access duration is 10 ms. For tri-radio devices, background scanning is disabled by default because one of the radios is always in WIPS mode.
Wi-Fi Scan Duration is the duration, in milliseconds, for which the AP scans a background channel when background scanning is enabled. The scan duration alternates with the AP interval. Connected clients remain connected to the AP for the scan duration.
Wi-Fi Access Duration is the duration, in seconds, after which the AP scans a background channel when background scanning is enabled. Background scanning does not occur during this duration, and the AP interval alternates with the scan duration.
VoIP-Aware
Only supported on 802.11ac Wave 2 APs. VoIP-aware scanning optimizes high priority traffic during background scanning to prevent disruption to voice and video traffic. Make sure that SSIDs added to this radio have the Application Visibility option enabled for traffic detection.
The AP performs a quick scan of channels for a duration of 30 ms instead of a full scan. If a voice or video application is in progress, after every 10 seconds on the service channel to serve Wi-Fi clients, the radio switches to a single off-service channel for 30 ms.
If you enable this option on Wave 1 APs (AP120, AP320, AP322), background scanning is disabled because VoIP-aware Scanning is not supported.
Off
AP radios do not perform scanning.
To enable WIPS security features with background scanning, you must enable the Wi-Fi Security Features option.
Configure the interval to update client RSSI data. You can specify an interval from 5 to 60 seconds.
Type the IP address or the host name of the primary or secondary Network Time Protocol (NTP) server with which an AP can synchronize the time. The default primary NTP server is the NIST (National Institute of Standards and Technology) NTP server, time.nist.gov.
You can send device logs to a syslog server. Type the IP address or hostname of the syslog server.
These log messages are sent to a syslog server:
- Login success and failure
- VLAN configuration
- Server discovery
- Client association and disassociation
SSH access for an AP can only be used in conjunction with WatchGuard Technical Support for troubleshooting purposes.
- To show a display banner when a user logs in to an AP through SSH, select Show SSH Banner.
- You can configure the SSH Idle Timeout (in minutes) after which an SSH connection automatically logs out.
When you enable support for IPv4/IPv6 dual stack, an AP can operate on both IPv4 and IPv6 addresses simultaneously. When you disable support for IPv4/IPv6 dual stack networks, the AP to which you apply the device settings can operate on IPv4 networks only.
You can restrict SSH access to APs from specific IP addresses. You must provide at least one IP address and wildcard mask. You can provide a maximum of 20 entries. SSH access to the communication IP of the AP is enabled only from the IP addresses that match the IP address and wildcard mask you configure.
SSH access for an AP can only be used in conjunction with WatchGuard Technical Support for troubleshooting purposes.
AeroScout tags are small, battery-powered devices mounted on equipment or carried by personnel. The AeroScout Engine Server (AES) determines the location of these tags based on the signal strength information that it receives from Wi-Fi Cloud APs.
To integrate AeroScout with Wi-Fi Cloud, make sure the APs at the required locations broadcast at least one SSID on the 2.4 GHz band. AeroScout tags use this band to communicate with the APs. APs at this location must only use channels 1, 6, and 11 on the 2.4 GHz band.
Select the AeroScout check box, then set the port number (default is 1144) to use for AP and AeroScout communications. Make sure that this port is open for bidirectional UDP communication between the AES and your APs.
You can send visibility analytics data directly from the AP to a third-party analytics server. You can then use this raw data for custom applications and reports for your wireless network.
Visibility analytics sent to the third-party server contain this data:
- The sending AP's MAC Address
- The sending AP's timestamp
- The MAC address of the detected client
- The RSSI of the detected client
- A time value indicating when the client was detected
The Send Interval option in the Third Party Analytics Integration configuration defines how often RSSI data is sent to your server. For example, if you want to capture RSSI values for live client location tracking, you can set the interval to as low as every 10 seconds.
The visibility analytics data can be sent as a CSV file or a JSON file. To authenticate to the external server to send the file, you can provide either an authorization key or a username and password combination.
The Disable LEDs option enables you to hide any visible LED activity on 802.11ac Wave 2 APs for security reasons. (Not supported on AP120, AP320, and AP322). The device settings are applied to all APs in the selected location and subfolder locations that inherit the device settings. This option cannot be configured for individual APs.
You can flash the LEDs for identification purposes from Monitor > WiFi > Access Points when you select an AP action.
Select Disable Reduced Capability LED Indication to disable the LED status of the AP that indicate if the device is running on reduced power capability (using PoE 802.af instead of PoE+ 802.3at).
Security
VLAN monitoring is essential for the wired-side connection status, host name detection, smart device detection, and rogue AP detection.
SSID VLAN Monitoring
SSID VLAN Monitoring is enabled by default. An AP monitors the VLAN it uses to communicate with Wi-Fi Cloud and any SSID VLANs. Additionally, user-defined VLANs can be monitored with the Monitor Additional VLANs option. An AP can monitor up to 16 VLANs. You can disable SSID VLAN Monitoring if you do not want the AP to monitor VLANs corresponding to the SSIDs defined on the AP. This optimizes the use of IP addresses by not creating an automatic bridge interface for every VLAN on an SSID to reduce traffic on wireless networks (for example, the guest network).
Auto VLAN Monitoring
You can enable Auto VLAN Monitoring to automatically monitor the VLANs added by an SSID or your own user-configured VLANs when activity is detected. Auto VLAN Monitoring is useful in deployments where VLANs change or where you do not want to add VLANs explicitly.
- For an AP to automatically monitor a VLAN, the VLAN must have DHCP enabled. If the VLAN uses a static IP address, the AP will not be able to monitor the VLAN.
- You cannot manually delete automatically monitored VLANs from the monitor list.
- Different VLANs might being monitored after an AP restarts.
- Automatically monitored VLANs can have IPv6 addresses but monitoring uses only IPv4 addresses.
Monitor Additional VLANs
To manually specify the additional VLANs to monitor as a comma-separated list, select the Monitor Additional VLANs check box. The VLAN used by the device to communicate with the server is always monitored and does not have to be specified. The VLANs to be monitored must be configured on the switch port where the device is connected and must be DHCP enabled. The VLAN ID 0 indicates an untagged VLAN on the switch port where the device is connected, irrespective of the actual VLAN number on the switch.
Offline mode
The Offline Mode feature provides basic security coverage when there is no connectivity between an AP acting as a WIPS sensor and Wi-Fi Cloud. The AP can provide some device classification and prevention capabilities when it is disconnected from Cloud services. The AP also generates and stores events, and sends the events to Wi-Fi Cloud when the AP reconnects. Specify the amount of time (1-60 minutes, default 15) after the AP detects a loss of connectivity before the AP switches to offline mode.
Device Classification Policy
You can select a WIPS device classification policy for APs when they are in Offline mode.
Access Point Classification
- Classify Networked APs as Rogue or Authorized — APs that are detected as being connected on the wired network are classified as Rogue or Authorized.
- Classify Non-networked APs as External — APs that are not connected on the wired network are classified as External.
Client Classification
- Associated with a Authorized AP as Authorized — Clients that associate with an Authorized AP are classified as an Authorized client.
- Associated with a Rogue AP as Unauthorized — Clients that associate with a Rogue AP are classified as an Unauthorized client.
- Associated with an External AP as Unauthorized — Clients that associate with an External AP are classified as an Unauthorized client.
Intrusion Prevention Policy
You can select a WIPS intrusion prevention policy for APs when they are in Offline mode. For more information on these settings, see Automatic Intrusion Prevention.
You can enable Intrusion Prevention against these threats:
- Rogue APs
- Uncategorized APs that are connected to the network
- APs categorized as Authorized but using no security mechanism (Open)
- APs categorized as Authorized but using weak security mechanism (WEP)
- Authorized client connections to APs categorized as External
- Unauthorized client connections to APs categorized as Authorized
- Uncategorized client connections to APs categorized as Authorized
- Authorized clients participating in any ad-hoc network
- Honey Pot/Evil Twin APs
Select the channels for the AP to monitor and defend from the list of available channels. These channels change based on your country of operation. WatchGuard recommends that you use the default settings unless you want to monitor and defend on specific channels based on a manual channel plan for your deployment.
WiFi Radios
IoT Radios
Bluetooth Low Energy (BLE) is only supported by the AP225W, AP325, and AP327X, and is used for proximity-based services on compatible mobile devices.
- UUID — Identifies the beacon for the selected location. The default value of the UUID is a predefined random string at the Root location. You can keep this value or generate a new value.
- Major — A number that identifies a subset of beacons within a large group.
- Minor — A number that identifies a specific beacon for the device.
- Advertising Interval — The periodic interval at which beacons are transmitted. The UUID and Major values are defined at a location in your location hierarchy. For subfolder locations, you can copy the values of these parameters from the parent locations.
You can configure Bluetooth scanning to detect nearby Bluetooth devices. Bluetooth scanning is only supported on the AP225W, AP325, and AP327X.
You can view and classify detected Bluetooth devices on the Monitor > WIPS > Clients page. To view Bluetooth clients, click the drop-down list and select Bluetooth Clients. For more information, see Monitor Client WIPS Status.
LAN Port
(AP225W only) You can enable a VLAN extension on an available LAN interface on your AP225W. When you enable a VLAN Extension, it takes precedence over the Wired Extension configuration in the SSID Network settings.
Select the VLAN Extension check box to enable VLAN Extension. Select the LAN interface, then specify the VLAN ID for the LAN interface.
You can select a VLAN ID from 0 to 4094. 0 indicates an untagged VLAN. You can map a LAN port to only one VLAN ID. The same VLAN ID can be mapped to more than one LAN port.
If you enable the VLAN Extension option, wired clients will not be able to pass traffic over a Remote Access Point VPN tunnel because the wired client's traffic is forwarded by the local endpoint instead of the remote endpoint. To enable this function, use the Wired Extension option in the NAT configuration of the SSID settings instead.
Link aggregation enables both Ethernet ports of the AP to logically merge into a single link. You must connect the AP to a compatible switch with link aggregation enabled. Both links should use CAT6 Ethernet cabling.
The Link Aggregation option is only supported on 802.11ac Wave 2 APs, except the AP225W.
To define the transmit hash policy, you can select from these options:
- Layer 2 (MAC)
- Layer 3+4 (IP+Port)
- Layer 2+3 (MAC+IP)
If you enable link aggregation for the device, the Enable Wired Extension option in the SSID profile is ignored and the wired extension is not enabled.