Automatic Intrusion Prevention
Applies To: Wi-Fi Cloud-managed Access Points (AP125, AP225W, AP325, AP327X, AP420)
You can perform active prevention against these types of threats:
- Rogue AP — Unauthorized APs connected to your network. An attacker can gain access to your network through Rogue APs. You can also automatically quarantine uncategorized APs, indeterminate APs, and APs manually banned by the administrator.
- Misconfigured AP — APs authorized by the administrator that do not conform to the Authorized WiFi Policy. An attacker can gain access to your network through misconfigured APs. This could happen if the APs are reset, tampered with, or if there is a change in the security policy.
- Client Misassociation — Authorized clients that connect to rogue or external (neighboring) APs. Corporate data on the authorized client is vulnerable with these connections. We recommend you provide automatic intrusion prevention against authorized clients that connect to Rogue or External APs.
- Over the Air Threats — Detect and prevent MAC spoofing by unauthorized APs, Honeypots, Evil Twin APs, and Denial of Service (DoS) attacks.
Intrusion Prevention works with both dedicated WIPS sensor devices and APs with background scanning. Background scanning devices are less effective with a higher number of concurrent channels for prevention activity. For more information, see AP Scan Modes To configure your AP scan mode, see Configure Device Settings.
Before You Activate Intrusion Prevention
Before you activate Intrusion Prevention, make sure your deployment is correctly configured and stable.
- Make sure your known approved devices are classified as Authorized before you activate intrusion prevention.
- Enable Intrusion Prevention only after your wireless deployment is stable and fully configured.
- If you modify your wireless deployment, disable Intrusion Prevention temporarily to avoid mis-classification and network disruption during the transition phase to your new deployment configuration.
Configure Automatic Intrusion Prevention
To configure AP auto-classification, in Discover, select Configure > WIPS > Automatic Intrusion Prevention.
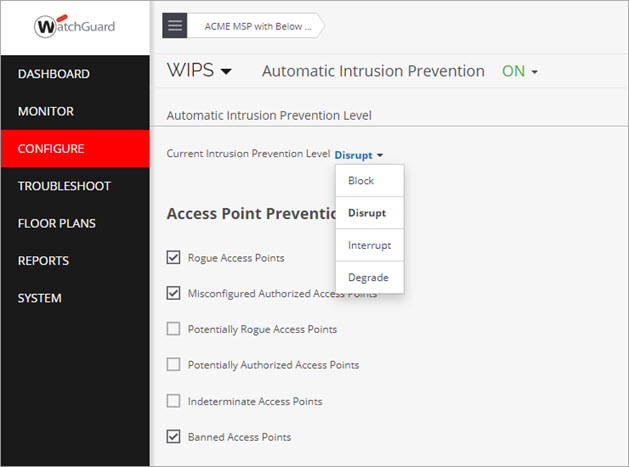
Intrusion Prevention Levels
WIPS can prevent unwanted communication in your wireless network. It provides you with different levels of active prevention mechanisms. The Intrusion Prevention Level enables you to specify the desired level of prevention and number of multiple simultaneous preventions across radio channels. The greater the number of channels across which simultaneous prevention is required, the effectiveness of prevention in inhibiting unwanted communication is diminished.
You can select from these intrusion prevention levels:
- Block (1) — A single AP in WIPS Sensor mode can block unwanted communication on any one channel in the 2.4 GHz band and any one channel in the 5 GHz band.
- Disrupt (2, default)) — A single AP in WIPS Sensor mode can disrupt unwanted communication on any two channels in the 2.4 GHz band and any two channels in the 5 GHz band.
- Interrupt (3) — A single AP in WIPS Sensor mode can interrupt unwanted communication on any three channels in the 2.4 GHz band and any three channels in the 5 GHz band.
- Degrade (4) — A single AP in WIPS Sensor mode can degrade the performance of unwanted communication on any four channels in the 2.4 GHz band and any four channels in the 5 GHz band.
Block is the most powerful prevention level. It can severely block almost all popular Internet applications. However, at this level, a single sensor can simultaneously prevent unwanted communication on only one channel in the 2.4 GHz band and one channel in the 5 GHz band. If you want the sensor to prevent unwanted communication on multiple channels simultaneously, you must select other prevention levels.
We recommend you use the default level of Disrupt to balance channel coverage and effectiveness of the disruption.
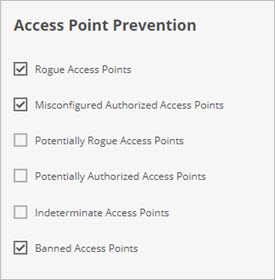
Access Point Prevention
In this section, you can prevent connections to specific classifications of APs, including rogue APs, misconfigured authorized APs, and uncategorized APs that are potentially rogue or authorized.
Client Prevention
In this section, there are several options for client prevention based on the type of client and connection.
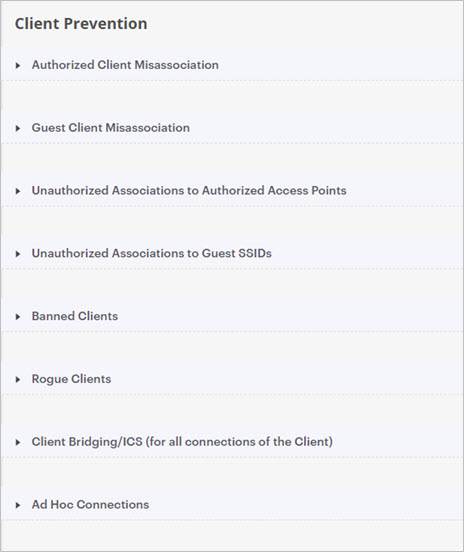
- Authorized Client Misassociation — Prevent authorized clients from connecting to guest, external, and uncategorized APs.
- Guest Client Misassociation — Guest clients can mistakenly associate to external or uncategorized APs. Unauthorized clients may also try to connect to your authorized and guest APs. You can prevent a client from connecting to an external/potentially external AP or indeterminate AP.
- Unauthorized Associations to Authorized Access Points — Prevent an unauthorized client connection to an authorized AP.
- Unauthorized Associations to Guest SSIDs — Prevent rogue, external, and uncategorized clients from connecting to you Guest SSIDs.
- Banned Clients — A Banned Client is a client MAC address that you added to the Banned Client list. You can prevent connections to Authorized, Guest, and indeterminate APs from banned clients. For more information, see Banned Access Points and Clients.
- Rogue Clients — Rogue Clients are clients that have been classified as unauthorized by Wi-Fi Cloud. You can prevent connections to any AP from rogue clients.
- Client Bridging/ICS (for all connections of the Client) — A bridging client is a client with packet forwarding enabled between its wired and wireless interfaces. An authorized client bridging to the enterprise LAN or an unauthorized or uncategorized bridging client connected to the enterprise LAN are serious security threats. You can prevent connections from several client types that performing bridging.
- Ad Hoc Connections — An ad hoc connection is a peer-to-peer connection between clients that can introduce security threats. You can prevent authorized, guest, and rogue clients from participating in ad hoc connections.
Prevent the Following Threats
In this section, you can enable the detection of several types of over-the-air threats, such as denial of service attacks and Honeypot/Evil Twin APs.
You must have an AP configured as a dedicated WIPS Sensor to effectively prevent these over-the-air threats,
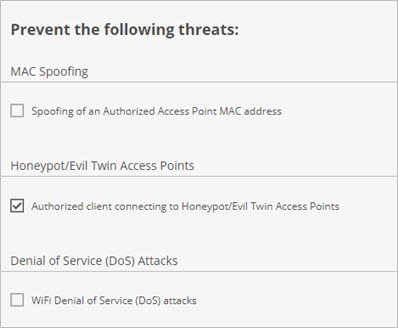
- MAC Spoofing — Prevents connections to unauthorized APs that spoof their MAC address to pretend to be an authorized AP.
- An AP with one radio for Wi-Fi access and one radio for WIPS scanning cannot detect AP MAC address spoofing of the SSIDs broadcast by the AP. A second AP with WIPS scanning is required to detect AP MAC address spoofing on this AP.
- A single dual radio AP in dedicated WIPS sensor mode can detect AP MAC address spoofing of another AP's MAC address.
- Honeypot/Evil Twin APs — Prevents authorized clients from connecting to Honeypot or Evil Twin APs. These are rogue APs from nearby networks that broadcast the same SSID as an Authorized AP to appear as a legitimate AP on your network.
- Denial of Service (DoS) Attacks — Detects denial of service attacks on the wireless network while preventing false positives. This includes all types of DoS attacks, including association/dissociation and authentication broadcast flood attacks, and RTS/CTS flood attacks. When a DoS attack occurs, Wi-Fi Cloud attempts to restore legitimate communication between authorized APs and clients to reduce the impact of the attack. You can also locate clients that use spoofed or random MAC addresses to perform DoS attacks.
Activate Automatic Intrusion Prevention
Intrusion Prevention is disabled by default. You must activate the feature for a location before the Intrusion Prevention settings take effect.
To activate Intrusion Prevention:
- Open Discover.
- From the Navigator, select the location where you want to enable Intrusion Prevention. Make sure this location folder contains the APs that you want to protect with WIPS. Intrusion Prevention activation settings are location-specific and cannot be inherited from a parent location. You can apply Intrusion Prevention activation recursively to subfolders of the current location when you save the settings.
- Select Configure > WIPS > Automatic Intrusion Prevention.
- Click the Automatic Intrusion Prevention drop-down list.

- (Optional) To apply this action to all subfolders of your current location folder, select the Apply recursively to subfolders check box.
- Click Activate.
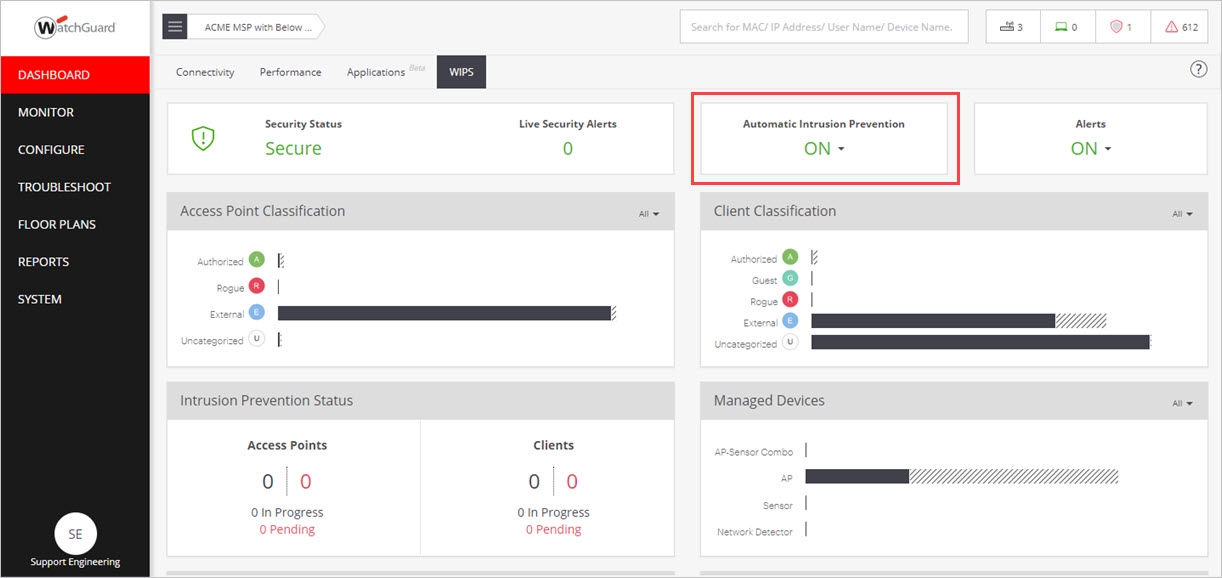
You can also enable Automatic Intrusion Prevention directly from the Dashboard page, WIPS tab.