Remote Access Point
Applies To: Wi-Fi Cloud-managed Access Points (AP120, AP125, AP225W, AP320, AP322, AP325, AP327X, AP420)
Remote Access Point functionality is only supported on the AP225W, AP327X, and AP420. The APs must run firmware v9.0.1-14.3 and higher to configure the device as a remote AP.
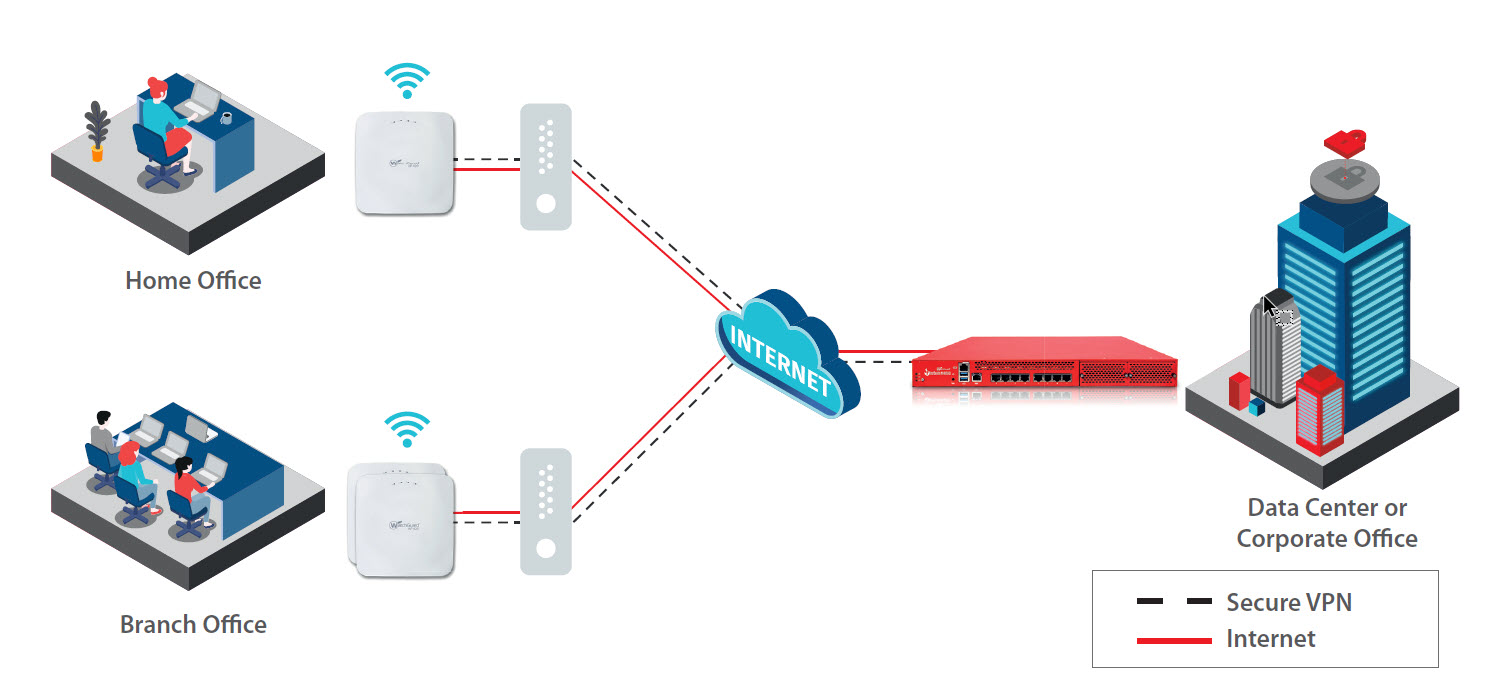
Remote APs enable you to set up a WatchGuard AP with the configuration and security settings of your corporate network and then send the APs to remote employees. When the remote employee installs the AP at their location, they can connect to the corporate SSID.
All communications between the AP and the remote endpoint occur over a secure IPSec VPN tunnel.
You can delete the VPN tunnel for each remote AP when required, such as when a remote employee is no longer employed with your organization. This prevents connections to the corporate network from the remote AP.
Remote APs offer these benefits:
- High-performance, enterprise-grade Wi-Fi AP for employees who work remotely from home or small branch offices
- Secure access to corporate network resources for remote users
- Extend your network SSIDs to remote locations with the same access controls and policies used by corporate APs
- Use existing corporate authentication methods, such as RADIUS / 802.1X, pre-shared key, and captive portal, across all corporate and remote APs
- Use the monitoring and troubleshooting tools available in Discover to manage and monitor APs deployed both in the corporate network and in remote locations
- Integrate easily with industry-standard firewalls such as the WatchGuard Firebox
For more information on how to configure the WatchGuard Firebox Mobile VPN with IKEv2 for the remote Access Point solution, see Configure a Firebox VPN for a Remote Access Point.
How the Remote AP VPN Solution Works
When a Wi-Fi client connects to a remote AP through the SSID configured for the corporate network, the AP establishes an IPSec VPN tunnel to the corporate network. The tunnel securely carries the network traffic between Wi-Fi clients and the corporate network.
You can configure multiple SSIDs to use a single tunnel, or you can define a separate tunnel for each SSID.
To preserve VPN throughput on the remote AP, you can also configure the network to only tunnel corporate network traffic, while Internet-bound traffic is directly forwarded to the ISP network from the remote AP.
Configure a Remote AP
To configure a remote AP in Wi-Fi Cloud, you must:
- Create an IPSec VPN Tunnel Profile
- Add the IPSec VPN Tunnel to an SSID Profile
- Deploy an SSID to the Remote AP
Create an IPSec VPN Tunnel Profile
To create an IPSec VPN tunnel profile for a remote AP in Wi-Fi Cloud:
- Open Discover.
- Select Configure > WiFi, then select the Tunnel Interface tab.
- Click Add Tunnel Interface Profile.
- From the Tunnel Type drop-down list, select VPN with IPSec.
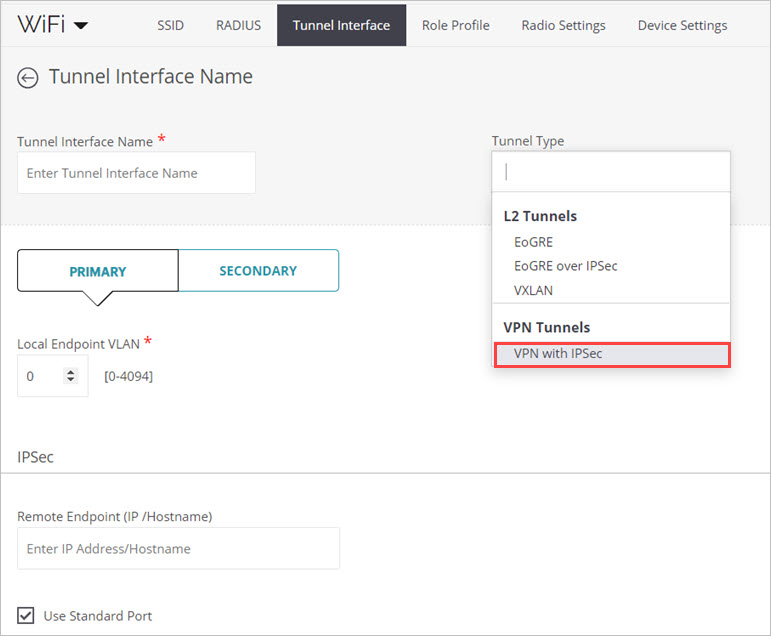
- Specify the primary and secondary Remote Endpoint IP address or host name for your enterprise network servers.
- Select the Use Standard Port check box to use these IKE UDP ports:
- Port 500 if no NAT detected
- Port 4500 if NAT is detected between two endpoints
If you use a custom port for IKE connections, clear the Use Standard Port check box and specify the custom port number in the Port field.
- Specify the details for the IPSec Phase 1 and Phase 2 parameters.
Phase 1 Parameters
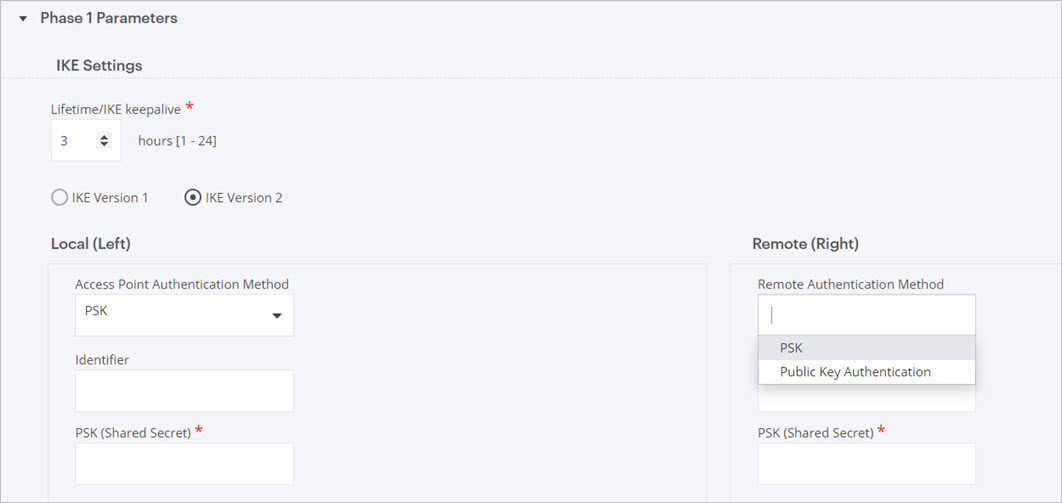
IKE Settings
- Lifetime/IKE keepalive — Internet Key Exchange (IKE) keepalive is the time (in hours) that generated keys are active for. After the specified amount of time, new keys are generated and shared between the endpoints. The default is 3 hours.
- IKE Version 1 / IKE Version 2 — Select IKE Version 1 or IKE Version 2 (default).
- Aggressive Negotiation Mode (IKE Version 1 only) — If you select IKE Version 1, this option enables a quick negotiation of IKE keys between the endpoints. If enabled, the endpoints exchange only three packets to set up a security association. If disabled (normal mode), six packets are exchanged before a tunnel is created.
Local (Left)
- AP Authentication Method — Select the method used to authenticate to an AP:
- PSK — Use a pre-shared key to share a single personal key between the endpoints.
- EAP — Extensible Authentication Protocol uses an authentication server (RADIUS) to verify the identity of the APs.
- Identifier — Type a unique identifier for the AP endpoint. Clear this text box to use the local VLAN endpoint IP address as the identifier.
- PSK (Shared Secret) — Type a pre-shared key. This must match the PSK configured on the remote endpoint.
- EAP Username — If you use EAP authentication, type the username for the account you use for authentication.
- EAP Password — If you use EAP authentication, type the password for the account you use for authentication.
- EAP Method — Select a method to use for EAP authentication:
- MD5 (eap-md5)
- PEAP (eap-peap)
- MSCHAPv2
- AAA Identity — If you use EAP authentication, type the IP address of your RADIUS server. The AAA (authentication, authorization, and accounting) server controls access to APs, and enforces policies and device usage for effective network security.
Remote (Right)
- Remote Authentication Method — Select the method used to authenticate to the remote endpoint:
- PSK — Use a pre-shared key to share a single personal key between the endpoints.
- Public Key Authentication — Exchange a public key between endpoints to authenticate the identity of each endpoint. The endpoints exchange public keys in messages that contain a digital certificate. To apply a digital signature on the generated keys, click Upload certificate.
- Identifier — Type a unique identifier for the remote endpoint.
- PSK (Shared Secret) — Type a pre-shared key. This must match the PSK configured on the remote endpoint.
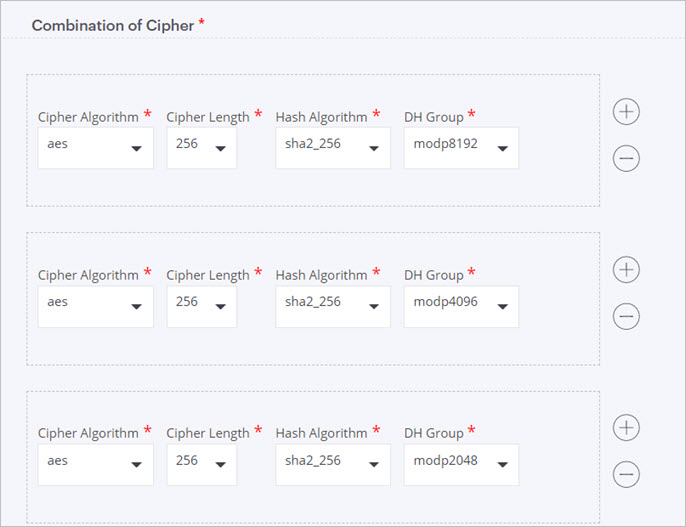
Phase 1 — Combination of Cipher
Select the Cipher Algorithm, Cipher Length, Hash Algorithm, and DH Group (Diffie-Hellman) that defines how to encrypt the data packets sent through the VPN tunnel.
Phase 2 Parameters
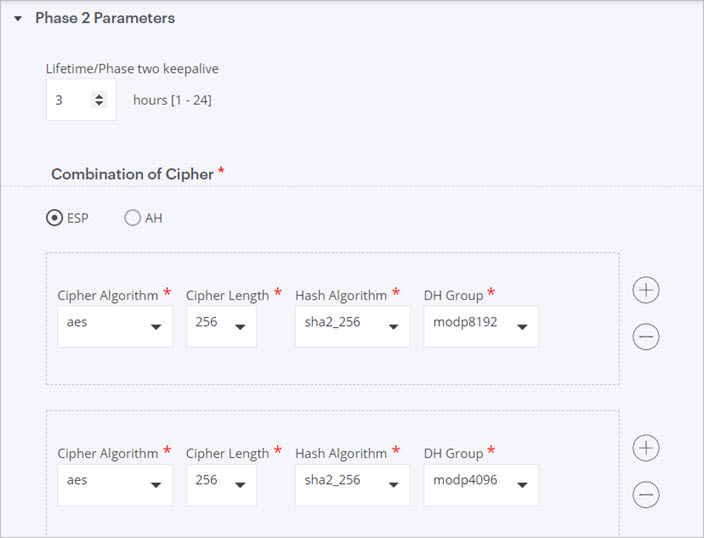
- Lifetime/Phase two keepalive — Phase 2 keepalive is the time (in hours) that generated keys are active for. After the specified period of time, new keys are generated and shared between the endpoints. The default is 3 hours.
Combination of Cipher
- Select the ESP or AH IPSec security protocol:
- ESP — (Encapsulating Security Payload) encrypts the entire packet and provides the ability to authenticate senders and keep data private.
- AH — (Authentication Header) only provides message authentication to verify that the message is intact and unaltered during transmission. The message itself is not encrypted. Packets are authenticated with a checksum created by a hash-based message authentication code (HMAC) and a key.
If you select the ESP protocol, select the Cipher Algorithm, Cipher Length, Hash Algorithm, and DH Group (Diffie-Hellman) that defines how to encrypt the data packets sent through the VPN tunnel.
If you select the AH protocol, you can only select the Hash Algorithm and DH Group.
- Click Save.
Add the IPSec VPN Tunnel to an SSID Profile
To add the IPSec VPN tunnel to an SSID profile:
- Open Discover.
- Select Configure > WiFi, then select the SSID tab.
- Select an SSID.
- In the SSID settings, select the Network tab.
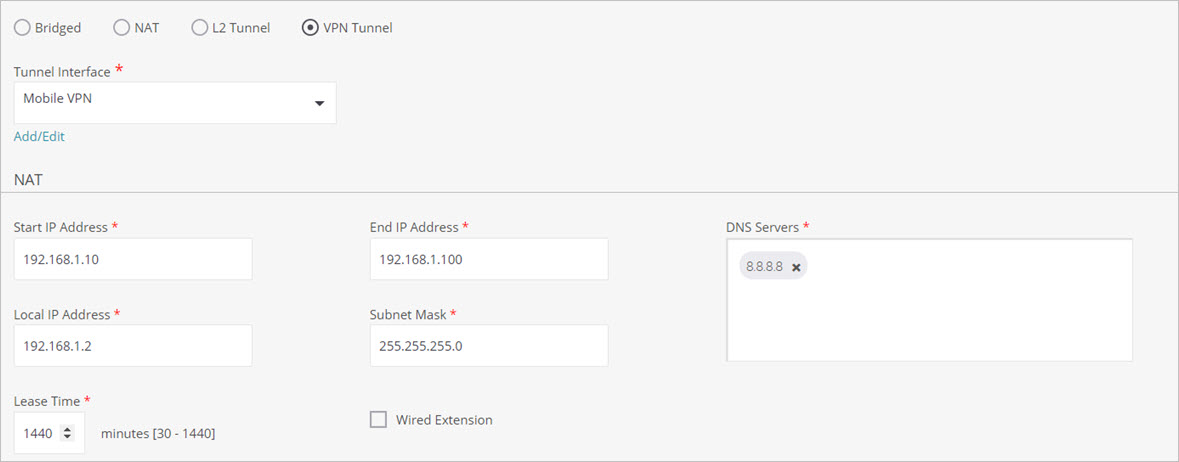
- Select VPN Tunnel, then from the Tunnel Interface drop-down list, select the VPN tunnel that you configured.

- Specify the NAT settings for the SSID. Wi-Fi clients receive an IP address from this address pool when they associate to the AP.
- To split the traffic between the corporate network and the public Internet, select the Split Tunnel for Client Traffic check box.
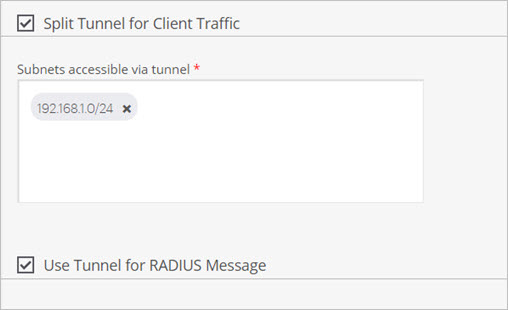
Only corporate-bound traffic is sent through the tunnel, while Internet traffic bypasses the tunnel. You can specify the subnets that are accessible through the tunnel. For example: 192.168.1.0/24.
- To enable RADIUS messages between the remote AP and a RADIUS authentication server located on the corporate network behind the remote tunnel endpoint, select the Use Tunnel for RADIUS Message check box.
802.1X authentication must be enabled on the SSID to enable RADIUS messages over the tunnel.
The Remote AP VPN tunnel does not support IPv6 communications. The RADIUS server must have an IPv4 address to tunnel RADIUS messages between the AP and the RADIUS server.
Deploy an SSID to the Remote AP
To deploy an SSID to a remote AP, make sure the SSID with the VPN tunnel you configured is applied to the correct location for the remote AP, such as a remote worker home office AP or a branch office AP.
Configure Custom IPSec Credentials for Each Remote AP
You can optionally configure custom IPSec credentials for an AP. This enables you to disable any tunnel between a remote AP and your corporate network.
For example, if a remote employee is no longer employed by your organization, you can change the credentials to block the remote AP and prevent the creation of a tunnel from the AP to your corporate network.
Custom IPSec credentials for each AP take precedence over the IPSec credentials defined in the tunnel profile.
To configure the IPSec credentials for each AP:
- Open Discover.
- Select Monitor > WiFi, then select the Access Points tab.
- Right-click the AP, then select Customize > IPSec Credentials.
- Select the Customize check box, then specify either PSK or XAUTH/EAP credentials.
- Click Save.

You can also customize IPSec credentials for an AP from these pages in Discover:
- Monitor > WIPS > Managed WiFi Devices
- Floor Plans
Monitor the IPSec VPN Tunnel
When the IPSec VPN tunnel is active, you can monitor the tunnel and its connection status in Discover.
To view active tunnels:
- Open Discover.
- Select Monitor > WiFi, then select the Tunnels tab.
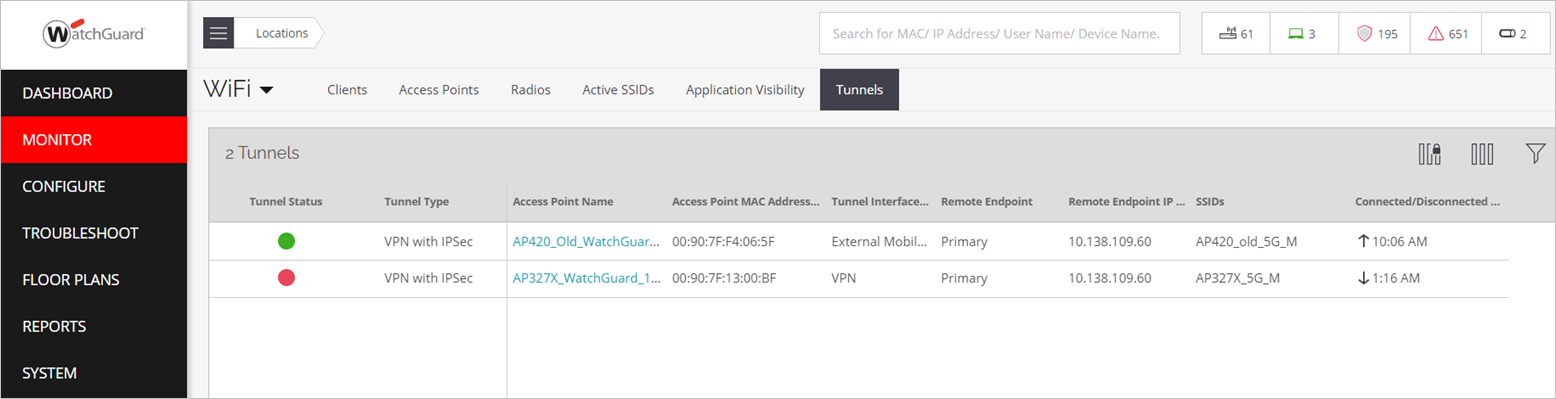
You can view the date since the tunnel was connected or disconnected from the endpoint. You can also view the remote AP details, such as the AP name, MAC address, SSID name, and endpoint information.
For more information, see Monitor Tunnels.