Applies To: Cloud-managed Fireboxes
You can configure your cloud-managed Firebox as an authentication server. To do this, you add users and groups to the Firebox authentication database (Firebox DB). After you configure users and groups, you can select the users or groups in firewall policies.
If you want users on your internal network to connect to the Authentication Portal on the Firebox, you must enable connections to the Authentication Portal. For more information, see Enable the Authentication Portal on the Firebox.
Manage Firebox Users and Groups
To manage user accounts in the Firebox database, in WatchGuard Cloud:
- Select Configure > Devices.
- Select the cloud-managed Firebox.
- Click Device Configuration.
- Click the Firebox Database tile.
The Firebox Database page opens.
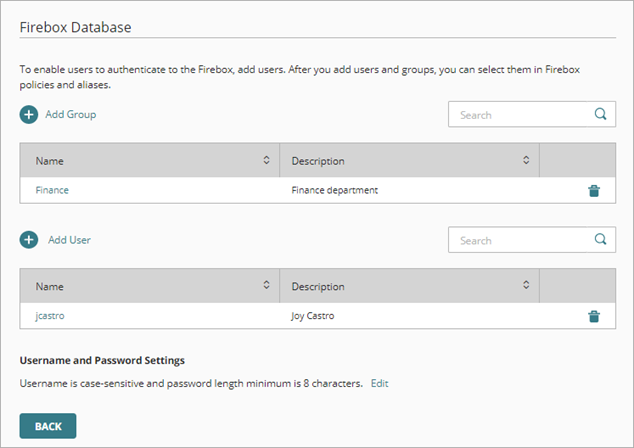
From this page you can configure the username and password settings, and add users and groups.
Configure Username and Password Settings
By default, Firebox user accounts are case-sensitive. Passwords must be between 8 and 32 characters. You can change the case-sensitivity and minimum password length settings.
When you change the minimum password length, it does not affect existing user accounts. If you want to increase the minimum password length for all accounts, change the setting before you add the user accounts.
To change username and password settings:
- From the Firebox Device Configuration page, click the Firebox Database tile.
The Firebox Database page opens. - In the Username and Password Settings section, click Edit.
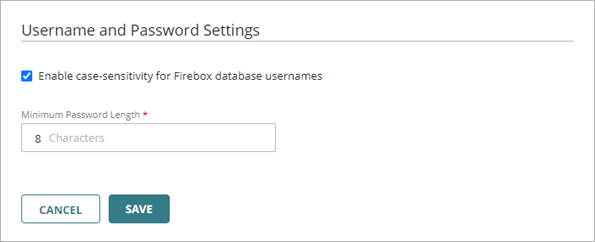
- To disable case-sensitivity for usernames, clear the Enable case-sensitivity for Firebox database usernames check box.
- To change the minimum number of characters for passwords, in the Minimum Password Length text box, type a number between 8 and 32.
- Click Save.
On the Firebox Database page, the Username and Password Settings section shows the updated settings.
Add Users
You can create a Firebox user account and assign the user to one or more groups.
If you enabled Mobile VPN with IKEv2, the IKEv2-Users group appears in the Groups list on the Add User page. You can assign the user to the IKEv2-Users group on this page. Or, after you add a user, you can select the user in the Mobile VPN with IKEv2 configuration, which adds the user to the IKEv2-Users group.
If you enabled Mobile VPN with SSL, the SSLVPN-Users group appears in the Groups list on the Add User page. You can assign the user to the SSLVPN-Users group on this page. Or, after you add a user, you can select the user in the Mobile VPN with SSL configuration, which adds the user to the SSLVPN-Users group.
To apply a firewall policy to a user, you can specify the user name or the name of a group the user is a member of in the firewall policy.
To add a user:
- From the Firebox Device Configuration page, click the Firebox Database tile.
The Firebox Database page opens. - Click Add User.
The Add User page opens.

- In the Name text box, type the user name. Tip!
- In the Description text box, type a description for this user account.
- In the Password text box, type the password for this user account.
- In the Timeout text box, type the maximum length of time the user can remain authenticated while active (sending traffic through the Firebox).
- In the Idle Timeout text box, type or select the length of time the user can remain authenticated when idle (not sending traffic through the Firebox).
- To add the user to one or more groups, in the Groups list, select each group.
- Click Save.
Add Groups
You can add groups to the Firebox and then add users to those groups.
To apply a firewall policy for users in the group, you can specify the group name in the firewall policy.
To add a group:
- From the Firebox Device Configuration page, click the Firebox Database tile.
The Firebox Database page opens. - Click Add Group.
The Add Group page opens.
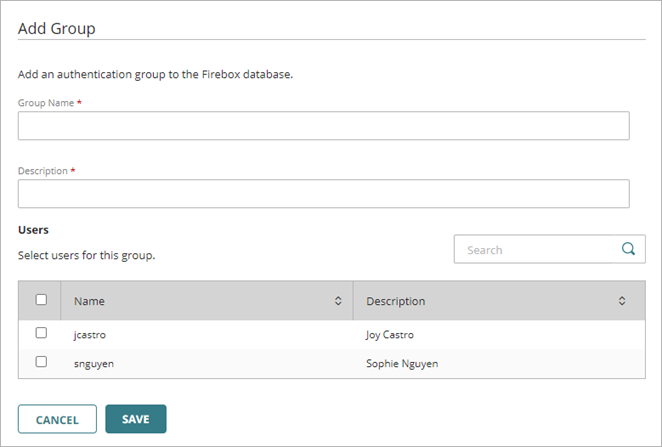
- In the Group Name text box, type a name for the group. Tip!
- In the Description text box, type a description for the group.
- To add users to the group, in the Users list, select each user name.
- Click Save.
After you add a group, you can add the group in your Mobile VPN configurations. For more information, see Authentication Methods for Mobile VPN.
After you add users and groups, you can select Firebox DB users and groups in policies and aliases. For more information, see: