Applies To: Locally-managed Fireboxes
You can define, edit, and remove users and user groups for role-based administration in WatchGuard System Manager (WSM) and WatchGuard Server Center. You can choose how a user or group is authenticated and define the password for a local user.
When you edit a user or group, you can change all the details for the user or group, but you cannot change the user or group name. Instead, you must remove the existing user or group and then add a new user or group with the new name.
- To use an Active Directory server to authenticate a user or group, before you define users or groups, you must set up Active Directory authentication. For more information, go to Configure Active Directory Authentication for the Management Server.
- To use a RADIUS server to authenticate a user or group, before you define users or groups, you must set up RADIUS authentication. For more information, go to Configure RADIUS Authentication for the Management Server.
Use WatchGuard System Manager to Configure Users or Groups
- Connect to Your Management Server with WSM.
- Select File > Manage Users.
The Manage Users dialog box appears.
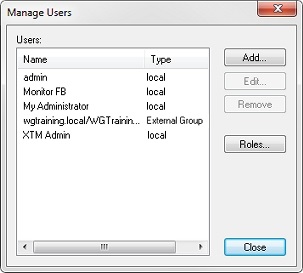
- To add a new user, click Add.
To edit details for an existing user, select a user from the list and click Edit.
The User Properties dialog box appears.
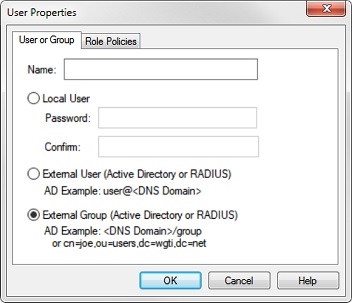
- On the User or Group tab, in the Name text box, type a name for the user or group.
User names are case insensitive. Duplicate names are not allowed. - Select a user type:
- To define a new user to be authenticated locally, select Local User.
In the Password text box, type a new password. In the Confirm Password text box, type the password again. - To define a new user to be authenticated to an Active Directory or RADIUS server, select External User. This is the principal name for the user in Active Directory or the user name on the RADIUS server.
- To define a new group to be authenticated to an Active Directory or RADIUS server, select External Group. This is either the distinguished name or canonical name for the group in Active Directory or the group name in RADIUS.
- If you added a new user or group, select the Role Policy tab to assign a Role Policy to the user or group.
For more information, go to Assign Roles to a User or Group with WSM and WatchGuard Server Center. - Click OK.
Use WatchGuard Server Center to Configure Users or Groups
- In the left navigation bar, select Users.
The Users page appears.

- To add a new user, click Add.
To edit details for an existing user, select a user from the list and click Edit.
The User and Group Properties dialog box appears.
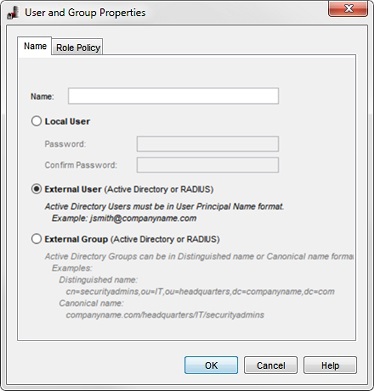
- In the Name text box, type a name for the user or group.
- Select a user or group type:
- To define a new user to be authenticated locally, select Local User.
In the Passwordand Confirm Password text boxes, type a new password. - To define a new user to be authenticated to an Active Directory or RADIUS server, select External User.
- To define a new group to be authenticated to an Active Directory or RADIUS server, select External Group.
- If you added a new user or group, select the Role Policy tab to assign a Role Policy to a user or group.
For more information, go to Assign Roles to a User or Group with WSM and WatchGuard Server Center. - Click OK.
Remove a User or Group
You can not remove predefined users or groups. You can only remove user-defined users and groups.
To remove a user or group:
- In the Users list, select the user or group you want to delete.
- Click Remove.
A message dialog box appears and asks whether you are sure you want to delete the user or group. - Click Yes.
The user or group is removed from the list.
About Role-Based Administration with Management Server
About Predefined Roles with Management Server
Assign Roles to a User or Group with WSM and WatchGuard Server Center
Define Roles and Role Properties with WSM and WatchGuard Server Center