Configure a Replacement (RMA) FireCluster Member
If your Firebox hardware fails during the warranty period, WatchGuard might replace it with an RMA (Return Merchandise Authorization) unit of the same model. When you exchange a Firebox for an RMA replacement, WatchGuard Customer Care transfers the licenses from the original device serial number to the new device serial number. All the features that were licensed to the original device are transferred to the replacement device.
Caution: When you return a Firebox, return only the defective product. You should keep any expansion modules, and keep all of the original manuals, cables, cords, and disks, as we do not ship these with the replacement product.
If you must replace a member of a FireCluster, follow the procedures in this topic to prepare the replacement Firebox and add it to the FireCluster.
These procedures require that you use WatchGuard System Manager. You cannot use Fireware Web UI to configure a cluster or change the FireCluster settings.
Before you join the replacement Firebox to your cluster, compare the version of Fireware OS on the replacement Firebox with the version installed on the current cluster master Firebox. You can use WatchGuard System Manager to find the version of Fireware installed on each Firebox.
To find the OS version and build number installed on the replacement Firebox:
- Start the replacement Firebox. It does not have to be connected to the Internet.
- Use an Ethernet cable to connect your management computer to interface 1.
- In WatchGuard System Manager, connect to the Firebox with the default Firebox settings:
- IP Address — 10.0.1.1
- User Name — status
- Passphrase — readonly
- IP Address — 10.0.1.1
- After you connect to the Firebox, adjacent to the Firebox model number, find the OS version and build number.
To find the OS version and build number installed on the cluster master in WatchGuard System Manager:
- In WatchGuard System Manager, connect to the cluster master.
- Expand the cluster and the cluster master details.
- In the cluster member details, find the OS version and build number.
If the OS version and build numbers are not the same, you must upgrade the replacement Firebox to the same version of Fireware OS that is installed on the cluster master.
Get the Feature Key for the Replacement Firebox
Because your replacement Firebox has a different serial number, you must get a new feature key for it. You must have the Firebox feature key to upgrade software on the Firebox (if necessary), and to add the replacement Firebox to the FireCluster configuration.
If you completed the previous procedure on this page to compare the OS versions, you are connected to your replacement Firebox.
If the Firebox is connected to the Internet, synchronize the feature key with Firebox System Manager:
- Start Firebox System Manager.
- Select Tools > Synchronize Feature Key.
If you are logged in to the device as a Device Monitor user, the Synchronize Feature Key dialog box appears. If you are logged in as a Device Administrator, the feature keys are synchronized.
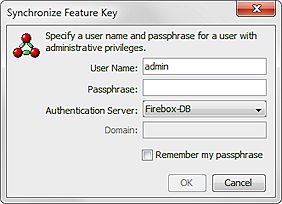
- In the User Name text box, type the name of a user account with Device Administrator credentials.
- In the Passphrase text box, type the passphrase for the user.
- From the Authentication Server drop-down list, select the authentication for the user account you specified.
- If you select an Active Directory authentication server, in the Domain text box, type the domain for the user account you specified.
- Click OK.
The Firebox connects to the WatchGuard website and downloads the current feature key to your Firebox . - Open Policy Manager.
- Select Setup > Feature Keys > Details.
The Feature Key Details dialog box opens. - Copy the feature key text to a local file. You will need this feature key later to update the FireCluster configuration.
If the replacement Firebox is not connected to the Internet, manually copy the feature key from the WatchGuard website:
- To get the feature key for your device:
- Open a web browser and go to https://myproducts.watchguard.com/manage-products.
- Log in to your WatchGuard account.
The Manage Products page appears. - On the Manage Products page, in the Network Security section, click View Products.
The Network Security page opens with a list of devices activated for your account. - From your list of activated devices, select the replacement Firebox. The replacement Firebox is in your activated products list with the same Friendly Name as the original Firebox, but with the serial number of the replacement Firebox.
The Product Details page for the replacement Firebox opens. - Click Get Feature Key.
The feature key details appear in a dialog box. - Click Copy.
- Paste the selected text into a local text file.
Upgrade or Downgrade the Fireware OS on the Replacement Firebox
If the version of Fireware OS on the replacement Firebox is the same as the version installed on the cluster master, skip this section and go to the Update the FireCluster Configuration section.
You cannot downgrade a Firebox to a version of Fireware lower than Fireware v12.1.3 Update 8, v12.5.9 Update 2, or v12.7.2 Update 2, based on your device model.
If you completed the previous procedures on this page to compare the OS versions and synchronize the feature key, you are connected to the replacement Firebox. You can now upgrade or downgrade the replacement Firebox.
To upgrade or downgrade Fireware OS on the replacement Firebox with WatchGuard System Manager:
- To make sure the correct Fireware OS version and build number is installed on your management computer, in WatchGuard System Manager, select Help > About WatchGuard.
The list of installed Fireware OS appliance software appears. - Select Tools > Policy Manager.
Policy Manager appears. - Select File > Upgrade.
The Upgrade dialog box opens. - Type the configuration passphrase. The default administrator account credentials are:
Username — admin
Passphrase — readwrite - To enter the path to the upgrade (or downgrade) image, click Browse. Make sure to select the image file that is the same version as the version installed on the cluster master.
- Confirm that you want to upgrade the Firebox.
The Firebox reboots automatically after you confirm.
Update the FireCluster Configuration
Before you update the FireCluster configuration, make sure you have completed these steps on the replacement Firebox:
- Synchronize the feature key
- Copy the feature key to local text file (required for Step 7 in the next procedure)
Next, complete these steps in WatchGuard System Manager to update the FireCluster configuration so it uses the new feature key:
You can use Fireware Web UI to connect to a FireCluster, but you cannot use the Web UI to configure a cluster or change the FireCluster settings.
- In WatchGuard System manager, connect to the FireCluster and start Policy Manager.
- Select FireCluster > Configure.
- Select the Members tab.
- Select the cluster member you replaced, and click Edit.
- Select the Feature Key tab.
- To remove the feature key for the old Firebox, click Remove.
- Click Import.
The Import Firebox Feature Key dialog box appears. - Paste the feature key text from the replacement Firebox into the Import Feature Key dialog box.
- Select File > Save > To Firebox, specify the IP address of the active Firebox, and click OK.
The configuration is saved to the active Firebox. - Use an Ethernet cable to connect your management computer to interface 1 on the replacement Firebox.
- Select File > Save > To Firebox, specify the IP address of the replacement Firebox, and click OK.
The configuration is saved to the replacement Firebox.
Connect the Replacement Firebox and Form the Cluster
- Power off the replacement Firebox.
- Disconnect the cables from the Firebox to replace, and connect them to the replacement Firebox. Make sure you connect each cable to the same numbered interface on the new Firebox as it was connected to on the old Firebox.
- Make sure you install any expansion modules you removed from the old Firebox.
- Start the replacement Firebox.
The cluster forms automatically after you connect the replacement Firebox. To verify whether a cluster has formed, connect to the device in WatchGuard System Manager and refresh the status periodically. If the cluster does not form automatically after a few minutes, reboot or power cycle each Firebox to trigger automatic cluster formation.
If the cluster still does not form, reset the replacement Firebox to factory-default settings. This resets the configuration settings and removes the feature key, but does not change the installed version of Fireware OS. You can then use Fireware System Manager to start discovery of the replacement Firebox.
- Start the replacement Firebox with factory-default settings.
For information about how to reset your Firebox, go to Reset a Firebox. - Start Firebox System Manager for the cluster master.
- To manually start discovery of the second cluster member, select Tools > Cluster > Discover Member.
For more information, go to Discover a Cluster Member. - On the Front Panel tab, expand the cluster to view the status of both cluster members.
For more information, go to Monitor and Control FireCluster Members.
Update Mobile VPN with IKEv2 Profiles
If you use Mobile VPN with IKEv2 with the FireCluster, make sure you generate new profiles and install them on your clients after you add the replacement Firebox to the cluster. For more information, go to Configure Client Devices for Mobile VPN with IKEv2.