Applies To: Locally-managed Fireboxes
You can move the database from an existing Dimension server to a new Dimension server. This procedure enables you to retain the current log messages and reports in the database. Configuration options from your existing Dimension server cannot be moved.
Move the Dimension Database in VMware:
- Log in to the web UI.
- In the Navigator pane, click Virtual Machines.
The Virtual Machines page opens.
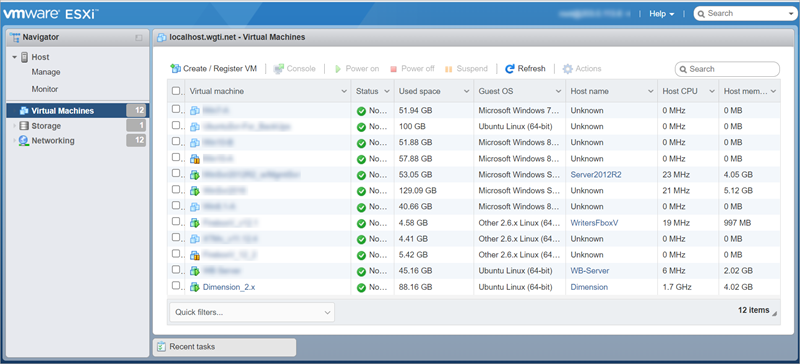
- To shut down the old Dimension server, select the check box next to the virtual machine you want to shut down.
- Click Shut down.
- Deploy a new Dimension instance and complete the Setup Wizard.
WARNING: You must complete the Setup Wizard for the new Dimension v2.2x instance before you migrate your data. If you migrate your existing database disk to the new instance before you run the Setup Wizard, all data is deleted.
When you run the Setup Wizard on the new Dimension instance, you must set the Log Server Authentication Key to the same one that was set on your old instance. The key is not stored on the data disk.
- Click Shut down.
- In the Navigator pane, click Storage.
The Storage page opens with the Datastores tab selected.
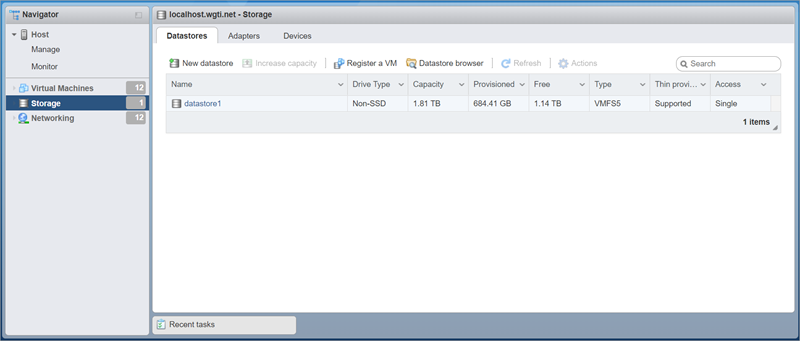
- Click Datastore browser.
The Datastore browser dialog box opens.
- Select the datastore where the old Dimension server was installed.
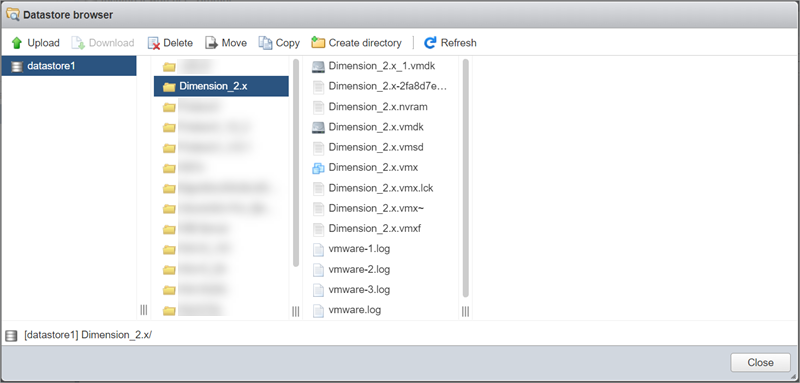
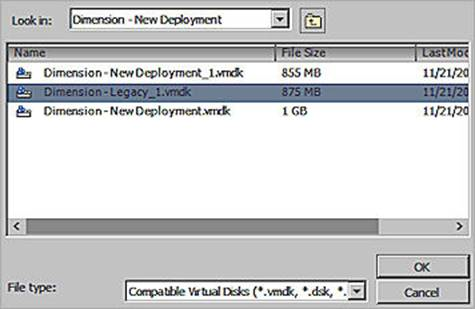
- Select the folder with the name of your old Dimension server. There are two .vmdk files. The file with "_1" appended to the name contains the database.
- Select the .vmdk file that contains your database.
- Click Copy.
The Select destination dialog box opens.
- Select the folder for the new Dimension server.
- Click Copy.
The copying process begins and the .vmdk file appears in the folder. - Close the Datastore browser dialog box.
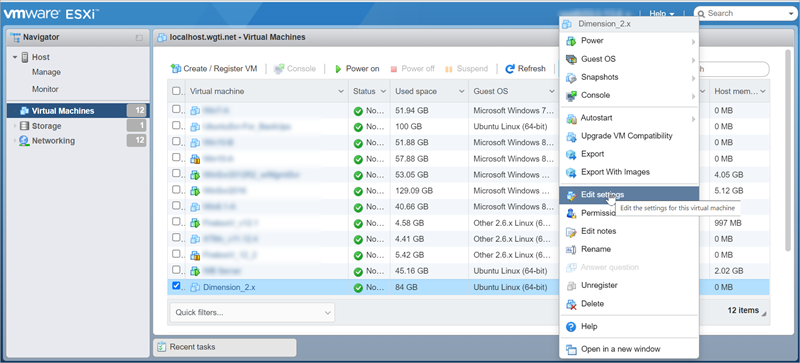
- In the Navigator pane, click Virtual Machines.
- Select the new Dimension server.
- Click Actions > Edit settings.
The Edit settings dialog box opens.
- Click the x to remove Hard disk 2.
- Select the Delete files from datastore check box.
- Click Save.
The empty data disk from the Setup Wizard is deleted. - Click Actions > Edit settings.
The Edit settings dialog box opens. - Click Add hard disk > Existing hard disk.
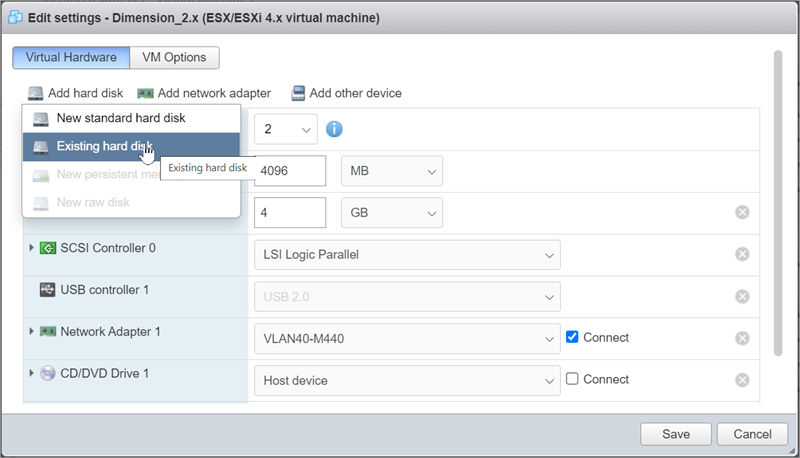
- Select the folder for your new Dimension instance.
- Select the .vmdk file that was copied in Step 10.
- Click Select.
- Click Save.
- Select the check box next to your new Dimension server.
- Click Power on.
- From a client computer, log in to the new Dimension server and confirm that your log and report data is present.
Be sure to carefully examine the contents of your new Dimension server before you delete the old Dimension server instance on your ESXi server.
- If you use Dimension Command, you must import the new Dimension CA certificate to your Fireboxes.
- Power off the old Dimension server.
- Deploy a new Dimension instance and complete the Setup Wizard.
You must complete the Setup Wizard for the new Dimension server instance before you continue. Throughout this process, Dimension initializes the database on the second hard drive and deletes the current contents.
When you run the Setup Wizard on the new Dimension instance, you must set the Log Server Authentication Key to the same one that was set on your old instance. The key is not stored on the data disk.
- Power off the new Dimension server.
- In vSphere, select the new Dimension instance from the left-side panel.
- In the right-side panel, click the Summary tab.
- In the Resources section, right-click the datastore and select Browse Datastore.
The Datastore Browser opens. - Open the folder with the name of your old Dimension instance.
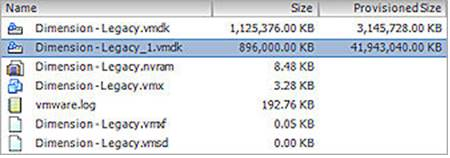
There are two .vmdk files. The file with "_1" appended to the name contains the database.
Right-click the .vmdk file that contains your database, then select Copy.
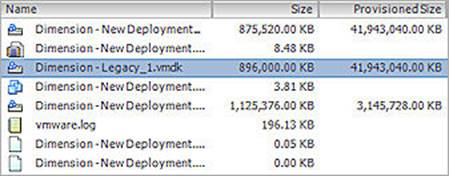
- Open the folder with the name of your new Dimension instance.
- Right-click in the folder and select Paste.
The copying process starts and the .vmdk file appears in the folder.
- Close the Datastore Browser.
- In vSphere, from the the left-side panel, right-click the new Dimension instance and select Edit Settings.
The Virtual Machine Properties dialog box opens. - Click Add.
The Add Hardware wizard opens. - Select Hard Disk and click Next.
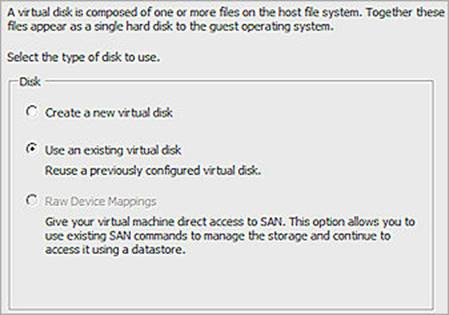
- In the Select a disk dialog box, select Use an existing virtual disk.
- Click Next.
- In the Disk File Path section, click Browse.
- Browse to the folder with the name of the new Dimension system.
- Select the .vmdk file that contains your old Dimension database and click Open.
- Click Next twice, then click Finish to complete the Add Hardware wizard.
The message "New Hard Disk (adding)" appears in the list of devices in the Virtual Machine Properties.
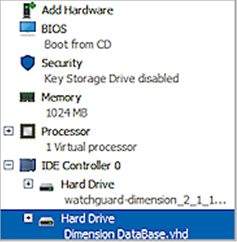
- In the list of devices, select Hard disk 2 and click Remove.
- Click OK to confirm the changes to the new Dimension instance.
Note If you edit the new Dimension server again, you will see the drives listed as Hard disk 1 and Hard disk 2. This is expected and the drive from the old Dimension server instance is now present as Hard disk 2.
- Power on the new Dimension server.
- From a client computer, log in to the new Dimension server and confirm that your log and report data is present. If necessary, change the IP address and other configuration options on the new Dimension server to match the configuration of your old Dimension server.
Be sure to carefully examine the contents of your new Dimension server before you delete the old Dimension server instance on your ESXi server.
- If you use Dimension Command, you must import the new Dimension CA certificate to your Fireboxes.
Move the Dimension Database in Hyper-V
To move the Dimension database of a Dimension server installed on Hyper-V:
- Power off the old Dimension server.
- Deploy a new Dimension instance and complete the Setup Wizard.
You must complete the Setup Wizard for the new Dimension server instance before you continue. Throughout this process, the Dimension initializes the database on the second hard drive and deletes the current contents. Do not add the existing virtual hard drive to your new instance before you complete the Setup Wizard.
When you run the Setup Wizard on the new Dimension instance, you must set the Log Server Authentication Key to the same one that was set on your old instance. The key is not stored on the data disk.
- Power off the new Dimension server.
- In the Virtual Machines section, right-click the old Dimension instance and select Settings.
The Settings Dialog box opens.
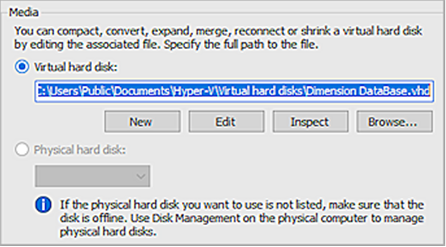
- Select the second Hard Drive in the list.
The configuration for the Hard Drive appears. - Select the text that appears in the text box under Virtual hard disk.
- Right-click on the text, then select Copy.
- Click Cancel to close the Settings dialog box without making any changes.
- In the Virtual Machines section, right-click the new Dimension instance and select Settings.
The Settings Dialog box opens. - Select the second Hard Drive in the list.
The configuration for the Hard Drive appears. - Select the text that appears in the text box under Virtual hard disk.
- Right-click the text, then select Paste.
The path to the original Database hard drive replaces the current hard drive. - Click OK to confirm.
- Power on the new Dimension server.
- From a client computer, log in to the new Dimension server and confirm that your log and report data is present. If necessary, change the IP address and other configuration options on the new Dimension server to match the configuration of your old Dimension server.
Be sure to carefully examine the contents of your new Dimension server before you delete the old Dimension server instance on your Hyper-V server.
- If you use Dimension Command, you must import the new Dimension CA certificate to your Fireboxes.
Move External Dimension Database in VMware or Hyper-V
To move an external Dimension database (such as a PostgreSQL database) of a Dimension server installed on VMware or Hyper-V:
- Power off the old Dimension server.
- Deploy a new Dimension instance and complete the Setup Wizard.
Throughout this setup process, select the Built-in Database option. If you configure the new Dimension server to use your existing database, it will re-initialize the database and delete all current data.
When you run the Setup Wizard on the new Dimension instance, you must set the Log Server Authentication Key to the same one that was set on your old instance. The key is not stored on the data disk.
- Connect to your new Dimension server and change the configuration to use your existing PostgreSQL database. For instructions, go to Configure the Database Location.
- Power on the new Dimension server.
- From a client computer, log in to the new Dimension server and confirm that your log and report data is present. If necessary, change the IP address and other configuration options on the new Dimension server to match the configuration of your old Dimension server.
Be sure to carefully examine the contents of your new Dimension server before you delete the old Dimension server instance on your ESXi server.
- If you use Dimension Command, you must import the new Dimension CA certificate to your Fireboxes.
For more information, go to Manage Dimension Certificates.