On the Database > Status page, you can see the status of the Dimension database, stop and start the database, review the database log rate, and create or restore a database backup file.
To manage the Dimension database:
- Select

 > Administration > Administration > Database.
The Database pages open. - Select the Status tab.
See the Status of the Database
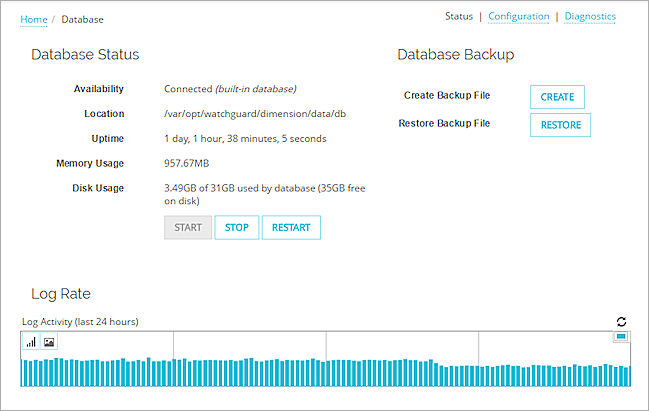
In the Database Status section, you can see the current status of the Dimension database.
- Availability — The current status of the Dimension database.
- Location — The location of the Dimension database.
- Uptime — The amount of time since the database was last started.
- Memory Usage — The amount of memory used by the database.
- Disk Usage — The amount of disk space used by the built-in database, and the amount of available disk space. This does not show disk usage for an external database.
When the database is local to the Dimension system, the maximum size of the database is limited to 80% of the size of the data disk for the virtual machine. The oldest data is automatically purged when database utilization reaches approximately 95% of the maximum database size.
Stop and Start the Database
In the Database Status section, you can also stop and start the database processes.
- To stop the database processes, click Stop.
- To start the database processes, click Start.
- To stop the database processes and automatically start them again, click Restart.
Log Rate
In the Log Rate section, you can see the recent level of activity for your Dimension database over the past 24 hours. By default, the data appears in a bar chart. You can also see the data as a line chart.
- To see the log rate data in a line chart, click
 .
. - To see the log rate data in a bar chart, click
 .
.
This is the default setting. - To see the date and time of the activity level in the chart, place your cursor over a section of the chart.
The date and time the activity occurred appears at the top right corner of the chart. - To refresh the data in the Log Rate chart, click
 .
.
Back Up and Restore the Database
To create a snapshot of the persistent data from the Dimension server, you can generate a database backup file. This data includes:
- Database schema definitions
- Dimension server configuration tables
Remote backup settings are stored outside of the database and not included in the database backup file.
- Dimension users and role policies
- Tables related to managed devices, including device configuration files
- Tables related to managed VPN configurations
Historical data is not included in the database backup file. For more information about how to back up and restore historical data, see Back Up and Restore Historical Data.
To return Dimension to an earlier version, you can restore a database backup file to Dimension. When you restore a database backup file, all of the data in your Dimension server database is erased and is replaced with the data in the backup file.
You must log in to Dimension with a user account that has Super Administrator credentials to back up or restore the Dimension database.
Create a Database Backup File
Before you can back up the Dimension database, you must specify the location of the Remote Backup directory for Dimension. For more information, see Configure Remote Backup Settings.
To back up the database:
- Click Create.
The Create Database Backup File dialog box opens. - Click Yes.
The database backup process begins.
Restore a Database Backup File
If your Dimension database has suffered a catastrophic event, you can restore a database backup file to return Dimension to an earlier version. When you restore a database backup file, all of the information in your Dimension database is erased and replaced with the information from the backup file.
If you have configured Dimension to use an external database, before you can restore a database backup file to Dimension, make sure you have the correct permissions to replace the contents of the external database.
When the database backup file is restored, the Dimension server completes these processes:
- Verifies the backup file contains the required database tables
- Stops the Dimension servers
- Deletes the database
- Creates a new database
- Executes the archive utility to populate the database with the objects and data in the backup file
- Clears the web server sessions
- Starts the Dimension servers
Because historical data is not included in a database backup file, you must restore the historical data separately. Before you restore the Dimension database, make sure you have backed up your historical data. After you restore your Dimension database, you can restore the historical data. For more information, see Back Up and Restore Historical Data.
To restore a database backup file:
- Click Restore.
The Restore Database Backup File dialog box opens.
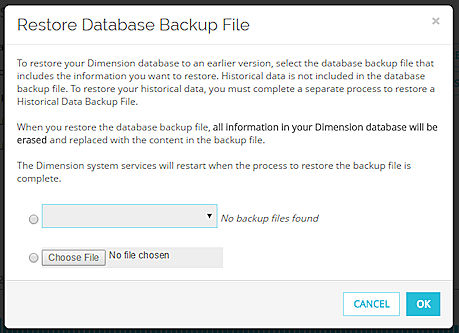
- Select a database backup file:
- If the file is located on your instance of Dimension, select the first option and select the backup file from the drop-down list.
- If the file is in another location, select the second option and browse to locate the backup file.
- Click OK.
Dimension completes the processes to restore the database backup file. Tip!
Upgrade the Dimension Database
If the version of the Dimension database schema on your instance of Dimension is not the correct version for your version of Dimension, you can manually update the database schema. The database schema can be out of date if the schema does not upgrade correctly when you upgrade your instance of Dimension.
When the database schema version is not up-to-date, the Upgrade button appears on the Database Status page.
- Select > Administration > Administration > Database.
The Database pages open. - Select the Status tab.
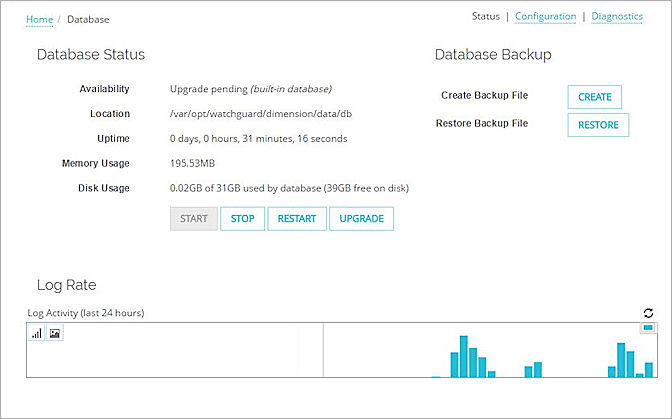
- In the Database Status section, click Upgrade.
The Upgrade Database confirmation message appears.
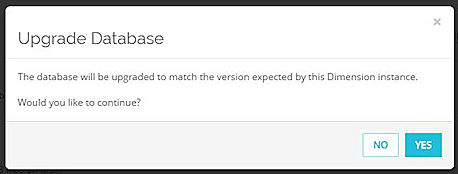
- Click Yes.
The database schema is upgraded and the Upgrade button is removed from the Dimension Status section.
Configure and Monitor the Dimension Database