Applies To: DNSWatch in WatchGuard Cloud
References to DNSWatch in this topic relate to DNSWatch in WatchGuard Cloud. To learn about the legacy DNSWatch UI, go to About WatchGuard DNSWatch in Fireware Help.
This quick start topic outlines the general steps to set up and configure DNSWatch in WatchGuard Cloud:
- Before You Begin
- Enable DNSWatch on the Firebox
- DNSWatch Migration to WatchGuard Cloud (Legacy UI Users)
- Configure DNSWatch in WatchGuard Cloud
- Monitor DNSWatch
If you currently use DNSWatch in the legacy UI, you must first migrate your Fireboxes and DNSWatch configurations from the legacy DNSWatch UI to DNSWatch in WatchGuard Cloud. Go to DNSWatch Migration to WatchGuard Cloud (Legacy UI Users) to begin the migration process.
Before You Begin
Before you can manage DNSWatch in WatchGuard Cloud, you must make sure that:
- Your Firebox is activated, and connected to WatchGuard Cloud.
- You add your Firebox to WatchGuard Cloud for cloud reporting or cloud management. Fireboxes do not have to be cloud-managed, but they must be added to WatchGuard Cloud for visibility. For more information, go to Get Started — Add a Device to WatchGuard Cloud.
- Your Firebox has the DNSWatch subscription service enabled in the feature key.
Enable DNSWatch on the Firebox
When DNSWatch is enabled on a Firebox and the Firebox receives a DNS query, it uses DNSWatch as the DNS resolver. If the requested domain is filtered or blocked in the DNSWatch configuration, DNSWatch returns a block page instead of the requested content.
Shared IP Addresses
To use DNSWatch in WatchGuard Cloud, the same public IP address cannot be associated with Fireboxes activated for two different accounts in the WatchGuard account.
If you enable DNSWatch on Fireboxes activated in two different WatchGuard accounts, and those Fireboxes use the same public IP address, DNSWatch associates the public IP address with the first Firebox that successfully registered with DNSWatch.
Any other Firebox with the same public IP address that is registered to a different DNSWatch account will receive an error and not receive the IP address of DNSWatch DNS servers. Make sure no other Fireboxes that use the same public IP address are activated to a different account in the WatchGuard account.
Recommendations
- Only enable DNSWatch on the gateway Firebox in a nested Firebox environment under a single account. This is typically the Firebox closest to the ISP equipment or public IP address.
- Do not enable DNSWatch on Fireboxes in different accounts using a shared public IP address. Choose one of the Fireboxes from one account to enable DNSWatch.
- Do not enable DNSWatch on Fireboxes that use a primary external interface that is behind an Internet service provider NAT (multiple individual networks behind a single or small group of public addresses).
You can enable DNSWatch on cloud-managed Fireboxes from WatchGuard Cloud, and on locally-managed Fireboxes from Fireware Web UI and Policy Manager.
Registration status and the IP addresses of the DNSWatch DNS servers appear only in Fireware Web UI.
- In the Networking section on the Device Configuration page for the Firebox, click the DNS widget.
The DNS configuration page opens. - Select the DNSWatch tab.
- Enable DNSWatch.

- Click Save.
- Select Subscription Services > DNSWatch.
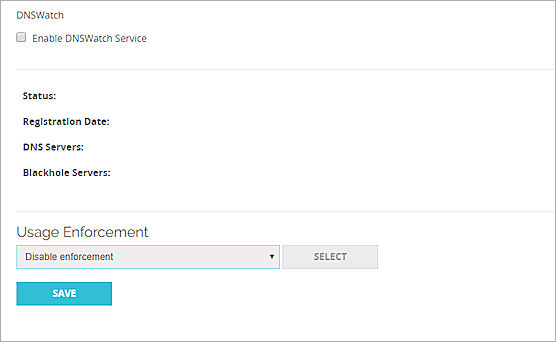
- Select the Enable DNSWatch Service check box.
- From the Usage Enforcement drop-down list, select the enforcement option.
The default option is Disable enforcement.
If your network does not have a local DNS server, we recommend you change this to enable enforcement on some or all internal interfaces. - If you selected Enforce on selected interfaces, to select the interfaces for enforcement, click Select.
The list of internal interfaces appears. By default, enforcement is enabled on all interfaces.

- Enforcement for all interfaces is enabled by default. To disable enforcement for an interface, clear the check box for that interface.
- Click OK.
- Click Save.
The Firebox connects to the DNSWatch account where the Firebox was activated and registers the Firebox to your DNSWatch account. Registration status and IP addresses of DNSWatch DNS Servers appear on the DNSWatch configuration page.
- Select Subscription Services > DNSWatch.

- Select the Enable DNSWatch check box.
- From the drop-down list, select the enforcement option.
The default option is Disable enforcement.
If your network does not have a local DNS server, we recommend you change this to enable enforcement on some or all internal interfaces. - If you selected Enforce on all Trusted, Optional and Custom interfaces, click Select to select the interfaces for enforcement.
The list of internal interfaces appears.
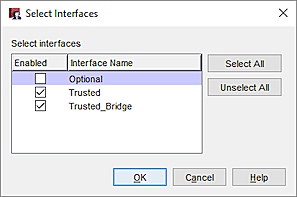
- Enforcement for all interfaces is enabled by default. To disable enforcement for an interface, clear the check box for that interface.
- Click OK.
- Save the configuration to the Firebox.
The Firebox connects to the DNSWatch account where the Firebox was activated and registers the Firebox to your DNSWatch account. Registration status and IP addresses of DNSWatch DNS Servers appear on the DNSWatch configuration page.
For more information, go to Enable DNSWatch on Your Firebox.
DNSWatch Migration to WatchGuard Cloud (Legacy UI Users)
If you currently manage DNSWatch in the legacy UI, management of DNSWatch in WatchGuard Cloud is a two-step process:
- Migrate from the legacy DNSWatch UI to WatchGuard Cloud.
- Configure DNSWatch in WatchGuard Cloud.
Before you can manage and configure DNSWatch in WatchGuard Cloud, you must first complete a one-time migration procedure to migrate your Fireboxes and DNSWatch configuration data from the legacy DNSWatch UI to WatchGuard Cloud.
The DNSWatch Migration tool migrates all eligible Fireboxes from the legacy DNSWatch UI to DNSWatch in WatchGuard Cloud. The migration process is not reversible. After migration completes, you must manage DNSWatch for your Fireboxes in WatchGuard Cloud and can no longer manage DNSWatch in the legacy DNSWatch UI.
Eligible Fireboxes are Fireboxes that are added to WatchGuard Cloud and allocated to a Subscriber account. For more information, go to the Before You Begin section in this topic.
DNSWatch data that is migrated:
- Content Filtering Policies
- Domain Lists
- Domain Allowlist
- Domain Filterlist
- Domain Blocklist
DNSWatch data that is not migrated:
- DNSWatchGO
- DNSWatchGO for Chrome OS
- Block page configurations
DNSWatchGO and DNSWatchGO for Chrome OS can only be managed in the legacy DNSWatch UI.
After migration, you must configure the Block pages as part of the configuration process in WatchGuard Cloud. For more information, go to Add DNSWatch Configurations in WatchGuard Cloud.
Before You Migrate
These accounts can perform DNSWatch migration:
- Tier-1 Service Providers
- Tier-1 Subscribers
Service Providers must have an Owner role, or a Helpdesk role with access to all of their Subscriber accounts.
Before you begin the DNSWatch migration process to WatchGuard Cloud, make sure that:
- Fireboxes listed in the legacy DNSWatch UI are added to WatchGuard Cloud and allocated to a Subscriber account.
Fireboxes do not have to be cloud-managed, but they must be added to WatchGuard Cloud for visibility. For more information, go to Get Started — Add a Device to WatchGuard Cloud.
- You review your DNSWatch content filter policies and domain list configurations in the legacy UI before you migrate to WatchGuard Cloud.
Migrate DNSWatch to WatchGuard Cloud
To migrate DNSWatch from the legacy UI to WatchGuard Cloud:
- Log in to WatchGuard Cloud as a tier-1 Service Provider or tier-1 Subscriber.
- Select Configure > DNSWatch.
The DNSWatch Migration tool opens.
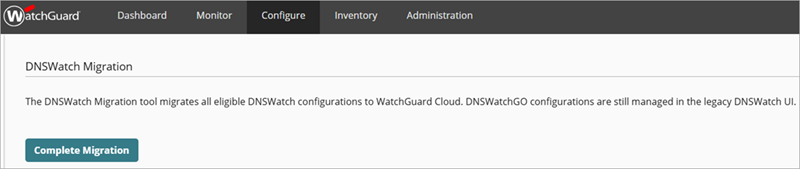
- Click Complete Migration.
The DNSWatch Migration begins. - If a Firebox cannot be migrated, an error message shows with a link to correct the issue. Error messages include:
- Device not added to WatchGuard Cloud — Click Add Device to go to the Add Device page to add a new device to WatchGuard Cloud. For more information, go to Get Started — Add a Device to WatchGuard Cloud.
AA new tab in your browser opens. - Device not allocated to an account — Click Allocate Device to go to the Inventory > Firebox > Unallocated page to allocate the device. For more information, go to Allocate Fireboxes.
A new tab in your browser opens.

- After you correct the issue, return to the DNSWatch Migration page. Click
 to refresh the Firebox list. The Fireboxes you added to WatchGuard Cloud or allocated to an account no longer show in the list.
The DNSWatch Migration is now in progress and can take up to one hour to complete. You can navigate away from this page and return to review the status.
- (Optional) Click Migrate Without These Devices if you want to skip the migration of the Fireboxes with errors in the list.
If you select Migrate Without These Devices and want to add the Fireboxes after migration is complete, you must manually add or allocate the Fireboxes. For more information, go to Quick Start — Set Up DNSWatch in WatchGuard Cloud.
- Device not added to WatchGuard Cloud — Click Add Device to go to the Add Device page to add a new device to WatchGuard Cloud. For more information, go to Get Started — Add a Device to WatchGuard Cloud.
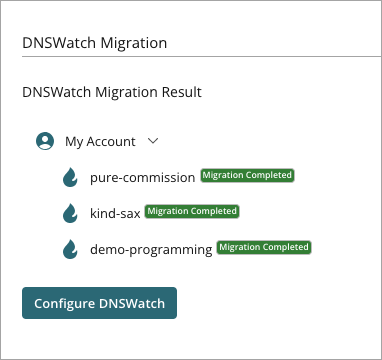
The DNSWatch Migration Result page opens with a list of all Fireboxes you selected for migration and their migration status. Migration statuses include Migration Completed and Migration in Progress.
If a Firebox has not yet completed migration, the Migration in Progress status shows. The DNSWatch Support team is notified and updates the status to Migration Completed. Confirm the status again later. If the issue persists, contact WatchGuard Support.
- After all Fireboxes successfully migrate, click Configure DNSWatch to configure DNSWatch in WatchGuard Cloud.
It can take up to 30 minutes for the Firebox to update DNSWatch IP addresses and connect to DNSWatch servers after migration is complete.
Changes made in the legacy DNSWatch UI after migration do not sync to DNSWatch in WatchGuard Cloud.
For more information about DNSWatch configuration in WatchGuard Cloud, go to Add DNSWatch Configurations in WatchGuard Cloud.
For more information, go to DNSWatch Migration to WatchGuard Cloud.
Configure DNSWatch in WatchGuard Cloud
To use DNSWatch in WatchGuard Cloud to protect your network from malicious sites and filter content, you must create DNSWatch configurations. DNSWatch configurations define the settings and content filters that DNSWatch uses to determine whether to block a site.
Your operator role determines what you can view and do in WatchGuard Cloud. Your role must have the DNSWatch permission to view or configure this feature. For more information, go to Manage WatchGuard Cloud Operators and Roles.
Add a DNSWatch Configuration
To add a DNSWatch configuration, in WatchGuard Cloud:
- Log in to WatchGuard Cloud.
- Select Configure > DNSWatch.
The DNSWatch page opens.
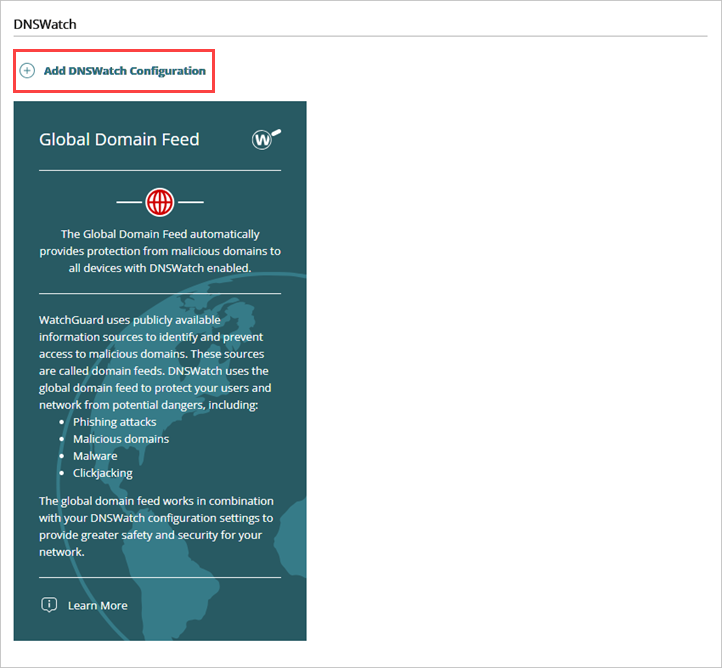
- Click Add DNSWatch Configuration.
The Add DNSWatch Configuration wizard opens.
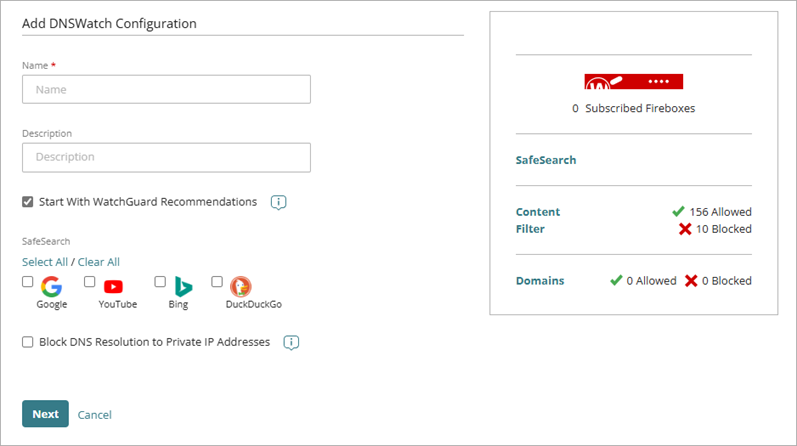
- In the Name text box, enter a name for the configuration.
- In the Description text box, enter a description for the configuration.
- To automatically populate the Content Filter list with WatchGuard recommendations, select Start With WatchGuard Recommendations.
- In the SafeSearch section, select the web browser search engines you want to enable SafeSearch for. For more information, go to About SafeSearch in DNSWatch in WatchGuard Cloud. You can enable SafeSearch enforcement for these search engines:
- YouTube
- Bing
- DuckDuckGo
- To block responses for any domain names that resolve to IP addresses in the three private IP ranges reserved by the Internet Engineering Task Force (IETF), select Block DNS Resolution to Private IP Addresses.This can help protect your network from DNS rebinding attacks, which attempt to gain access to resources on your network that use private IP addresses.
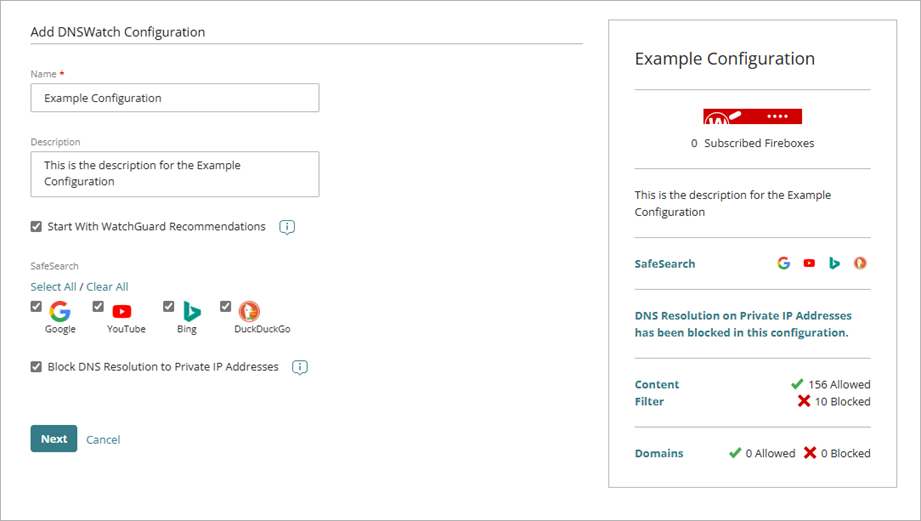
- Click Next.
The Content Filter page of the Add DNSWatch Configuration wizard opens.

- In the Content Filter list, select or clear the check box next to a content category or subcategory to allow or block it. If you selected Start With WatchGuard Recommendations in Step 6, some categories are automatically selected. For more information about DNSWatch content filter categories, go to About Content Filter Categories in DNSWatch in WatchGuard Cloud.
- Allow — Users can connect to sites in these categories and DNSWatch does not return a content filtering block page in their browser.
- Block — Users cannot connect to blocked site and DNSWatch returns a content filtering block page in the browser.
For information on how to customize the security and content filtering block pages, go to Manage the Block Pages for DNSWatch in WatchGuard Cloud
- Click Next.
The Domains List page of the Add DNSWatch Configuration wizard opens.
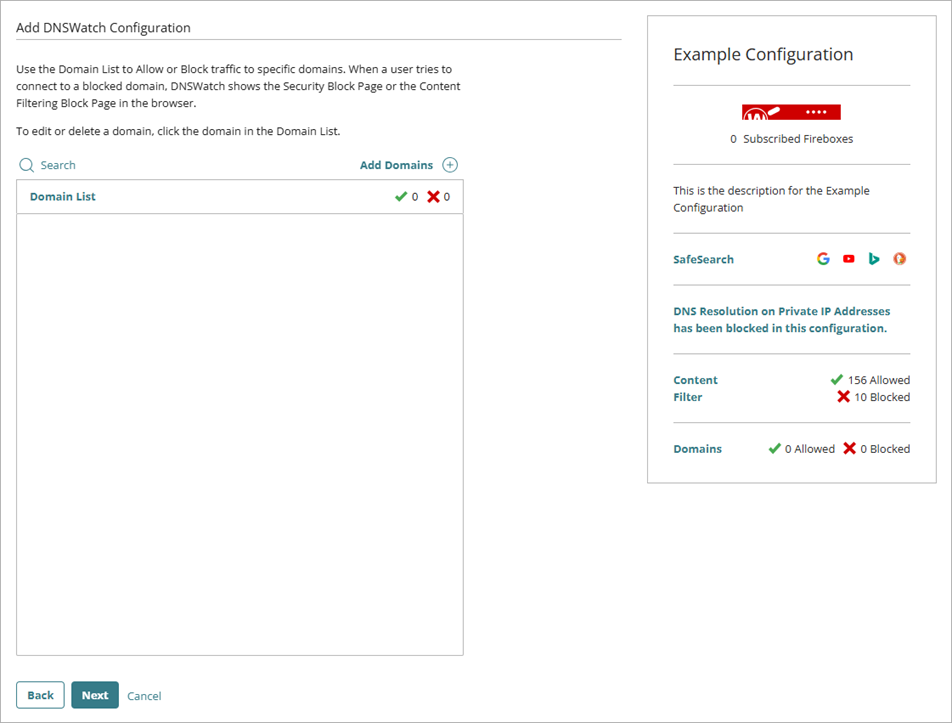
- To allow or block traffic to specific domains, click Add Domains.
The Add Domains dialog box opens.

- In the List Name text box, enter a name for the list.
- In the Domain List text box, enter or paste a list of domain names. You can specify one domain name on each line or you can use a comma, space, or semicolon to separate each domain name. To upload a CSV or TXT file with a list of domain names, click the upload icon.

- In the List Type drop-down list, select the action you want DNSWatch to take for the domains in the list. You can select:
- Allow — Users can connect to the domain and DNSWatch does not return a security block page in the browser.
- Block — Users cannot connect to the domain and DNSWatch returns a security block page in the browser.
- For Block type domain lists, to mark every listed domain as malicious, select Mark all as Malicious.
When you mark a domain as malicious and a user attempts to visit that domain, DNSWatch returns the security block page to the user. When you block a domain but do not mark it as malicious and a user attempts to visit that domain, DNSWatch returns the content filter block page to the user.
- To also block or allow the subdomains of all listed domains, select Include Subdomains.

- Click Add.
The added domains appear in the Domains List.
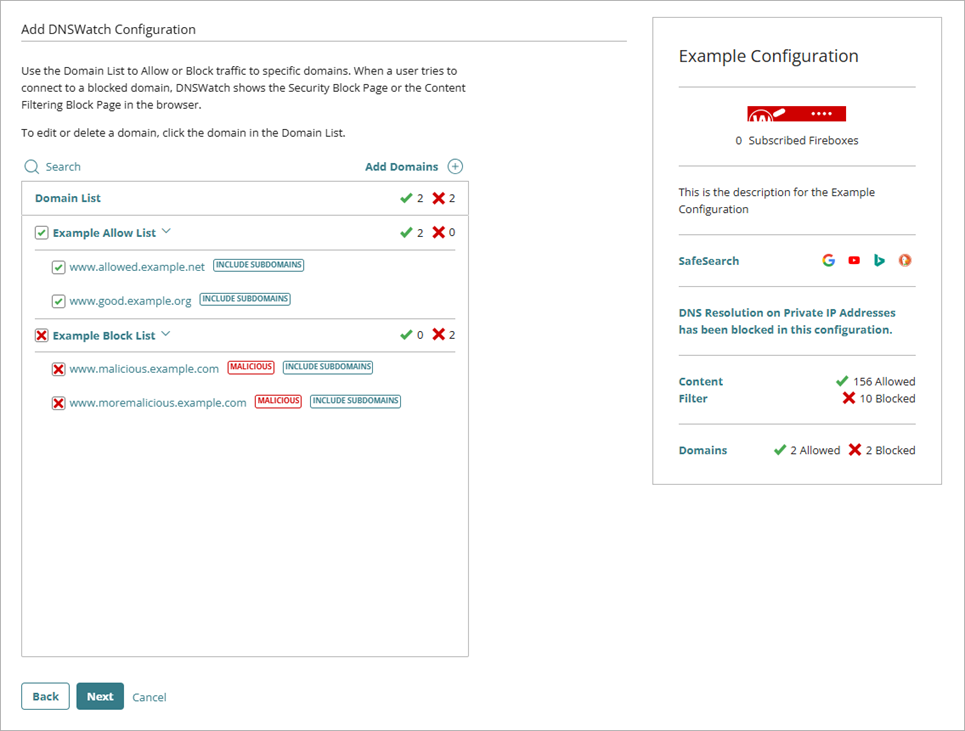
- Repeat Steps 12 to 18 to add additional block and allow lists.
- Click Next.
- From the list, select the accounts and Fireboxes you want to apply this DNSWatch configuration to. The number of Fireboxes the configuration applies to appears as the number of Subscribed Fireboxes on the configuration widget.
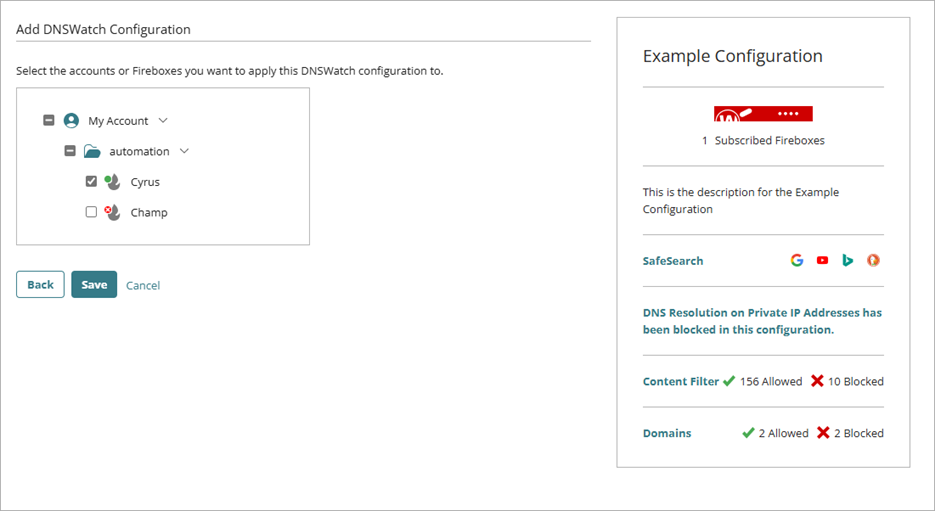
- Click Save.
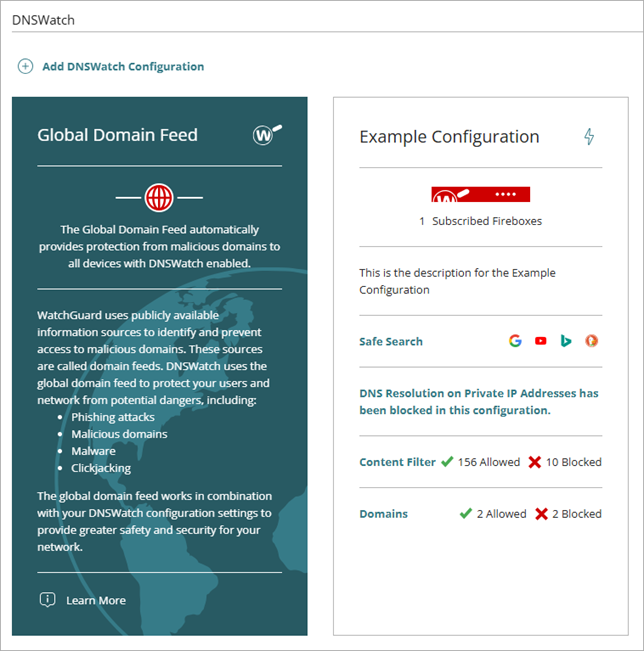
The saved DNSWatch configuration appears as a widget on the DNSWatch page.
Monitor DNSWatch
You can use DNSWatch dashboards and reports to review the status of your Fireboxes, to view traffic through the selected device, and to monitor allowed, blocked, or malicious activity.
After you migrate to DNSWatch in WatchGuard Cloud from the legacy DNSWatch UI, you can view DNSWatch reports in WatchGuard Cloud only. You can no longer view reports in the legacy DNSWatch UI.
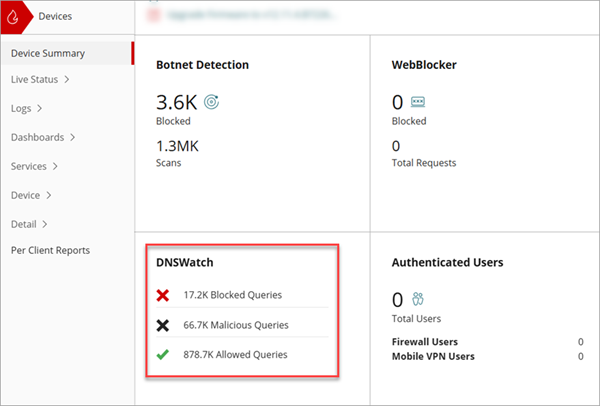
On the Device Summary page, a DNSWatch summary widget shows the number of blocked queries, malicious queries, and allowed queries.
For more information, go to About the Device Summary Page.
Review the Executive Dashboard Report
On the Executive Dashboard page, you can view high-level details of traffic through the selected Firebox.
For DNSWatch, the Executive Dashboard includes:
- Top Allowed DNS — Shows the top allowed DNS domains and number of occurrences for the selected time period.
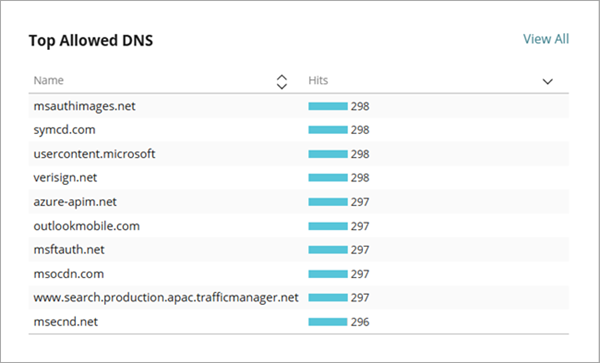
If this dashboard is not available for your device, make sure that logging is enabled. Logging for cloud-managed Fireboxes is automatically enabled. For locally-managed Fireboxes, you must manually enable logging in Fireware Web UI or Policy Manager. For more information, go to Configure Logging and Notification for a Policy.
To download the Executive Dashboard Report, click ![]() .
.
For more information, go to Executive Dashboard (WatchGuard Cloud).
Review the Security Dashboard Report
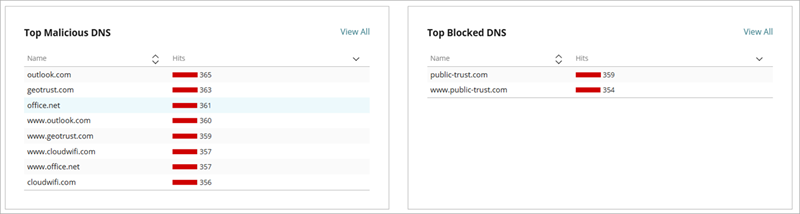
On the Security Dashboard page in WatchGuard Cloud, you can view the top threats in each security area protected by Firebox subscription services.
For DNSWatch, the Security Dashboard includes the top threats in these categories:
- Top Malicious DNS — Shows the top malicious domains DNSWatch detected in the selected time period.
- Top Blocked DNS — Shows the top domains that DNSWatch denied DNS requests to in the selected time period.
To download the Security Dashboard Report, click ![]() .
.
For more information, go to Security Dashboard (WatchGuard Cloud).
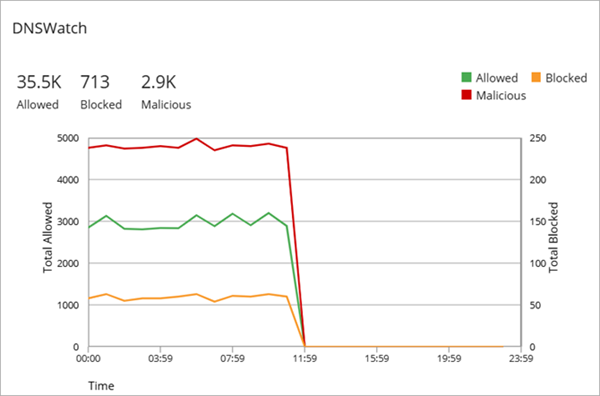
Review the Subscription Dashboard Report
On the Subscription Dashboard page, you can view high-level activity for subscription services enabled on your Firebox for the date and time range you select.
For DNSWatch, the Subscription Dashboard includes a tile that shows Allowed, Blocked, and Malicious activity.
For more information, go to Subscription Dashboard (WatchGuard Cloud).
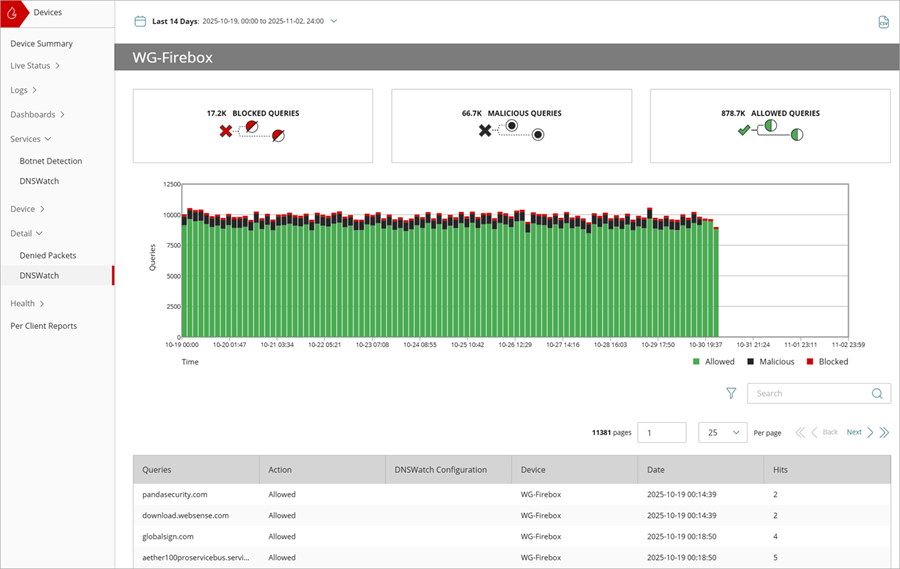
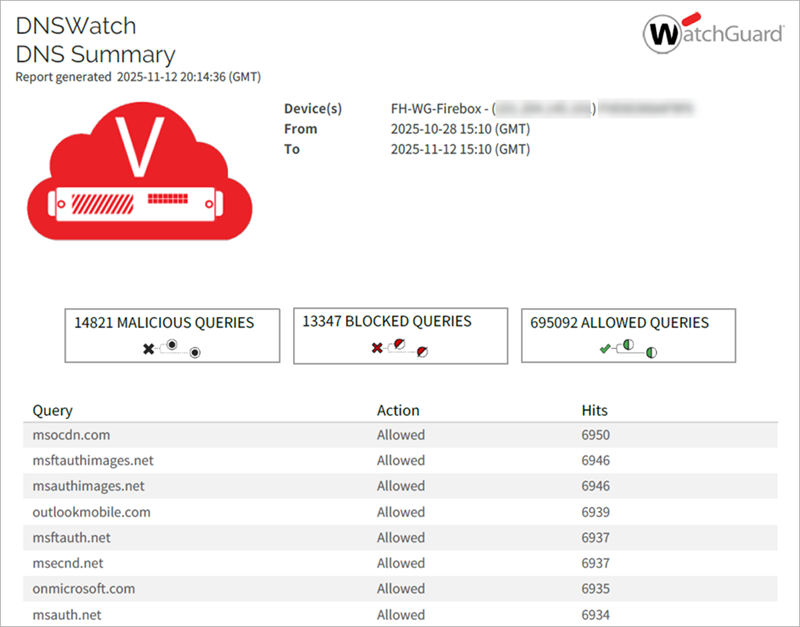
Review the DNSWatch Service and Detail Reports
The DNSWatch Service report shows a summary of the blocked queries, malicious queries, and allowed queries detected by DNSWatch. The DNSWatch Detail report includes a table that shows every instance of malicious or blocked activity detected by DNSWatch for the selected time period.
For more information, go to DNSWatch Service and Detail Reports in WatchGuard Cloud.
Configure Firebox Scheduled Reports for DNSWatch
You can schedule reports to run for one or more Fireboxes. Each scheduled report can contain multiple reports. WatchGuard Cloud sends scheduled reports as a zipped folder email attachment that contains individual .PDF reports to the recipients you specify. Recently generated reports are also available for download in WatchGuard Cloud.
You can schedule reports to run daily, weekly, monthly, or immediately. For daily, weekly, and monthly reports, the report frequency also determines the date range for data included in the report. For example, a weekly report includes data collected from 00:00 UTC to 23:59 UTC for the specified time period.
From the Scheduled Reports page, you can add, edit, or delete scheduled reports.
To view DNSWatch reports in your scheduled Firebox report, select DNSWatch in the Services section when you configure your report.

The DNSWatch scheduled report shows all malicious, blocked, and allowed queries for the selected time period.
To add a scheduled report for DNSWatch in WatchGuard Cloud, go to Schedule Firebox Reports.
About DNSWatch in WatchGuard Cloud
DNSWatch Migration to WatchGuard Cloud