Applies To: Locally-managed Fireboxes
- Select

 > Administration > Administration > Server Management.
The Server Management pages open with the Status tab selected. - Select the Configuration tab.
The Configuration pages open with the General tab selected. If the user mode is read-only, you must change to read-write mode to continue. - Select the Reporting tab.
The Reporting settings appear. - To unlock the configuration so you can make changes, click
 .
.
For more information about how to unlock and lock the Dimension configuration, go to Lock and Unlock the Dimension Configuration. - Configure the settings as described in the next sections.
- Click Save.
Configure Custom Report Templates
You can create report templates to customize the look and feel of the PDFs you generate your reports. For each custom report template that you create, you specify the report name, details to include in the header and the footer of the report, and the logo to use for the report. When you select an image file to use for the logo, you can select a PNG, JPG, or GIF image file that is no larger than 100 x 40 pixels.
When you create a report template, you can also select to make one template the Default template that is used for all On-demand PDF reports.
Add a Report Template
In the Custom Report Templates section:
- Click Add.
The Create Custom Template dialog box opens. - In the Name text box, type a name for the report template.
For example, type ExampleCompanyExecutiveReport. - In the Header text box, type the text to include in the header of each page of the report.
- In the Footer text box, type the text to include in the footer of each page of the report.
- From the Paper Size drop-down list, select an option:
- Letter (8.5" x 11")
- A4 (210 x 297 mm)
- Legal (8.5" x 4)
- To select a logo for the report, click Browse and select an image file.
- To specify this report template as the default template to use for reports, select the Default custom template check box.
- Click OK.
The report template appears in the Custom Templates list.
Edit a Report Template
When you edit a report template, you can modify any of the settings except for the report name.
In the Custom Report Templates section:
- From the Custom Templates list, select a report.
- Click Edit.
The Edit Custom Template dialog box opens. - Modify the settings as necessary.
- Click OK.
- Click Save.
Delete a Report Template
In the Custom Report Templates section:
- From the Custom Templates list, select a report.
- Click Remove.
The template is immediately removed from the list. - Click Save.
Specify FTP Servers
In the FTP Servers section, you can manage the list of remote FTP servers where you can send reports. You can optionally specify a directory in which to save the reports, and the user credentials to use to connect to the FTP server.
If you do not already have an FTP server to use for reports, you must install and configure an FTP server before you can configure the FTP Server settings for Dimension.
Before you begin, make sure that you have this information for the FTP server:
- The IP address or host name of the server
- The user name for connections to the server
- The directory path where backup files are saved
Add an FTP Server
To add an SSH FTP server:
- Click Add.
The Add FTP Server dialog box opens. - In the FTP Server Address text box, type the IP address or domain name for the remote FTP server.
For example, type 203.0.113.10 or ftp.example.com. - (Optional) In the Directory for Reports text box, type the directory location on the FTP server to save the reports.
- (Optional) In the User Name text box, type the user name to use to connect to the FTP server.
- (Optional) In the Passphrase text box, type the passphrase for the user name you specified.
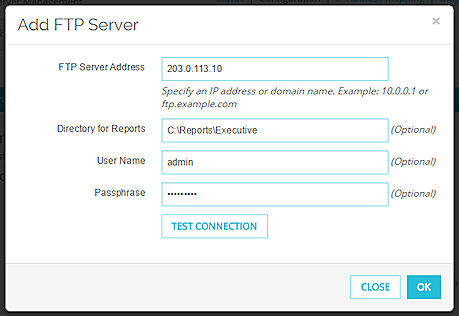
- To make sure that Dimension can contact the FTP server you specified, click Test Connection.
- Click OK.
The FTP server appears in the FTP Servers list.
Edit an FTP Server
When you edit the settings for an FTP server, you can modify any of the settings except for the FTP Server Address.
In the FTP Servers section:
- From the FTP Servers list, select a server.
- Click Edit.
The Edit FTP Server dialog box opens. - Modify the settings as necessary.
- Click OK.
- Click Save.
Delete an FTP Server
In the FTP Servers section:
- From the FTP Server list, select a server.
- Click Remove.
The server is immediately removed from the list. - Click Save.
Configure ConnectWise Settings
If you have an account with ConnectWise, you can send your relevant WatchGuard reports to ConnectWise to be included in your ConnectWise reports. You can generate daily reports to send to ConnectWise on a regular schedule.
When you send reports to ConnectWise, these WatchGuard reports are converted to the related ConnectWise reports:
| WatchGuard Report | ConnectWise Report |
|---|---|
| Firebox Statistics | Bandwidth |
| Intrusion Prevention Service Summary | Intrusion |
| WebBlocker Summary | Filtered Sites |
| Most Popular Domains | Top Sites |
To send your WatchGuard reports to ConnectWise, you must complete these steps:
- Configure settings for the ConnectWise applications.
- Configure ConnectWise to accept your WatchGuard reports.
For more information about how to configure ConnectWise, see the documentation provided by ConnectWise. - Configure Dimension to send reports to ConnectWise:
- Enable ConnectWise integration.
- Create a daily report schedule.
To enable ConnectWise integration to send your WatchGuard reports to ConnectWise:
- Select the Enable ConnectWise Integration check box.
The ConnectWise settings are enabled. - In the ConnectWise Server (Site) text box, type the address of your ConnectWise server.
Make sure to type the ConnectWise server address in one of these formats: test.connectwise.com or test.connectwise.com:<port>. - In the Company ID text box, type the ConnectWise identification for your company.
- In the Integrator Login and Integrator Passphrase text boxes, type the user name and passphrase for your ConnectWise Company ID.
- From the Server Time Zone drop-down list, select the time zone where your ConnectWise server is located.
- In the Company Names list, add, edit, or remove the Managed ID and Management Solution information for your company. You can add one or more company names to the list.
- To import the CA certificate for your ConnectWise server, click Import Certificate.
Next, you must configure a report schedule that includes ConnectWise reports. For more information about how to create a schedule, see Schedule Dimension Reports.
For a detailed example of how to complete ConnectWise integration, go toConfigure ConnectWise Integration for Reports.