Applies To: Locally-managed Fireboxes
When you first log in to Dimension, the Home page appears with the Devices tab selected.
From the Home page, select a tab to see the available options on that page:
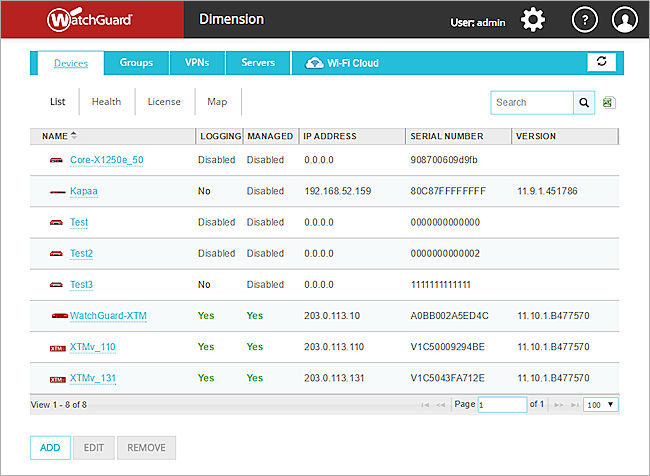
- Devices — The Devices page includes a list of all Fireboxes that send log messages to the Dimension server.
- Groups — The Groups page includes a list of device groups that send log messages to the Dimension server.
- VPNs — From the VPNs page you can create and manage VPNs between the connected Fireboxes that Dimension manages.
- Servers — The Servers page includes a list of all the WatchGuard servers that send log messages to the Dimension server.
Before a Firebox or WatchGuard server can appear in the Devices or Servers lists, you must configure the Firebox or WatchGuard server to send log messages to the Dimension server. For information about how to configure logging for your Fireboxes and WatchGuard servers, see:
From the Home page, you can also connect directly to WatchGuard Wi-Fi Cloud and manage your AP devices. For more information, see Connect to WatchGuard Wi-Fi Cloud.
To refresh the information on any of the Home pages, click ![]() .
.
To download a CSV file of the content on any of the Home pages, click ![]() .
.
To return to the Home page from another page in Dimension, click Home in the breadcrumbs at the top of the page.

About the Devices Page
From the Devices page, you can select a device to view all of the dashboards, log messages, and reports for that device. For each device, the Devices list includes these details:
- Name — The Device Name you specified when you configured the device.
- Logging — Whether the Firebox is connected to Dimension for log message storage.
- Managed — Whether the Firebox is managed by Dimension.
- IP Address — The current IP address of the device.
- Serial Number — The serial number of the device.
- Version — The current OS version on the device.
- Model — The hardware model of the device.
You can click a column header to sort the list by that column. You can also use the page navigation arrows to move to the next page of devices in the list, type a page number in the text box to go directly to that page, and select the number of devices (25, 100, 250, or 500) from the drop-down list to see on a page.
For information about how to view details for a Firebox in the Devices list, go to View Devices.
Filter the Devices List
If there are many Fireboxes in your Devices list, you can use the Search feature at the top of the page to filter the list of Fireboxes and temporarily reduce the number of devices that appear in the list.
To filter the Devices list:
- In the Search text box, type the parameter to search on.
- Click
 .
.
The Devices list is reorganized so only devices that meet your specified parameters appear. - To remove the filter from the Devices list, click
 .
.
All devices appear in the Devices list again.
Remove a Device from the Devices List
If there are Fireboxes that you no longer want to keep in the Devices list, you can delete them from the list. This is helpful when the list includes a Firebox that is no longer in use.
- From the Devices list, select the row for the Firebox to delete from the list.
Do not click the Name of the device. That action opens the main page for the selected device. - Click Remove.
The selected device is removed from the list.
About the Groups Page
On the Groups page, you can create groups of devices so you can see log messages and reports for more than one device at the same time. You can also edit the groups you create or delete them from the Groups list.
You can click a column header to sort the list by that column. You can also use the page navigation arrows to move to the next page of groups in the list, type a page number in the text box to go directly to that page, and select the number of devices (25, 100, 250, or 500) from the drop-down list to see on a page.
For information about how to view details for the groups in the Groups list, go to View Groups.
Add a Group
- On the Groups page, click Add.
The Add Group dialog box opens. - In the Group Name text box, type a name for the group.
- (Optional) In the Description text box, type a descriptive phrase to help you identify the group.
- Adjacent to the Select Devices list, click
 .
.
The Select Devices dialog box opens. - To search for specific devices, groups, or FireClusters in the list, in the Device(s) text box, type the name of the device, group, or FireCluster.
The devices in the Selected list change based on your search parameters. - To add a device to the group, select a device in the Selected list and click
 to move the device to the Available list.
 - To remove a device from the group, select a device in the Available list and click
 to move the device to the Selected list.
 - Click OK.
The Add Group dialog box open with the devices you selected in the Select Devices list. - Click Save.
The group appears in the Groups page.
Edit a Group
To change a group in the Groups list:
- In the Groups list, select a group.
- Click Edit.
- Add or remove devices, groups, or FireClusters in the group.
Delete a Group
To remove a group from the Groups list:
- In the Groups list, select a group.
- Click Remove.
A confirmation dialog box appears. - Click OK.
About the VPNs Page
On the VPNs page, you can create and manage hub-and-spoke VPNs between the connected Fireboxes that Dimension manages.
For more information about the VPNs you can create and manage, go to Manage VPNs for Connected Fireboxes.
For complete instructions to create and manage VPNs with Dimension, go to Configure Managed VPNs.
About the Servers Page
On the Servers page, you can select a WatchGuard server to view the log messages and reports for that server.
For each server, the Servers list includes these details:
- Name — The Device Name you specified when you configured the device.
- Connected — The status of the connection between the device and the Dimension server.
- IP Address — The current IP address of the device.
- Type — The type of WatchGuard server.
From the Servers page, you can sort the list of servers or delete a server from the list.
To sort the Servers list, click any column header.
If there are servers in the Servers list that you no longer want to keep, you can delete them from the list. This is helpful when the list includes a server that is no longer in use.
- From the Servers list, select the row for the server to delete from the list.
Do not click the Name of the server. That action opens the main page for the selected server. - Click Remove.
The selected server is removed from the list.
For information about how to view details for a WatchGuard server in the Servers list, go to View Servers.
Common Dimension Features
On many of the Dimension pages, you can use these common features to navigate through the pages, refine the data you see included in reports, or make configuration changes.
Unlock and Lock the Configuration
Before you can make changes to the Dimension configuration settings in the Administration pages, you must unlock the configuration. This enables more than one user with administrative credentials to connect to Dimension at the same time, but ensures that only one connected user can make changes to the configuration at the same time.
To unlock the configuration so you can make changes, click ![]() .
.
For more information about how to unlock and lock the Dimension configuration, go to Lock and Unlock the Dimension Configuration.
Show or Hide the Navigation Menu
On the Dimension pages with a left navigation menu, you can hide the left navigation menu to increase the size of the main display and see more information in the details of the log messages and reports.
- To increase the main display size, at the top of the left navigation menu, click
- To restore the left navigation menu, click
Breadcrumbs
The breadcrumbs links appear at the top of most second level pages in Dimension to show you where you are in the Dimension web UI.
To go to another level in the path, click a blue link in the breadcrumbs path.
For example, in the path Home > Waimea > Per Client Reports, click Home to return to the main Dimension Home page.
Refresh Data
On many of the Home pages, you can click ![]() to refresh the data for the date and time range you selected.
to refresh the data for the date and time range you selected.
Search
In the Search text box, type the text to search for in the log messages that appear on a Device or Server page. This option is not available for Reports pages. To refine your search, you can also specify the name of one column to search in. Though you can search for any column included in your log files, some of the columns that are most often searched are: policy, protocol, src_ip, src_port, dst_ip, dst_port, src_intf, dst_intf, app_name, and app_cat_name.
For example, to search for all log messages with a source IP address that starts with 192.168, type src_ip=192.168.
Actions
For devices and servers, from the Actions drop-down list, you can export log messages to a CSV file. For devices, you can also select to view a Timeslice Analysis.