Manage Users
Applies To: Wi-Fi Cloud-managed Access Points (AP120, AP125, AP225W, AP320, AP322, AP325, AP327X, AP420)
If there are any changes made to the account information in a user’s WatchGuard account, they are not automatically updated in Wi-Fi Cloud. The Wi-Fi Cloud account must be modified manually, or you can delete the Wi-Fi Cloud user and have the user log in again through their WatchGuard account so that the corresponding account data is updated.
Add Local Wi-Fi Cloud User
You can add additional secondary users for your account that are local to Wi-Fi Cloud. You can use these accounts with profiles and service privileges to delegate specific Wi-Fi Cloud management functions to the user.
You can add a maximum of 25 admin users to your account.
These users are local to Wi-Fi Cloud and are not connected to WatchGuard accounts. To log in with a local user account, you must log in directly to Wi-Fi Cloud from this URL: https://login.watchguard.cloudwifi.com/cas/login?authtype=local
To add a new local Wi-Fi Cloud user account:
- Log in to Wi-Fi Cloud with your primary administrative user account.
- Open Launchpad.
- Select Admin and select the Users tab.
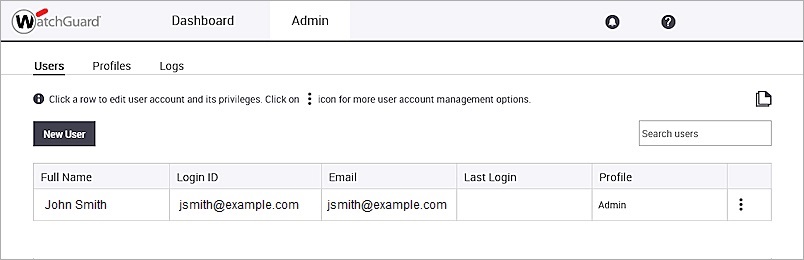
- Click New User.
- Add the details for the user:
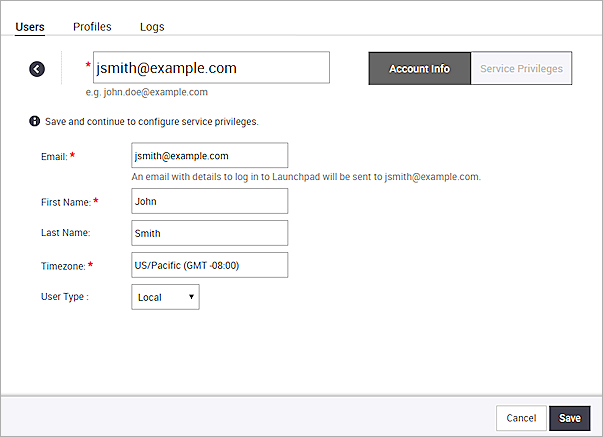
- Login ID — Type a login ID for the user. This is the email address of the user and is the login name the user will use to authenticate.
- Email — Type the email address of the user. An email will be sent to this address with login details for the user.
- First Name — Type the first name of the user.
- Last Name — Type the last name of the user.
- Timezone — Type the name of the timezone region and then select the appropriate time zone from the drop-down list.
- User Type — Select Local from the drop-down list.
- Click Save.
Assign Profile
After users are added to Wi-Fi Cloud, you can assign a profile to the user account.
To assign profile to a user account:
- Open Launchpad.
- Select Admin and select the Users tab.
- In the row of the user account to edit, click
 and select Service Privileges.
Or, select the user account and click Service Privileges. - From the Select Profile drop-down list, select a profile to assign to the user account, or assign a custom profile.
For more information about profiles, see Manage Profiles.
For more information about the service privileges available, see Manage Privileges.
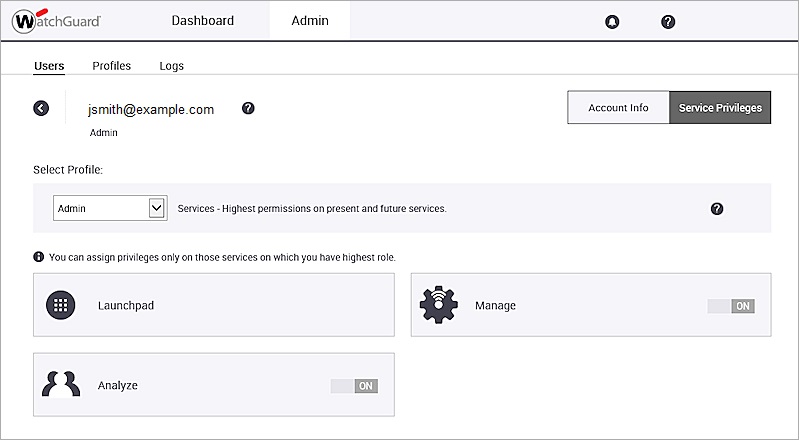
- Click Save.
Change Profile
If you change the user profile from Admin to Custom, all previous permissions for Launchpad services do not change until new rules have been defined for the Custom profile.
If you change the profile from Custom to Admin, the user has Admin permissions for all Launchpad services.
For more information, see Users and Profiles
Edit User
To edit user account information, you must have user management privileges. Changes to user account information appear the next time the user logs in.
You cannot modify the data for a currently logged in user.
All user account settings can be changed except for the user account login ID. If you change the email ID for a user, a notification email is sent to the previous email ID, and a confirmation email is sent to the new email ID you specified for the user account. If you change an email ID more than once before it is confirmed by the user, the confirmation email that has been sent to the latest email ID is considered valid.
If the user has not received the confirmation email, you can send another confirmation email to the new email ID. To send the confirmation email again:
- On the Edit user page, scroll to the Email section.
- Click Resend email link.
This link is available only if the user has not confirmed the new email ID.
To edit user account information:
- Open Launchpad.
- Select Admin and select the Users tab.
- Click the row of the user account to edit.
The Account Info page appears for the user account you selected.
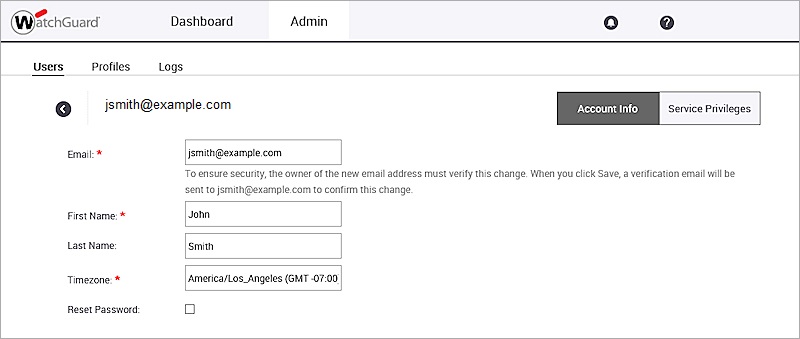
- Modify the account information.
- Email — Email address of the user to which emails can be sent.
- First Name — First name of the user.
- Last Name — Last name of the user.
- Timezone — Timezone of the user. Note that a change in time zone for the user will not be indicated until the next time the user logs in.
- Click Save.
Lock or Unlock a User Account
To disable access to Launchpad for a user, you can lock that user account. You can unlock a locked user account at any time. When a user account is locked, ![]() appears adjacent to the user account name.
appears adjacent to the user account name.
To lock or unlock a user account:
- Open Launchpad.
- Select Admin and select the Users tab.
- In the row of the user account to lock or unlock, click and select Lock/Unlock.
Reset Password
When you reset the password for a user account, an email message with a password reset link is sent to the user. The user can click the link to set a new password.
To reset the password for a user account:
- Open Launchpad.
- Select Admin and select the Users tab.
- Select a user account.
The Account Info page appears for the user account you selected. - Select the Reset Password check box.
- Click Save.
The password for the user account is reset and a notification email is sent to the user.
Search for a User Account
You can search for user accounts by the login ID, name, email, last login, or profile.
To search for a user account:
- Open Launchpad.
- Select Admin and select the Users tab.
- At the top-right of the page, in the Search users text box, type the keyword to search on.
A list of user accounts that match the search parameter appears as you type.
Delete a User Account
To permanently delete a user account:
- Open Launchpad.
- Select Admin and select the Users tab.
A list of user accounts appears. - In the row of the user account to delete, click then select Delete.
A confirmation message appears. - Click Yes.