Applies To: ThreatSync
ThreatSync automation policies define the actions that ThreatSync takes automatically when a threat is detected. When an incident meets the conditions you specify in the automation policy, ThreatSync performs the specified actions (for example, delete the file and isolate the device). When there is more than one automation policy assigned to an account, ThreatSync applies the policies to devices in the order shown on the Automation Policies page.
Your ThreatSync account includes default automation policies with recommended settings. You can edit the default policies and configure additional ThreatSync automation policies based on the requirements of your network.
ThreatSync default automation policies are disabled by default. For new accounts, the default automation policies appear on the Automation Policies page. For existing accounts, you must click Generate Default Policies on the Automation Policies page to view them in your automation policy list. We recommend you enable the default automation policies so you can focus on incidents that require manual investigation and remediation.
For more information about ThreatSync default automation policies, go to About ThreatSync Automation Policies.
On the Automation Policies page for a Subscriber account, you can:
- Add an Automation Policy (Subscribers)
- Enable or Disable an Automation Policy
- Change the Order of Automation Policies
- Deploy an Automation Policy
Service Providers can create automation policy templates that include multiple automation policies, then assign the templates to the accounts they manage. If you are Subscriber, automation policies assigned to your account through a template appear at the top of the policies list. For more information, go to Manage ThreatSync Automation Policy Templates (Service Providers).
Add an Automation Policy (Subscribers)
When you add an automation policy, you specify the conditions and actions that ThreatSync performs for an incident.
To add an automation policy:
- Log in to your WatchGuard Cloud account.
- For Service Provider accounts, from Account Manager, select My Account.
- Select Configure > ThreatSync.
The Automation Policies page opens. - Click Add Automation Policy.
The Add Policy page opens.
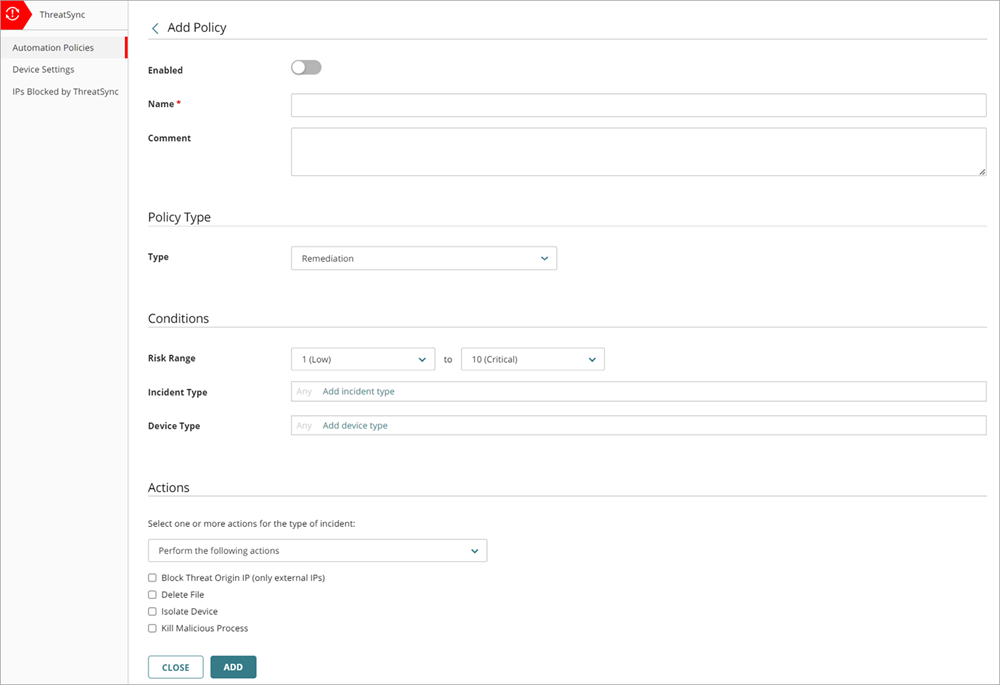
- To enable the new policy, click the Enabled toggle.
- Enter a Name for your policy and any comments.
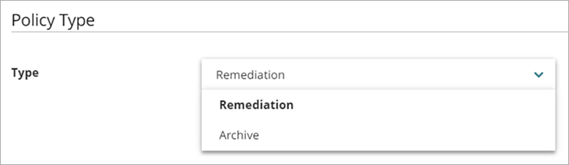
- In the Policy Type section, from the Type drop-down list, select the type of policy you want to create:
- Remediation — The automation policy performs the specified remediation actions for incidents that meet the conditions.
- Archive — The automation policy changes the status of incidents that meet the conditions to Archived.
- In the Conditions section, specify the conditions that an incident must meet for this automation policy to apply:
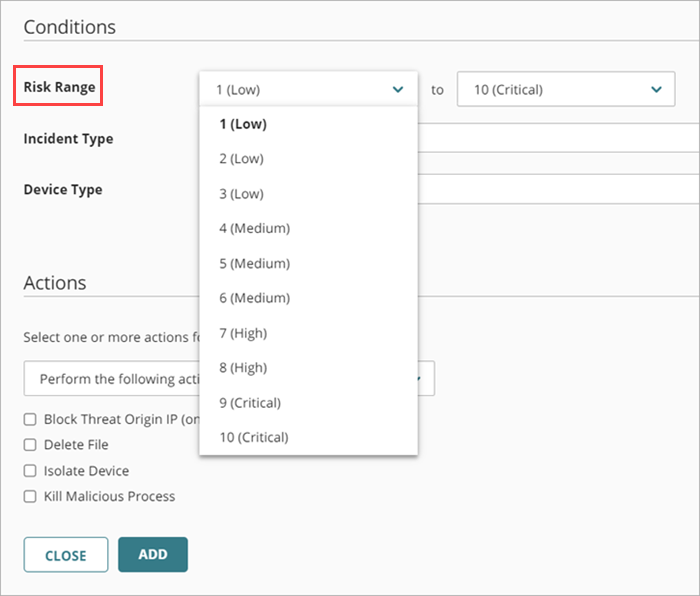
- Risk Range — Specify a range of incident risk levels. For more information, go to ThreatSync Risk Levels and Scores.
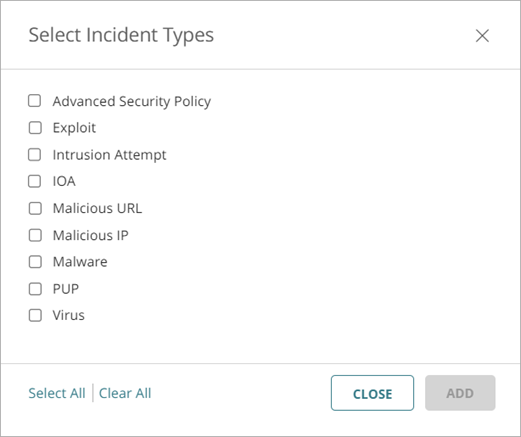
- Incident Type — Select one or more of these incident types:
- Advanced Security Policy — The execution of malicious scripts and unknown programs that use advanced infection techniques.
- Exploit — Attacks that try to inject malicious code to exploit vulnerable processes.
- Intrusion Attempt — A security event where an intruder tries to gain unauthorized access to a system.
- IOA — Indicators of Attack (IOAs) are indicators that are highly likely to be an attack.
- Malicious URL — A URL created to distribute malware, such as ransomware.
- Malicious IP — An IP address associated with malicious activity.
- Malware — Malicious software designed to damage, disrupt, and gain unauthorized access to computer systems.
- PUP — Potentially Unwanted Programs (PUPs) that might install when other software installs on a computer.
- Virus — Malicious code that enters computer systems.
- Malicious Access Point — An unauthorized wireless access point connected to your network or operating in your airspace.
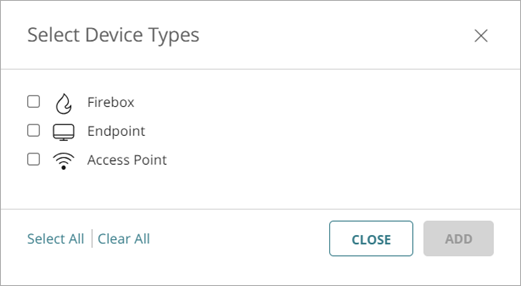
- Device Type — Select one or more of these device types:
- Firebox
- Endpoint
- Access Point
-
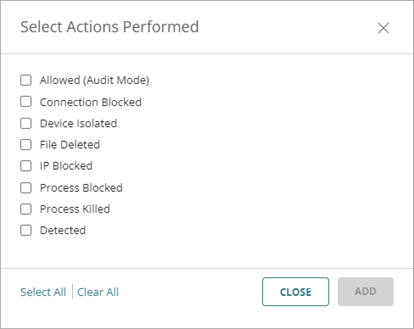
Actions Performed — Select one or more of these actions performed on an incident (Archive policy type only).
- Allowed (Audit Mode) — Incident detected, but because the device is in Audit mode, no action was taken.
- Connection Blocked — Connection blocked.
- Process Blocked — Process blocked by an endpoint device.
- Device Isolated — Communication with device is blocked.
- File Deleted — File was classified as malware and deleted.
- IP Blocked — Network connections to and from this IP address are blocked.
- Process Killed — Process ended by an endpoint device.
- Detected — Incident detected but no action was taken.
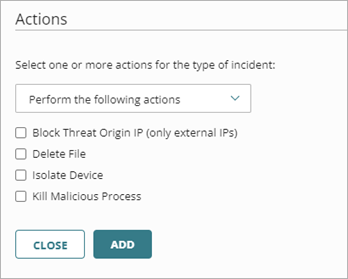
- In the Actions section, from the drop-down list, select whether you want to perform or prevent specified actions.
- Perform — ThreatSync performs the specified actions for new incidents that meet the policy conditions.
- Prevent — ThreatSync prevents the specified actions. To create an exception to a broader Perform policy, you can add a policy with the Prevent action and rank it higher than the other policy in the policy list. A policy with the Prevent action does not prevent the manual execution of an action by an operator.
- Select one or more of these actions to perform or prevent:
- Block Threat Origin IP (only external IPs) — Blocks the external IP address associated with the incident. When you select this action, all Fireboxes with ThreatSync enabled in the WatchGuard Cloud account block connections to and from the IP address.
- Delete File — Deletes the flagged file associated with the incident.
- Isolate Device — Isolates the computer from the network to prevent the spread of the threat and block the exfiltration of confidential data. When you select Isolate Device as the action, you can specify isolation exceptions to allow communication from processes you select. For more information, go to Isolation Exceptions.
- Kill Malicious Process — Terminates a process that exhibited malicious behavior associated with the incident.
- Archive the Incident — Changes the incident status to Archived (Archive policy type only).
If the policy type is Archive, the Archive the Incident action is selected automatically and you cannot select a different action.
- Click Add.
The new policy is added to the policy list.
Isolation Exceptions
When you choose Isolate Device as the action in an automation policy, you can create exceptions to the isolation to allow communications from specific processes.
To create an isolation exception in an automation policy:
- On the Add Policy page, in the Actions section, select Isolate Device.
The Isolate Device section appears. - Enable Advanced Options.
The Advanced Options section appears.

- In the Allow Communication from these Processes text box, enter the names of the processes you want to allow as exceptions to the isolation. For example, enter chrome.exe to allow communication with Google Chrome.
- (Optional) If you want a message to show on isolated devices, enable Show Message on Device and enter a custom message in the Show Message on Device text box. If you do not want a message to show on isolated devices, disable Show Message on Device.
- Click Add
Enable or Disable an Automation Policy
In the Automation Policies list, you can enable or disable specific automation policies in a Subscriber account. For example, during a security event, you might want to disable automation policies that archive incidents so that you can review all ThreatSync activity.
If your Service Provider assigned a policy to your account through a template, the policy appears first in the automation polices list, but you cannot enable or disable it.
You can also enable or disable an automation policy when you edit it.
To enable or disable an automation policy:
- Select Configure > ThreatSync.
- On the Automation Policies page, click the name of the automation policy you want to enable or disable.
The Edit Policy page opens. - Click the Enabled toggle to enable or disable the automation policy.
- Click Save.
Change the Order of Automation Policies
On the Automation Policies page, you can change the priority order of automation policies to rank them from top to bottom. When an incident matches the conditions configured in multiple policies, ThreatSync performs the action specified in the highest ranked policy that applies.
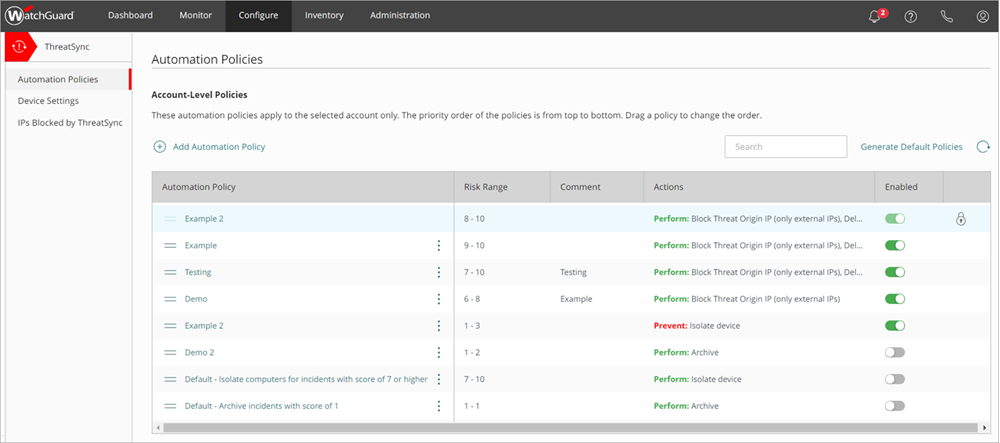
Each recommended action in an incident is evaluated individually against a policy. If an incident does not have a recommended action that matches an action specified in the policy, that policy is skipped. For more information, go to ThreatSync Automation Policy Precedence.
To change the automation policy order in the policy list:
- Click the move handle for the automation policy you want to move and drag the policy up or down in the list.
- Deploy your policy changes.
Deploy an Automation Policy
After you add, update, enable, or disable an automation policy, the Automation Policies page shows a message banner that states you have undeployed policy changes.

To deploy an automation policy and apply your changes, click Deploy.
The changes deploy to the ThreatSync decision engine, which then sends actions to Fireboxes or endpoint devices when incidents match the policy.
Manage ThreatSync Automation Policy Templates (Service Providers)
Manage IP Addresses Blocked by ThreatSync