Manage DNSWatchGO Client Groups
You can create DNSWatchGO Client groups to organize your DNSWatchGO Clients and assign specific content filter policies to each group. For example, you can create separate client groups for your Sales and Customer Support teams, then assign a different policy to each group.
This feature enables you to allow or block different content categories for each group. So you could allow your Marketing team to visit websites in the Social Media categories, but restrict access to Social Media for everyone else.
To manage DNSWatchGO Client groups, log in to DNSWatch.
Create a New Client Group
Before you create any new groups, all DNSWatchGO Clients are in the default group, which uses your default policy. You move clients into a group after you create it.
To create a new DNSWatchGO Client group:
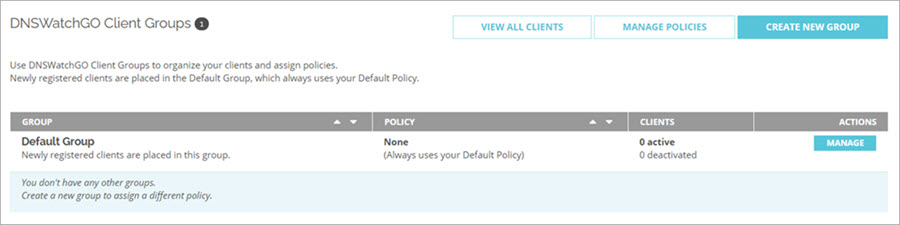
- Select Configure > DNSWatchGO Client Groups.
The DNSWatchGO Client Groups page opens.
- Click Create New Group.
The Create a New Group page opens.
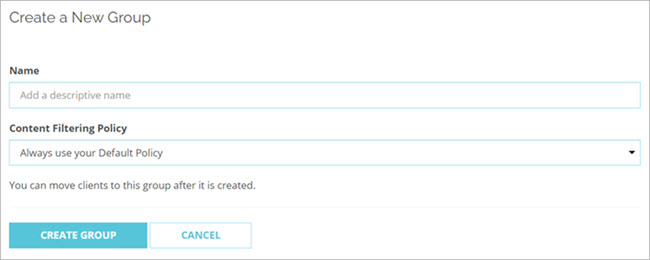
- In the Name text box, type a descriptive name for the group.
- From the Content Filtering Policy drop-down list, select the policy to assign to the new group.
- Click Create Group.
Your group is created and displayed on the DNSWatchGO Client Groups page.
Edit a Client Group
You can edit groups if you want to change the name or assign a different policy.
To edit a group:
- Select Configure > DNSWatchGO Client Groups.
The DNSWatchGO Client Groups page opens. - Click Edit next to the group you want to edit.
The Edit Group page opens.
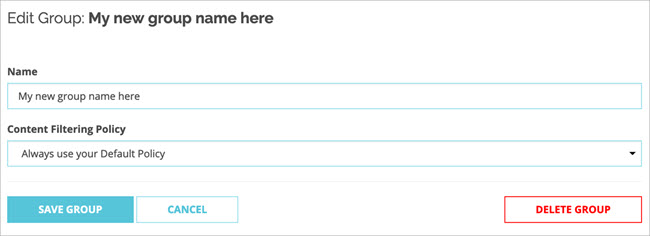
- In the Name text box, type a new descriptive name for the group.
- In the Content Filtering Policy drop-down, select the policy to assign to the group.
- Click Save Group.
Move DNSWatchGO Clients to a Different Group
By default, all clients are in the default group and use the default policy. If you want a client to use a different content filter policy, you must move the client to a different group.
To move DNSWatchGO Clients to a different DNSWatchGO Client group:
- Select Configure > DNSWatchGO Client Groups.
The DNSWatchGO Client Groups page opens. - Click Manage next to the group that includes the clients you want to move.
The DNSWatchGO Clients page opens. - Select the check box next to the clients you want to move. Tip!
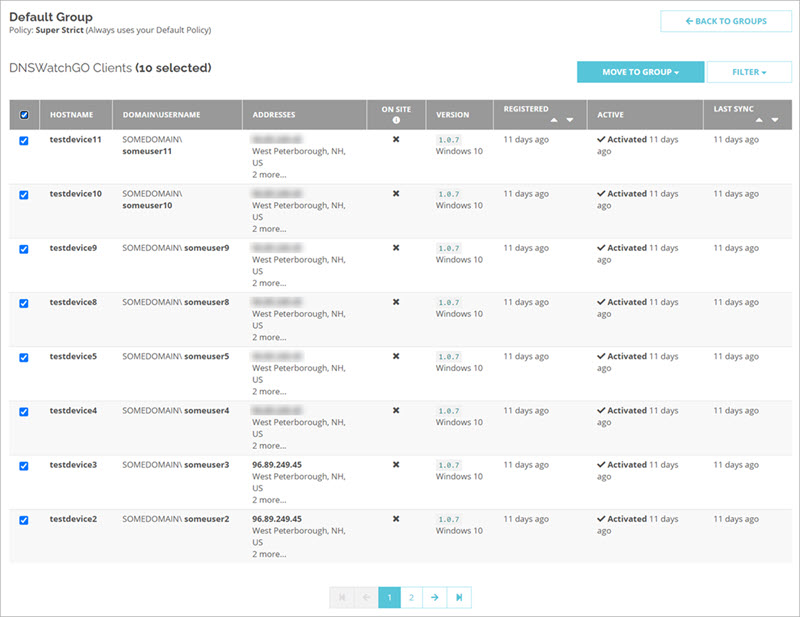
- From the Move to Group drop-down list, select the group to move your clients to.
The Confirm move to group dialog box opens. - Click Move Clients.
You can also filter the clients in the DNSWatchGO Clients page. For more information, go to View DNSWatchGO Clients Status.
Delete a Client Group
When you delete a DNSWatchGO Client group, all clients from that group move to the Default Group with the Default Policy assigned.
If you do not use a DNSWatchGO Client group, you can delete it.
To delete a DNSWatchGO Client group:
- Select Configure > DNSWatchGO Client Groups.
The DNSWatchGO Client Groups page opens. - Click Edit next to the group you want to edit.
The Edit Group page opens.
- Click Delete Group.
View DNSWatchGO Clients
To view a list of your DNSWatchGO Clients and their assigned groups and policies:
- Select Configure > DNSWatchGO Client Groups.
The DNSWatchGO Client Groups page opens. - Click View All Clients.
The DNSWatchGO Clients page opens.
Manage User Access to Content in DNSWatch
View DNSWatchGO Clients Status
About DNSWatchGO Protected Networks