Use the macOS or iOS Native IPSec VPN Client
Applies To: Locally-managed Fireboxes
Apple iOS devices (iPhone, iPad, and iPod Touch) and macOS 10.6 and higher devices include a native Cisco IPSec VPN client. You can use this client to make an IPSec VPN connection to a Firebox. To use the native IPSec VPN client to make a connection to your Firebox, you must configure the VPN settings on your Firebox to match those on the iOS or macOS device.
For IPSec VPN connections from a macOS device, you can also use the WatchGuard IPSec VPN Client for macOS. For more information, go to Install the IPSec Mobile VPN Client Software.
You must configure Mobile VPN with IPSec for default-route VPN (0.0.0.0/0). The VPN client on the macOS or iOS device does not support split tunneling.
Supported Phase 1 and 2 Settings
For devices with iOS 9.3 and higher or macOS 10.11.4 and higher, these combinations of Phase 1 and 2 settings are supported.
If Diffie-Hellman Group 14 is selected in the Phase 1 settings:
- Phase 1 Authentication — MD5, SHA1, SHA2-256, SHA2-512
- Phase 1 Encryption — AES256
- Phase 2 Authentication — MD5, SHA1
- Phase 2 Encryption — 3DES, AES128, AES256
- Perfect Forward Secrecy — No
If Diffie-Hellman Group 2 is selected in the Phase 1 settings:
- Phase 1 Authentication — MD5, SHA1
- Phase 1 Encryption — DES, 3DES, AES128, AES256
- Phase 2 Authentication — SHA1, MD5
- Phase 2 Encryption — 3DES, AES128, AES256
- Phase 2 PFS — No
For devices with versions of iOS lower than 9.3, these Phase 1 and 2 settings are supported.
- Diffie-Hellman Group 2
- Phase 1 Authentication — MD5 , SHA1
- Phase 1 Encryption — DES, 3DES, AES128, AES256
- Phase 2 Authentication — MD5 , SHA1
- Phase 2 Encryption — 3DES, AES128, AES256
- Phase 2 PFS — No
SHA2 is not supported for Phase 2 for Mobile VPN with IPSec connections from macOS and iOS devices. We recommend you use SHA1.
Diffie-Hellman Group 5 is not supported on Apple devices for aggressive mode. Mobile VPN with IPSec only supports aggressive mode.
Configure the Firebox
Many of the VPN tunnel configuration settings in the VPN client on the macOS or iOS device are not configurable by the user. It is very important to configure the settings on your Firebox to match the settings required by the VPN client on the macOS or iOS device.
- (Fireware v12.3 or higher) Select VPN > Mobile VPN.
- In the IPSec section, select Configure.
The Mobile VPN with IPSec page appears. - (Fireware v12.2.1 or lower) Select VPN > Mobile VPN with IPSec.
The Mobile VPN with IPSec page appears. - Click Add.
The Mobile VPN with IPSec Settings page appears.
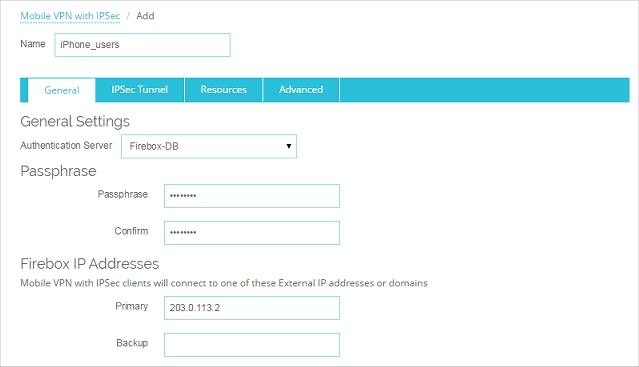
- In the Name text box, type the name of the authentication group your macOS or iOS VPN users belong to.
You can type the name of an existing group, or the name for a new Mobile VPN group. Make sure the name is unique among VPN group names, as well as all interface and VPN tunnel names.
- From the Authentication Server drop-down list, select an authentication server.
You can authenticate users to the Firebox (Firebox-DB) or to a RADIUS, VASCO, SecurID, LDAP, or Active Directory server. Make sure that the method of authentication you select is enabled.
If you create a Mobile VPN user group that authenticates to an external authentication server, make sure you create a group on the server with the same name you specified in the wizard for the Mobile VPN group. If you use Active Directory as your authentication server, the users must belong to an Active Directory security group with the same name as the group name you configure for Mobile VPN with IPSec. For more information, go to Configure the External Authentication Server.
- Type and confirm the Passphrase to use for this tunnel.
- In the Firebox IP Addresses section, type the primary external IP address or domain name to which Mobile VPN users in this group can connect.
- Select the IPSec Tunnel tab.
The IPSec Tunnel settings appear.

- Select Use the passphrase of the end user profile as the pre-shared key.
This is the default setting. - From the Authentication drop-down list, select an authentication method.
- From the Encryption drop-down list, select an encryption method.
- In the Phase 1 Settings section, click Advanced.
The Phase 1 Advanced Settings appear.
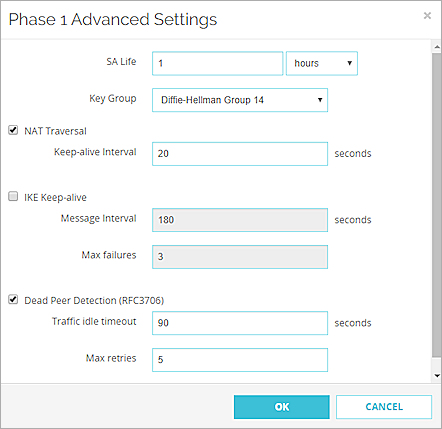
- Set the SA Life to 1 hour.
The VPN client on the macOS or iOS device is configured to rekey after 1 hour. If this profile is only used for connections by VPN clients on macOS or iOS devices, set the SA Life to 1 hour to match the client setting.
To use this VPN profile for all supported VPN clients, set the SA Life to 8 hours. When the SA Life is set to 8 hours, WatchGuard IPSec Mobile VPN clients rekey after 8 hours, but the VPN client on the macOS or iOS device uses the smaller rekey value of 1 hour.
- From the Key Group drop-down list, select Diffie-Hellman Group 14 or Diffie-Hellman Group 2.Tip!
- Do not change any of the other Phase 1 advanced settings.
- Click OK.
- In the Phase 2 Settings section, clear the PFS check box.
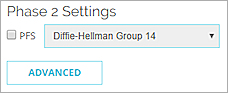
- In the Phase 2 Settings section, click Advanced.
The Phase 2 Advanced settings appear.
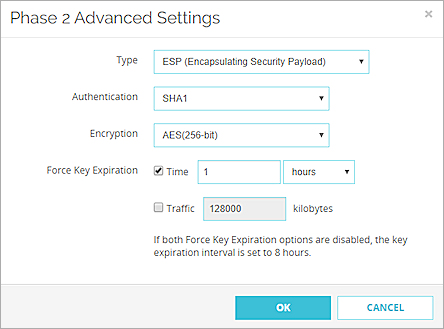
- From the Authentication drop-down list, select SHA1.
SHA2 is not supported for Phase 2 for Mobile VPN with IPSec connections from macOS and iOS devices. - From the Encryption drop-down list, select an encryption method.
- In the Force Key Expiration settings, set the expiration Time to 1 hours.
- In the Force Key Expiration settings, clear the Traffic check box.
- Click OK.
- Select the Resources tab.
- Select the Allow All Traffic Through Tunnel check box. This configures the tunnel for default-route VPN (0.0.0.0/0). The VPN client on the macOS or iOS device does not support split tunneling.
- In the Virtual IP Address Pool list, add the internal IP addresses that are used by Mobile VPN users over the tunnel.
To add an IP address or a network IP address to the virtual IP address pool, select Host IP or Network IP, type the address, and click Add.
The number of IP addresses should be the same as the number of Mobile VPN users. The virtual IP addresses do not need to be on the same subnet as the trusted network. If FireCluster is configured, you must add two virtual IP addresses for each Mobile VPN user.
WARNING: The IP addresses in the virtual IP address pool cannot be used for anything else on your network.
- Select the Advanced tab.
- (Fireware v12.2.1 or higher) Configure the DNS settings:
Assign the network DNS/WINS settings to mobile clients
If you select this option, mobile clients receive the DNS and WINS settings you specify at Network > Interfaces > DNS/WINS. For example, if you specify the DNS server 10.0.2.53in the Network DNS/WINS settings, mobile VPN clients use 10.0.2.53as a DNS server.
By default, the Assign the Network DNS/WINS Server settings to mobile clients setting is selected for new mobile VPN configurations.
Do not assign DNS or WINS settings to mobile clients
If you select this option, clients do not receive DNS or WINS settings from the Firebox.
Assign these settings to mobile clients
If you select this option, mobile clients receive the domain name, DNS server, and WINS server settings you specify in this section. For example, if you specify example.com as the domain name and 10.0.2.53 as the DNS server, mobile clients use example.com for unqualified domain names and 10.0.2.53 as the DNS server.
You can specify one domain name, up to two DNS server IP addresses, and up to two WINS server IP addresses.
For more information about DNS and WINS server settings for Mobile VPN with IPSec users, go to Configure DNS and WINS Servers for Mobile VPN with IPSec.
- Click Save.
Make sure that you add all VPN users to the authentication group you selected.
For information about how to add users to a Firebox user group, go to Define a New User for Firebox Authentication.
First, use the Mobile VPN with IPSec Wizard to configure the basic settings:
- Select VPN > Mobile VPN > IPSec.
The Mobile VPN with IPSec Configuration dialog box appears. - Click Add.
The Add Mobile VPN with IPSec Wizard appears. - Click Next.
The Select a user authentication server page appears.
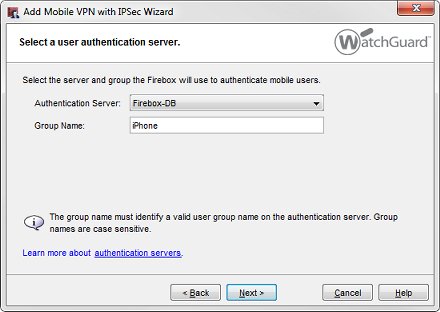
- From the Authentication Server drop-down list, select an authentication server.
You can authenticate users to the Firebox (Firebox-DB) or to a RADIUS, VASCO, SecurID, LDAP, or Active Directory server. Make sure that the method of authentication you select is enabled.
- In the Group Name text box, type the name of the authentication group your macOS or iOS device users belong to.
You can type the name of a Mobile VPN group you have already created, or type a group name for a new Mobile VPN group. Make sure the name is unique among VPN group names, as well as all interface and tunnel names.
If you create a Mobile VPN user group that authenticates to an external authentication server, make sure you create a group on the server with the same name you specified in the wizard for the Mobile VPN group. If you use Active Directory as your authentication server, the users must belong to an Active Directory security group with the same name as the group name you configure for Mobile VPN with IPSec. For more information, go to Configure the External Authentication Server.
- Click Next.
The Select a tunnel authentication method page appears.
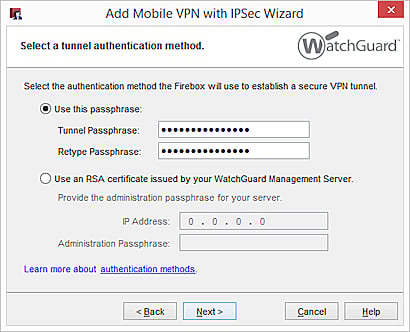
- Select Use this passphrase. Type and confirm the passphrase.
- Click Next.
The Direct the flow of Internet traffic page appears.
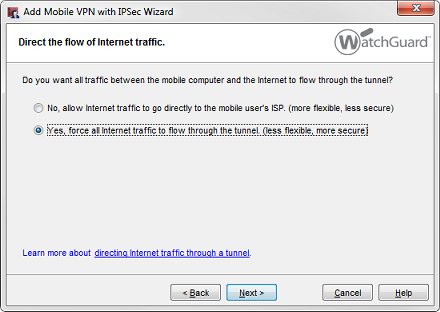
- Select Yes, force all Internet traffic to flow through the tunnel. This configures the tunnel for default-route VPN (0.0.0.0/0). The VPN client on the macOS or iOS device does not support split tunneling.
- Click Next.
The Identify the resources accessible through the tunnel page appears.
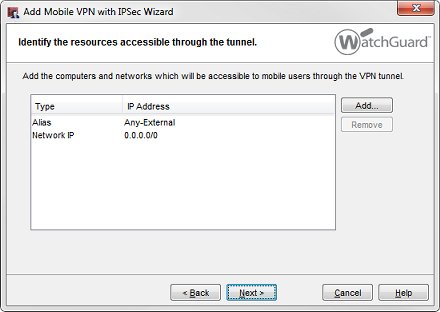
For a default-route VPN configuration, the configuration automatically allows access to all network IP addresses and the Any-External alias.
- Click Next.
The Create the virtual IP address pool page appears.
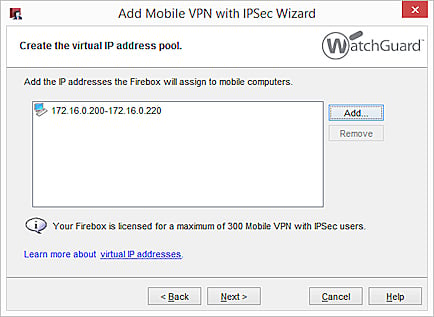
- To add one IP address or an IP address range, click Add.
To add more virtual IP addresses, repeat this step.
Mobile VPN users are assigned an IP address from the virtual IP address pool when they connect to your network. The number of IP addresses in the virtual IP address pool should be the same as the number of Mobile VPN users.
WARNING: The virtual IP addresses must be on a different subnet than the local networks. The virtual IP addresses cannot be used for anything else on your network.
- Click Next.
- To add users to the new Mobile VPN with IPSec group, select the Add users check box.
- Click Finish.
The Mobile VPN configuration you created appears in the Mobile VPN with IPSec Configuration dialog box.
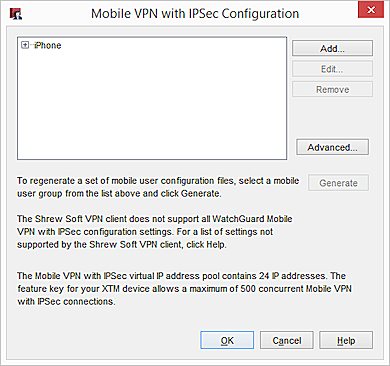
Next, you must edit the VPN Phase 1 and Phase 2 settings to match the settings for the VPN client on the macOS or iOS device.
- In the Mobile VPN with IPSec Configuration dialog box, select the configuration you just added.
- Click Edit.
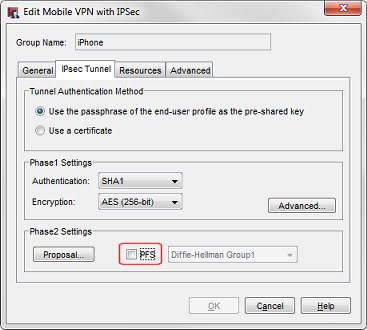
The Edit Mobile VPN with IPSec dialog box appears. - Select the IPsec Tunnel tab.
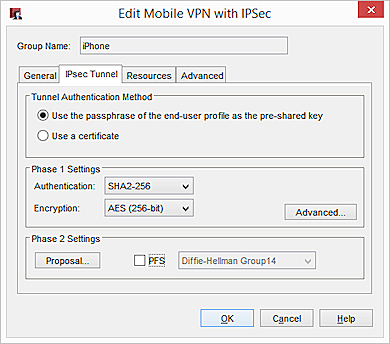
- From the Authentication drop-down list, select an authentication method.
- From the Encryption drop-down list, select an encryption method.
- Click the Advanced button in the Phase 1 Settings section.
The Phase1 Advanced Settings dialog box appears.
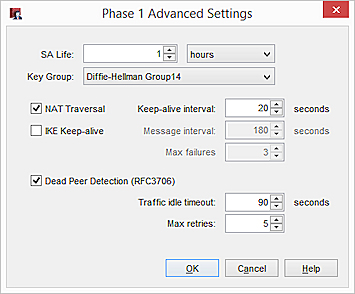
- Set the SA Life to 1 hour.
The VPN client on the macOS or iOS device is configured to rekey after 1 hour. If this profile is only used for connections by VPN clients on macOS or iOS devices, set the SA Life to 1 hour to match the client setting.
To use this VPN profile for all supported VPN clients, set the SA Life to 8 hours. When the SA Life is set to 8 hours, WatchGuard IPSec Mobile VPN clients rekey after 8 hours, but the VPN client on the macOS or iOS device uses the smaller rekey value of 1 hour.
- From the Key Group drop-down list, select Diffie-Hellman Group 14 or Diffie-Hellman Group 2.
- Do not change any of the other Phase 1 Advanced Settings.
- Click OK.
- In the Phase 2 Settings section, click Proposal.
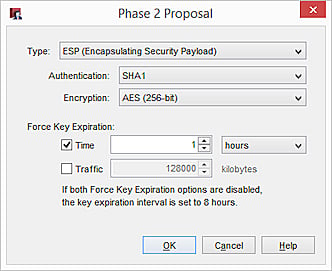
- From the Authentication drop-down list, select MD5 or SHA1.
SHA2 is not supported for Phase 2 for Mobile VPN with IPSec connections from macOS and iOS devices. - From the Encryption drop-down list, select an encryption method.
- Set the Force Key Expiration to 1 hour and 0 kilobytes.
- In the Force Key Expiration settings, set the expiration Time to 1 hours.
- In the Force Key Expiration settings, clear the Traffic check box.
- Click OK.
- In the Edit Mobile VPN with IPSec dialog box, clear the PFS check box.
Perfect Forward Secrecy is not supported by the VPN client on the iOS device.
- Click the Advanced tab.
- (Fireware v12.2.1 or higher) Configure the DNS settings:
Assign the network DNS/WINS settings to mobile clients
If you select this option, mobile clients receive the DNS and WINS settings you specify at Network > Interfaces > DNS/WINS. For example, if you specify the DNS server 10.0.2.53in the Network DNS/WINS settings, mobile VPN clients use 10.0.2.53as a DNS server.
By default, the Assign the Network DNS/WINS Server settings to mobile clients setting is selected for new mobile VPN configurations.
Do not assign DNS or WINS settings to mobile clients
If you select this option, clients do not receive DNS or WINS settings from the Firebox.
Assign these settings to mobile clients
If you select this option, mobile clients receive the domain name, DNS server, and WINS server settings you specify in this section. For example, if you specify example.com as the domain name and 10.0.2.53 as the DNS server, mobile clients use example.com for unqualified domain names and 10.0.2.53 as the DNS server.
You can specify one domain name, up to two DNS server IP addresses, and up to two WINS server IP addresses.
For more information about DNS and WINS server settings for Mobile VPN with IPSec users, see Configure DNS and WINS Servers for Mobile VPN with IPSec.
- Click OK.
- Save the configuration file to your Firebox.
Make sure that the macOS or iOS users are members of the authentication group you selected.
Next, you add the settings you configured on your Firebox to the VPN client settings on the macOS or iOS device.
Configure the VPN Client on an iOS Device
To manually configure the VPN client settings on the iOS device:
- Select Settings > General > VPN > Add VPN Configuration.
- Configure these settings in the VPN client:
- Type — IPSec
- Server — The external IP address of the Firebox
- Account — The user name on the authentication server
Specify the user name only. Do not preface the user name with a domain name and do not specify an email address. - Password — The password for the user on the authentication server
- Use Certificate — Set this option to OFF
- Group Name — The group name you chose in the Firebox Mobile VPN with IPSec configuration
- Secret — The tunnel passphrase you set in the Firebox Mobile VPN with IPSec configuration
After you add the VPN configuration, a VPN switch appears in the Settings menu on the iOS device.
To enable or disable the VPN client, click the VPN switch. When a VPN connection is established, the VPN icon appears in the status bar.
The VPN client on the iOS device stays connected to the VPN only while the iOS device is in use. If the iOS device locks itself, the VPN client might disconnect. Users can manually reconnect their VPN clients. If users save their passwords, they do not have to retype the password each time the VPN client reconnects. If users do not save their passwords, they must type the password each time the client reconnects.
The WatchGuard Mobile VPN app for iOS is no longer available in the Apple Store.
Configure the VPN Client on a macOS Device
The Firebox does not generate a client configuration file for the VPN client on the macOS device. The user must manually configure the VPN client settings to match the settings configured on the Firebox.
To configure the VPN settings on the macOS device:
- Open System Preferences and select Network.
- Click + at the bottom of the list to add a new interface. Configure these settings:
- Interface — VPN
- VPN Type — Cisco IPSec
- Service Name — Type the name to use for this connection
- Click Create.
The new VPN interface appears in the list of network interfaces. - Select the new interface in the list. Edit these settings:
- Server Address — The external IP address of the Firebox
- Account Name — The user name on the authentication server
Specify the user name only. Do not preface the user name with a domain name and do not specify an email address. - Password — The password for the user on the authentication server
- Click Authentication Settings. Configure these settings:
- Shared Secret — The tunnel passphrase you set in the Firebox Mobile VPN with IPSec configuration
- Group Name — The group name you chose in the Firebox Mobile VPN with IPSec configuration
- To add the VPN status icon to the macOS menu bar, select the Show VPN status in menu bar check box .
- Click Connect to start the VPN tunnel.
After you apply these settings, a VPN status icon appears in the menu bar of the macOS device.
To start or stop the VPN client connection, click the VPN status icon.