Applies To: Locally-managed Fireboxes
When you manage your Fireboxes with a WatchGuard Management Server, you can use RapidDeploy from the Management Server to remotely configure your RMA replacement Firebox. After you call WatchGuard Support and receive your RMA number, you can follow the instructions in these procedures to configure your RMA Firebox with RapidDeploy.
To specify the IP address for your Firebox, you can either use DHCP or configure your Firebox with a static IP address. Make sure to follow the instructions for the method your Firebox uses to get an IP address.
Some of the steps in the procedures can occur in a different order. For example, the transfer of the license key to the replacement Firebox could occur after the replacement Firebox is deployed in the Deployment Center. You must make sure, however, that the .CSV file with the list of Fireboxes is uploaded to the Deployment Center before the replacement Firebox is powered on at the remote location. If the Firebox is powered on before the .CSV file is uploaded, when the Firebox contacts the Deployment Center, it cannot receive the necessary information to contact the Management Server.
If your Firebox that was replaced was not managed by your Management Server, you can use RapidDeploy from the Website to remotely configure your RMA Firebox. For more information, go to Configure an RMA Replacement with RapidDeploy from the Website.
Configure an RMA Firebox with DHCP
To successfully configure an RMA Firebox that uses DHCP, certain steps must be completed at WatchGuard, at the remote location of the failed Firebox, and at the central office location.
At WatchGuard
WatchGuard completes these steps:
- WatchGuard Customer Support initiates the process to ship the replacement Firebox to the customer.
- WatchGuard Customer Care initiates the license key and serial number transfer in the WatchGuard Salesforce database.
At the Remote Location — Prepare the Firebox
You complete these steps at the location of the failed Firebox:
- Power off the failed Firebox.
- Remove the replacement Firebox from the shipping container, but do not power it on.
At the Central Office — Prepare for RapidDeploy
To begin the RapidDeploy process, you connect to the Management Server in WatchGuard System Manager (WSM). Before you connect to the Deployment Center, make sure you have:
- Activated the replacement Firebox on the WatchGuard website (myproducts.watchguard.com/activate).
- Created the .CSV file with the correct information for your replacement Firebox.
For information about how to create a .CSV file for an RMA Firebox with DHCP, go to Register Your Devices.
- Open WSM and connect to the Management Server.
- Select File > RapidDeploy > Deployment Center.
- Select an option:
- Delete the failed Firebox from the Management Server.
- In the .CSV file, specify a new, unique friendly name for the replacement Firebox.
If the failed Firebox has not been removed from the Management Server, you must specify a name for the replacement Firebox that is different from the friendly name for the failed Firebox.
Or
- Complete the RapidDeploy process to deploy your replacement Firebox:
- Get the serial number for the replacement Firebox from the Customer Care case notes for the shipment of your replacement Firebox.
- Create a .CSV file with the serial number and friendly name for your replacement Firebox and the IP address of the Management Server that will manage the replacement Firebox.
Make sure to type the serial number with only uppercase letters; do not include hyphens. - Upload the .CSV file to the Deployment Center.
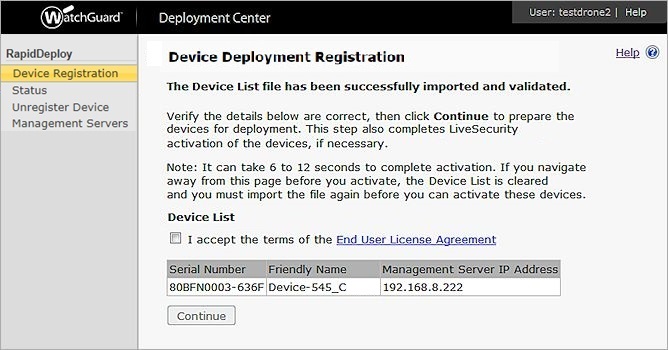
Example of a successfully imported device list .CSV file.
At the Remote Location — Install the Firebox
After you have uploaded the .CSV file with the information for the replacement Firebox to the Deployment Center, you can complete the installation of the replacement Firebox.
- Connect the Ethernet and power cables to the replacement Firebox for proper operation in a production environment.
- Power on the replacement Firebox and connect it to the Internet.
At the Central Office — Complete Deployment
After the replacement Firebox is powered on and connected to the Internet:
- The administrator waits for approximately 10 minutes while the replacement Firebox at the remote location registers with the Management Server that was specified in the .CSV file.
- When the replacement Firebox appears in WSM in the Management Server tree, you connect to the replacement Firebox to apply to the Firebox the device configuration template that is stored on the Management Server.
For more information about how to apply a device configuration template to a Firebox, go to Create Device Configuration Templates.
Configure an RMA Firebox with a Static IP Address
You can also use RapidDeploy to deploy your replacement Firebox in an environment that requires a static IP address. To specify a static IP address for your RMA Firebox, you must create a .CSV file with the static IP address information for the Firebox and save the .CSV file to a USB drive. The USB drive must be formatted with the FAT, VFAT, or FAT32 file system and must be writable. For information about how to create a .CSV file for an RMA Firebox with a static IP address, go to Use a USB Drive to Configure Interface Settings.
To configure your RMA Firebox to use a static IP address:
- Create a .CSV (comma-separated values) file and save it to a USB drive.
- Connect the USB drive to the Firebox before you power it on.
For an RMA Firebox, the .CSV file with the static IP address for the Firebox must either be stored at the remote location of the replacement Firebox, or it must be delivered to the remote location with the replacement Firebox. The Firebox can then connect to the Deployment Center to complete the RapidDeploy process and register with the Management Server. - When the replacement Firebox appears in WSM in the Management Server tree, you connect to the replacement Firebox to apply to the Firebox the device configuration template that is stored on the Management Server.
For more information about how to apply a device configuration template to a Firebox, go to Create Device Configuration Templates.
About the Deployment Center and RapidDeploy from the Management Server
Configure a Replacement (RMA) Firebox
Create Device Configuration Templates