Applies To: Endpoint Security Elite, Endpoint Security 360, Endpoint Security Prime, WatchGuard EDR, WatchGuard EDR Core, Endpoint Security Basic
To get the most recent updates and make sure that your network has the best protection, migrate all the endpoints on your network to the latest version of the protection software. This should include your servers, environments with gold images, and virtual systems.
Because each environment is unique, we recommend that you plan a controlled upgrade process to reduce the risk of potential issues.
Controlled Protection Upgrade Process
You should configure your solution to gradually deploy a protection upgrade across your organization. It is important to plan the upgrade and remember that a version upgrade can include updates to these components:
- Management UI — Upgrade occurs on the WatchGuard server. Changes in the management UI appears when the upgrade completes.
- WatchGuard Agent — Upgrade occurs in the background. A reboot of the endpoint is not required.
- Protection software — Upgrade can install or uninstall drivers that require the endpoint to restart.
A controlled protection upgrade limits the scope of the upgrade process to a small number of endpoints and groups that you specify. After you complete the limited upgrade, you can then verify that it works as expected before you continue a gradual rollout to other endpoints and groups.
We recommend that you plan and gradually deploy the upgrade on your network.
Caution: Endpoint Security runs in the background of the operating system and when you upgrade the protection, it could require drivers to uninstall or install. When this happens, the computer might need to restart. The protection upgrade and restart could interact with shutdown tasks scheduled at the same time on the computer (for example, tasks triggered by Microsoft KB updates). It is important to clear pending shutdown tasks before the upgrade operation. Restart the affected computer before the upgrade operation starts.
In the management UI, you can export a list of all managed computers to a .CSV file. Use this list to review the protection software and WatchGuard Agent versions for the computers in your network. To export a list of the computer details to a .CSV file, on the Computers page, click ![]() and select Export.
and select Export.
Your operator role determines what you can see and do in WatchGuard Cloud. Your role must have the Configure Per-Computer Settings permission to view or configure this feature. For more information, go to Manage WatchGuard Cloud Operators and Roles.
To deploy a protection upgrade in a controlled way:
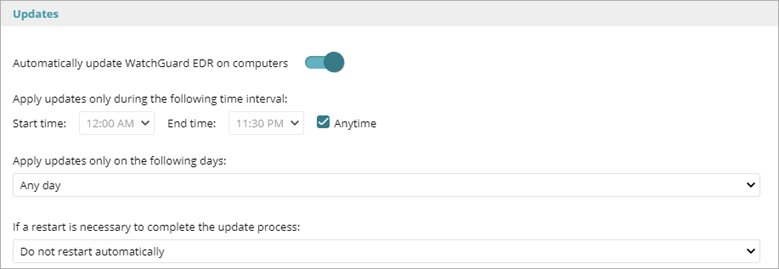
- In the Endpoint Security management UI, disable the automatic update option in all settings profiles.
- Select Settings > Per-Computer Settings.
- Select the profile you want to disable updates for.
- Select Updates.
- Disable the Automatically update WatchGuard Endpoint Security 360 on computers toggle.
- Create a new settings profile for a group of recipients that includes computers and devices that are representative of your environment. For more information on how to create a settings profile, go to Manage Settings Profiles.
For example, the group might include regular endpoints, endpoints that run key business applications, endpoints with settings that are specific to the management team, servers with key custom applications installed, and so on. - FOR SERVERS AND ENDPOINTS THAT ARE NOT REBOOTED FREQUENTLY: To minimize the impact of the protection upgrade on scheduled shutdown tasks, reboot the server at the start of the maintenance window before the Endpoint Security protection upgrade starts.
- Enable the Automatically update WatchGuard Endpoint Security 360 on computers toggle for the group.
- Specify when you want updates to be applied.
We recommend that you schedule updates when they will not interfere with other updates, backups, etc. Avoid Endpoint Security updates at the same time as Windows updates. Windows updates will take precedence and could cause the Endpoint Security update to fail. - If a restart is necessary to complete the update process, specify when you want the restart to begin.
The actual time when the restart begins is four hours after the time you specify here. If a Windows update requires a reboot at the same time as the Endpoint Security update, then the WatchGuard Agent will not restart and the upgrade will fail. - To make sure the upgrade was successful, monitor the endpoints for a period of time (for example, one or two weeks) and verify that all applications work as expected.
In most cases, an upgrade requires a system reboot. - Continue to deploy the upgrade on your network in stages.
You can complete the process in multiple phases, based on your network configuration (number of endpoints, servers, and other factors).
When Endpoint Security upgrades to a new version, the WatchGuard Agent unregisters and re-registers the Endpoint Security protection software with Windows. During this time, Windows Security can report to the user that there is no antivirus enabled. During the upgrade process, your endpoints remain protected by the Endpoint Security antivirus at all times.