This document describes how to set up AuthPoint multi-factor authentication (MFA) for Microsoft 365 with Entra ID users. Microsoft 365 must already be configured and deployed before you set up MFA with AuthPoint.
After you configure MFA for Microsoft 365, we recommend that new AuthPoint users navigate to the IdP portal to activate their token.
The steps in this guide are for Entra ID users. If you have Active Directory users, or if your Entra ID users are synced with an on-premise AD server, refer to Microsoft 365 Integration with AuthPoint for Active Directory Users.
For information about the URLs and IP ranges that AuthPoint services use, go to WatchGuard Cloud URLs and Network Access Requirements.
If you use Microsoft Office desktop applications (such as Outlook, Teams, and Word) on any device that runs Windows 10, make sure your operating system is updated to version 20H2 or higher. AuthPoint MFA does not support MFA for web applications on Windows 8.1.
AuthPoint only supports push authentication in older or built-in browsers. This can impact Microsoft desktop applications such as Teams. Outlook, and OneDrive.
Contents
Before You Begin
Before you begin these procedures, make sure that:
- You have synced your Entra users and groups to WatchGuard Cloud Directories and Domain Services and set up an Entra ID external identity in AuthPoint. To do this, complete the steps in these help topics:
- End-users can log in to Microsoft 365
- A token is assigned to a user in AuthPoint (to test MFA)
- You have an AuthPoint identity provider (IdP) certificate (go to Certificate Management).
- You have an Azure P1 license
Migrate From On-Premise Active Directory to Entra
This integration guide is specifically for Entra users. If you have an on-prem Active Directory and want to migrate to Entra ID, you must complete the steps in this section or reach out to WatchGuard Support for assistance.
The process to migrate from Active Directory to Entra ID will result in downtime, and all users will have to delete their existing mobile tokens and activate new tokens.
If you contact WatchGuard Support, we can assist with the migration and enable your AuthPoint users to keep their existing tokens when you migrate.
To migrate from on-prem Active Directory to Entra ID:
- If your Microsoft 365 domain is federated, you must roll back the federation and change the status from federated to managed. For detailed steps to do this, refer to the Microsoft documentation or the Rollback Instructions section of our Microsoft 365 Integration with AuthPoint for Active Directory Users integration guide.
- Add an authentication domain to sync users from Entra ID to Directories and Domain Services in WatchGuard Cloud. For detailed steps, go to Add an Authentication Domain to WatchGuard Cloud.
- Add an Entra ID external identity to AuthPoint. For detailed instructions, go to the Sync Users from Entra ID AuthPoint help topic. Do not sync users to AuthPoint yet.
- Quarantine and delete your Active Directory users from AuthPoint. To do this, we recommend that you remove the user from their AD group to give them the Quarantine status in AuthPoint, then remove the user from AuthPoint. You can also enable the Quarantined Users Cleanup setting to automatically remove AD synced users.
- Sync the deleted Active Directory users from Entra ID to AuthPoint. AuthPoint sends the newly synced users an email to activate a new mobile token for authentication. Users must manually delete their previous mobile tokens.
- Complete the steps in the sections below to set up AuthPoint as an external authentication method for Microsoft 365.
Add an Application to Entra
You need to register AuthPoint as an application in Entra. This establishes a trust relationship between AuthPoint and Entra.
There are two options when you do this:
- You can register a new application that is specifically to support this integration (AuthPoint multi-factor authentication for Microsoft 365 with user accounts that exist only in Entra ID). We recommend this method.
- If you have already set up an authentication domain in WatchGuard Cloud Directories and Domain Services to sync users and groups from Entra, then you already have a registered application in Entra. You can update the existing application to use for this integration as well.
Register a New Application (Recommended Method)
- In a new tab, log in to the Microsoft Azure Portal.
- Select the Microsoft Entra ID service.
- From the navigation menu, select App registrations.
- Click New Registration.
The Register an application page appears. - Type a name for the application.
- For Supported account types, select Multiple Entra ID Tenants.
- Select Allow all tenants.
- Click Register.
A page appears that shows the details for your app. - Copy the Application (client) ID value. You need this value when you configure AuthPoint.
- From the navigation menu, select API permissions.
- Click Add a permission.
- Select Microsoft Graph.
- Select Delegated permissions.
- Select these permissions:
- User.Read
- openid
- profile
- Policy.ReadWrite.AuthenticationMethod
- Click Add permissions. The permissions you add require Administrator approval. If you see the status message "Not granted for <name>", click Grant admin consent for <name>.
- From the navigation menu, select Manage > Authentication.
- Select the Settings tab, and then enable Allow public client flows.
- From the navigation menu, select Token configuration.
- Click Add optional claim.
- For Token Type, select ID.
- Select the email and upn check boxes.
- Click Add.
- Select the Turn on the Microsoft Graph email permission (required for claims to appear in token) check box.
- Click Add.
Configure an Existing Application
- In a new tab, log in to the Microsoft Azure Portal.
- Select the Microsoft Entra ID service.
- Select Manage > App Registrations.
- Click on your application name. This should be the same application that you use for your Entra ID authentication domain in WatchGuard Cloud Directories and Domain Services.
- Copy the Application (client) ID value. You need this value when you configure AuthPoint.
- From the navigation menu, select API permissions.
- Click Add a permission.
- Select Microsoft Graph.
- Select Delegated permissions.
- Select these permissions:
- User.Read
- openid
- profile
- Policy.ReadWrite.AuthenticationMethod
There are additional permissions required to sync users and groups to Directories and Domain Services. Do no remove those existing permissions from your application.
- Click Add permissions. The permissions you add require Administrator approval. If you see the status message "Not granted for <name>", click Grant admin consent for <name>.
- From the navigation menu, select Token configuration.
- Click Add optional claim.
- For Token Type, select ID.
- Select the email and upn check boxes.
- Click Add.
- Select the Turn on the Microsoft Graph email permission (required for claims to appear in token) check box.
- Click Add.
- Leave this tab open.
Configure AuthPoint
To start, you need to add an Entra EAM resource in AuthPoint and create a new Zero Trust authentication policy. The Entra EAM resource is a specific AuthPoint resource type that is used for this integration. The authentication policy for the Entra EAM resource determines which users can authenticate and log in to Microsoft 365 and which authentication methods they can use (Push, QR code, and OTP).
To configure AuthPoint:
Add an Entra EAM Resource in AuthPoint
To add a resource in AuthPoint:
- Log in to WatchGuard Cloud.
- Select Configure > AuthPoint.
- From the navigation menu, select Resources.
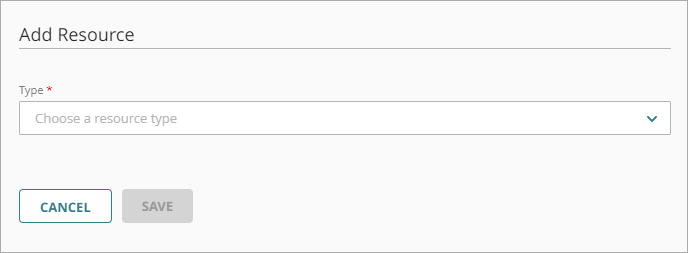
- Click Add Resource.
The Add Resource page opens.
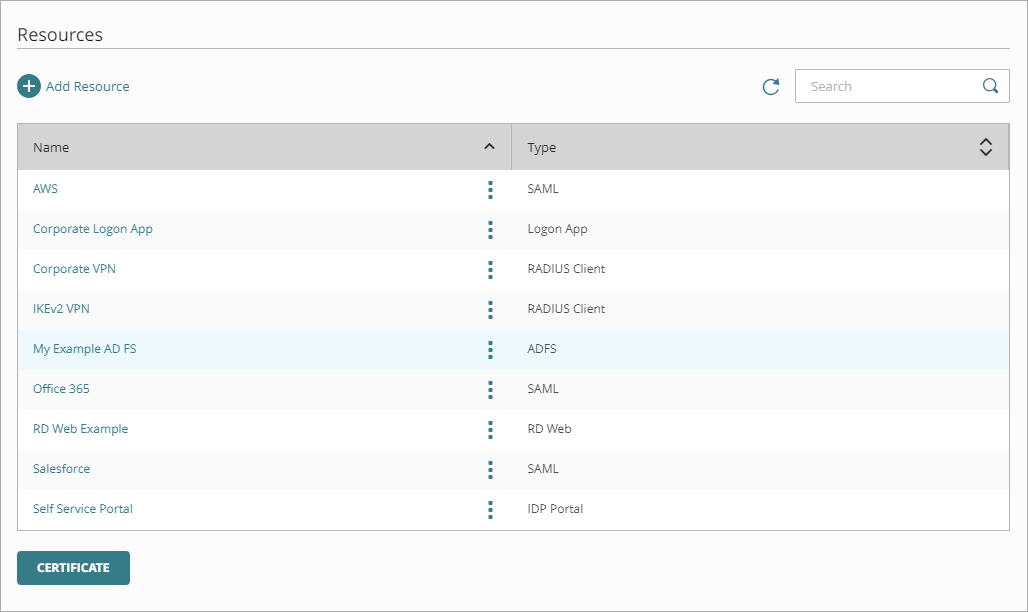
- From the Type drop-down list, select Microsoft Entra EAM.
Additional fields appear.
- Enter a name for this resource.
- In the Application ID text box, enter the application (client) ID that you copied from Entra.
- Click Save.
- After you add the Entra EAM resource, copy the Client ID, Discovery Endpoint, and Reply URL values. You need this information when you configure Entra.
Add a Zero Trust Authentication Policy
Zero Trust policies specify which resources users can authenticate to and which authentication methods they can use (Push, QR code, and OTP).
You must have at least one Zero Trust authentication policy that includes the Microsoft Entra EAM resource. If you already have Zero Trust authentication policies, you do not have to create a new authentication policy. You can add this resource to your existing authentication policies.
Users that do not have an authentication policy for a specific resource cannot authenticate to log in to that resource.
To configure a Zero Trust authentication policy:
- Go to Configure > Zero Trust. If you have a Service Provider account, you must select an account from Account Manager.
- Click Add Policy.
- Type a name for this policy.
- In the Target section, from the Content drop-down list, select which groups this policy applies to. You can make multiple selections to add multiple groups.
- In the Resources section, select the AuthPoint resources this policy applies to.
- In the Conditions section, select the conditions that apply to this policy. When you add a condition to an authentication policy, the policy applies only to user authentications that match the policy and the policy conditions. For example, if you add a Network Location to a policy, the policy only applies to user authentications that come from that Network Location. Users who only have a policy that includes a Network Location do not get access to the resource when they authenticate outside of that Network Location (because they do not have a policy that applies, not because authentication is denied). For more information, go to About Zero Trust Conditions.
- (Optional) To create a new condition, click Add New Condition. After you create a new condition, you must still add the condition to the policy.
- From the Type drop-down list, select the type of condition to add to the policy.
- From the Name drop-down list, select which condition of the chosen type to add to the policy.
- To add more conditions, repeat Step 6.
If you add conditions to a policy, we recommend that you create a second policy for the same groups and resources without the conditions. Assign a higher priority to the policy with the policy objects. For more information about priority, go to About Zero Trust Policy Precedence.
- In the Action section, select an option to specify whether to allow or deny authentications for the resources in this policy. In our example, we want to allow authentications.
- Allow — Allow user groups in this policy access to the resources associated with this policy.
- Deny — Deny authentications when users in the groups associated with this policy try to authenticate to the resources associated with this policy.
- If you allow access with this policy, select the check box for each authentication option users can select when they authenticate to resources in this policy with MFA.
For SAML resources, if you select more than one authentication option, users must select one of the available options when they authenticate. For example, if you select OTP and Push, users can choose to type their OTP or approve a push to authenticate. You cannot require that they do both.
- Click Save.
Your policy is created and added to the end of the policy list. - Review the order of your policies and adjust as necessary. For more information about priority, go to About Zero Trust Policy Precedence.
Configure Entra to use AuthPoint as an External MFA Provider
To configure Microsoft 365:
- In the Microsoft Azure Portal tab, search for “Microsoft Entra authentication methods".
- On the Authentication Methods page, select Manage > Policies.
- Click Add External Method.
- Enter a name for this authentication method.
- In the Client ID text box, type or paste the Client ID value you copied from the Microsoft Entra EAM resource information page in AuthPoint.
- In the Discovery Endpoint text box, type or paste the Discovery Endpoint value you copied from the Microsoft Entra EAM resource information page in AuthPoint.
- In the App ID text box, type or paste the Application (client) ID of your Entra application.
- Click Request permission. A pop-up window opens where you can accept the request.
- In the Enable and target section, enable the toggle.
- Select the Include tab.
- From the Add Target drop-down list, select All Users or Select Targets. In our example, we select Select Targets.
- Search the group and click Select.
- Click Save.
- Go to the Microsoft Entra ID service.
- Select Manage > App Registrations.
- Click on your application name.
- From the navigation menu, select Manage > Authentication (Preview).
- Select the Redirect URI configuration tab.
- Click Add Redirect URI.
- In the Web applications section, click Web.
- In the Redirect URI text box, type or paste the Reply URL value you copied from the Microsoft Entra EAM resource information page in AuthPoint.
- Click Configure.
Configure a Conditional Access Policy in Entra
- In the Microsoft Azure Portal tab, search for “Microsoft Entra Conditional Access".
- From the navigation menu, click Overview and add a new policy.
- In the Name text box, type a name.
- In the Users section, click 0 users and groups selected.
A new menu opens with configuration options. - Select the Include tab, and select the users you want to require AuthPoint MFA for.
- In the Target resources section, click No target resources selected.
A new menu opens with configuration options. - Select the Include tab, and then select the applications you want to protect with AuthPoint MFA.
- For Grant, click 0 controls selected.
A new menu opens with configuration options. - Select Grant access, and select the Require multifactor authentication check box.
- Click Select.
- For Enable Policy, select On.
- Click Create.
Register External Multi-Factor Authentication Method
The Microsoft rollout and registration of external multi-factor authentication providers is in progress. After the rollout is finished, users must be registered with their external MFA (AuthPoint) with Microsoft Entra ID before they can use it to satisfy MFA. As part of this rollout, Microsoft Entra ID will automatically register users who have authenticated with AuthPoint MFA within the last 28 days.
For users who have not authenticated with AuthPoint within 28 days of the registration feature rollout, admins must register the user for external MFA (AuthPoint) before the user can use AuthPoint to authenticate again. These users might see a change the next time they log in, based on their current authentication setup:
- If the users are only set up for external MFA (AuthPoint), they must complete a just-in-time registration before they can log in.
- If the users are set up for external MFA (AuthPoint) and other authentication methods, they might not be able to use AuthPoint to authenticate and log in. To use AuthPoint, the users can register at security info or an Entra ID admin can register the user in the Microsoft admin center.
Test the Integration
To test the integration of AuthPoint and Microsoft 365, you can authenticate with a mobile token on your mobile device. You can choose any method (one-time password, QR code, or push).
In this example, we test the integration with the push authentication method (users receive a push notification in the mobile app that they must approve to authenticate).
- In a web browser, connect to Microsoft 365.
- Enter your email address and password.
- After you enter your password, select the option to use AuthPoint MFA to validate your identity.
You are redirected to the AuthPoint authentication page. - For the authentication method, select Send Push.
- Approve the authentication request you receive on your mobile device.
You are logged in to Microsoft 365.
The Single Sign-On session for Entra (with the AuthPoint Entra EAM resource) is not integrated with the SAML Single Sign On session. After you authenticate to Entra, AuthPoint MFA is still required when you log in to a protected SAML resource.