Applies To: WatchGuard SaaS DR
This quick start topic outlines the general steps to set up and configure a WatchGuard SaaS DR cloud integration with Microsoft 365 in WatchGuard Cloud:
- Before You Begin
- Activate the License and Allocate WatchGuard SaaS DR Users
- Configure Notifications and Alerts
- Configure Scheduled Reports
- Review Policy Alerts
- Review the Microsoft 365 Defense Goal Report
Before You Begin
Before you can create a cloud integration with Microsoft 365, you must:
- Have a minimum of a Microsoft Office 365 E1 or a Microsoft 365 Business Basic license
- Enable audit logging for your Microsoft 365 organization
- Verify Microsoft 365 roles and permissions
Enable Audit Logging
Before WatchGuard SaaS DR can connect to data through a cloud integration, you must enable audit logging for your Microsoft 365 organization.
Audit logging is enabled by default for Microsoft 365 organizations. To verify audit logging is enabled, run this PowerShell command on the computer where you add the cloud integration:
Get-AdminAuditLogConfig | Format-List UnifiedAuditLogIngestionEnabled
If audit logging is not enabled, the status is False:
UnifiedAuditLogIngestionEnabled : False
If the status is True, no further action is required. If the status is False, run this PowerShell command to enable audit logging:
Set-AdminAuditLogConfig -UnifiedAuditLogIngestionEnabled $true
The audit logging configuration change can take up to 60 minutes.
For more information, go to Turn Auditing On or Off in the Microsoft documentation.
Verify Roles and Permissions
The administrator who adds the cloud configuration must have these administrator roles and permissions enabled in their Microsoft 365 account:
- Global Administrator
- Security Administrator
- Service Support Administrator
- User Administrator
You can select an existing administrator or create a new administrator with the correct permissions. For more information, go to Assign Admin Roles in the Microsoft Admin Center in the Microsoft documentation.
Administrator roles and permissions are only required during the initial configuration of the cloud integration. After the cloud integration is added, administrator permissions are no longer required.
Activate the License and Allocate WatchGuard SaaS DR Users
To use WatchGuard SaaS DR, you must purchase a WatchGuard SaaS DR or Total NDR license. WatchGuard SaaS DR is licensed for each user. For more information, go to About WatchGuard SaaS DR Licenses or About Total NDR Licenses.
After you purchase a WatchGuard SaaS DR license, you must activate the license at www.watchguard.com. For more information, go to Activate a WatchGuard SaaS DR License or Activate a Total NDR License.
You manage user allocation for your account and all accounts you manage in WatchGuard Cloud. For more information, go to Allocate WatchGuard SaaS DR Users or Allocate Total NDR Users.
For information about WatchGuard SaaS DR trial licenses, go to About Trials in WatchGuard Cloud.
Configure Notifications and Alerts
You can configure WatchGuard Cloud to send email notifications when WatchGuard SaaS DR detects a threat or vulnerability. To set up email notifications, you specify which SaaS collectors, policy alerts, and remediation alerts generate a notification when they are created or updated.
Configure SaaS Collector, Remediation, and Policy Alerts
SaaS collectors collect user activity logs from Microsoft 365 so that NDR can monitor user activity. On the Alerts page, you can specify which SaaS collectors, remediation actions, and policy alerts are included in the notification rules you configure to generate alerts and send email notifications from WatchGuard Cloud.
Available pages and features vary and depend on your license type. Throughout this documentation, NDR refers generally to all products. If you do not see a page or feature in the NDR UI, it is not supported by your product.
To configure NDR Alerts, from WatchGuard Cloud:
- Select Configure > NDR > Alerts.
The Alerts page opens.
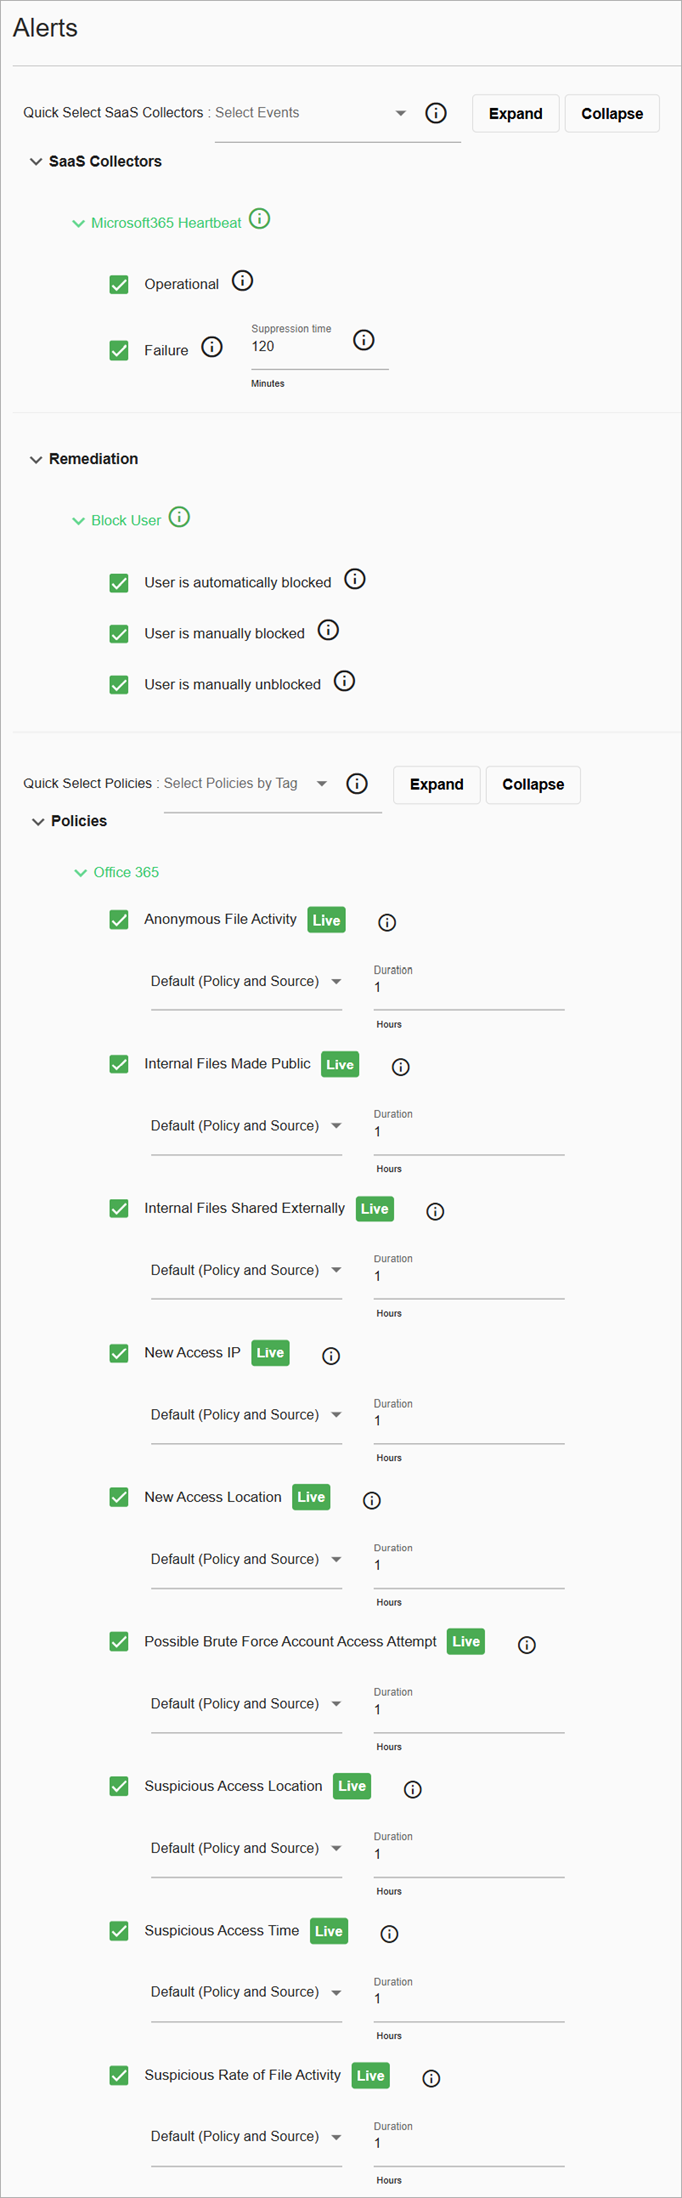
- In the SaaS Collectors section, select the Microsoft 365 Heartbeat options that you want to include in your alerts.
- Operational — Select this option to send a notification when the SaaS collector recovers from a failure event. This notification indicates that the SaaS collector is back up and running properly.
- Failure — Select this option to send a notification when a failure event occurs. A failure notification is generated when no heartbeat message is received from the SaaS collector for 120 minutes.
- Suppression Time — NDR continues to generate failure events every 120 minutes until the SaaS collector recovers. This suppression timer enables you to configure the time between successive failure notifications.
- In the Remediation section, select the check boxes next to the block actions you want to include in your alerts.
- Block User
- User is automatically blocked
- User is manually blocked
- User is manually unblocked
- Block User
- In the Policies section, select the check boxes next to the policies that you want to generate policy alerts. To bundle your alerts, select one of these options from the Default (Policy and Source) drop-down list:
- Policy — All notifications are bundled together with the same policy.
- Policy and Source — All notifications are bundled together if the policy name and source are the same.
- In the Duration section, select a time between one hour and 12 hours for the duration of bundled alerts. The default is one hour.
For more information, go to Level 1 Policies for WatchGuard SaaS DR — Microsoft 365.
Configure Notification Rules
In WatchGuard Cloud, you can configure notification rules to generate alerts and send email notifications for NDR activity. Notification rules make it easier for you to respond to emerging threats on your network.
Delivery Methods
For each notification rule, you can select one of these delivery methods:
- None — The rule generates an alert that appears on the Alerts page in WatchGuard Cloud.
- Email — The rule generates an alert that appears on the Alerts page in WatchGuard Cloud and also sends a notification email to the specified recipients.
Add a WatchGuard SaaS DR Notification Rule
To add a new WatchGuard SaaS DR notification rule:
- Select Administration > Notifications.
- Select the Rules tab.
- Click Add Rule.
The Add Rule page opens.
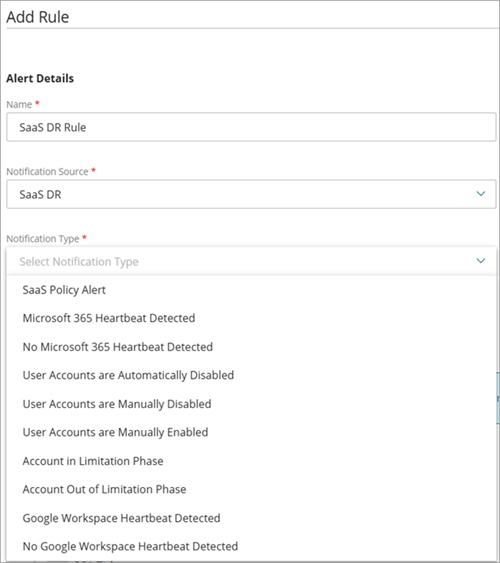
- On the Add Rule page, in the Name text box, enter a name for your rule.
- From the Notification Source drop-down list, select WatchGuard SaaS DR.
- From the Notification Type drop-down list, select one of these WatchGuard SaaS DR notification types:
- SaaS Policy Alert — Generates an alert when WatchGuard SaaS DR generates a new policy alert for your account.
- Heartbeat Detected — Generates an alert when WatchGuard SaaS DR detects a heartbeat from your SaaS integration. SaaS collectors communicate with Microsoft 365 every 30 minutes to confirm that the integration is working properly.
- No Heartbeat Detected — Generates an alert when WatchGuard SaaS DR does not detect a heartbeat from your SaaS integration for 120 minutes.
- User Accounts are Automatically Disabled — Generates an alert when a Microsoft 365 user account is automatically disabled by a WatchGuard SaaS DR policy.
- User Accounts are Manually Disabled — Generates an alert when a Microsoft 365 user account is manually disabled.
- User Accounts are Manually Enabled — Generates an alert when a Microsoft 365 user account is manually enabled.
- (Optional) Type a Description for your rule.
- To send an email message when the rule generates an alert:
- From the Delivery Method drop-down list, select Email.
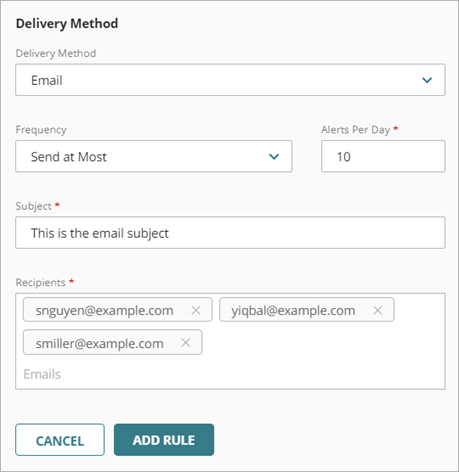
- From the Frequency drop-down list, configure how many emails the rule can send each day:
- To send an email message for each alert the rule generates, select Send All Alerts.
- To restrict how many email messages the rule sends each day, select Send At Most. In the Alerts Per Day text box, enter the maximum number of email messages this rule can send each day. You can specify a value up to 20,000 alerts per day.
- In the Subject text box, enter the subject line for the email message this rule sends when it generates an alert.
- In the Recipients section, enter one or more email addresses. Press Enter after each email address, or separate the email addresses with a space, comma, or semicolon.
- From the Delivery Method drop-down list, select Email.
- Click Add Rule.
Configure Scheduled Reports
You can schedule different NDR reports to run in WatchGuard Cloud. Each scheduled report can contain multiple reports. WatchGuard Cloud sends scheduled reports as a zipped .PDF email attachment to the recipients you specify. Recently generated reports are also available for download in WatchGuard Cloud.
Add a Scheduled Report
You can schedule reports to run daily, weekly, monthly, or immediately. For daily, weekly, and monthly reports, the report frequency also determines the date range for data included in the report. For example, a weekly report includes data collected from 00:00 UTC to 23:59 UTC for the specified time period.
To add a scheduled report:
- Click Add Scheduled Report.
The Create Schedule wizard opens with the Report Description step selected.
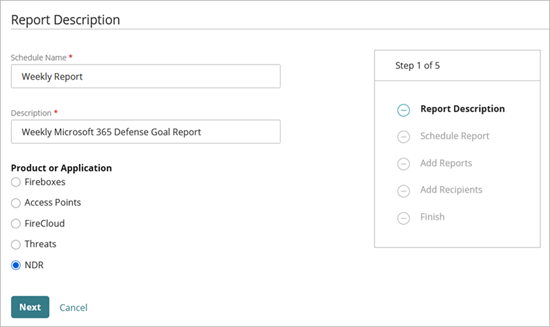
- In the Schedule Name text box, type a name for the report.
- In the Description text box, type a description for the report.
- In the Product or Application section, select NDR.
- Click Next.
The Add Reports page opens.

- In the Reports section, select the check box for each report to include in your scheduled report. To include all available reports, click Select All .
- Click Next.
The Schedule Report step opens.
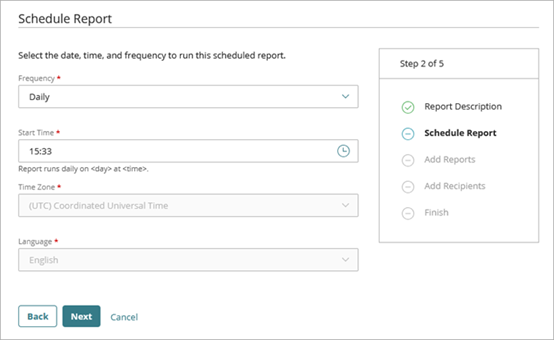
- From the Frequency drop-down list, select one of these options to specify how often to run the report:
- Daily — Runs daily and contains data for the past 24 hours (includes 00:00 until 23:59, adjusted to the timezone)
- Weekly — Runs weekly and contains data for the past week (includes Sunday 00:00 to Saturday 23:59)
- Monthly — Runs monthly and contains data for the past month (includes the first day 00:00 to the last day 23:59)
- Run Once — Queues the report to run for the date range you specify
The time required to generate and send the report depends on the types of selected reports, and position of the request in the processing queue.
- For a Weekly report, specify the day of the week to run the report.
- For a Monthly report, specify the day of the month to run the report.
- To select the time the report starts to run, in the Start Time text box, click
 .
.
Or, in the Start Time text box, type the hour and minute of the day to start the report, in 24-hour format HH:MM. - Click Next.
The Add Recipients step opens.
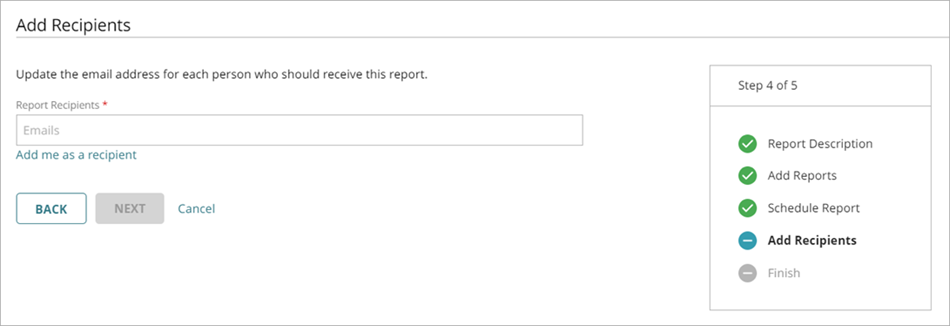
- In the Report Recipients text box, type the email address for each report recipient. To separate multiple addresses, use a space, comma, or semicolon. Press Enter to add the specified addresses to the recipient list.
Reports must be smaller than 10 MB to be emailed. - To add yourself as a recipient, click Add me as a recipient.
The email address associated with your WatchGuard Cloud account shows in the list. - Click Next.
The Finish page opens, with a summary of the scheduled report settings. - Click Save Report.
The report is added to the list of scheduled reports.
Review Policy Alerts
Policy alerts notify you of user activity that is unauthorized or unexpected. When you configure WatchGuard SaaS DR policies to reflect the access policies of your organization, each policy alert you receive indicates a policy violation that might be a threat to your organization.
When you first set up WatchGuard SaaS DR, a subset of policies are activated by default. These are identified by the Level 1 tag and they automatically generate policy alerts. Nine Microsoft 365 policies are included in Level 1. These default policy alerts reflect the threats and vulnerabilities that are most common and easiest to remediate. For more information, go to Level 1 Policies for WatchGuard SaaS DR — Microsoft 365.
We recommend you wait at least two days after WatchGuard SaaS DR is enabled to review your policy alerts.
To review policy alerts:
- Select Monitor > NDR > Policy Alerts.
- To view only alerts from active policies, from the Status Types drop-down list, clear the Not Active check box.
- To view detailed information about each policy alert, click a policy name to go to the Policy Alert Details page.
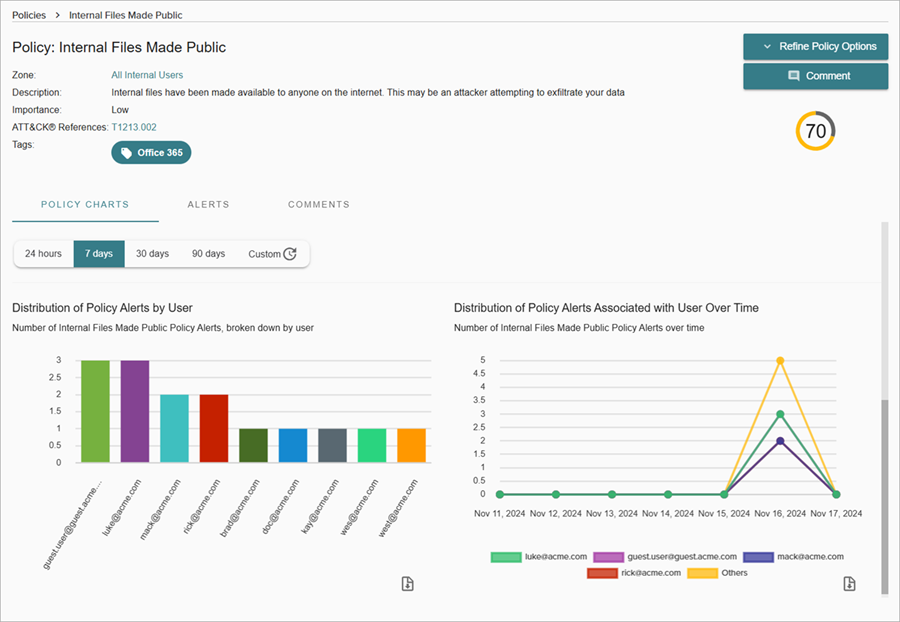
The Policy Alert Details page shows a summary of policy alerts by user, importance, the threat score, and tags associated with the policy.
You can modify policy configuration details from the Refine Policy Options drop-down list:
- Refine Activity Triggers — Activity Triggers evaluate event logs against a policy and generate an alert when specific conditions are met. You can refine these conditions in the policy configuration.
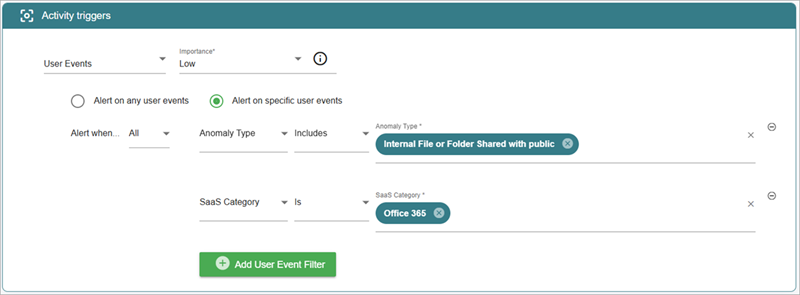
- Refine Zones — You can make changes to the zone definition or associated rule. For more information, go to Manage NDR Zones.
For more information, go to Configure WatchGuard NDR and WatchGuard SaaS DR Policies.
Review the Microsoft 365 Defense Goal Report
The WatchGuard SaaS DR Microsoft 365 Defense Goal Report is based on Microsoft 365 security best practices and recommendations from the Cybersecurity and Infrastructure Security Agency (CISA).
The Microsoft 365 Defense Goal Report monitors your network and user activity for vulnerabilities that can put your organization at risk. This report presents a summary of the controls WatchGuard SaaS DR monitors to help you prevent threats. Each control included in the report is based on a WatchGuard SaaS DR policy.

To generate a Microsoft 365 Defense Goal Report, go to Configure Scheduled Reports.
For more information, go to Microsoft 365 Defense Goal Report.
About WatchGuard SaaS DR Cloud Integration — Microsoft 365
Configure WatchGuard NDR and WatchGuard SaaS DR Alerts and Notification Rules for Subscribers