Applies To: Locally-managed Fireboxes
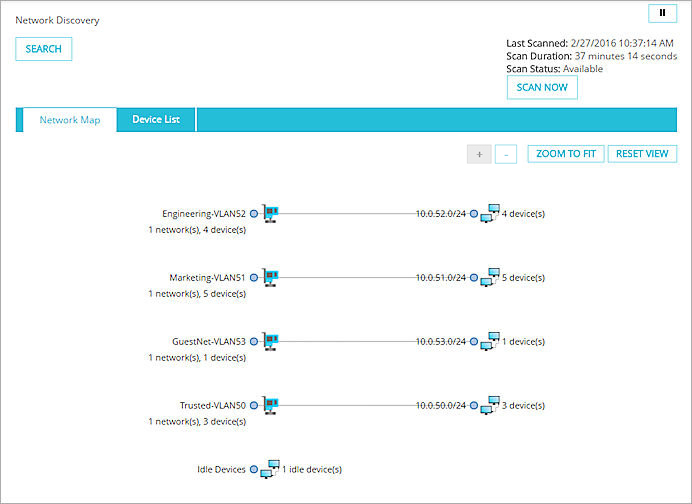
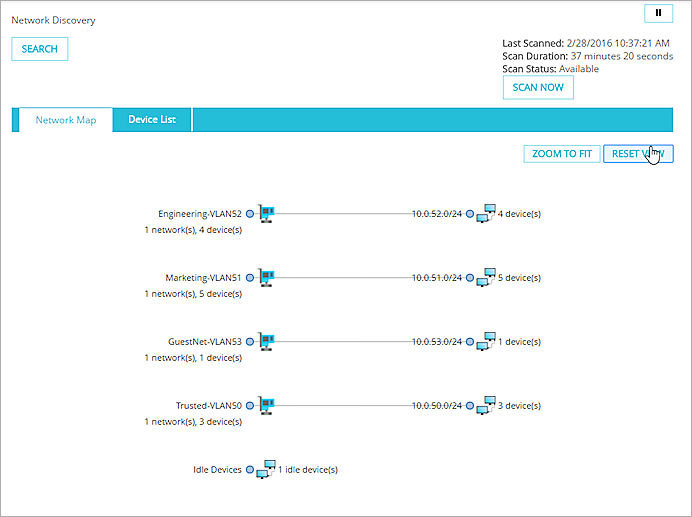
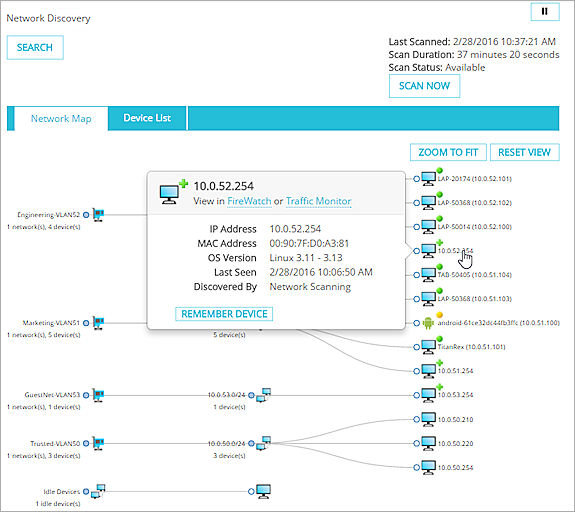
On the Dashboard > Network Discovery page, you can see a tree map view of all the devices on your network that are connected to the interfaces on your Firebox. You can see this detailed information for each connected device:
- IP address
- MAC address
- Host name
- Operating system
- Open ports
Network Discovery is only supported on Firebox M Series, T Series, and FireboxV devices.
When you enable the Network Discovery feature on your Firebox, the process load increases and consumes additional memory. This could noticeably affect the performance of your Firebox, particularly if you have a large network. Make sure to only enable the Network Discovery feature if you plan to use it. To help minimize the performance impact on your Firebox, we recommend that you configure the Network Discovery Scan settings to only scan the networks that you must monitor.
See Devices on Your Network
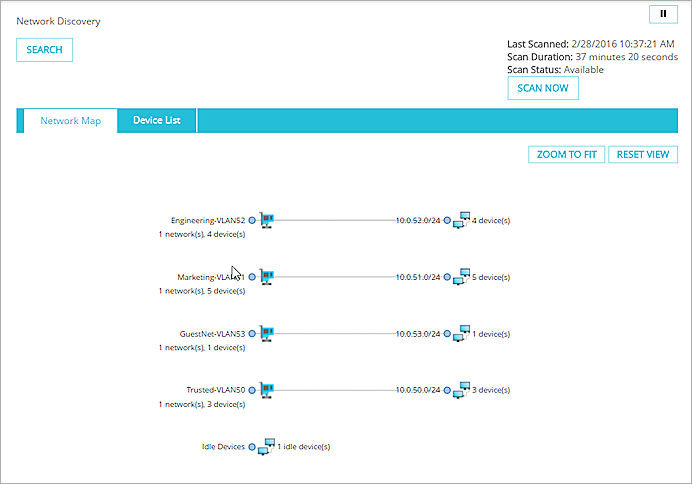
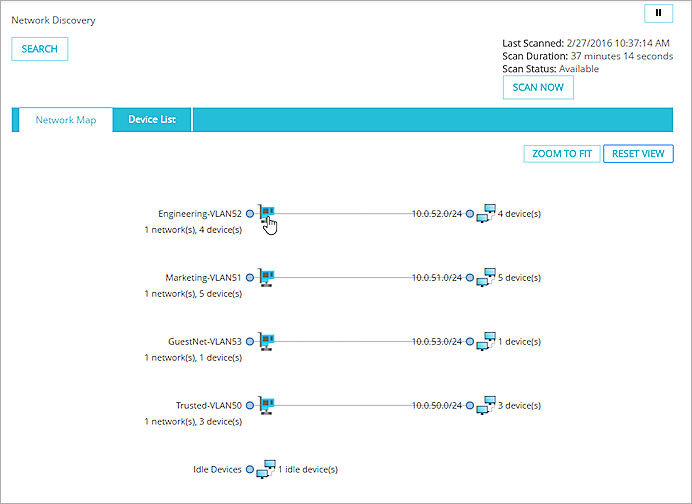
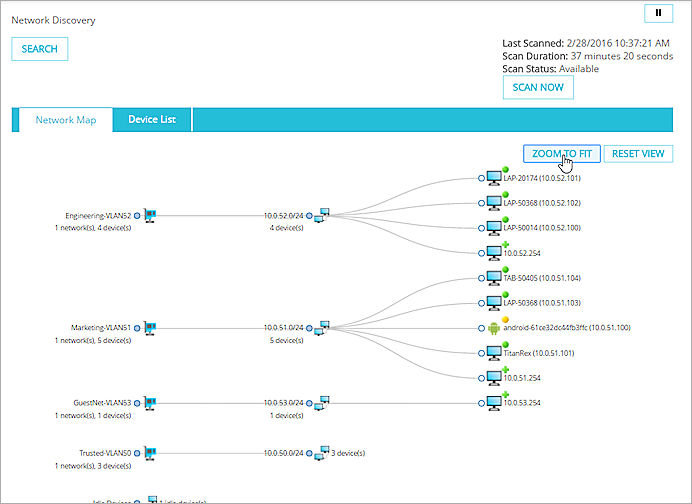
The Network Map is organized by interface, in a tree map. Interfaces are on the first level, subnets are on the second level, and devices are on the third level. Each interface can have several subnets.
The connections between interfaces, subnets, and devices are indicated by the branch lines of the tree map. If there are distant network connections to your network, they appear at the last level, behind a device, and appear as a dotted line, which indicates that there could be more than one connection between the device directly connected to you network and the endpoints.
Run a Scan
To see the devices on your network, if you are logged in to your Firebox with Device Administrator credentials, you can run a scan that finds all the devices connected to your network. You can schedule a scan to run automatically, or run an on-demand scan. Scan times can vary based on network conditions, which can include the size of your network, how many hosts are active, and how many services are enabled. On-demand scans take longer to complete than scheduled scans.
An on-demand scan has three stages:
- Quick Host discovery phase — Finds basic information about each device to organize the interfaces and connected devices in the map
- TCP and OS phase — Finds more detailed information, such as the TCP port and the OS on the device
- UDP and Service Version phase — Finds the UDP port and services versions
To schedule a scan, configure the Network Scan settings, which specify the interfaces that are included in the scan and at what frequency the scan runs.
For more information about how to configure scheduled scan settings or run an on-demand scan from the Network Scan page, go to Network Discovery.
To run an on-demand scan from the Network Discovery page:
- At the top-right of the Network Discovery page, click Scan Now.
The Scan Now dialog box appears.
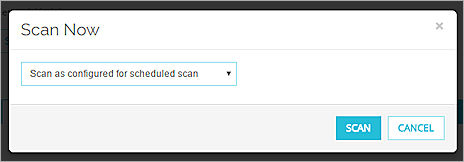
- From the drop-down list, select a scan option:
- Scan as configured for scheduled scan Tip!
- Scan the following interfaces
- Scan the following networks
- If you selected Scan the following interfaces, select the check box for each interface to scan.
If you selected Scan the following networks, type each network to scan and click Add. - Click Scan.
The Firebox runs the network scan.
To stop an on-demand scan before it completes:
At the top-right of the page, click Stop Scan.
See Scan Details
While the network scan runs, you can view the details of the progress of the scan. Details include:
- Scan Type — On-demand or scheduled
- Scan Started — The date and time the scan began
- Estimated Completion Time — The amount of time in minutes before the scan is completed Tip!
- IP Addresses Scanned — The number of IP addresses that have been scanned in the current scan stage
- Scan Target — The networks or interfaces you specified in the scan settings
- Scan Stage — The start date and time, and end date and time, for each stage of the scan
To see scan details:
- At the top-right of the page, click Show Details.
The Scan Details dialog box appears.
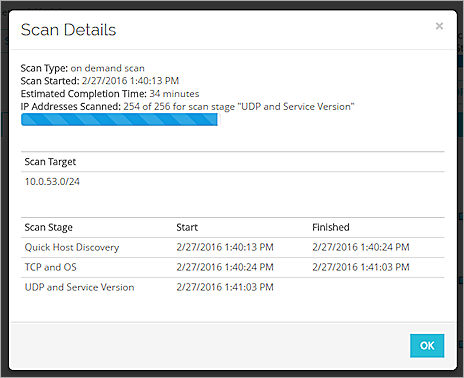
- Review the details of the current scan.
- Click OK.
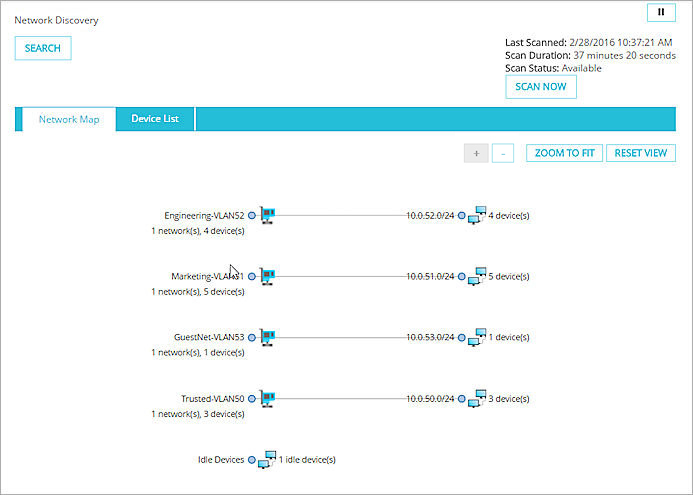
After the network scan has completed, the devices appear in the Network Map and Devices List tabs. Devices remain in the map and list until they are removed because:
- A new on-demand or scheduled scan does not find the device
- No on-demand or scheduled scan has run for seven days
- No traffic was found for a mobile device for more than two hours; a mobile device is removed from the map after seven days with no response
Use the Network Map
After a manual or scheduled scan has completed, you can use the Network Map to see all the devices connected to your network and see details about each connected device.
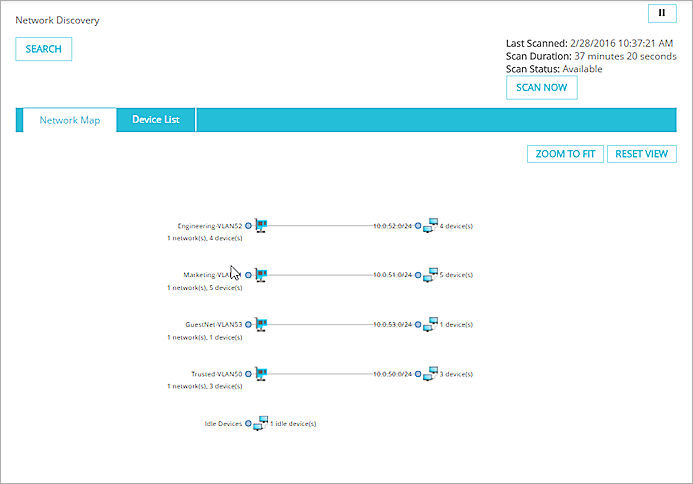
Zoom In and Out
You can use your mouse wheel to zoom in and out on the Network Map.
You can use your mouse wheel to zoom in and out on the Network Map.
You can use your mouse wheel to zoom in and out on the Network Map.
You can use your mouse wheel to zoom in and out on the Network Map.
You can use your mouse wheel to zoom in and out on the Network Map.
You can use your mouse wheel to zoom in and out on the Network Map.

You can use your mouse wheel to zoom in and out on the Network Map.

You can use your mouse wheel to zoom in and out on the Network Map.

You can use your mouse wheel to zoom in and out on the Network Map.

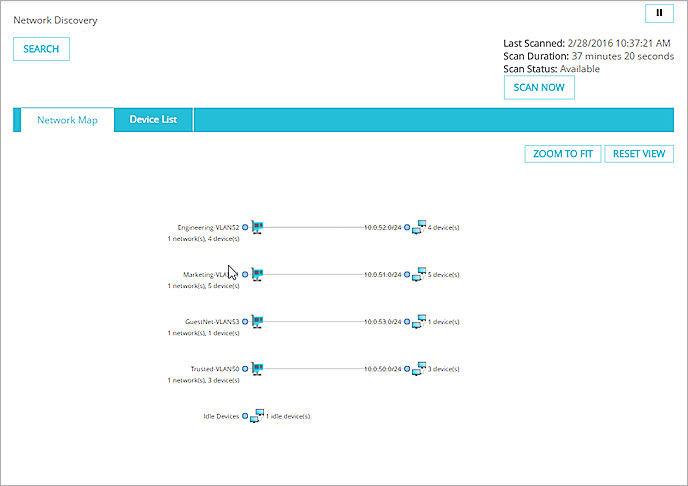
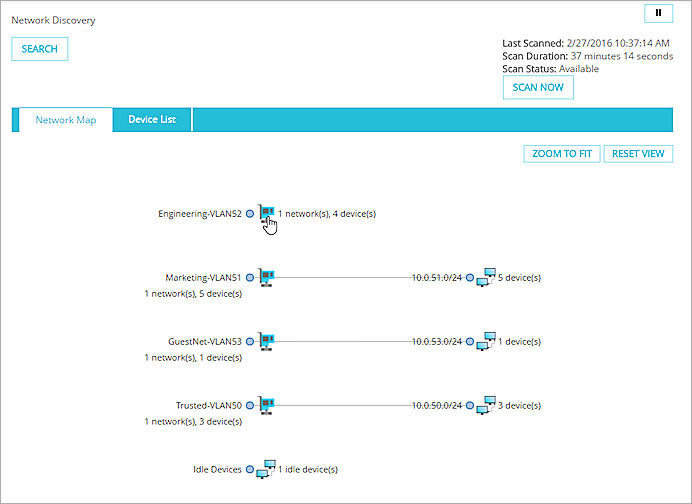
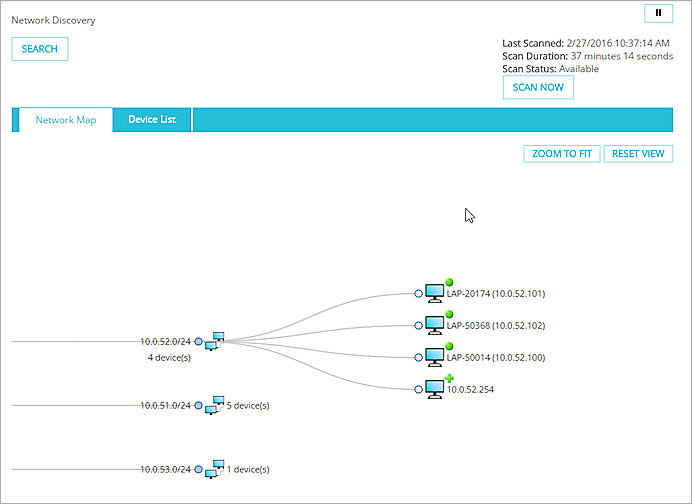
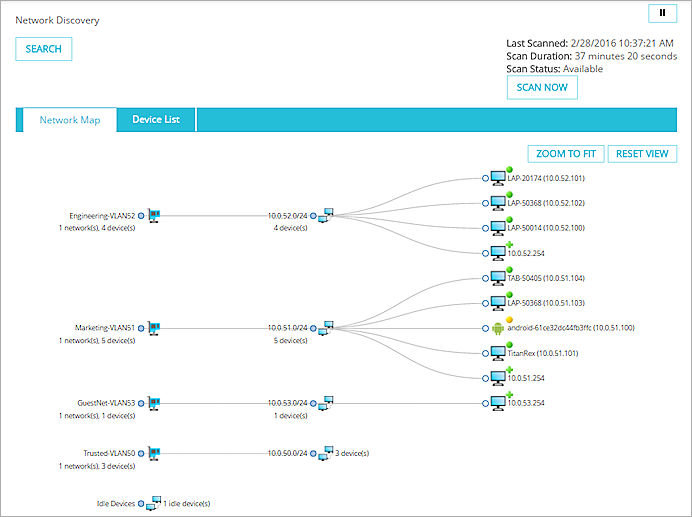
Click Nodes to Expand the Map
You can click each node in the map to expand it and see the connections to that node.

You can click each node in the map to expand it and see the connections to that node.
You can click each node in the map to expand it and see the connections to that node.
You can click each node in the map to expand it and see the connections to that node.
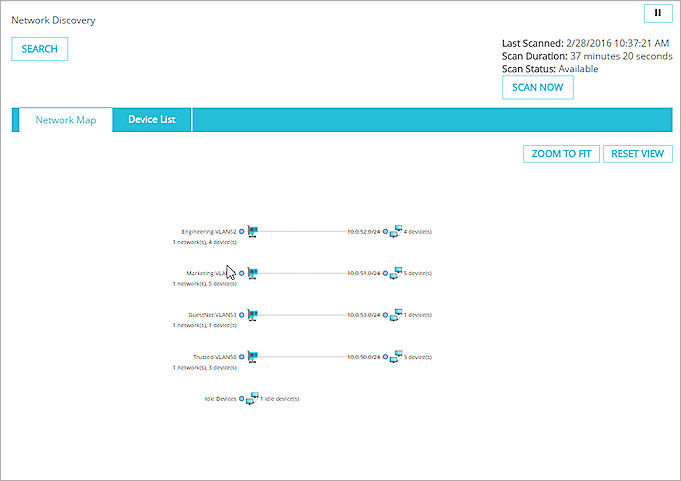
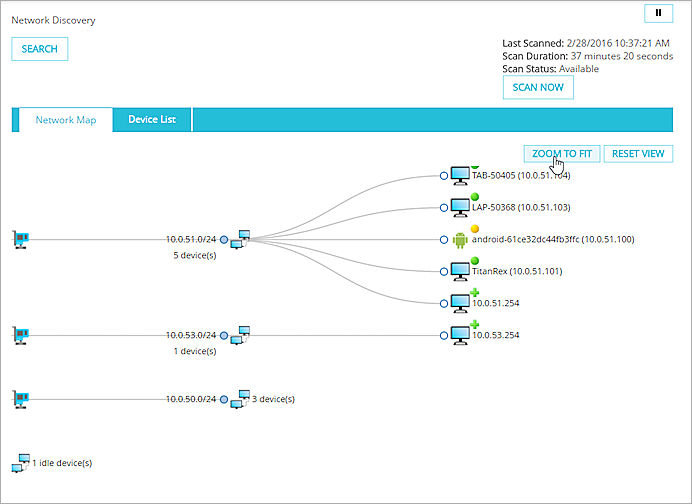
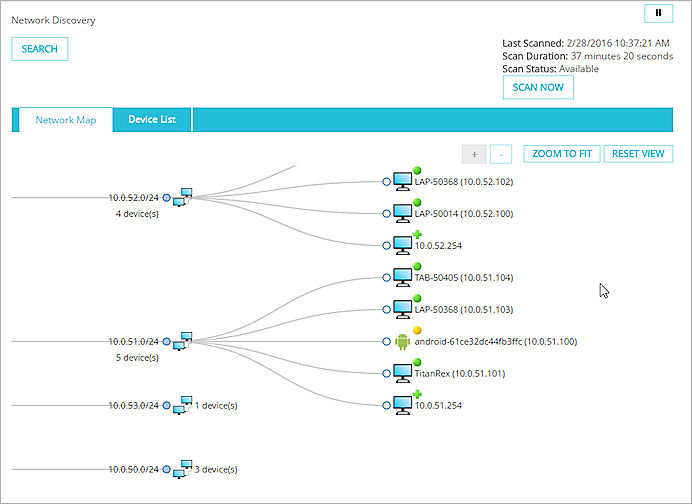
Zoom to Fit
You can change the zoom of the expanded Network Map so all nodes and devices are visible on the page.

You can change the zoom of the expanded Network Map so all nodes and devices are visible on the page.
You can change the zoom of the expanded Network Map so all nodes and devices are visible on the page.
You can change the zoom of the expanded Network Map so all nodes and devices are visible on the page.
Reset the Map View
When you the map nodes are expanded, you can reset the map to the initial collapsed view.
To reset the map view, click Reset View.
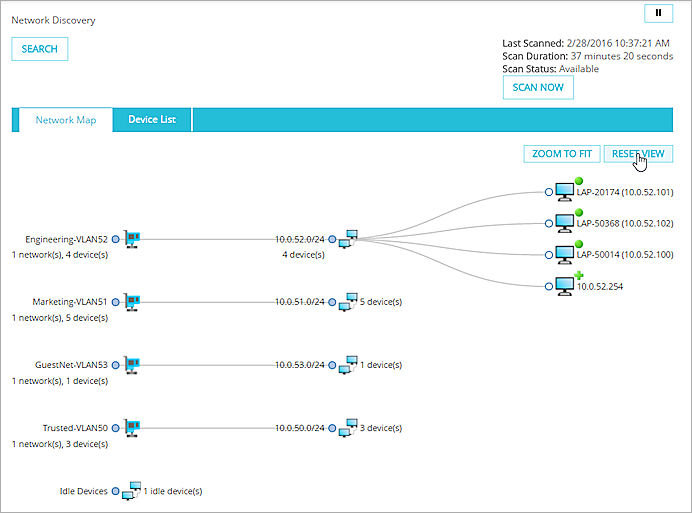
The map view returns to the original view, which shows only the interfaces, networks, and idle devices.
Review the Device List
On the Device List tab, you can see all of the devices connected to your network in a list.
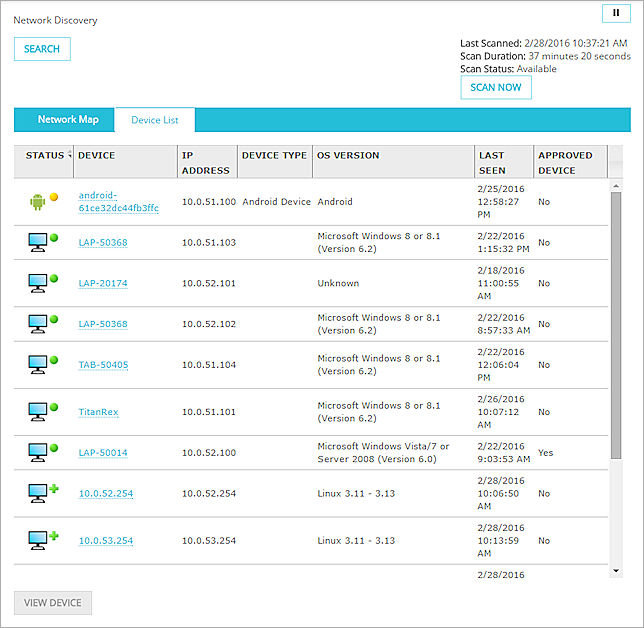
The list includes this information for each device:
- Status — The status of the device at the last scan and, if available, a scan details indicator icon.
 — The device was found on the network the last time it was scanned.
 — The device has sent traffic in the last two hours.
 — The device has not sent traffic in the last two hours.
- Device — The name of the device. If the device name cannot be detected, a host name or IP address appears in this column.
- IP Address — The IP address of the device.
- Device Type — The type of device. For a mobile device, the type of mobile device appears, such as Android or iPhone. If the device type is not available, this column is empty.
- OS Version — The OS version on the device.
- Last Seen — The last time the device was online when a scan occurred.
- Approved — Whether the device has been designated as approved. When you edit the device details, you can specify whether a device is approved. An Approved Device remains in the Network Map when it is offline. Offline devices that are approved appear in the Idle Devices branch of the Network Map.
View Device Details
You can see the details for a device from the Network Map tab or from the Device List tab.
- From the Network Map tab, place your cursor over the device.
The device information dialog box appears.
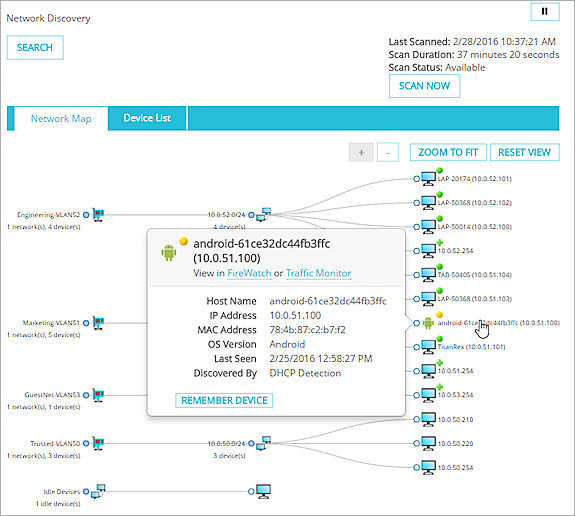
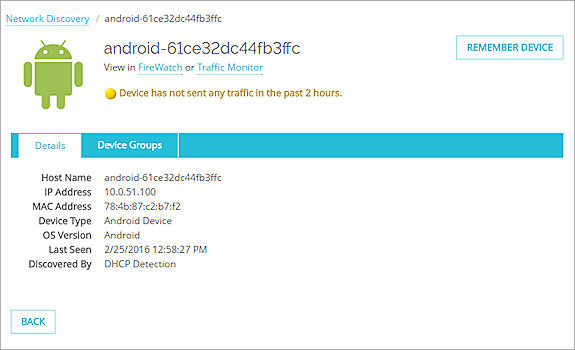
Example of an Android device
From the device information dialog box, you can quickly see the basic device details. You can also open FireWatch or Traffic Monitor to see details about the device connections, or click Remember Device to edit the device information.
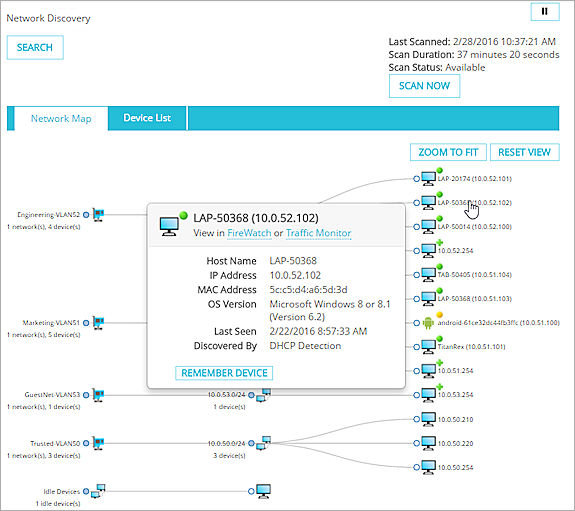
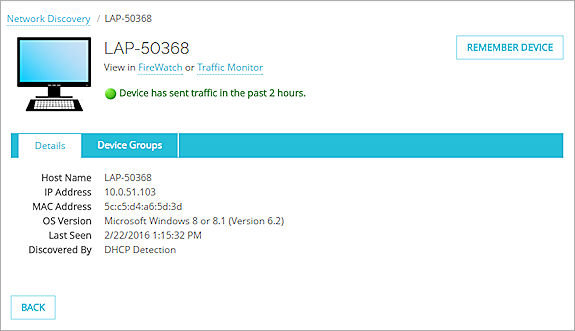
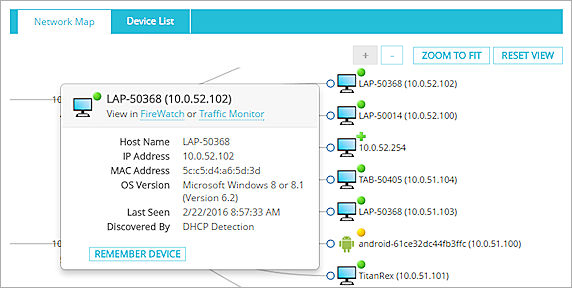
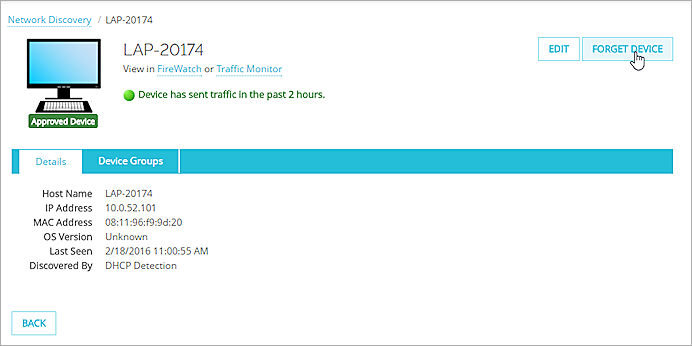
Example of a Windows laptop device
From the device information dialog box, you can quickly see the basic device details. You can also open FireWatch or Traffic Monitor to see details about the device connections, or click Remember Device to edit the device information.
Example of a device found by a network scan
From the device information dialog box, you can quickly see the basic device details. You can also open FireWatch or Traffic Monitor to see details about the device connections, or click Remember Device to edit the device information.
To see the full details for the device, from the Network Map tab, click the device.
From the Device List tab, select the row of a device and click View.
Or, in the Device column, click the device name.
The Details page appears for the device.
Example of the Details page for an Android device
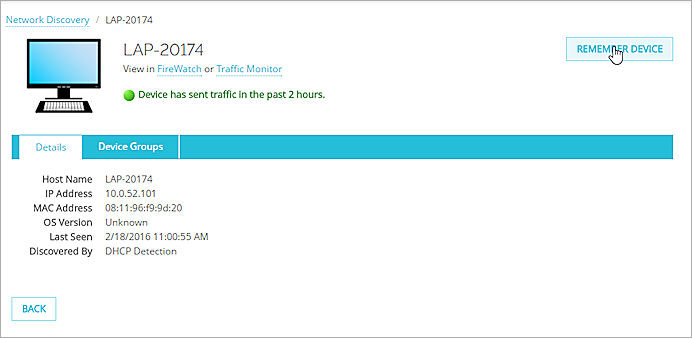
Example of the Details page for a Windows laptop device
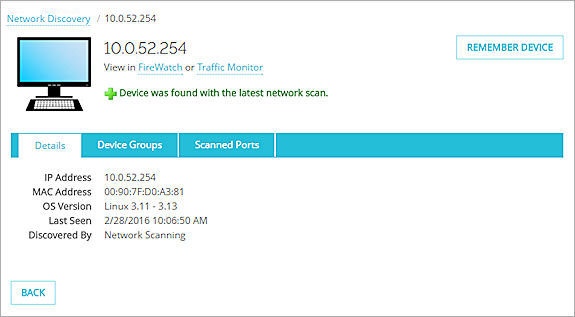
Example of the Details page for a device found by a network scan
The details that appear depend on the type of device and can include:
- Host Name — The host name of the device
- IP Address — The IP address of the device
- MAC Address — The MAC address of the device
- Device Type — The type of device, such as Android, iPhone, or Windows. If the device type is not available, this line is empty
- OS Version — The OS version on the device
- Last Seen — The last time the device was online when a scan occurred
- Discovered By — The scan type that detected the device
- To see which groups the device is a member of, select the Device Groups tab.
The list of groups appears.
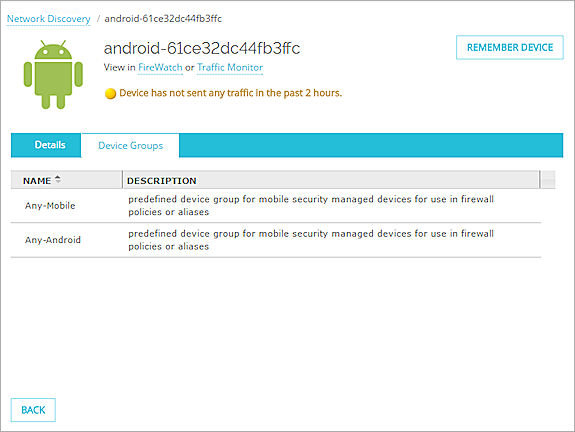
Example of the Device Groups page for an Android device
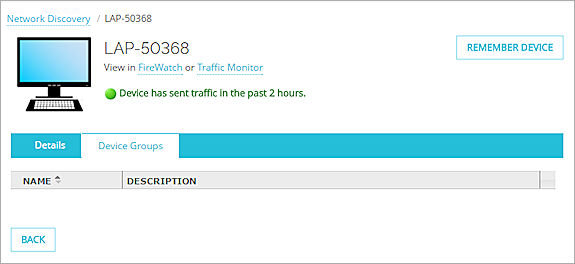
Example of the Device Groups page for a Windows laptop device
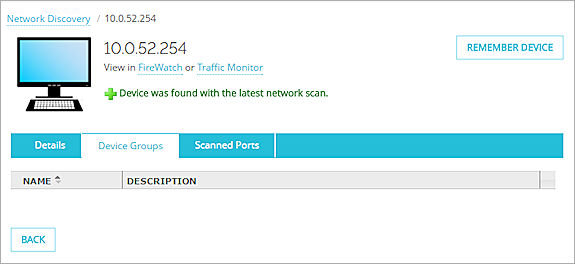
Example of the Device Groups page for a device found by a network scan
- To see details about which ports the device used to connect to the network, select the Scanned Port tab.
The Scanned Port tab only appears if the device was discovered by a network scan.
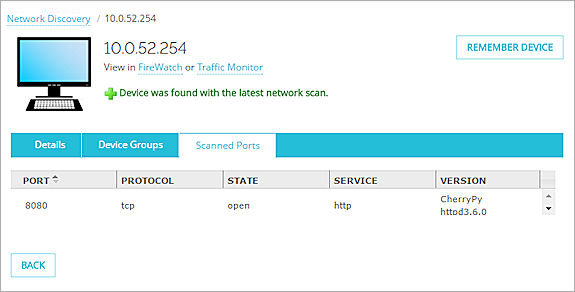
The details that appear for each port includes:
- Port — The port number.
- Protocol — The protocol in use on the port. For example, TCP or UDP.
- State — The current state of the port.
- Service — The name of the service in use on the port.
- Version — The version of the service appears only if it is detected.
Edit Device Details and Forget a Device
To make it easier to identify those devices that often appear in the Network Map, you can edit the details for the devices in the map to add a name and a description. You can also specify whether a device is an Approved Device. An Approved Device remains in the Network Map when it is offline. Offline devices that are approved appear in the Idle Devices branch of the Network Map. The details you specify for a device are saved in the device configuration file for your Firebox.
You can edit the device details from the device information dialog box or from any of the device Details pages. For an approved device, you can change the device details that you specified, or forget the device so it is no longer approved.
To edit the device details for a device that is not approved:
- Click Remember Device.
Example of the Remember device button on the device information dialog box.
Example of the Remember device button on the Details page.
The Edit Device dialog box appears.
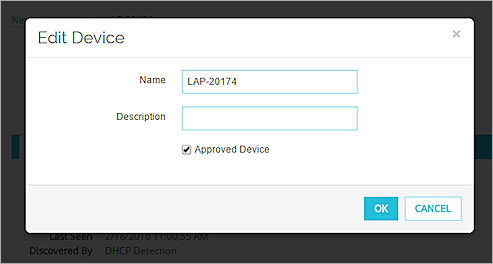
- In the Name text box, the name from the device automatically appears. You can type a new, friendly name to help you identify the device.
- In the Description text box, type a brief description of the device.
- To specify that the device is approved, and enable it to appear in the Idle Devices branch when it is offline, select the Approved Device check box.
- Click OK.
When you select to remember a device, the Edit and Forget buttons appear in the device information dialog box and on the details page in place of the Remember Device button. If you selected to approve the device, the Approved Device label appears below the device icon.
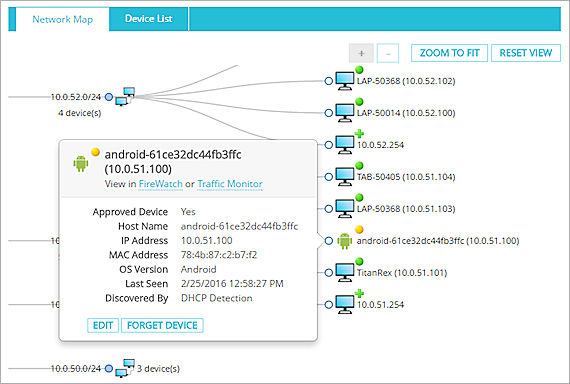
Example of the device information dialog box with the Edit and Forget Device buttons.
Example of the device Details page with the Edit and Forget Device buttons.
To change the details you specified for a device:
- From the device information dialog box or the device Details page, click Edit.
The Edit Device dialog box appears.
- Modify the settings.
- Click OK.
You can also remove the approved status of a device so it no longer appears in the Idle Devices branch.
To remove the approved status from a device:
- From the device information dialog box, or the device Details page, click Forget Device.
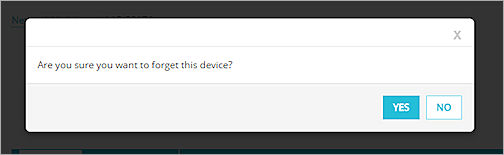
- Click Yes.
Search for Devices
You can search the network map to find devices that match the specific parameters that you specify. When you run a search, the map is updated to include only the device that match your search parameters.
To run a search:
- At the top of the Network Discovery page, click Search.
The Search dialog box appears.
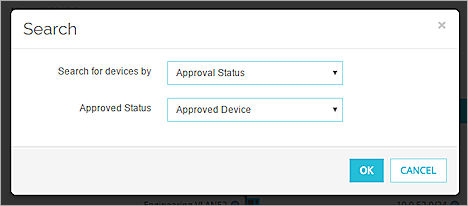
- From the Search for devices by drop-down list, select a search category.
The search parameters that appear depend on the category you select. - Select the parameters for the search.
The available search parameters are included in the Search Parameters List. - Click OK.
The network map is updated to include only the devices that match the search parameters you specified.
Search Parameters List
| Search Category | Search Parameters |
|---|---|
| Approval Status |
Approved Status
|
| Compliance Status |
Compliance Check
|
| Device Name |
Type the mobile device name |
| Device Status |
|
| Device Type |
|
| Discovered By |
|
| FireClient UUID | Type the UUID number of the FireClient on the mobile device You can type all or part of the UUID number |
| Host Name | Type the host name of the mobile device You can type all or part of the host name |
| IP Address | Type the IP address of the mobile device You can type all or part of the IP address |
| Known/Unknown Status |
Known or Unknown Status
|
| Last Seen |
|
| MAC Address | Type the MAC address of the mobile device You can type all or part of the MAC address |
| Open Port | Type the port used for the mobile device connection You can type all or part of the port number |
| OS Version | Type the OS version on the mobile device You can type all or part of the OS version |
| User Name | Type the user name associated with the mobile device You can type all or part of the user name |
See Authenticated Users in Fireware Web UI