Applies To: Locally-managed Fireboxes
Before you create a Firebox Cloud virtual machine, you must create a Microsoft Azure account. When you set up your account, you specify billing information and the credentials you use to connect to the Microsoft Azure portal.
Identify your Firebox Cloud Software Plan and License Type
When you create a Firebox Cloud VM in Azure, you select one of these two software plans.
Firebox Cloud (BYOL)
With the Bring Your Own License (BYOL) software plan, you purchase a Firebox Cloud license for a specified size, Small, Medium, Large, or Extra Large. The Firebox Cloud license defines the maximum number of Azure CPU cores that the Firebox Cloud VM can use.
When you create a Firebox Cloud (BYOL) VM, you select a License Type. To deploy your VM with appropriate resources, select the License Type that matches your Firebox Cloud license size.
Firebox Cloud (PAYG)
With the Pay As You Go (PAYG) software plan, you do not purchase a Firebox Cloud license. The PAYG option includes a 30 day free trial.
For more information about license options and trials, go to Firebox Cloud License Options.
On 31 July 2026, Microsoft implemented capacity limitations for several Azure VM series that affect previously supported Firebox Cloud instance families. Although affected Azure VM instance families are no longer available for new Firebox Cloud deployments, Firebox Cloud supports other Azure VM instance families that remain available for deployment. For more information and migration guidance, go to this Knowledge Base article: Unable to deploy a Firebox Cloud instance in Microsoft Azure because of Azure VM capacity limitations 
Supported Instance Types
Firebox Cloud supports these instance families:
- Dsv5
- Dasv5
- Esv5
- Easv5
Dsv5 and Dasv5 are currently the supported Azure VM families for Firebox Cloud. Firebox Cloud supports Dsv5 and Dasv5 General Purpose VMs, and Esv5 and Easv5 Memory Optimized VMs. Newer Dsv6 and Dsv7 families require a Generation 2 image and are not currently supported.
All Azure services that are part of the deployment are mandatory to run Firebox Cloud. To deploy your instance of Firebox Cloud on Azure, you must complete the following procedures.
For information about how to deploy load balancers with Firebox Cloud, go to Deploy Firebox Cloud with Azure Load Balancers.
Create a Key Pair for SSH Authentication
Before you create a Firebox Cloud instance, you must generate an SSH-2 RSA public key / private key pair. You can generate a new key pair when you configure your Firebox Cloud deployment, or you can use a tool such as puttygen, or ssh-keygen command in Linux to generate the key pair.
- Use the public key when you deploy your Firebox Cloud instance.
-
To use the puttygen utility to generate an SSH-2 RSA key pair:
- Download and install the PuTTYgen utility available from www.puttygen.com.
- Start PuTTYgen.
- Click Generate.
- Move the mouse over the blank area to generate some randomness.
PuTTYgen uses the mouse movements as input to generate the key pair.
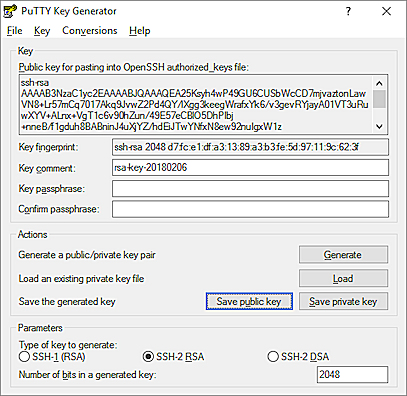
- To save the generated public key to a file, click Save public key.
- (Optional) Specify a passphrase to protect the private key file.
- To save the generated private key to a file, click Save private key.
Save the private key in a secure location. You must provide the private key to connect to the Fireware command line interface.
Deploy Firebox Cloud
To create the Firebox Cloud instance:
- Log in to the Azure portal with your Microsoft Azure account credentials.
- Click Create a resource.
The Azure Marketplace opens. - In the Search services and marketplace text box, enter Firebox Cloud.
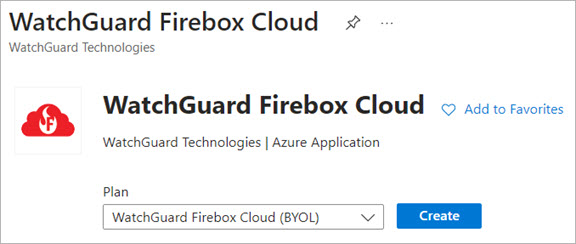
- Select WatchGuard Firebox Cloud.
The WatchGuard Firebox Cloud license options opens.
- From the Subscription drop-down list, select a subscription.
- From the Plan drop-down list, select WatchGuard Firebox Cloud (BYOL) or WatchGuard Firebox Cloud (PAYG).
- Click Create.
The Create a Resource Wizard opens with the Basics tab selected.
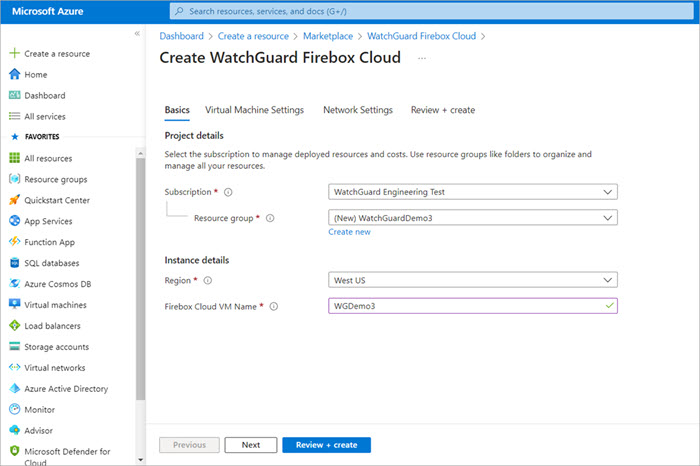
- On the Basics tab, select the subscription to manage deployed resources and costs.
- In the Subscription section, select a subscription from the drop-down list. The subscription is the name of the Azure subscription where the virtual machine and resources are stored. This is the account that Microsoft bills for VM use and storage.
- From the Resource Group drop-down list, select or create a resource group. A resource group is a collection of resources that share the same life cycle, permissions, and policies. All objects, such as networks and interfaces, and data for the Firebox Cloud instance will be associated with the resource group you specify. The resource group does not affect networking or connectivity from the Firebox to existing Azure resources.
Microsoft Azure does not support deployment of a managed application to a resource group with existing resources. You must create a new resource group or use an empty resource group.
- In the Instance Details section, from the Region drop-down list, select the Azure region for this Firebox Cloud instance.
- From the Firebox Cloud VM Name drop-down list, select the name for the Firebox Cloud virtual machine.
- Click Next.
The Firebox Configuration tab opens.
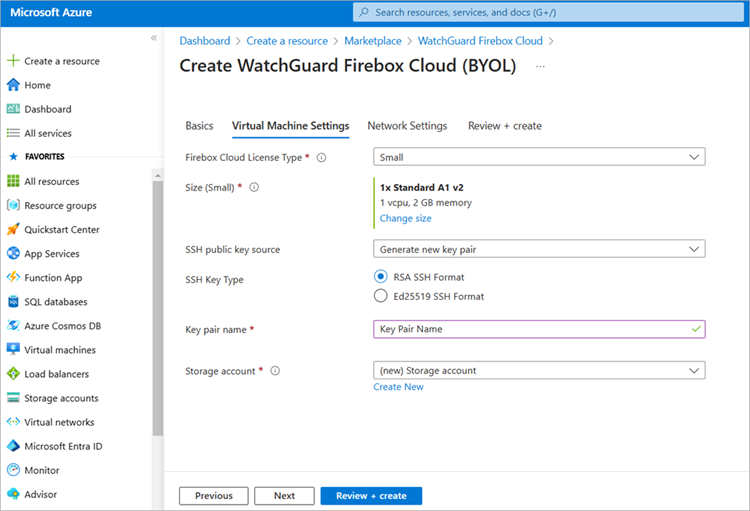
- On the Firebox Configuration tab, you specify virtual machine configuration details.
- From the License Tier drop-down list, select the Firebox Cloud license you purchased from WatchGuard or a WatchGuard reseller. Select Small, Medium, Large, or Extra Large.
- In the VM Family section, select an appropriate VM family. Firebox Cloud supports Dsv5 and Dasv5 General Purpose VMs and Esv5 and Easv5 Memory Optimized VMs.
- From the SSH public key source drop-down list, select the public key for this Firebox. You can generate a new key pair, use an existing key stored in Azure, or use a tool such as puttygen, or ssh-keygen command in Linux to generate the key pair. You must use the private key associated with this public key to connect to the Firebox Cloud CLI.
- In the SSH Key Type section, select the SSH key format. Firebox Cloud supports RSA SSH Format.
- In the Key pair name section, enter a name for the key pair.
- Click Next.
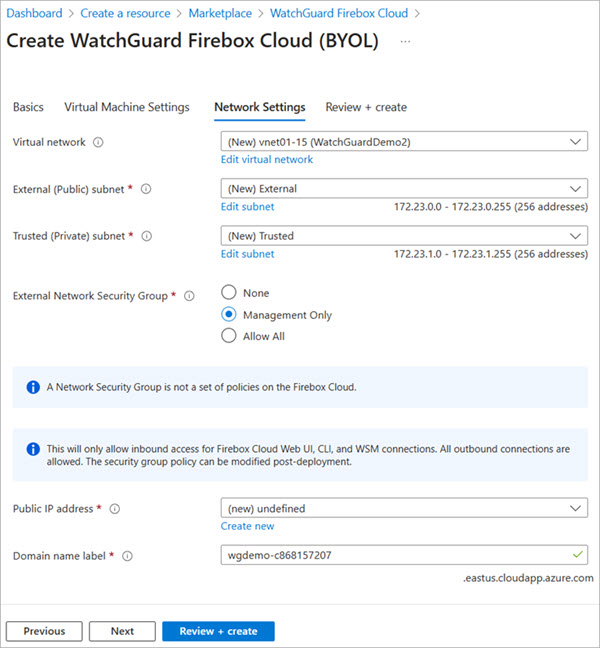
- On the Network Configuration tab, in the Network Deployment Mode section, specify whether you want to create a new virtual network or use an existing one.
- Select Create New Virtual Network > Next if you want to create a new VNet.
If you select Create New Virtual Network, the deployment automatically creates an External subnet, Trusted subnet, NSG, User Defined Route Tables, Standard Public IP, and enables IP forwarding on both interfaces.
- Select Use Existing Virtual Network if you want to use an existing VNet.
If you select an existing virtual network, make sure it includes at least two subnets for Firebox Cloud. Firebox Cloud does not create additional subnets during deployment. The External Interface IP and the Trusted Interface IP must be available IP addresses in the selected subnets.
- In the Existing Virtual Network Name text box, enter the name of the existing virtual network that contains the External and Trusted subnets.
- In the Existing VNet Resource Group text box, enter the name of the Resource Group where the existing VNet is located.
- In the External Subnet Name text box, enter the name of the existing External (Public) subnet.
- In the Trusted Subnet Name text box, enter the name of the existing Trusted (Private) subnet.
- In the Firebox External Interface IP text box, enter the IP address assigned to the Firebox on the existing External subnet.
- In the Firebox Trusted Interface IP text box, enter the IP address assigned to the Firebox on the existing Trusted subnet.
- Click Next.
- In the Next: Review + Create step, review the information, and correct any errors.
- Click Create.
The deployment begins.
After the deployment is completed, you can go to the resource group or pin the VM to the Microsoft Azure dashboard.
(Optional) Create a New Route Table
Azure automatically routes traffic between Azure subnets, virtual networks, and on-premises networks. If you want to change the default routing, you must create a new route table.
Route tables are independent resources in Azure so you can create them before or after you create other resources. After you create a route table, make sure you link the route table to a subnet to make your custom routes active.
To create a route table:
- Log in to the Azure portal with your Microsoft Azure account credentials.
- In the Search text box, enter Route table. Select Route table from the list.
- On the Route table page, select Create.
The Create Route table page opens with the Basics tab open by default..
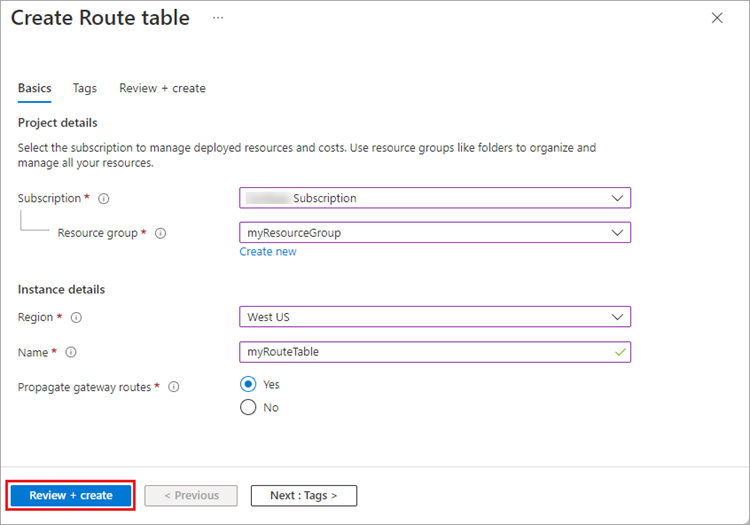
- From the Subscription drop-down list, select a subscription to deploy the route table in.
- From the Resource group drop-down list, select an existing resource group, or click Create new to create a new resource group.
- In the Instance details section, in the Name text box, enter a name for the route table.
- Next to Propagate gateway routes, select No if you plan to associate the route table to a subnet in a virtual network that is connected to your on-premises network through a VPN gateway, and you do not want to propagate your on-premises routes to the network interfaces in the subnet. Otherwise, select Yes.
- From the Region drop-down list, select a region to deploy the route table in.
- Click Review + create. Click Create to create your new route table.
For more information about how to associate a route table to a subnet, or to view route table commands, go to Create, change, or delete a route table in the Azure documentation.
Find the Instance ID (VM ID)
After you deploy your Firebox Cloud instance, you must find the Instance ID, also known as the VM ID. You will need this to log in to the Fireware Web UI to run the Firebox Cloud Setup Wizard.
To find the Firebox Cloud Instance ID:
- From the Azure navigation menu, select Virtual machines.
- Select the name of your virtual machine.
The Virtual Machine Details Page opens. - In the upper-right corner of the Essentials section, click JSON View.
The Resource JSON opens. - Search for vmId. The vmId is in this format: "vmId": "1234eaaa-73fc-4c8a-8335-91f514122f27"
- Copy the VM ID.
You must have this instance ID to run the Firebox Cloud Setup Wizard.
Activate your Firebox Cloud License
For Firebox Cloud with a BYOL license, you must activate the Firebox Cloud serial number and license key at www.watchguard.com. Before you can activate Firebox Cloud, you must have the Firebox Cloud serial number and a license key you received from WatchGuard. When you activate Firebox Cloud, if you do not see an option to type a license key, your device does not require a license key.
To activate your Firebox Cloud license:
- Go to www.watchguard.com.
- Click Support.
- Click Activate Products.
- Log in to your WatchGuard Customer or Partner account. If you do not have an account, you can create one.
- If necessary, navigate to the Support Center and select My WatchGuard > Activate Products.
- When prompted, enter your Firebox Cloud serial number.
- If prompted, enter your Firebox Cloud license key.
- If you want to activate the Firebox Cloud license with MSSP points, select the Activate For Use in MSSP Command check box.
- When activation is complete, copy the feature key and save it to a local file.
For more information about how to activate your Firebox Cloud license, go to Activate a Device or Service at WatchGuard.com.
Run the Firebox Cloud Setup Wizard
After you deploy Firebox Cloud, you can connect to Fireware Web UI through the public IP address to run the Firebox Cloud Setup Wizard. You use the wizard to set the administrative passphrases for Firebox Cloud.
To run the Firebox Cloud Setup Wizard:
- Connect to Fireware Web UI for your Firebox Cloud with the public IP address:
https://<eth0_public_IP>:8080 - Log in with the default Administrator account user name and passphrase:
- User name — admin
- Passphrase — The Firebox Cloud Instance ID
The Firebox Cloud Setup Wizard welcome page opens.
- Click Next.
The setup wizard starts. - Review and accept the End-User License Agreement. Click Next.
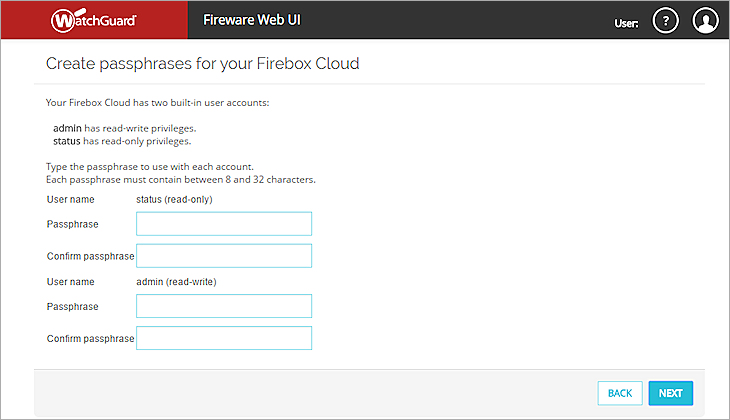
- Specify new passphrases for the built-in status and admin user accounts.
- Click Next.
The configuration is saved to Firebox Cloud and the wizard is complete.
WatchGuard does not store any sensitive customer information in the Firebox Cloud configuration or on the Azure cloud-based platform.
Connect to Fireware Web UI
To connect to Fireware Web UI and administer Firebox Cloud:
- Open a web browser and go to the public IP address for your instance of Firebox Cloud at:
https://<eth0_public_IP>:8080 - Log in with the admin user account. Make sure to specify the passphrase you set in the Firebox Cloud Setup Wizard.
By default, Firebox Cloud allows more than one user with Device Administrator credentials to log in at the same time. To prevent changes by more than one administrator at the same time, the configuration is locked by default. To unlock the configuration so you can make changes, click  .
.
If you prefer to allow only one Device Administrator to log in at the same time, select System > Global Settings and clear the Enable more than one Device Administrator to log in at the same time check box.
Microsoft Azure automatically terminates your management connection to Firebox Cloud after 30 minutes of inactivity. To avoid unexpected disconnection of your management session, do not set the Management Session Idle Timeout in the Fireware Authentication > Settings page to a value higher than 30 minutes.
Add the Feature Key
If you have received or downloaded the Firebox Cloud feature key to a local file, in the Feature Key Wizard select Yes I have a local copy of the feature key and paste the feature key into the wizard.
If you activated a Firebox Cloud license at www.watchguard.com, your feature key is available directly from WatchGuard. You must add this feature key to the Firebox Cloud configuration to enable all functionality and configuration options on Firebox Cloud.
After you add the feature key, Firebox Cloud automatically reboots with a new serial number.
To add the feature key, from Fireware Web UI:
- Select System > Feature Key.
The Feature Key Wizard page opens.
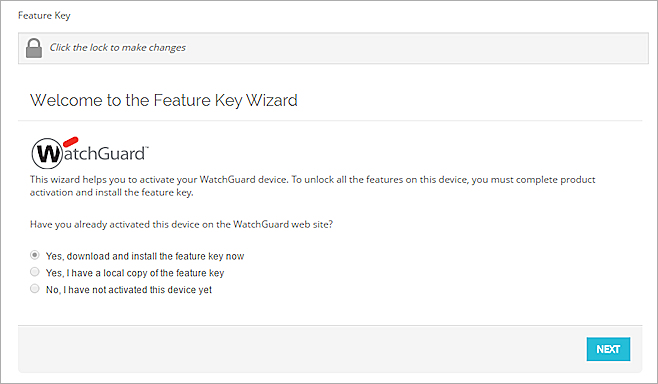
- To unlock the configuration file, click .
- To download and install the feature key, click Next.
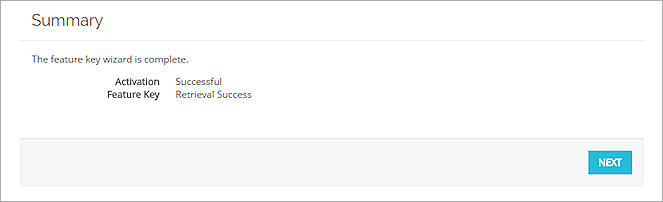
- On the Summary page, verify that your feature key was successfully installed.
When your feature key has been installed, Feature Key Retrieval Success appears on the Summary page.
- Click Next.
The wizard completes and Firebox Cloud reboots with a new serial number.
Next Steps
After you run the setup wizard and add the feature key you can use Fireware Web UI or Policy Manager to configure the settings for Firebox Cloud.
Enable Feature Key Synchronization
Enable Firebox Cloud to automatically check for feature key updates when services are about to expire.
To enable feature key synchronization, in Fireware Web UI:
- Select System > Feature Key.
- Select the Enable automatic feature key synchronization check box.
- Click Save.
To enable feature key synchronization, in Policy Manager:
- Connect to Firebox Cloud in WatchGuard System Manager.
- Open Policy Manager.
- Select System > Feature Keys.
- Select the Enable automatic feature key synchronization check box.
- Click Save.
Configure Firebox Cloud to Send Feedback to WatchGuard
To enable Firebox Cloud to send feedback, in Fireware Web UI:
- Select System > Global Settings.
- Select the Send advanced device feedback to WatchGuard check box.
- Select the Send threat telemetry to WatchGuard check box (Fireware v12.11 and higher).
- Select the Send Fault Reports to WatchGuard daily check box.
To enable Firebox Cloud to send feedback, in Policy Manager:
- Connect to Firebox Cloud in WatchGuard System Manager.
- Open Policy Manager.
- Select Setup > Global Settings.
- Select the Send advanced device feedback to WatchGuard check box.
- Select the Send threat telemetry to WatchGuard check box (Fireware v12.11 and higher).
- Select the Send Fault Reports to WatchGuard daily check box.
Configure Firewall Policies and Services
The default WatchGuard and WatchGuard Web UI policies allow management connections from any computer on the trusted, optional, or external networks.
We strongly recommend that you do not allow management connections from the external network, and that you edit the WatchGuard and WatchGuard Web UI policies to remove the Any-External alias from the From list after you complete initial configuration.
To allow management from only a specific computer on the external network, you can add the address of that management computer to the From list in these policies.
Configure other policies and services as you would for any other Firebox.
Firebox Cloud does not support every Fireware feature. For a summary of the differences between Firebox Cloud and other Firebox models, go to Firebox Cloud Feature Differences.