Applies To: Locally-managed Fireboxes
Every Firebox uses an XML file to store configuration settings for backup and recovery purposes, and you can save this XML configuration file and use it to configure a different Firebox.
For example, if you have a new Firebox, trade up Firebox upgrade, or a replacement (RMA) Firebox, you can save the Firebox configuration settings from your existing Firebox to a local XML file and then migrate and save that configuration file to a new Firebox.
The XML configuration file includes most Firebox settings, except the following settings that are specific to an individual Firebox, such as:
- The Firebox Feature key
- Firebox management user credentials
- Certificates — The new Firebox uses different certificates than the original Firebox. For more information, go to Additional Migration Steps.
You cannot use a saved backup image (.fxi file) to migrate a configuration. A backup image includes device-specific information such as the serial number, certificates, and private keys. You will receive the error "import failed 400 invalid platform" if you try to use a backup image file. For more information on how to save your XML configuration file, go to Save the XML Configuration File from Original Firebox.
About WatchGuard Cloud
Before you move a locally-managed Firebox configuration to a new Firebox, consider migrating your new Firebox to cloud management with WatchGuard Cloud. WatchGuard Cloud provides a single user interface where you can monitor and configure all your WatchGuard products and services, and a multi-tier architecture that makes it easy to manage inventory across your accounts. For more information on how to migrate a locally-managed Firebox to WatchGuard Cloud, go to Migrate Fireboxes to WatchGuard Cloud.
Before You Begin
Before you begin, review the requirements, migration methods, and additional configuration steps that might be required to fully configure the new or replacement locally-managed Firebox.
Feature Keys
- Make sure you have activated the new Firebox in your WatchGuard account and that you have downloaded a feature key for the device. For more information, go to Get the Feature Key for the New Firebox.
- When you use Policy Manager to migrate a configuration to a new Firebox model that is different than the original model, you must import the feature key for the new Firebox model into the configuration and update the device name before you save the configuration to the new Firebox.
Firebox Model
- Make sure you verify and update the device model in the configuration file before you save the configuration to the new Firebox. The Firebox Model information should match the model in the feature key of the new Firebox. The name is still the same as the original Firebox.
- To verify or update the device model, name, and time zone, from Policy Manager, select Setup > System.
Fireware Version
- If you use Policy Manager to migrate the Firebox configuration, note that some Firebox features are supported only in specific versions of Fireware or operate very differently in different versions of Fireware.
- If the new Firebox runs a different Fireware version than your original Firebox, review and update the OS Compatibility setting in the configuration file to the OS version that the new Firebox uses. For more information, go to Configure Fireware OS Compatibility.
If you have a brand new Firebox with factory-default settings, the version of Fireware that is installed on the Firebox is indicated on a sticker on the device.
Network Configuration
If you migrate and move a configuration to a different Firebox model with a different number or different types of network interfaces, make sure you verify your network configuration before you save the configuration to the new Firebox.
Make sure your internal and external networks and network interfaces are correctly configured for your network. An incorrect network configuration might result in the inability to connect to and administer the Firebox on the internal network or communicate with external networks. For more information, go to About Network Modes and Interfaces.
If the Fireboxes have different numbers of interfaces, you must use Policy Manager to migrate the configuration to the new Firebox. To use Fireware Web UI to migrate the configuration, the original and new Firebox must have the same number of interfaces.
- If you migrate to a new Firebox model with fewer interfaces, take action to resolve potential issues such as the loss of a configured internal network or a VLAN that fails to pass traffic. From Policy Manager, open the configuration file, select Network > Configuration, and make sure the network configuration for each network interface is correct before you save the configuration to the new Firebox. For more information, go to About Network Modes and Interfaces.
- If the new Firebox model has different types of interfaces (such as SFP ports) than the original Firebox, or if your original Firebox has an interface module installed, make sure you examine your network configuration to resolve any configuration issues with interface settings, such as external interfaces for SD-WAN, Multi-WAN, and failover functionality. From Policy Manager, open the configuration file, select Network > Configuration, and make sure the network configuration for each network interface is correct before you save the configuration to the new Firebox. For more information, go to About Network Modes and Interfaces.
- For wireless Fireboxes, if you move the configuration from a Firebox with wireless capabilities to a Firebox model that does not have wireless interfaces, or from an older Firebox with a single radio configuration to a dual radio configuration, you must disable the wireless settings in the configuration before you save the configuration to the new Firebox. For more information on how to enable or disable wireless, go to Enable Wireless Connections.
- If you move the configuration from a Firebox where your VPN Phase 2 proposals use traffic-based force key expiration to a new Firebox model that runs Fireware v2025.1.1 or higher, the default settings have changed to 1024 MB and a minimum value of 512 MB. Make sure you set an appropriate value based on the new default and minimum values to avoid frequent key expiration. Your current configuration values are preserved during a configuration migration from a previous Firebox model, but the new minimum values for traffic-based force key expiration will be enforced if you edit the VPN tunnel configuration and Phase 2 proposal settings. For more information, go to VPN Phase 2 proposal traffic-based force key expiration default setting changes in 2025.1.1 and higher in the WatchGuard Knowledge Base.
FireCluster
For a Firebox that is a FireCluster member:
- To migrate a FireCluster member to a new model, go to Move a FireCluster Configuration to a New Device Model.
- For information about how to configure an RMA replacement Firebox that replaces a member of a FireCluster, go to Configure a Replacement (RMA) FireCluster Member.
Mobile VPN
- If you use Mobile VPN with IKEv2 or Mobile VPN with SSL and the OpenVPN client, or the AuthPoint authentication server, you must complete additional steps after the migration so that VPN clients can connect to the new Firebox. For more information, go to Additional Migration Steps.
Certificates
- The new Firebox uses different certificates than the original Firebox. If you use the default certificates, network clients do not automatically trust the certificate on the new Firebox.
- If your original Firebox used a third-party certificate, and you want to use the third-party certificate on the new Firebox, go to Additional Migration Steps for instructions on how to import the third-party certificate.
Move Configuration to New Firebox
Follow these steps to migrate the configuration from the original Firebox to the new Firebox:
- Save a copy of the XML configuration file from the original Firebox
- Get the feature key for the new Firebox
- Migrate the XML configuration file to the new Firebox
- Perform additional migration steps
Save the XML Configuration File from Original Firebox
To save the configuration file from the original Firebox, you can use Policy Manager or Fireware Web UI.
If you can connect to the original Firebox, use Policy Manager to save the current device configuration to a local XML file. For more information, go to Save the Configuration File.
If the original Firebox is unavailable or inoperable, look for the latest configuration file saved on your management computer. By default, Policy Manager saves configuration files in the Documents\My WatchGuard\configs directory.
If you can connect to the original device with Fireware Web UI, you can manually save the current configuration to an XML file. For more information, go to Manage the Firebox Configuration File.
To download the configuration file, from Fireware Web UI:
- Select System > Configuration File.
- Click Download the Configuration File.
Get JSON File for Firebox Cloud (AWS or Azure only)
For Firebox Cloud, you must also save a copy of the JSON file because it contains the interface information. Save the JSON file and the XML file in the same directory so that Policy Manager can open the configuration. For information about how to save a copy of the JSON file, go to Open the Configuration File for a Firebox Cloud Instance.
Get the Feature Key for the New Firebox
The feature key for the new Firebox is available for download after you activate the device in your WatchGuard account. For an RMA device, WatchGuard activates the new device. To get the feature key for the new device, use one of these methods:
A Firebox that starts with factory-default settings automatically connects to WatchGuard to download its feature key. If you need to reset a Firebox to factory-default settings, go to Reset a Firebox for instructions.
To download the feature key to the new Firebox:
- Connect the Firebox interface 0 to a network with Internet access and DHCP.
- Start the Firebox with factory-default settings.
The Firebox connects to WatchGuard to download the feature key. If the download fails, the Firebox automatically continues to try to download the feature key if the Firebox has an active Internet connection.
You can manually download the feature key from the WatchGuard account where you activated the Firebox. You must use this method to get the feature key for FireboxV virtual devices. It can be useful to manually download the feature key for any Firebox model if the Firebox is unable to connect to automatically download the feature key. For more information, go to About the Product Details Page.
To get the feature key for your device:
- Open a web browser and go to https://myproducts.watchguard.com/manage-products.
- Log in to your WatchGuard account.
- On the Manage Products page, in the Network Security section, click View Products.
- Select a friendly name to open details for that device or product.
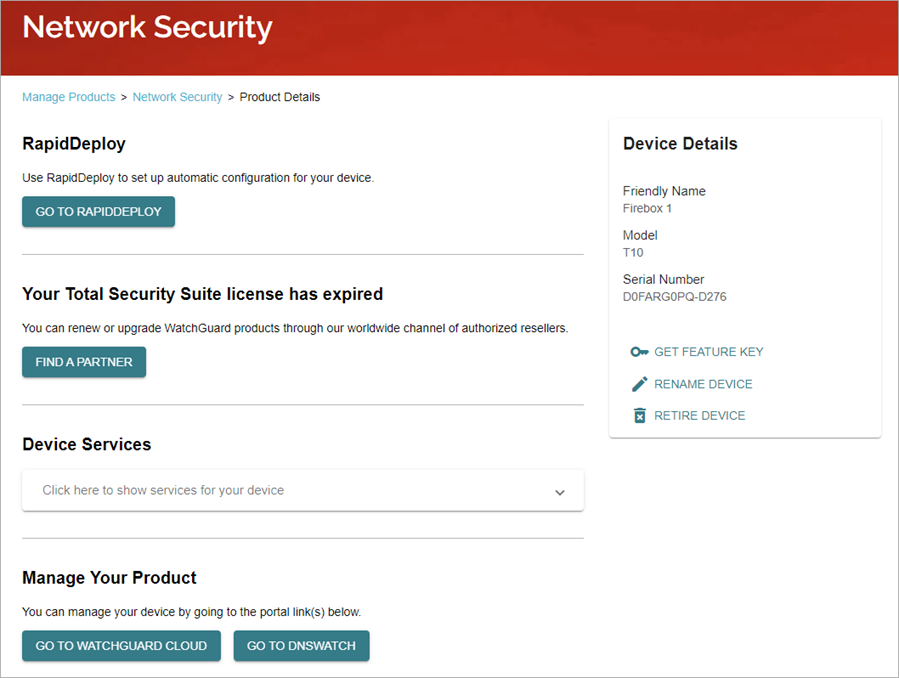
- Click Get Feature Key.
- Click Copy.
- Save the feature key to a local text file.
Migrate the XML Configuration File to the New Firebox
To migrate a saved Firebox configuration to a new or replacement Firebox, you must review and update the XML configuration file from the original Firebox, and then save the configuration to the new Firebox.
- You must use Policy Manager to migrate a configuration to a new Firebox model that has a different number of interfaces than your original Firebox, or migrate a configuration to a FireboxV virtual device or to Firebox Cloud.
- To use Fireware Web UI to migrate the configuration, the original and new Firebox must have the same number of network interfaces.
You can use Policy Manager or Fireware Web UI to configure the new Firebox:
To use this method, you must have WatchGuard System Manager (WSM) installed on a Windows management computer. In WSM, you use Policy Manager to update the configuration file from the original Firebox, and save it to the new Firebox. For more information, see the Firebox Migration with WSM video tutorial (7 minutes).
To connect to the new Firebox:
- Connect interface 0 to a network with a DHCP Server and Internet access.
- Power on the Firebox with factory-default settings.
- Connect your management computer to interface 1.
If the Firebox can connect to the Internet through interface 0, it automatically connects to WatchGuard to download its feature key.
Next, use Policy Manager to open and update the configuration file from the original device with the new feature key and device details.
- When you use Policy Manager to migrate a configuration to a new Firebox model that is different than the original model, you must import the feature key for the new Firebox model into the configuration and we recommend you review the device name, location, and time zone before you save the configuration to the new Firebox.
- If the original and new Fireboxes run different Fireware versions, make sure you review and update the OS Compatibility setting in the configuration file to the OS version that the new Firebox uses if required.
To open and edit the configuration file, in Policy Manager:
- Open Policy Manager.
- Select File > Open > Configuration File.
- Select the XML configuration file you saved from the original Firebox.
- Click Open.
- To update the feature key, select Setup > Feature Keys.
The Firebox Feature Key dialog box opens. - Click Remove to remove the current feature key of the original Firebox.
- To download the feature key from the new Firebox, click Download.
The Get Firebox Feature Keys dialog box opens.
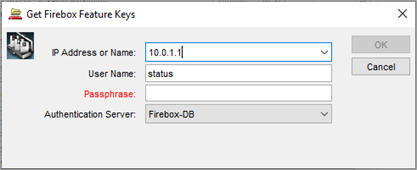
- In the IP Address or Name text box, type the IP address of Firebox interface 1. For a Firebox with factory-default settings, the IP address is 10.0.1.1.
- In the Passphrase text box, type the passphrase for the status user account. For a Firebox with factory-default settings, the passphrase is readonly.
Click OK.
Policy Manager connects to the new Firebox and downloads the feature key. This is the feature key that the new Firebox downloaded when it started with factory-default settings. In the Firebox Feature Keys dialog box, the Summary and Features sections show information from the feature key.

If you cannot connect to the new Firebox to get the feature key, or if the device does not have a feature key, you can manually add the feature key you downloaded from the Product Details page in your WatchGuard account.
To manually update the feature key:
- Click Import.
- Paste the feature key text or click Browse and select the text file you saved it to.
- Click OK.
- After you download or manually update the feature key, click OK.
Policy Manager updates the Firebox model in the device configuration to match the model in the feature key. - To verify or update the device name and time zone:
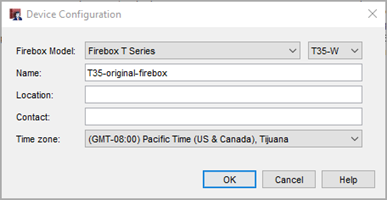
- Select Setup > System.
The Device Configuration dialog box opens. - Update the Name for the new Firebox, and update the Location, Contact, and Time zone, as required.
- Click OK.
The Firebox Model information matches the model in the feature key of the new Firebox. The name is still the same as the original Firebox.
- Select Setup > System.
- Select Network > Configuration and review the network interface configuration.
If you migrate a configuration to a new Firebox model with a different number or different types of network interfaces, make sure you verify your network interface configuration before you save the configuration to the new Firebox.
If you migrate your current Firebox configuration to a Firebox model with fewer interfaces than your original Firebox, when you save the configuration to the new Firebox, the process removes any network interfaces that are not physically available on the new Firebox. This includes the removal of wireless interfaces when you migrate a configuration from a wireless model to a non-wireless model.
These issues might occur when the process removes interfaces. To correct these issues, configure the feature to use an available interface.
- You might lose a configured network that used a removed interface.
- You might lose a BOVPN gateway that uses an IP address associated with a removed interface.
- You might have issues with Mobile VPN, SD-WAN, Multi-WAN, or a FireCluster that used a removed interface.
- You might lose a configured network that used a removed wireless interface.
- If you migrate your configuration to a Firebox with fewer interfaces than the original device, configured VLANs fail to pass traffic. When this occurs, the Firebox System Manager Status Report tab shows the interfaces as down. To correct this issue, change the interfaces for each configured VLAN. For more information about VLAN settings, go to Define a New VLAN.
- When you migrate a configuration to a Firebox that supports an interface module, you might see a Policy Manager dialog box that suggests that your new Firebox has more interfaces than it physically has. This is because the count also includes the interfaces on the optional interface module.
- If the new Firebox runs a different version of Fireware, select Setup > OS Compatibility and from the For Fireware version drop-down list, select the Fireware version that the new Firebox uses. For more information, go to OS Compatibility.
- If you use third-party certificates, go to Additional Migration Steps.
- To save the configuration to the new Firebox:
- Select File > Save > To Firebox.
- In the IP Address or Name text box, type the IP address of Firebox interface 1. For a Firebox with factory-default settings, the IP address is 10.0.1.1.
- In the Administrator Passphrase text box, type the passphrase for the admin user account. For a Firebox with factory-default settings, the passphrase is readwrite.
- Click OK.
- If Policy Manager asks you whether to continue with the save, click Yes.
After you save the configuration to the Firebox, edit the administrative user accounts to change the passphrases to more secure settings. For more information, go to Manage Users and Roles on Your Locally-Managed Firebox.
If your new Firebox has removable interface modules, the number of configurable interfaces that appear in Policy Manager depends on the interface modules installed on the Firebox. After you save the configuration to the new Firebox, you must open the configuration file from the new Firebox to update the interface list.
You can use Fireware Web UI to connect to your new Firebox from a management computer and migrate the XML configuration file. For more information, see the Firebox Migration with Web UI video tutorial (4 minutes).
To use Fireware Web UI to migrate the configuration, the original and new Firebox must have the same number of interfaces. If the Fireboxes have different numbers of interfaces, follow the steps to use Policy Manager to migrate the configuration.
To prepare the new Firebox:
- Connect to the new Firebox with the Web Setup Wizard to configure the device with a new, temporary basic configuration. For more information, go to Run the Web Setup Wizard.
- We recommend you upgrade the Firebox to the latest Fireware version. In Fireware Web UI, select System > Upgrade OS. For more information, go to Upgrade Fireware or WatchGuard System Manager.
To migrate the configuration to the new Firebox, from Firebox Web UI:
- Select System > Configuration File.
The Configuration File page opens.
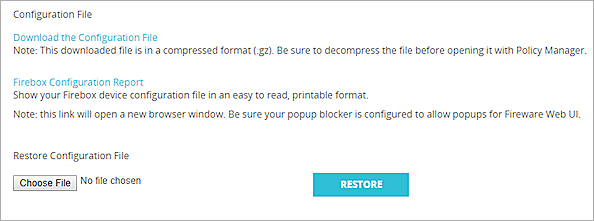
- Click Choose File or Browse and select the configuration file to upload.
The button name depends on the browser you use. - Click Restore.
The Firebox configuration is updated to the settings from the configuration file.
For more information, go to Manage the Firebox Configuration File.
After you save a configuration file that changes the IP address of the Firebox interface that your computer is connected to, before you can connect to the Firebox, you must make sure your computer has an IP address on the same network as the updated interface IP address.
The new Firebox has a different MAC address than the original Firebox. Devices in your network that previously connected to the original Firebox might fail to communicate with the new Firebox until their old ARP entries for the Firebox IP address expire. This can take up to 60 minutes or require you to reboot the affected devices. If a device in your network has a static ARP entry configured for the Firebox IP address, you must change it on that device.
Additional Migration Steps
After you migrate the configuration to the new Firebox, you might have to make other configuration changes to the Firebox and network clients.
By default, all certificates are different on the new Firebox. If you use the default certificates, network clients do not automatically trust the certificate on the new Firebox.
If the original Firebox used a third-party certificate, and you want to use the third-party certificate on the new Firebox:
- On the new Firebox, select the default certificate option in the settings for Firebox features that use a third-party certificate. You must complete this step before you can save the configuration on the new Firebox. For example, you might use a third-party certificate for inbound HTTPS content inspection, BOVPN, Mobile VPN with IKEv2, and Mobile VPN with L2TP.
- To configure HTTPS content inspection certificates, go to Use Certificates with Outbound HTTPS Proxy Content Inspection.
- To configure BOVPN certificates, go to Certificates for Branch Office VPN (BOVPN) Tunnel Authentication.
- To configure Mobile VPN with IKEv2 certificates, go to Edit the Mobile VPN with IKEv2 Configuration.
- To configure Mobile VPN with L2TP certificates, go to Certificates for Mobile VPN with L2TP Tunnel Authentication.
- If you use the Firebox web server certificate:
- In Fireware v12.2.1 or higher, select Setup > Certificates and then select the Firebox Web Server Certificate tab.
In Fireware v12.2 or lower, select Setup > Authentication > Web Server Certificate. - Make sure that Default certificate signed by the Firebox is selected.
- If you have a third-party certificate, the option Third party certificate is selected. You must select Default certificate signed by the Firebox instead.
- In Fireware v12.2.1 or higher, select Setup > Certificates and then select the Firebox Web Server Certificate tab.
- After you save the configuration on the new Firebox, import the third-party certificate after you migrate the configuration. For information about how to import a certificate, go to Manage Device Certificates (Web UI), and Manage Device Certificates (WSM).
- Apply the certificate to features as required. For example, if you used the third-party certificate for inbound HTTPS content inspection on the old Firebox, you can select to use the imported third-party certificate for HTTPS content inspection on your new Firebox. You might also have to do this in the BOVPN, IKEv2 mobile VPN, and L2TP mobile VPN configurations.
For general information about how the Firebox uses certificates, go to About Certificates.
If you use Mobile VPN with IKEv2, and you use the default Firebox IKEv2 certificate, you must do one of the following:
- Distribute an updated VPN client profile to all VPN client devices, which will distribute the new default Firebox IKEv2 certificate to clients. For more information, go to Configure Client Devices for Mobile VPN with IKEv2.
- Distribute only the new default Firebox IKEv2 certificate to all VPN client devices (if you do not want to distribute an updated VPN profile to clients).
If the original Firebox used a third-party certificate and you update the new Firebox to use the same third-party certificate, it is not necessary to distribute an updated VPN client profile. The existing VPN clients can connect after you update the new Firebox to use the third-party certificate.
The first time the WatchGuard Mobile VPN with SSL client connects to the new Firebox, users must respond to a prompt to trust the certificate.
For devices that use the OpenVPN client to connect with Mobile VPN with SSL, users must import a new VPN client profile and delete the old VPN client profile. For more information, go to Use Mobile VPN with SSL with an OpenVPN Client.
When you move an existing Firebox configuration to a new Firebox, the existing Firebox resource in AuthPoint is no longer associated with the new Firebox and you must delete the resource. To continue to use the AuthPoint authentication server on the new Firebox, you must add the device to WatchGuard Cloud again and add a new Firebox resource for the device in AuthPoint.
To replace a Firebox that you have already added to AuthPoint as a Firebox resource:
- Add the new Firebox to WatchGuard Cloud.
- Add the device as a new Firebox resource in AuthPoint.
- Add the new Firebox resource to your AuthPoint authentication policies, and remove the old Firebox resource from those policies. For more information, go to About AuthPoint Authentication Policies.
- Delete the Firebox resource associated with the old Firebox from your AuthPoint account.