After you download and install the plug-in, you must configure the connection between WatchGuard Cloud and ConnectWise RMM to map your WatchGuard Cloud accounts and the accounts in ConnectWise RMM.
You can establish the connection between WatchGuard Cloud and ConnectWise from the Administrator Login interface or the User Login interface in the onboarding application.
Make sure you specify the readwrite access ID and password for API access. The readonly access ID might cause errors when you use the plug-in.
Administrator Login
To establish the connection between WatchGuard Cloud and ConnectWise RMM from the Administrator Login page, you must have this information:
- Authentication API URL
- API URL
- Account ID
- Access ID
- Access Password
- API Key
To avoid errors when you configure the API connection, we recommend you copy and paste the API parameters directly from the user interface. You can view the WatchGuard Cloud parameters on the Administration > Managed Access page.
For more information about the Administrator Login interface, go to Administrator Login.
- Select API Connection.
- Select Administrator Login.
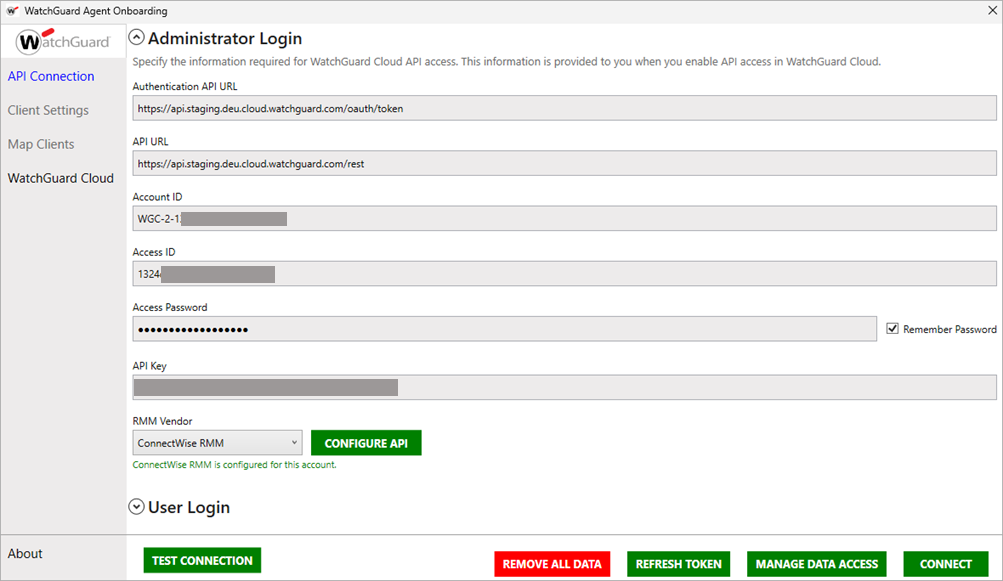
The Administrator Login interface opens. - Enter the API information for WatchGuard Cloud:
- Authentication API URL — Type the Authentication API URL used to request an authentication token. The URL varies by region.
- APAC Region — https://api.jpn.cloud.watchguard.com/oauth/token
- EMEA Region — https://api.deu.cloud.watchguard.com/oauth/token
- NA/Americas Region — https://api.usa.cloud.watchguard.com/oauth/token
- API URL — Type the base URL of the Endpoint Security API.
The URL varies by region.
- APAC Region — https://api.jpn.cloud.watchguard.com/rest/endpoint-security/management
- EMEA Region —https://api.deu.cloud.watchguard.com/rest/endpoint-security/management
- NA/Americas Region — https://api.usa.cloud.watchguard.com/rest/endpoint-security/management
- Account ID — Type the WatchGuard Cloud Account ID of the managed account for which you want to make API requests. This must be the Account ID of a Service Provider or Subscriber account that you manage in WatchGuard Cloud. To view your account ID, select Administration > My Account in WatchGuard Cloud.
- Access ID — Type the access ID for readwrite API access to WatchGuard Cloud.
- Access Password — Type the password for the readwrite access ID you specified for API access to WatchGuard Cloud.
API Key — Type the API key associated with your WatchGuard Cloud account.
RMM Vendor — From the drop-down list, select ConnectWise RMM.
- Authentication API URL — Type the Authentication API URL used to request an authentication token. The URL varies by region.
Make sure you specify the readwrite access ID and password for API access. The readonly access ID might cause errors when you use the plug-in.
- Complete one of these steps:
- If you do not require the onboarding application to automatically configure the mapping relationships, click Connect.
Wait for the onboarding application to establish a connection through the API. For information about how to manually map the accounts, go to Configure Custom Fields and Manually Map Accounts in ConnectWise RMM. - If you require the onboarding application to automatically configure the mapping relationships, click Configure API. For information about how to automatically map the accounts, go to Map Accounts. Enter the API information for ConnectWise RMM:
- Server URL — Enter the ConnectWise RMM server URL:
- North America — https://openapi.service.itsupport247.net
- Europe — https://openapi.service.euplatform.connectwise.com
- Asia — https://openapi.service.auplatform.connectwise.com
- Client ID — Enter the value you generated in the ConnectWise RMM tool. For more information, go to Enable API Access in ConnectWise RMM.
- Client Secret — Enter the value you generated in the ConnectWise RMM tool. For more information, go to Enable API Access in ConnectWise RMM.
- Records Per Request — Keep the default value of 500.
- If you do not require the onboarding application to automatically configure the mapping relationships, click Connect.
The Client ID and Client Secret values required in the plug-in are created for the API key in the ConnectWise RMM tool. For more information, go to Enable API Access in ConnectWise RMM.
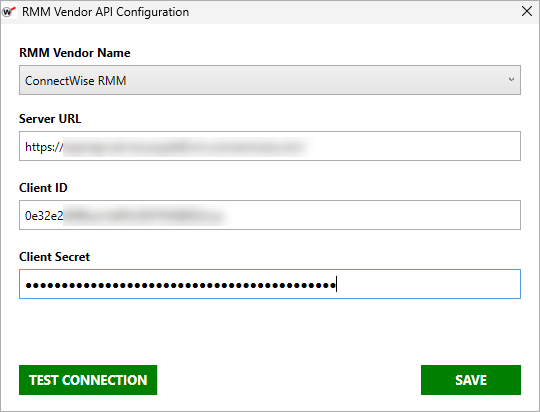
- Click Save.
- Click Test Connection.
Wait for the plug-in to establish a connection through the API. If the test connection is successful, a confirmation message appears. - Click Connect.
The connection process can take some time to complete when there is a large amount of data.
User Login
If you do not have the API login information required to connect as an Administrator, you can use the User Login interface. Before you can establish the connection between WatchGuard Cloud and ConnectWise RMM, you must first register as a device user in the onboarding application. Device registration is a one-time process for each device user, and the required registration information is provided in an invitation email from the administrator. The email contains this information:
- Server URL
- Account ID
- Registration Code
To avoid errors when you register as a device user, we recommend you copy and paste the registration information directly from the invitation email.
After you register as a device user in the onboarding application, you can log in to establish the connection. For more information about the User Login interface, go to User Login.
- Select API Connection.
- Select User Login.
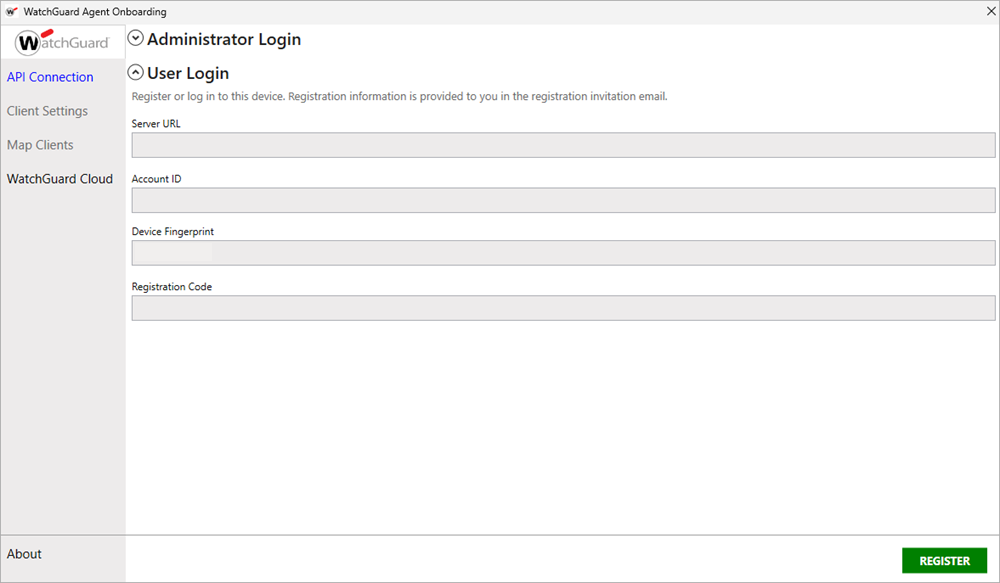
The User Login interface opens. - Enter the registration information provided in the invitation email:
- Server URL
- Account ID
- Registration Code
- Click Register.
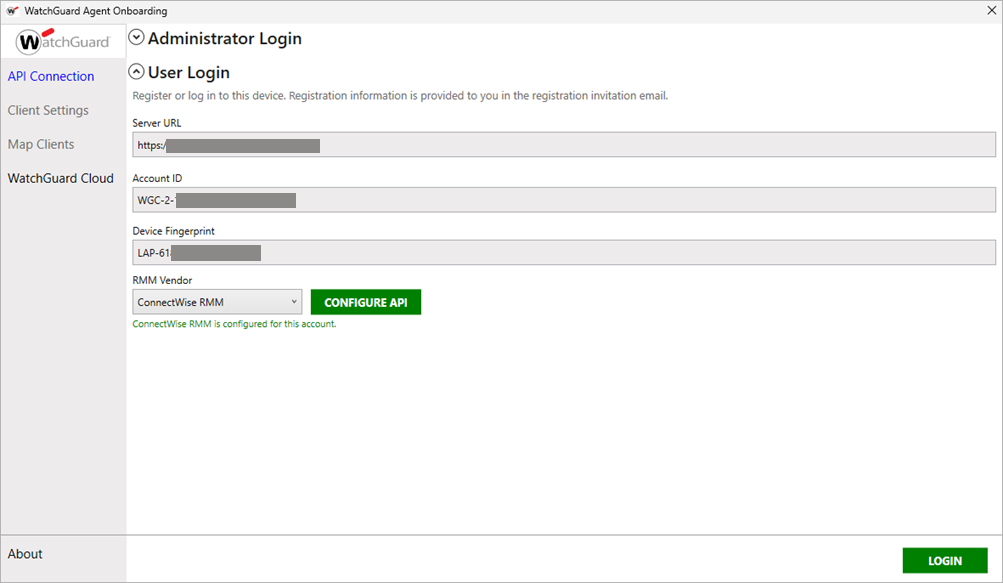
The User Login interface refreshes and the RMM Vendor configuration shows on the page.
-
In the RMM Vendor drop-down list, select ConnectWise RMM.
- Complete one of these steps:
- If you do not require the onboarding application to automatically configure the mapping relationships, click Login.
Wait for the onboarding application to establish a connection. For information about how to manually map the accounts, go to Configure Custom Fields and Manually Map Accounts in ConnectWise RMM. - If you require the onboarding application to automatically configure the mapping relationships, click Configure API. For information about how to automatically map the accounts, go to Map Accounts. Enter the API information for ConnectWise RMM:
- Server URL — Enter the ConnectWise RMM server URL:
- North America — https://openapi.service.itsupport247.net
- Europe — https://openapi.service.euplatform.connectwise.com
- Asia — https://openapi.service.auplatform.connectwise.com
- Client ID — Enter the value you generated in the ConnectWise RMM tool. For more information, go to Enable API Access in ConnectWise RMM.
- Client Secret — Enter the value you generated in the ConnectWise RMM tool. For more information, go to Enable API Access in ConnectWise RMM.
- Records Per Request — Keep the default value of 500.
- If you do not require the onboarding application to automatically configure the mapping relationships, click Login.
The Client ID and Client Secret values required in the plug-in are created for the API key in the ConnectWise RMM tool. For more information, go to Enable API Access in ConnectWise RMM.
- Click Test Connection.
Wait for the plug-in to establish a connection through the API. If the test connection is successful, a confirmation message appears. - Click Save.
- Click Login.
The onboarding application starts to synchronize the ConnectWise RMM client information.
Map Accounts
After you establish the connection between WatchGuard Cloud and ConnectWise RMM, you are prompted to map your ConnectWise RMM companies to the accounts you manage in WatchGuard Cloud.

If you select Yes, the Map Clients page opens. If you select No, you remain on the API Connection page. For more information on how to map accounts, go to Map ConnectWise RMM and WatchGuard Cloud Accounts.
Connection Troubleshooting
If the connection is not successful, from the Administrator Login interface:
- Make sure the access ID for API access is enabled in WatchGuard Cloud.
- Make sure the access ID and password are for the correct WatchGuard Cloud account ID.
- Verify the API key.
- Make sure the account ID is correct.
- Check if the WatchGuard Cloud account ID was removed or merged with another account.
If the registration or connection is not successful, from the User Login interface:
- Make sure the server URL, account ID, and registration code are correct.
- Contact the administrator to verify that your registration invitation is still valid.
Create Installation Tasks for Windows Devices from ConnectWise RMM
Create Installation Tasks for Mac Devices from ConnectWise RMM