This guide demonstrates how to integrate WatchGuard Cloud with ADIPSYS Hotspot Manager to enable guest users to authenticate to a captive portal.
Before you begin, make sure your access point is activated with a WatchGuard Standard Wi-Fi or USP Wi-Fi Management license and registered with WatchGuard Cloud. For more information, go to Activate an Access Point.
Contents
Platform and Software
The hardware and software used in this guide include:
- ADIPSYS Hotspot Manager:
- Hotspot Manager Portal Account
- WatchGuard:
- WatchGuard Cloud Account
- WatchGuard AP230W
- Wireless client devices
Additional charges might apply to use Hotspot Manager.
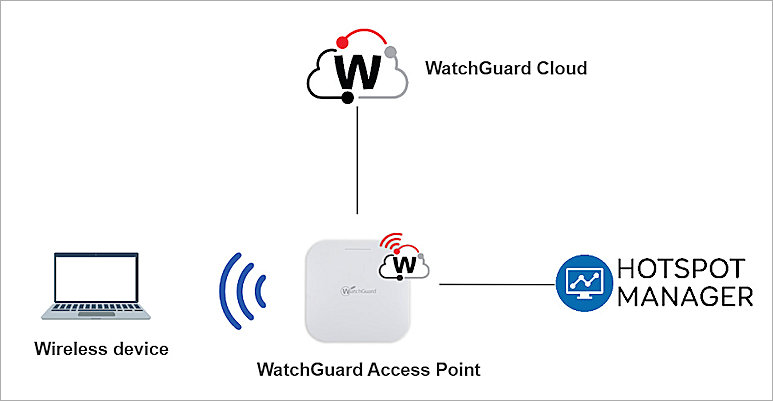
Test Topology
For more information about Hotspot Manager and WatchGuard access points managed in WatchGuard Cloud, go to the ADIPSYS Hotspot Manager support documentation and the Wi-Fi in WatchGuard Cloud Access Point documentation.
ADIPSYS Hotspot Manager Configuration
Get the WatchGuard Access Point Device Information
Make sure that you record the MAC address of the WatchGuard access points you want to use to integrate with ADIPSYS Hotspot Manager.
To get the information for your WatchGuard access point:
- Log in to your WatchGuard Cloud account.
If you are a service provider, make sure you have allocated the activated access point to a subscriber account in WatchGuard Cloud. - Select Configure > Devices.
- Select the Access Point tab.
- Find the access point you want to use to integrate with ADIPSYS Hotspot Manager.
- Copy the MAC address. This value is required when you configure ADIPSYS Hotspot Manager.
Add an Access Controller
To add an access controller in ADIPSYS Hotspot Manager:
- Log in to the Hotspot Manager portal.
- From the left navigation bar, select Configurations > Access controllers.
- Click Add an access controller.
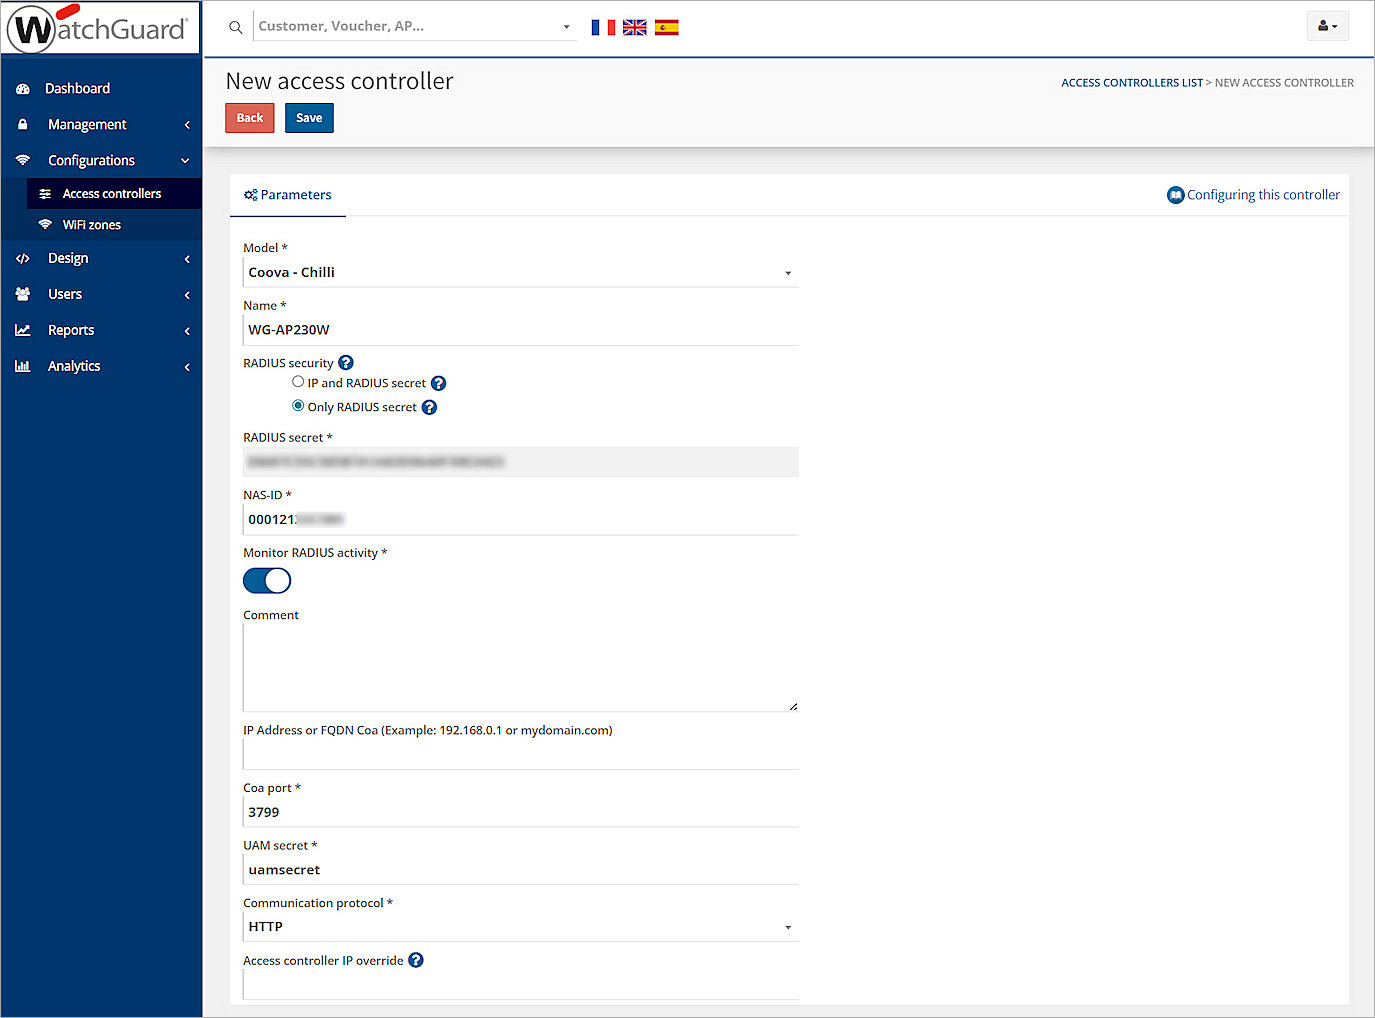
The New access controller page opens - From the Model drop-down list, select Coova - Chilli.
- In the Name text box, type a descriptive name.
- In the RADIUS security section, select Only RADIUS secret.
- Copy and save the RADIUS secret value that is shown on the page. You need this value when you configure the RADIUS authentication domain in WatchGuard Cloud.
- In the NAS-ID text box, type the MAC address of your WatchGuard access point without colon separators. Use the MAC address you recorded in the previous section.
- Enable Monitor RADIUS activity.
- In the UAM secret text box, type a pre-shared key. You need this value when you configure the captive portal in WatchGuard Cloud.
- From the Communication protocol drop-down list, select HTTP.
- Leave the other settings at their default values.
- Click Save.
Configure a Wi-Fi Zone and Hotspot
To associate your access controller with a Wi-Fi zone and create a hotspot:
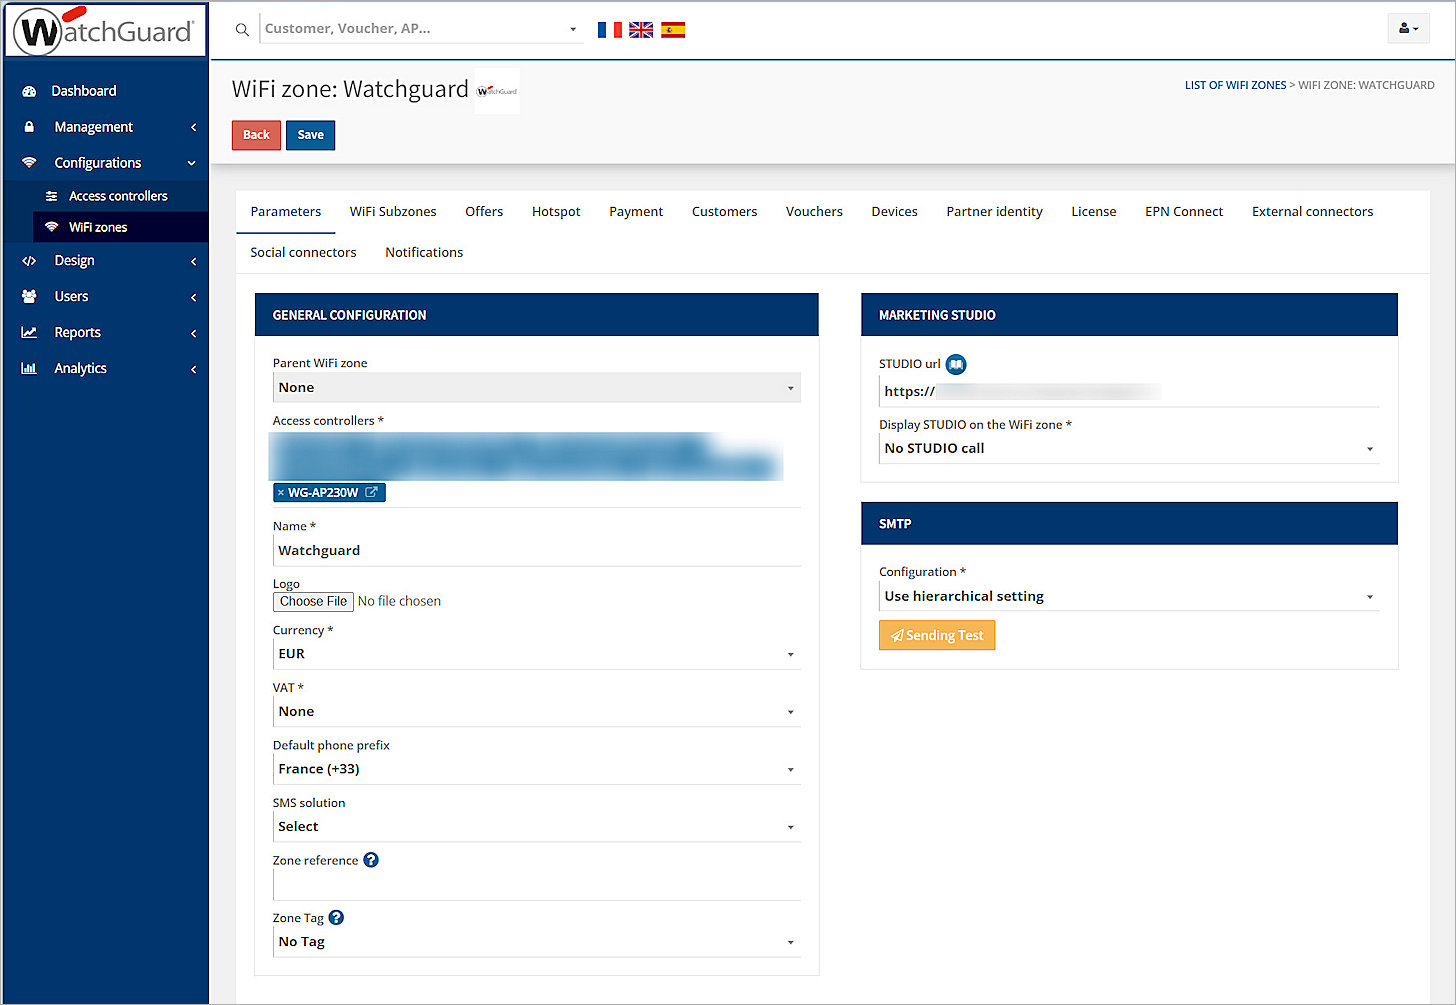
- From the left navigation bar, select Configurations > WiFi zones.
- Select your Wi-Fi zone.
- On the Parameters tab, in the Access controllers section, add the access controller you created in Add an Access Controller.
- Leave the other settings at their default values.
- Click Save.
- Select the Hotspot tab.
- Click Add a Hotspot.
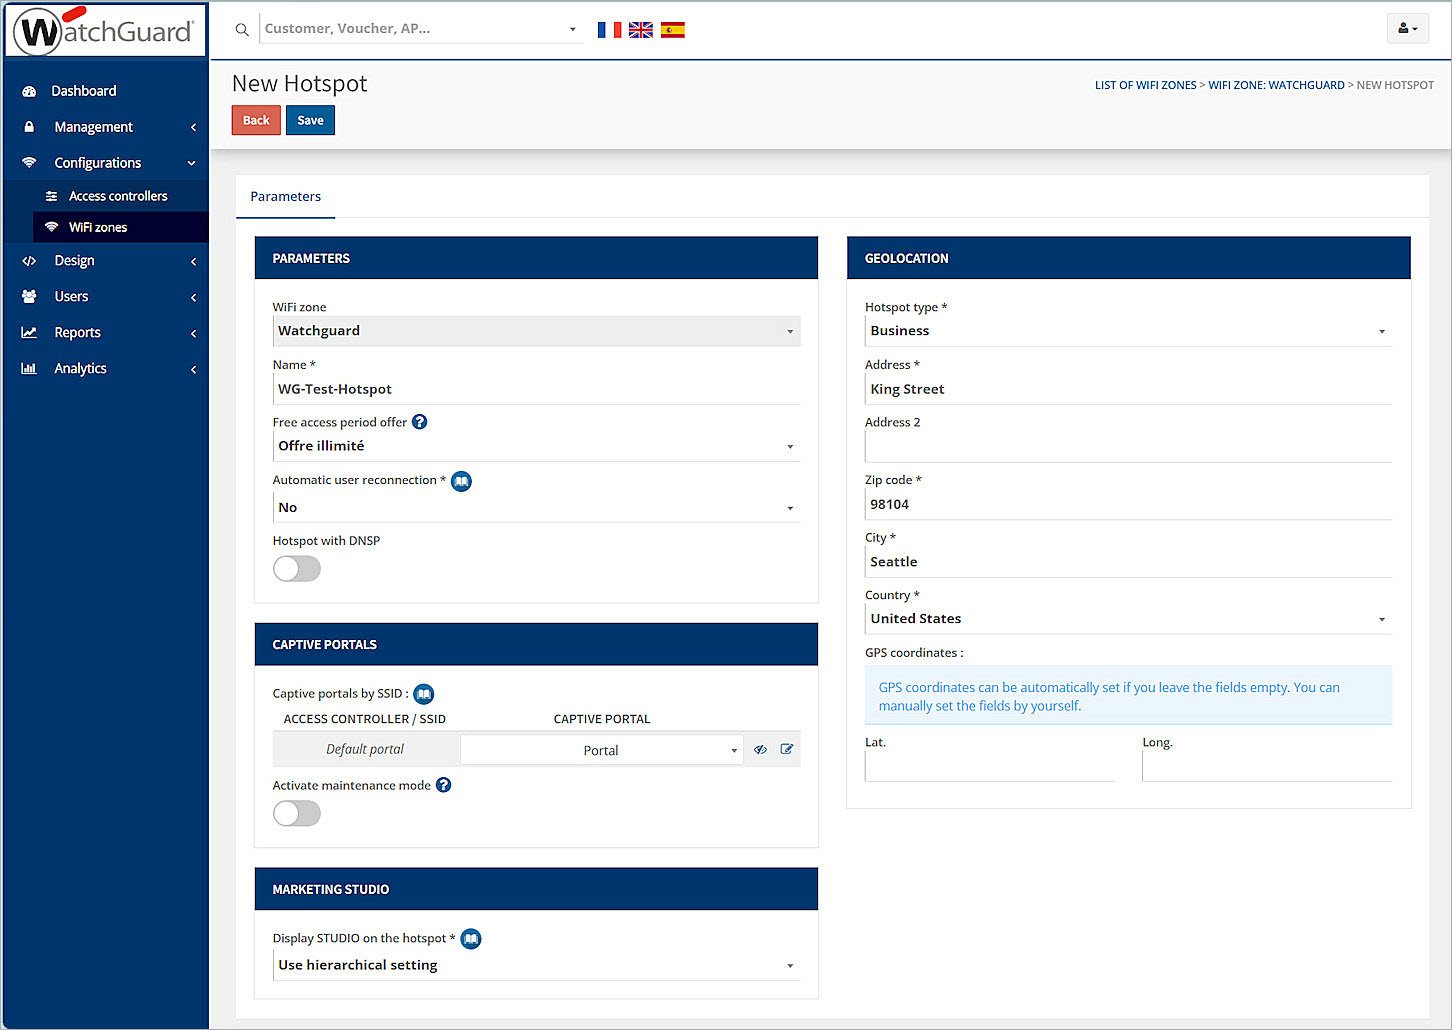
The New Hotspot page opens - In the Name text box, type a descriptive name.
- From the Free access period offer drop-down list, select an offer that matches your deployment. In this example, we select Offre illimité.
- In the Captive portals section, select an existing captive portal.
If you do not have a captive portal, from the left navigation bar, select Design > Captive portals to add one. - On the Geolocation tab, enter the Hotspot type, Address, Zip code, City, and Country information.
- Configure the other settings as required for your deployment, or leave them at their default values.
- Click Save.
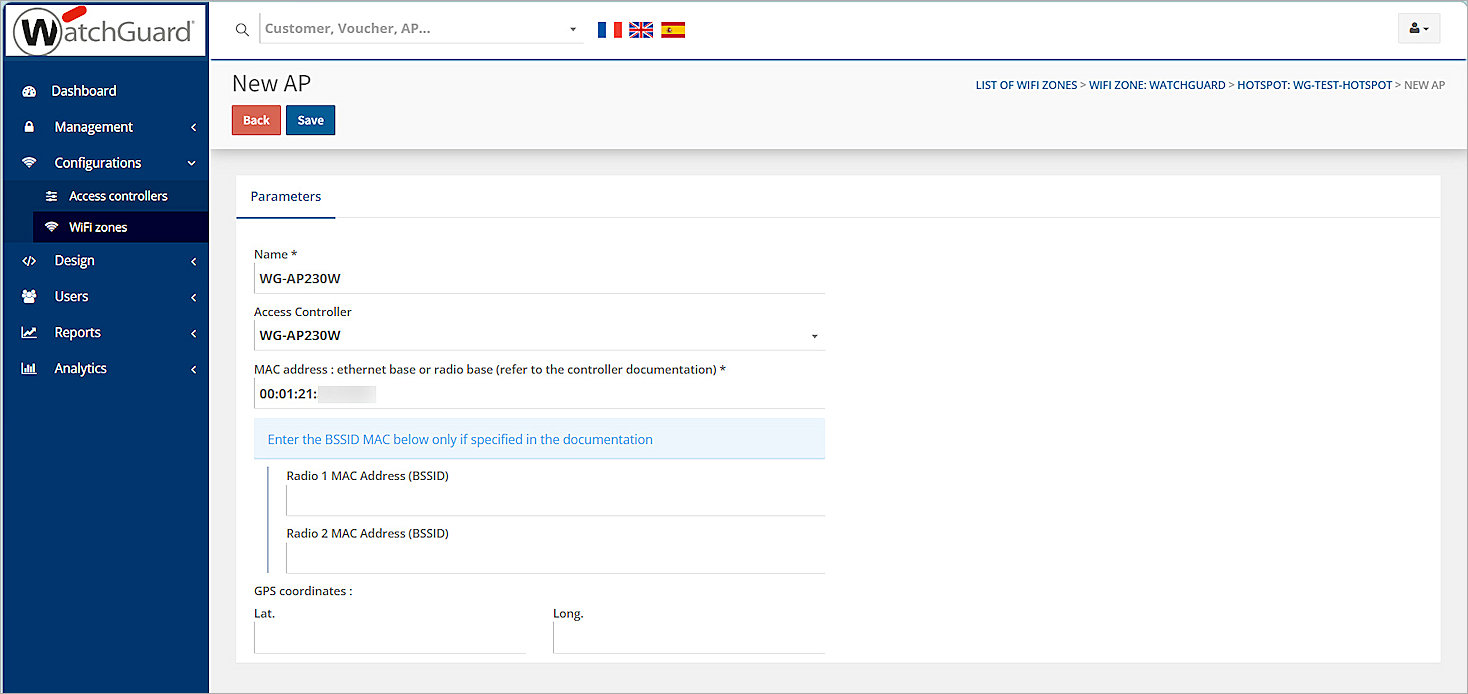
- After you save the hotspot, select the APs tab in the same Hotspot you just saved.
- Click Add an AP.
The New AP page opens - In the Name text box, type a descriptive name.
- In the Access Controller drop-down list, select the access controller you created.
- In the MAC address text box, type the MAC address of your WatchGuard access point you recorded in the previous section.
- Click Save.
WatchGuard Cloud Configuration
For detailed information on Wi-Fi in WatchGuard Cloud deployment, go to Get Started with Wi-Fi in WatchGuard Cloud.
Access points can have two different types of settings:
- Device-level settings — Settings that you apply individually to each access point.
- Access Point Site settings — Access Point Sites enable you to create settings and apply them to multiple access points that subscribe to the site.
The Captive Portal feature is only available when setting up Access Point Site settings.
Add a RADIUS Authentication Domain to WatchGuard Cloud
To configure a RADIUS authentication domain in WatchGuard Cloud:
- Log in to your WatchGuard Cloud account.
If you are a service provider, make sure you have allocated the activated access point to a subscriber account in WatchGuard Cloud. - Select Configure > Directories and Domain Services.
- Click Add Authentication Domain.
- In the Domain Name text box, type a domain name. In this example, we use hotspotmanager.fr.
- Click Next.
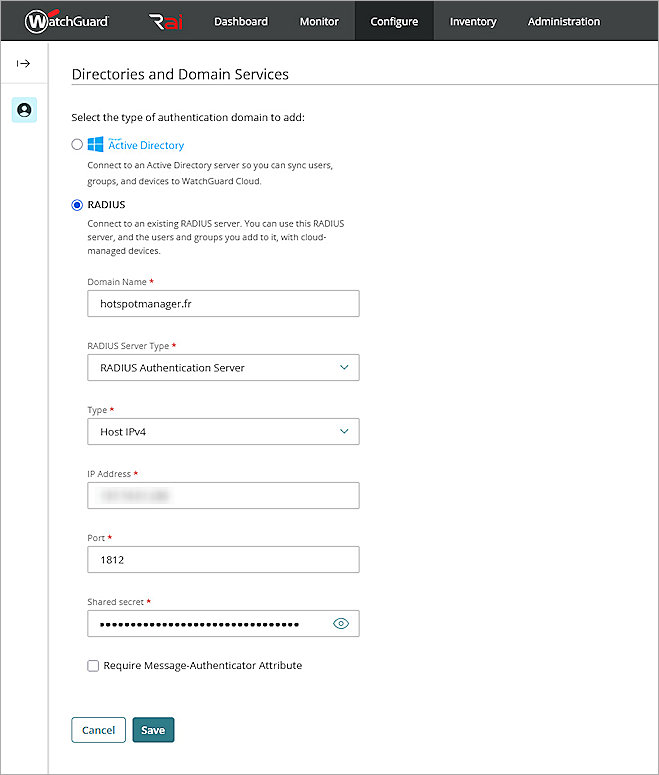
- From the Select the type of authentication domain to add list, select RADIUS.
- From the RADIUS Server Type drop-down list, select RADIUS Authentication Server.
- From the Type drop-down list, select Host IPv4.
- In the IP Address text box, type the primary IP address of the Hotspot Manager RADIUS server.
- In the Port text box, type the authentication port number of the Hotspot Manager RADIUS server.
- In the Shared secret text box, type the RADIUS secret you entered in the access controller configuration in Hotspot Manager.
- Click Save.
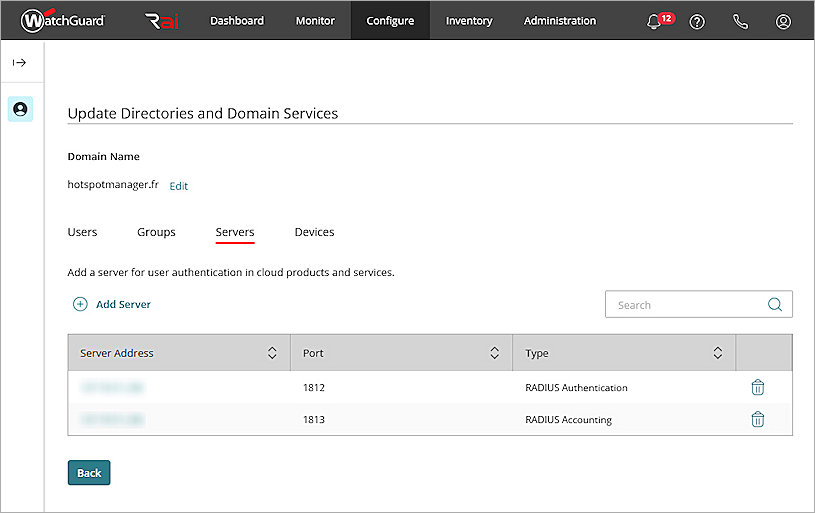
- From the authentication domain list, select the domain you just created.
- Select the Servers tab.
- Click Add Server.
- Repeat steps 6 to 12 to create a RADIUS Accounting Server.
Configure SSID Settings for an Access Point Site
To configure SSID settings for an Access Point Site in WatchGuard Cloud:
- Log in to your WatchGuard Cloud account.
If you are a service provider, make sure you have allocated the activated access point to a subscriber account in WatchGuard Cloud. - Select Configure > Access Points Sites.
- Select an existing site you created, or add a new site.
- In the Subscribed Devices tab, make sure your access points are subscribed to the site.
- From the Configuration Details tab, in the Wi-Fi Networks widget, click SSIDs.
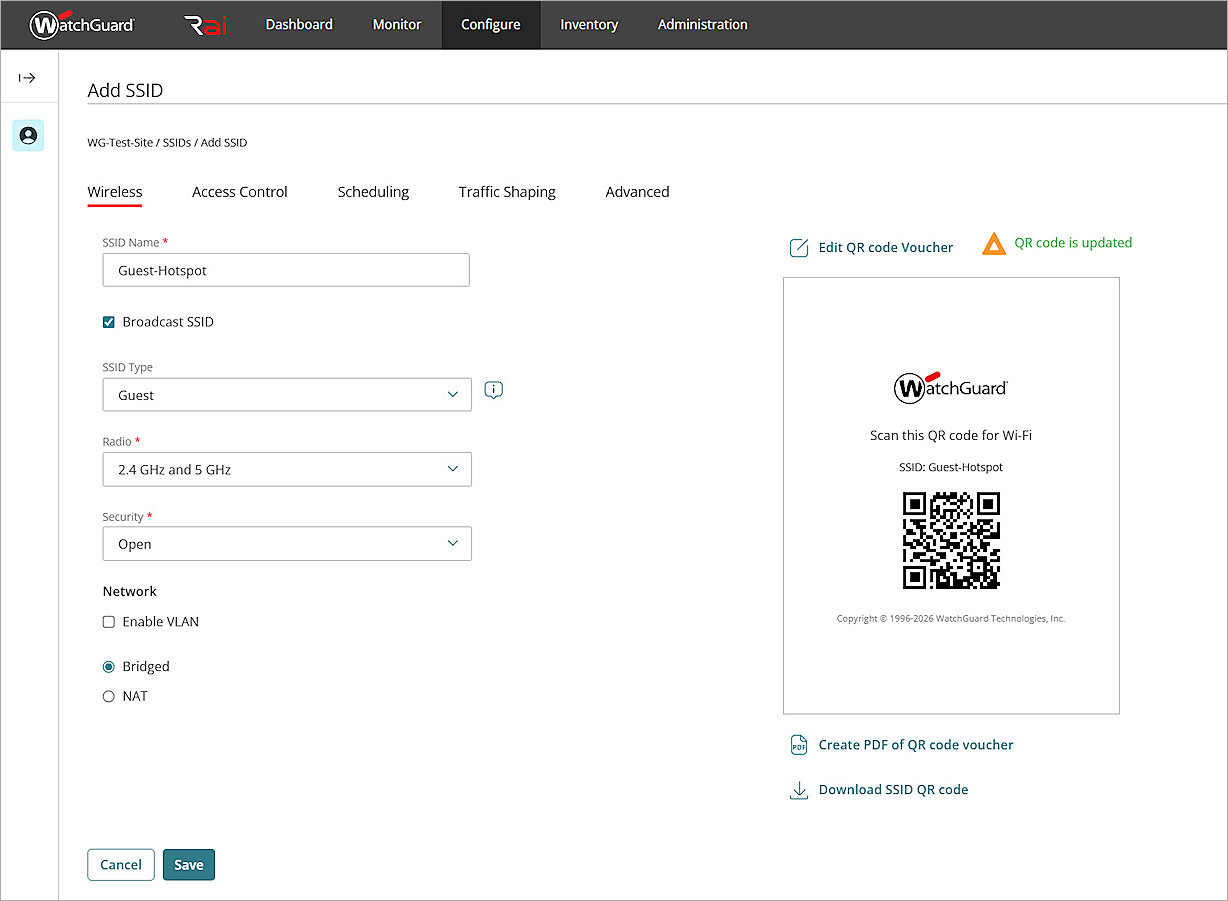
- Click Add SSID.
- In the SSID Name text box, type an SSID name. In this example, we use Guest-Hotspot.
- Enable the Broadcast SSID check box.
- From the SSID Type drop-down list, select Guest.
- From the Radio drop-down list, select 2.4 GHz and 5 GHz.
- From the Security drop-down list, select Open.
- In the Network section, select Bridged.
- Click Save.
- To apply the configuration to your access points, click Schedule Deployment in the banner at the bottom of the page.
- Type a Description for the deployment.
- Click Deploy, then click Close.
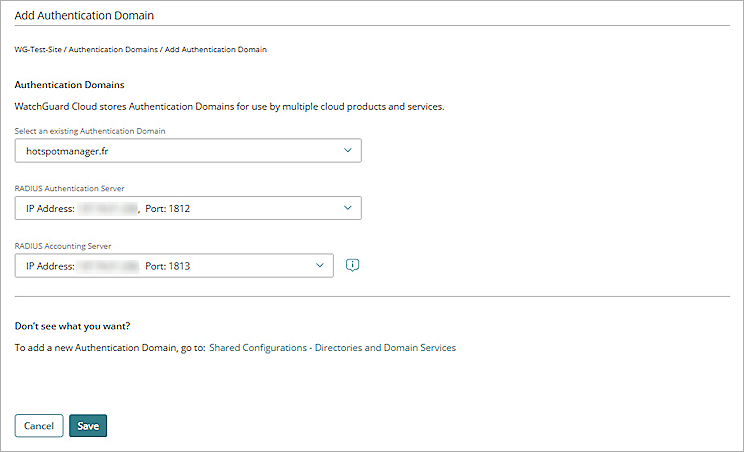
Configure an Authentication Domain for an Access Point Site
To configure Authentication Domain settings for an Access Point Site:
- Log in to your WatchGuard Cloud account.
If you are a service provider, make sure you have allocated the activated access point to a subscriber account in WatchGuard Cloud. - Select Configure > Access Point Sites.
- Select the Access Point Site.
- From the Configuration Details tab, in the Authentication section, click Domains.
- Click Add Authentication Domain.
- From the Select an existing Authentication Domain drop-down list, select the domain you created in the Add RADIUS Authentication Domain to WatchGuard Cloud section.
- From the RADIUS Authentication Server drop-down list, select the RADIUS authentication server.
- From the RADIUS Accounting Server drop-down list, select the RADIUS accounting server.
- Click Save
- To apply the configuration to your access points, click Schedule Deployment in the banner at the bottom of the page.
- Type a Description for the deployment.
- Click Deploy, then click Close.
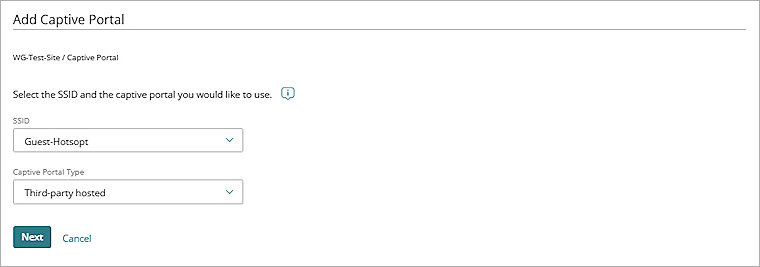
Configure a Captive Portal for a Guest SSID
To add a captive portal to an SSID:
- Log in to your WatchGuard Cloud account.
If you are a service provider, make sure you have allocated the activated access point to a subscriber account in WatchGuard Cloud. - Select Configure > Access Point Sites.
- Select the Access Point Site.
- From the Configuration Details tab, in the Portal widget, click Captive Portal.
- Click Add Captive Portal.
The Add Captive Portal page appears. - From the SSID drop-down list, select the SSID you created.
- From the Captive Portal Type drop-down list, select Third-party hosted.
- Click Next.
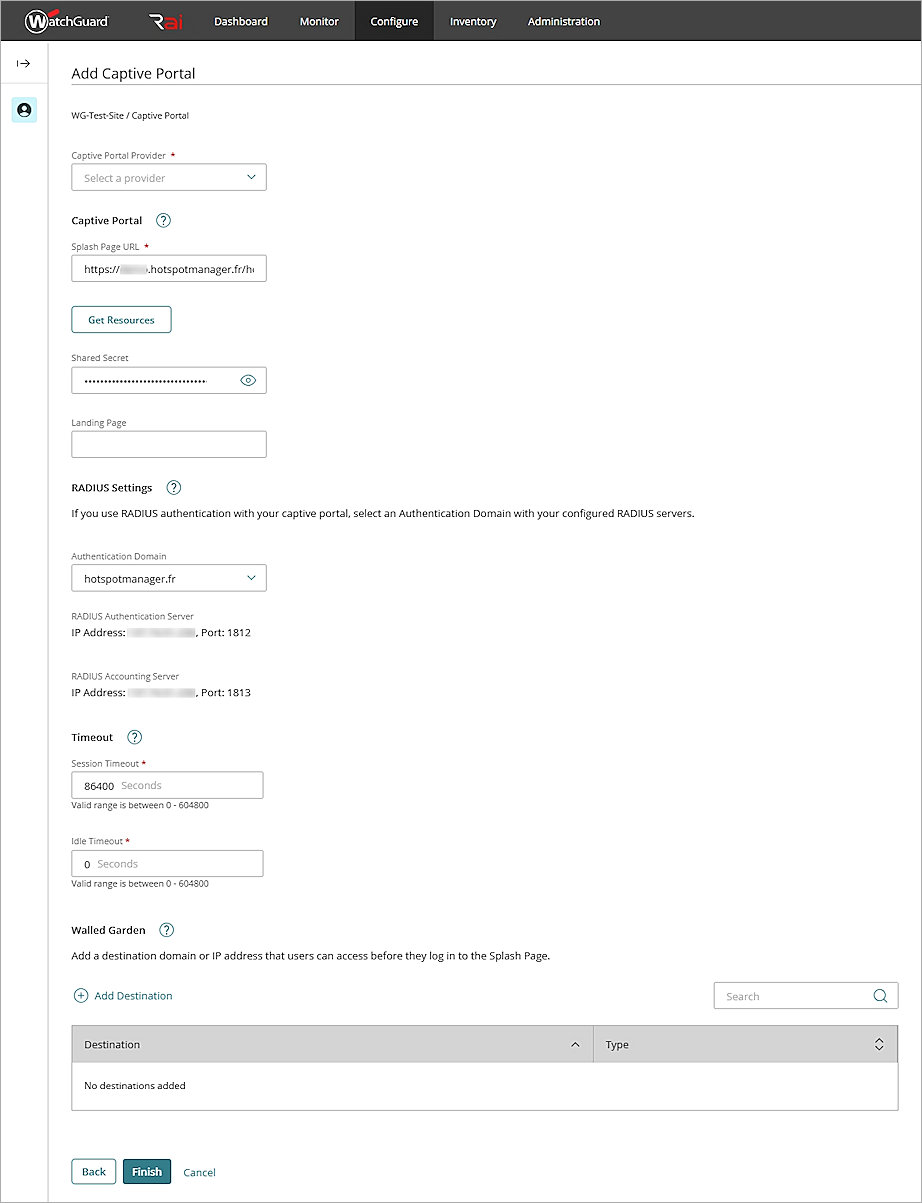
- In the Captive Portal Provider drop-down list, select ADIPSYS.
- In the Splash Page URL text box, type the portal splash page URL from the ADIPSYS hotspot configuration. To find the correct URL, check the captive portal settings in Hotspot Manager. For more information, go to the ADIPSYS Hotspot Manager support documentation.
- In the Shared Secret text box, type the UAM secret you configured when you added the access controller in Hotspot Manager.
- From the Authentication Domain drop-down list, select the authentication domain you created in the Add RADIUS Authentication Domain to WatchGuard Cloud section.
- (Optional) In the Walled Garden section, click Add Destination to add domains or IP addresses that users can access before they connect through the splash page.
- Leave the other options at their default settings.
- Click Finish.
- Return to the Configuration Details page of the Access Point Site.
- To apply the configuration to your access points, click Schedule Deployment in the banner at the bottom of the page.
- Type a Description for your deployment.
- Click Deploy, then click Close.
Test the Hotspot Manager Integration
To test the ADIPSYS Hotspot Manager integration with a WatchGuard Cloud Access Point:
- Use a wireless client to connect to the SSID you created in WatchGuard Cloud.
The user browser is redirected to the ADIPSYS Hotspot Manager splash page. - Complete the requested information to connect through the splash page.
The configured Landing Page or specified external page appears. - Access the Internet through the captive portal.