Applies To: Wi-Fi Cloud-managed Access Points (AP125, AP225W, AP325, AP327X, AP420)
To configure advanced settings for a guest wireless network:
- Select a guest Wi-Fi network or add a new guest Wi-Fi network.
- Click Advanced.
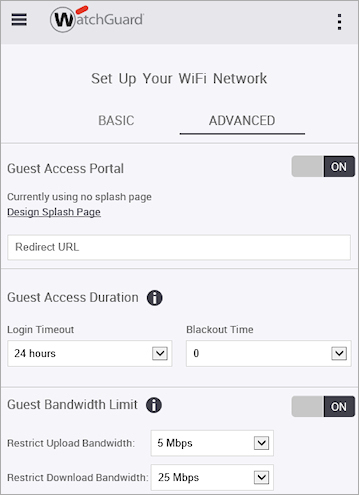
- Enable or disable a Guest Access Portal for the guest wireless network.
- To customize a splash page for your portal, click Design Splash Page.
The Engage app opens.
For more information on Engage, see About WatchGuard Engage.
If you configure a splash page with a Web Form passphrase, make sure you specify a passphrase in the Web Form configuration in Analyze. For more information, see Configure Portal Web Form Plug-In.
- Type the Redirect URL for the portal.
You can find the Redirect URL in the Wi-Fi Profile Captive Portal settings in Discover. For more information, see Configure SSID Settings.
- From the Login Timeout drop-down list, select the maximum duration for which a wireless guest user is allowed to access the guest wireless network after the user logs in.
- From the Blackout Time drop-down list, select the duration for which a wireless guest user cannot log back in to the guest wireless network after the Login Timeout period has elapsed.
- Enable or disable a Guest Bandwidth Limit.
- From the Restrict Upload Bandwidth drop-down list, select the restriction on uploads in Mbps.
- From the Restrict Download Bandwidth drop-down list, select the restriction on downloads in Mbps.
- Enable or disable DHCP for the wireless network SSID.
When DHCP is enabled, APs on the network SSID provide private DHCP addresses from a local NAT pool to connecting clients. We recommend you disable DHCP so that connecting wireless clients use your network DHCP server.
These configuration settings are applied to the SSID Profile when DHCP is enabled:
- The SSID Profile selects a random /24 network from a private address range for IP address allocation. For example, 172.16.100.0/24.
- The server 8.8.8.8 is configured as a DNS server by DHCP on the AP.
- For Guest networks, denies access for any protocol in any direction for the private networks 192.168.0.0/16, 172.16.0.0/12, and 10.0.0.0/8 in the Firewall settings of the SSID Profile.
- Enable or disable Content Filtering for the wireless network. The Content Filtering option is only visible when DHCP is enabled in Go.
If you enable Content Filtering, select a security policy to block content for the wireless network. These policies use Neustar UltraRecursive DNS servers to protect traffic. Neustar UltraRecursive DNS content filtering is intended for use by small deployments. For large enterprise deployments, you must subscribe to Neustar UltraRecursive DNS Enterprise services.
The Neustar DNS server addresses are 156.154.54.10 and 156.154.55.10.
- Security — Block malware, phishing, and scam sites.
- Pornography — Block sites that contain sexually explicit material.
- Other — Block sites that feature the following: mature content, abortion, alcohol, crime, drugs, file sharing, gambling, hate, suicide, tobacco, or violence.
- Custom — Select Custom to use custom DNS server IP addresses. For example, you can use these WatchGuard DNSWatch servers. For more information, see Configure Wi-Fi Cloud content filtering to use WatchGuard DNSWatch.
- North America (US East) — 54.174.40.213, 52.3.100.184
- EU (Ireland) — 34.240.115.208, 34.251.171.117
- APAC (Japan) — 54.199.61.196, 176.34.8.52
- APAC (Sydney) — 13.237.104.38, 13.237.109.176
WatchGuard DNSWatch is only able to filter known malicious domains such as phishing sites, and does not filter other objectionable content.
These rules with the selected DNS server IP addresses are added to the Firewall settings of the SSID when Content Filtering is enabled:
- Allow Selected DNS UDP (for the specified hosts)
- Allow Selected DNS TCP (for the specified hosts)
- Disallow Other DNS UDP
- Disallow Other DNS TCP
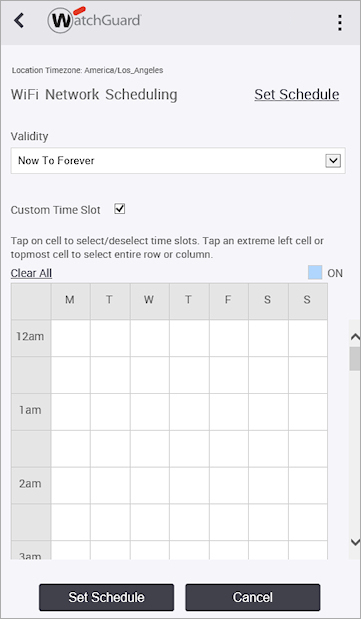
- To create a schedule for the wireless network, in the WiFi Network Scheduling section, click Edit.
- In the Validity drop-down list, select Now to Forever or Select Dates.
- Select the Custom Time Slot check box to customize the time schedule.
- When finished, click Set Schedule.
- Click Save.