Applies To: Wi-Fi Cloud-managed Access Points (AP125, AP225W, AP325, AP327X, AP420)
To deploy an AP with a Total Wi-Fi or Secure Wi-Fi AP subscription in Wi-Fi Cloud, you must:
Before you can manage and monitor your AP with WatchGuard Wi-Fi Cloud, you must activate the AP. When you activate your AP, you also enable your hardware replacement warranty, receive technical support, and get access to the latest AP firmware updates.
To activate your WatchGuard AP:
- Go to https://myproducts.watchguard.com/activate.
- Log in to your WatchGuard account, or create a new account if you do not have a WatchGuard account.
If you create a new WatchGuard account, after you finish the account creation process, go to https://myproducts.watchguard.com/activate, or select My WatchGuard > Activate Products from your account menu.

- Type the serial number for your AP.
Make sure the AP you want to activate has a Total Wi-Fi or Secure Wi-Fi AP subscription for Wi-Fi Cloud.
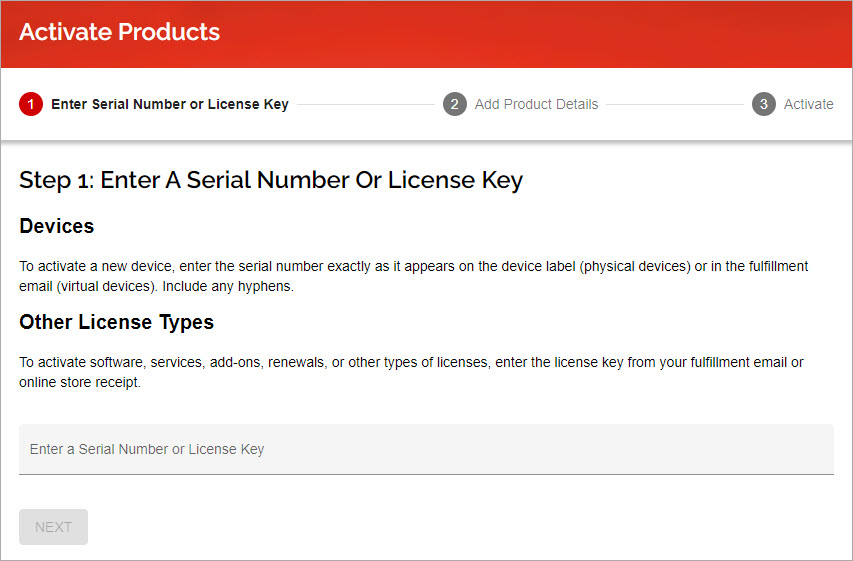
- Click Next.
- Specify a friendly name for the AP in your WatchGuard account.
- Click Activate.
From the Activation Complete page you have several options:
- You can activate another WatchGuard device.
- You can go directly to the WatchGuard Wi-Fi Cloud Dashboard management interface.
To connect to WatchGuard Wi-Fi Cloud for future management sessions, go to: https://dashboard.watchguard.cloudwifi.com/
You do not have to download or import the generated feature key that appears in your WatchGuard account for your Total or Secure Wi-Fi AP into Wi-Fi Cloud. The expiry date information is automatically communicated from WatchGuard servers to Wi-Fi Cloud.
To connect and power on your AP:
- Connect an Ethernet cable to the appropriate Ethernet interface on the AP.
- AP125 — LAN2 interface (PoE)
- AP225W — POE IN/LAN Uplink port
- AP325 / AP327X / AP420 — LAN1 interface (PoE+)
- Connect the other end of the Ethernet cable to your network. Make sure DHCP is enabled on the network where you connect the AP. If you want to set a static IP address for your AP after the initial setup, see How to set a static IP address for an AP in WatchGuard Wi-Fi Cloud.
- Make sure that the AP has Internet connectivity and can communicate on these ports:
- HTTP port 80
- HTTPS port 443
- UDP port 3851
- UDP port 3852 is also required if you have AP420 devices that run in Cloud Integration Point (CIP) mode
Ports must be open to these domains:
- *.cloudwifi.com
- redirector.online.spectraguard.net
The Firebox includes a predefined WG-Cloud-Managed-WiFi packet filter policy that you can add to enable traffic over the ports required for WatchGuard Wi-Fi Cloud domains.
- If your network does not support Power over Ethernet (PoE), connect the optional power adapter or PoE injector (sold separately). Make sure that APs that require PoE+ power are connected to a PoE+ compatible power source.
After you power on the AP, wait a few minutes for the AP to initialize, then verify that the AP LED indicators are lit. Make sure the AP is online and can communicate with WatchGuard Wi-Fi Cloud.
For more information, see Troubleshoot WatchGuard AP LED Status or the Hardware Guide for your AP.
If you have problems with your AP connection:
- Make sure that the Ethernet cable is correctly connected to the Ethernet port on the AP and the other end of the cable is connected to an Ethernet jack or a port on a switch that is enabled.
- If the AP did not receive a valid IP address from the DHCP server, make sure that a DHCP server is enabled and available on the network to which the AP is connected. If the AP still fails to get a valid IP address, you can reboot it once to try to resolve the problem.
- Make sure that Internet connectivity is available from the network to which the AP is connected. Verify that the required ports for communications to WatchGuard Wi-Fi Cloud (HTTP TCP ports 80/443, and UDP port 3851 to redirector.online.spectraguard.net) are open on the firewall. If you use a web proxy server, make sure the settings allow communication between the AP and WatchGuard Wi-Fi Cloud.
- If your AP was previously managed by a Gateway Wireless Controller on a WatchGuard Firebox, see this knowledge base article for instructions on how to change an AP locally-managed by a Gateway Wireless Controller to a Wi-Fi Cloud managed AP.
If the AP still does not appear in Wi-Fi Cloud after checking these settings, there might be a registration issue with the AP where the device was not correctly registered with Wi-Fi Cloud after activation. If there is a registration issue with the AP, you must contact WatchGuard Technical Support to correct the issue.
To connect to WatchGuard Wi-Fi Cloud:
- From a web browser, go to: https://login.watchguard.cloudwifi.com/ and log in to your account.
From your WatchGuard account in the Support Center, select My WatchGuard > Manage Wi-Fi Cloud.
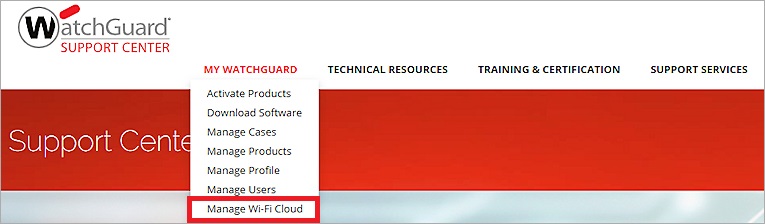
You can also go directly to: https://dashboard.watchguard.cloudwifi.com/
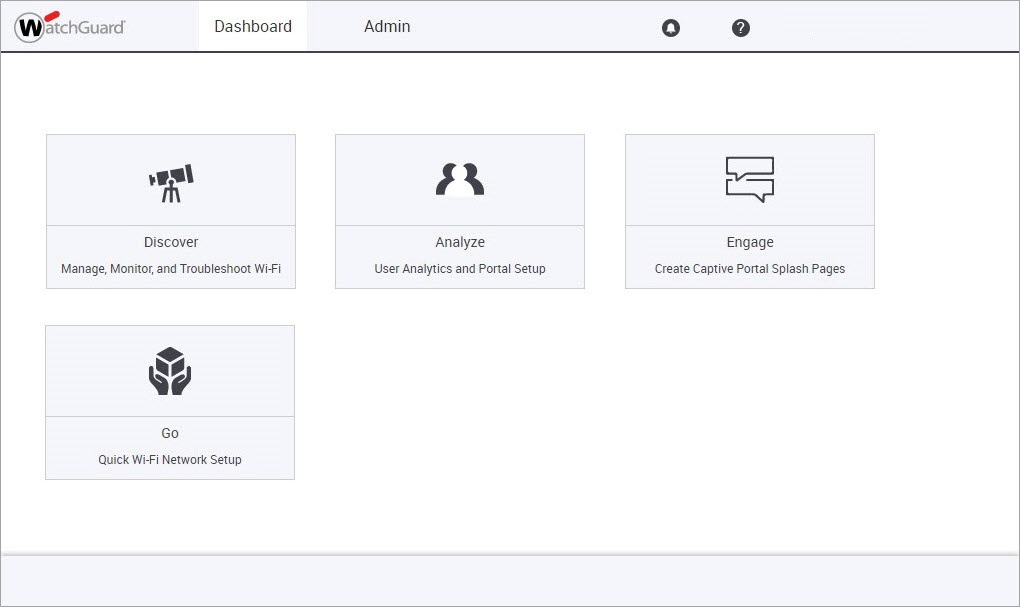
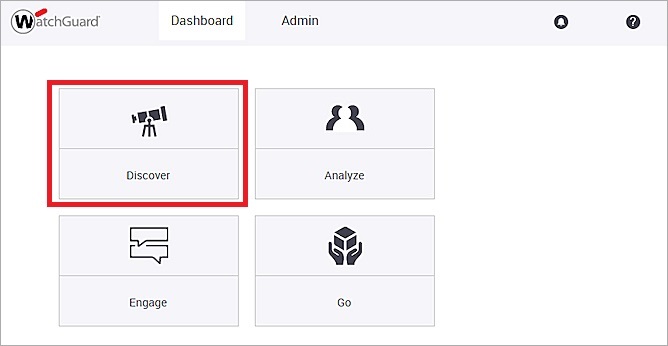
The Dashboard page includes the WatchGuard Wi-Fi Cloud services and applications that you use to manage and monitor your APs.
- Discover — Configure Wi-Fi networks and WIPS security, monitor the health of your Wi-Fi networks, and troubleshoot Wi-Fi connectivity issues.
- Analyze — Provide guest users with access to the Internet through your wireless network from a customized captive portal, and see analytics and reports about guest user access.
- Engage — Create and customize splash pages and campaigns for your guest wireless portal.
- Go — Quickly set up a wireless network with this mobile-optimized application.
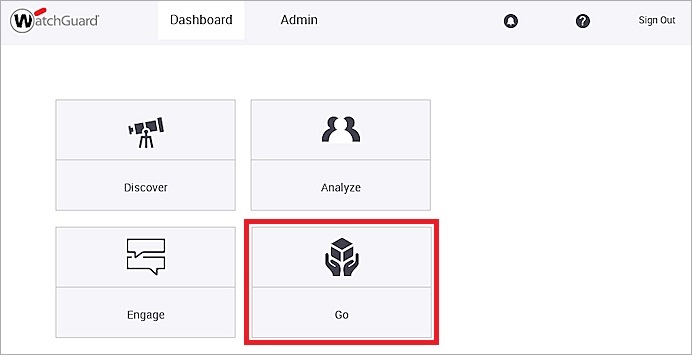
You can use Wi-Fi Cloud Discover or the Go application to set up a wireless network.
- Use Go to quickly set up a basic wireless network to test the AP you deployed.
- Use Discover to set up a location hierarchy for your APs and configure detailed SSID and AP device settings for your wireless network.
Set Up a Wireless Network with Go
To quickly set up a wireless network with the Go:
- From the Wi-Fi Cloud Dashboard, launch Go.
The Go application appears.
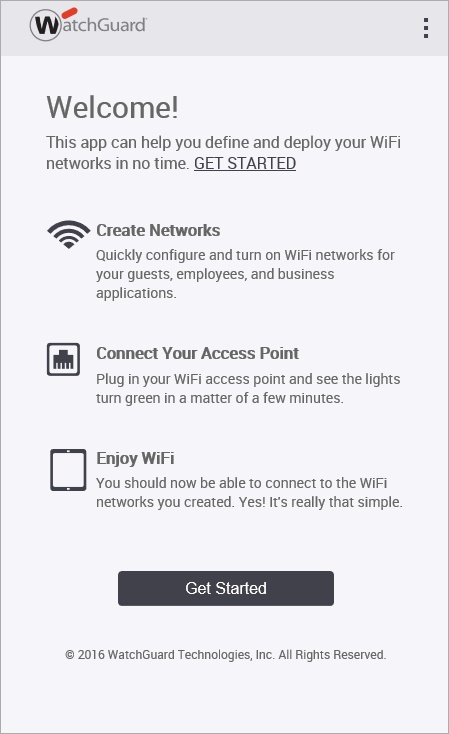
- Click Get Started to begin.
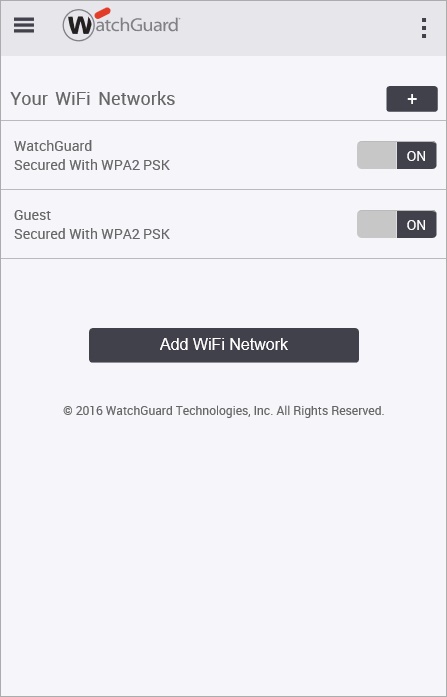
- To add a new wireless network, click
 or click Add WiFi Network.
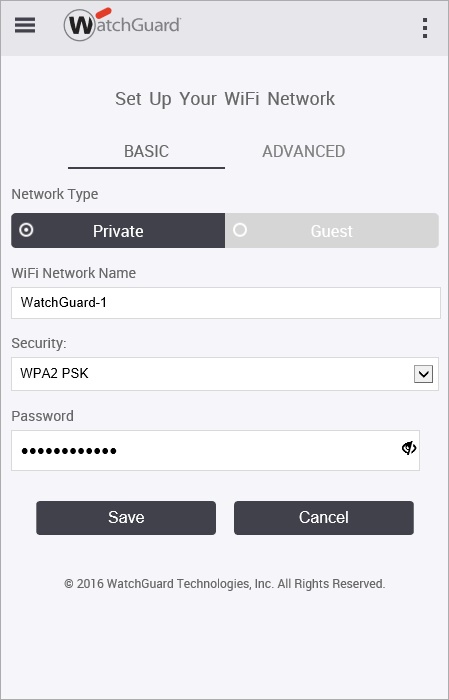
- Select the Network Type to create:
- Select a Private network if the wireless network is intended for use by internal users.
- Select a Guest network if the wireless network is intended for use by guests and visitors who should not have access to your internal network.
- In the WiFi Network Name text box, type a name for the network.
This network name is the SSID for the network. - From the Security drop-down list, select the security mode for the network. We recommend WPA2-PSK.
- In the Password text box, type a password for the security mode you selected.
- Click Save.
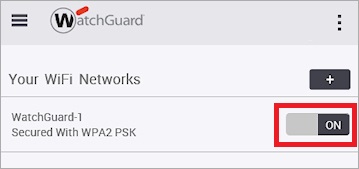
- To enable the wireless network you just created, click the switch to set it to ON.
Set Up a Wireless Network with Discover
To use Discover to set up a wireless network, see Set up a Wireless Network with Discover.
- From the WatchGuard Wi-Fi Cloud Dashboard, launch Discover.
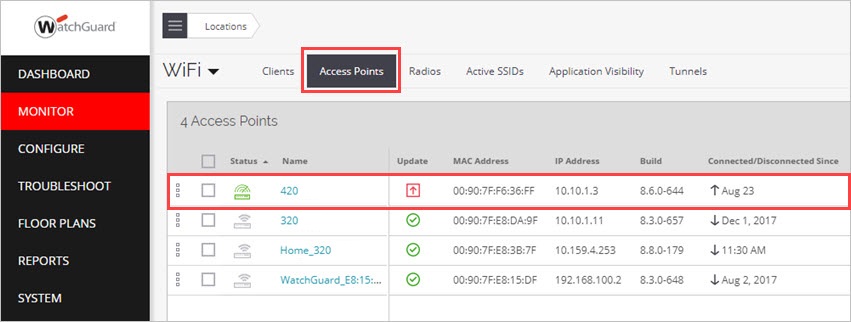
- Select Monitor > WiFi > Access Points.
Make sure your AP appears and the status is active. It may take several minutes for the AP to appear after the initial configuration.
To test connectivity, use a wireless client to connect to the SSID broadcast by the new AP.
For more detailed information on how to set up your APs for the first time, see Getting Started with WatchGuard Wi-Fi Cloud.
Additional Language Support
ACTIVEZ VOTRE PÉRIPHÉRIQUE AP
- Rendez-vous sur la page https://myproducts.watchguard.com/activate.
- Connectez-vous à votre compte WatchGuard ou créez un nouveau compte*.
* Si vous créez un nouveau compte, retournez sur la page https://myproducts.watchguard.com/activate à la fin du processus de création de compte.
- Saisissez le numéro de série de votre appareil.
Connecter le périphérique AP
- Connectez un câble Ethernet entre votre réseau et l'interface Ethernet de votre périphérique AP.
- AP125 — LAN2 interface (PoE)
- AP225W — PoE IN/LAN Uplink port
- AP325 / AP327X / AP420 — LAN1 interface (PoE+)
- Vous devez activer le protocole DHCP sur le réseau auquel vous connectez le périphérique AP.
- Assurez-vous que le périphérique AP dispose d'une connectivité Internet et peut communiquer avec les services WatchGuard Wi-Fi Cloud sur ces ports : HTTP TCP 80/443 et UDP 3851.
- Si vous disposez d'une appliance Firebox, la politique WatchGuard Wi-Fi Cloud ouvre les ports nécessaires.
- Si votre réseau ne prend pas en charge le protocole Power over Ethernet (PoE), connectez l’adaptateur secteur en option à l’injecteur PoE (vendu séparément).
- Après avoir mis le périphérique AP sous tension, attendez quelques minutes jusqu’à ce que le voyant d’alimentation et le voyant Ethernet (LAN) s’illumine en vert fixe. Cela indique que le périphérique AP est en ligne et peut communiquer avec le WatchGuard Wi-Fi Cloud.
Connectez-vous à WatchGuard Wi-Fi Cloud
Pour vous connecter à WatchGuard Wi-Fi Cloud, connectez-vous au Centre de support technique de WatchGuard ou rendez-vous à l'adress: https://login.watchguard.cloudwifi.com
Configurez votre périphérique AP
- Depuis le tableau de bord de WatchGuard Wi-Fi Cloud, lancez Go.
- Ajoutez un nouveau réseau sans fil et saisissez le SSID que vous souhaitez utiliser.
- Sélectionnez un mode de sécurité. Nous recommandons WPA2 PSK.
- Cliquez sur Enregistrer pour réinitialiser votre périphérique AP avec la nouvelle configuration.
- Activez votre nouveau réseau sans fil.
Vérifier le statut du point d’accès
- Dans le tableau de bord de WatchGuard WiFi Cloud, cliquez sur Discover.
- Sélectionnez Monitor > WiFi > Access Points.
- Vérifiez que votre point d’accès apparaît et que son statut est actif
L’apparition de l’appareil AP comme actif peut prendre quelques minutes suite à la configuration initiale.
AKTIVIEREN DES AP-GERÄTS
- Rufen Sie die Website https://myproducts.watchguard.com/activate.
- Melden Sie sich bei Ihrem WatchGuard-Account an, oder erstellen Sie ein neues Konto.*
* Falls Sie ein neues Konto erstellen, kehren Sie nach erfolgreichem Abschluss zur Seite https://myproducts.watchguard.com/activate zurück.
- Geben Sie die Seriennummer Ihres Geräts ein.
Anschließen des AP-Geräts
- Schließen Sie ein Ethernet-Kabel zwischen dem Netzwerk und der Ethernet-Schnittstelle des AP-Geräts an.
- AP125 — LAN2 interface (PoE)
- AP225W — PoE IN/LAN Uplink port
- AP325 / AP327X / AP420 — LAN1 interface (PoE+)
- Beim Herstellen der Verbindung zum AP-Gerät muss DHCP für die Netzwerkschnittstelle aktiviert sein.
- Stellen Sie sicher, dass das AP-Gerät mit dem Internet verbunden ist und über die folgenden Ports mit WatchGuard Wi-Fi Cloud-Services kommunizieren kann: HTTP TCP 80/443 und UDP 3851.
- Wenn Sie eine Firebox haben, werden die entsprechenden Ports durch die WatchGuard Wi-Fi Cloud-Richtlinie geöffnet.
- Wenn Ihr Netzwerk PoE (Power over Ethernet) nicht unterstützt, verbinden Sie das AP-Gerät mit dem optionalen Netzteil bzw. PoE-Injektor (wird separat vertrieben).
- Warten Sie nach dem Einschalten des AP-Geräts einige Minuten, bis die Betriebsanzeige und die Ethernet-Anzeige (LAN) beide grün leuchten. Das AP-Gerät ist jetzt online und kann mit WatchGuard Wi-Fi Cloud kommunizieren.
Herstellen der Verbindung zur WatchGuard Wi-Fi Cloud
Um eine Verbindung zur WatchGuard Wi-Fi Cloud herzustellen, melden Sie sich beim WatchGuard Support Center an, oder rufen Sie die folgende URL auf: https://login.watchguard.cloudwifi.com
Konfigurieren des AP-Geräts
- Starten Sie im Dashboard der WatchGuard Wi-Fi Cloud die App Go.
- Fügen Sie ein neues drahtloses Netzwerk hinzu, und geben Sie die SSID ein, die Sie verwenden möchten.
- Wählen Sie einen Sicherheitsmodus aus. Empfohlen wird WPA2 PSK.
- Klicken Sie auf Save (Speichern), um Ihr AP-Gerät auf die neue Konfiguration zurückzusetzen.
- Schalten Sie das neue drahtlose Netzwerk ein.
Überprüfen des AP-Status
- Starten Sie Discover im Dashboard der WatchGuard Wi-Fi Cloud.
- Wählen Sie Monitor > WiFi > Access Points aus.
- Überprüfen Sie, ob das AP-Gerät mit aktivem Status angezeigt wird.
Nach der anfänglichen Konfiguration kann es mehrere Minuten dauern, bis das AP-Gerät als aktiv angezeigt wird.
ATTIVAZIONE DEL DISPOSITIVO AP
- Navigare all’indirizzo https://myproducts.watchguard.com/activate.
- Accedere al proprio account WatchGuard, oppure crearne uno nuovo*.
* Se si crea un nuovo account, tornare a https://myproducts.watchguard.com/activate dopo aver terminato la procedura di creazione dell’account.
- Digitare il numero di serie del proprio dispositivo.
Collegare il dispositivo AP
- Collegare un cavo Ethernet tra la rete e l’interfaccia Ethernet del dispositivo AP.
- AP125 — LAN2 interface (PoE)
- AP225W — PoE IN/LAN Uplink port
- AP325 / AP327X / AP420 — LAN1 interface (PoE+)
- È necessario abilitare DHCP sulla rete a cui si connette il dispositivo AP.
- Assicurarsi che il dispositivo AP disponga della connettività Internet e possa comunicare con i servizi di WatchGuard Wi-Fi Cloud sulle porte seguenti: HTTP TCP 80/443 e UDP 3851.
- Se si dispone di un dispositivo Firebox, la policy WatchGuard Wi-Fi Cloud apre le porte necessarie.
- Se la rete non supporta il protocollo Power over Ethernet (PoE), collegare l’adattatore di alimentazione opzionale o l’iniettore PoE (venduto separatamente).
- Dopo aver acceso il dispositivo AP, attendere per alcuni minuti fino a quando sia l’indicatore di alimentazione che l’indicatore di rete Ethernet (LAN) si accendano fissi e di colore verde. Questo significa che il dispositivo AP è online e può comunicare con il cloud Wi-Fi WatchGuard.
Eseguire la connessione a WatchGuard Wi-Fi Cloud
Per eseguire la connessione a WatchGuard Wi-Fi Cloud, accedere a WatchGuard Support Center o andare all’indirizz: https://login.watchguard.cloudwifi.com
Configurare il dispositivo AP
- Nel dashboard di WatchGuard Wi-Fi Cloud, selezionare Go.
- Aggiungere una nuova rete wireless e digitare il codice SSID da utilizzare.
- Selezionare una modalità di sicurezza. Si consiglia WPA2 PSK.
- Fare clic su Save per reimpostare il dispositivo AP con la nuova configurazione.
- Attivare la nuova rete wireless.
Verifica dello stato dell’AP
- Nel dashboard di WatchGuard Wi-Fi Cloud, apri Discover.
- Seleziona Monitor > WiFi > Access Points.
- Verifica che l’AP sia visualizzato e che lo stato sia attivo.
Potrebbe trascorrere qualche minuto prima che il dispositivo AP venga visualizzato come attivo dopo la configurazione iniziale.
ACTIVE SU DISPOSITIVO AP
- Visite https://myproducts.watchguard.com/activate.
- Inicie sesión con su cuenta de WatchGuard o cree una cuenta nueva*.
* Si usted crea una cuenta nueva, regrese a https://myproducts.watchguard.com/activate luego de finalizar el proceso de creación de la cuenta.
- Ingrese el número de serie de su dispositivo.
Conecte el Dispositivo AP
- Conecte un cable Ethernet entre su red y la interfaz de Ethernet en su dispositivo AP.
- AP125 — LAN2 interface (PoE)
- AP225W — PoE IN/LAN Uplink port
- AP325 / AP327X / AP420 — LAN1 interface (PoE+)
- Debe habilitar DHCP en la red donde conecte el dispositivo AP.
- Asegúrese de que el dispositivo AP tenga conexión a Internet y pueda comunicarse con los servicios de la Nube Wifi de WatchGuard en estos puertos: HTTP TCP 80/443 y UDP 3851.
- Si tiene Firebox, la política de la Nube Wifi de WatchGuard abre los puertos necesarios.
- Si su red no es compatible con Alimentación a través de Ethernet (PoE), conecte el inyector PoE o adaptador de alimentación opcional (se vende por separado).
- Después de encender el dispositivo AP, espere unos minutos hasta que los indicadores Power y Ethernet (LAN) se iluminen en color verde. Esto indica que el dispositivo AP está en línea y se puede comunicar con la nube Wifi de WatchGuard.
Conéctese a la Nube Wifi de WatchGuard
Para conectarse a la Nube Wifi de WatchGuard, inicie sesión en el Centro de soporte de WatchGuard o ingrese a https://login.watchguard.cloudwifi.com
Configure su Dispositivo AP
- En el panel de control de la Nube Wifi de WatchGuard, elija Go (Ir).
- Añada un nueva red inalámbrica e introduzca el identificador de conjunto de servicio (SSID) que desee usar.
- Seleccione un tipo de seguridad. Le recomendamos que elija WPA2 PSK.
- Haga clic en Save (Guardar) para reiniciar su dispositivo AP con la nueva configuración.
- Conéctese a la nueva red inalámbrica.
Verificar el estado de AP
- En el panel de control de Wi-Fi Cloud de WatchGuard, elija Discover.
- Seleccione Monitor > WiFi > Access Points.
- Compruebe que se muestre su AP y que el estado sea activo.
Es posible que el dispositivo AP tarde varios minutos en mostrarse como activo luego de la configuración inicial.
ATIVAR O DISPOSITIVO DE AP
- Acesse https://myproducts.watchguard.com/activate.
- Faça login na conta WatchGuard ou crie uma nova*.
* Se for criar uma conta nova, acesse https://myproducts.watchguard.com/activate depois de concluído o processo de criação de conta.
- Insira o número de série do dispositivo.
Conectar o dispositivo AP
- Conecte um cabo Ethernet entre a rede e a interface Ethernet do dispositivo AP.
- AP125 — LAN2 interface (PoE)
- AP225W — PoE IN/LAN Uplink port
- AP325 / AP327X / AP420 — LAN1 interface (PoE+)
- Será preciso ativar o DHCP na rede em que o dispositivo AP for conectado.
- Lembre-se de conferir a conectividade do dispositivo AP com a internet e se ele consegue se comunicar com os serviços do WatchGuard Wi-Fi Cloud nestas portas: HTTP TCP 80/443 e UDP 3851.
- Se você tem um Firebox, a política do WatchGuard Wi-Fi Cloud abre as portas necessárias.
- Se a sua rede não é compatível com Power over Ethernet (PoE), conecte a fonte de alimentação opcional ou o injetor de PoE (vendido separadamente).
- Após ligar o dispositivo AP, aguarde alguns minutos até que o indicador de energia e o indicador de Ethernet (LAN) fiquem verde contínuo. Isto indica que o dispositivo AP está on-line e consegue se comunicar com o WatchGuard Wi-Fi Cloud.
Conecte ao WatchGuard Wi-Fi Cloud
Para conectar ao WatchGuard Wi-Fi Cloud, faça login no WatchGuard Support Center ou acesse https://login.watchguard.cloudwifi.com
Configure o dispositivo AP
- No Painel do WatchGuard Wi-Fi Cloud, execute Go.
- Adicione uma nova rede sem fio e digite o SSID que deseja usar.
- Selecione um modo de segurança. Recomendamos WPA2 PSK.
- Clique em Save para redefinir o dispositivo AP com a nova configuração.
- Mude para a nova rede sem fio.
Verificar status do AP
- No painel do WatchGuard Wi-Fi Cloud, inicie Discover.
- Selecione Monitor > WiFi > Access Points.
- Verifique se o AP é exibido e se o status é ativo.
Poderá levar vários minutos para que o dispositivo AP seja exibido como ativo depois da configuração inicial.
AP デバイスの起動
- https://myproducts.watchguard.com/activate にアクセスします。
- 登録済みのWatchGuard アカウントにログインするか、新しいアカウントを作成します*。
* 新しいアカウントを作成する場合は、アカウントの作成が完了してからもう一度 https://myproducts.watchguard.com/activate にアクセスしてください。
- デバイスのシリアル番号を入力します。
AP デバイスを接続する
- イーサネット ケーブルで ネットワークと AP デバイス上の イーサネット インターフェイスを接続します。
- AP125 — LAN2 interface (PoE)
- AP225W — PoE IN/LAN Uplink port
- AP325 / AP327X / AP420 — LAN1 interface (PoE+)
- AP デバイスを接続する際は、ネットワーク上で DHCP を有効にする必要があります。
- AP デバイスがインターネットに接続し、次に挙げるポートからWatchGuard Wi-Fi Cloud サービ スと通信できることを確認してください:HTTP TCP 80/443 UDP 3851。
- Firebox をお持ちであれば、WatchGuard Wi-Fi Cloudポリシーによって必要なポートが開きます。
- お使いのネットワークが PoE(Power over Ethernet)をサポートしていない場合、オプションの パワーアダプタ または、PoE インジェクタ(別売り)を接続してください。
- AP デバイスの電源を入れた後、電源及びEthernet(LAN) ランプが緑色に点灯するまで数分間お 待ちください。 このランプ状態は、AP デバイスがオンラインであり、WatchGuard Wi-Fi Cloud と 通信可能であることを意味しています
WatchGuard Wi-Fi Cloud に接続する
WatchGuard Wi-Fi Cloud に接続するには、WatchGuard Support Center にログインするか、下記をクリッ クしてください。https://login.watchguard.cloudwifi.com
AP デバイスを設定する
- WatchGuard Wi-Fi Cloud ダッシュボードから Go を選択します。
- 新たなワイヤレス ネットワークを追加し、お使いになる SSID を 入力します。
- セキュリティ モードを選びます。WPA2 PSK が推奨モードです。
- 新しい設定で AP デバイスをリセットするには、Save をクリックします。
- 新しいワイヤレス ネットワークに切り換えます。
アクセスポイントの状態を確認する
- WatchGuard Wi-Fi Cloud ダッシュボードから、Discover を開始します。
- Monitor > WiFi > Access Points を選択します。
- アクセスポイントが表示され、状態がアクティブになっていることを確認します。
初期構成の後、AP デバイスがアクティブになるまで数分かかることがあります。
AP 장치 활성화
- https://myproducts.watchguard.com/activate 로 이동합니다.
- WatchGuard 계정으로 로그인하거나 새 계정을 만듭니다*.
* 새 계정을 만들 경우 계정 생성 과정을 마친 후 https://myproducts.watchguard.com/activate 로 돌아가십시오.
- 장치의 일련 번호를 입력합니다.
AP 장치 연결
- 네트워크와 AP 장치의 이더넷 인터페이스 간에 이더넷 케이블을 연결합니다.
- AP125 — LAN2 interface (PoE)
- AP225W — PoE IN/LAN Uplink port
- AP325 / AP327X / AP420 — LAN1 interface (PoE+)
- AP 장치를 연결하는 네트워크에서 DHCP를 사용하도록 설정해야 합니다.
- AP 장치가 인터넷에 연결되어 있어야 하고 HTTP TCP 80/443 및 UDP 3851 포트를 통해 WatchGuard Wi-Fi Cloud 서비스와 통신할 수 있어야 합니다.
- Firebox를 사용하는 경우 WatchGuard Wi-Fi Cloud 정책에서 필요한 포트를 엽니다.
- 네트워크에서 PoE(Power Over Ethernet)가 지원되지 않을 경우, 옵션인 전원 어댑터 또는 PoE 인젝터를 연결합니다(별도 판매).
- AP 장치의 전원을 켠 후 전원 표시등과 이더넷(LAN) 표시등이 녹색으로 켜질 때까지 몇분 동안 기다립니다. 이 상태는 AP 장치가 온라인이고 WatchGuard Wi-Fi Cloud와 통신할 수 있음을 나타냅니다.
WatchGuard Wi-Fi Cloud에 연결
WatchGuard Wi-Fi Cloud에 연결하려면 WatchGuard 지원 센터에 로그인하거나 https://login.watchguard.cloudwifi.com 웹 사이트로 이동하십시오.
AP 장치 구성
- WatchGuard Wi-Fi Cloud Dashboard에서 Go를 실행합니다.
- 새로운 무선 네트워크를 추가하고 사용하려는 SSID를 입력합니다.
- 보안 모드를 선택합니다. WPA2 PSK를 권장합니다.
- Save를 클릭하여 새로운 구성으로 AP 장치를 재설정합니다.
- 새로운 무선 네트워크로 전환합니다.
AP 상태 확인
- WatchGuard Wi-Fi Cloud Dashboard에서 Discover 를 실행합니다.
- Monitor > WiFi > Access Points 를 선택합니다.
- AP가 표시되고 활성화된 상태인지 확인합니다
초기 설정 후 AP 장치가 활성 상태로 표시되려면 몇 분 정도 소요될 수 있습니다.
激活 AP 设备
- 转到 https://myproducts.watchguard.com/activate.
- 登录 WatchGuard 帐户,或创建一个新的帐户*。
* 如果创建新帐户,请在完成帐户创建过程后返回到 https://myproducts.watchguard.com/activate.
- 输入设备的序列号。
连接 AP 设备
- 在网络和 AP 设备上的以太网 接口之间连接一条 以太网电缆。
- AP125 — LAN2 interface (PoE)
- AP225W — PoE IN/LAN Uplink port
- AP325 / AP327X / AP420 — LAN1 interface (PoE+)
- 必须在连接 AP 设备的网络上开启 DHCP。
- 确保 AP 设备有 Internet 连接,并且可以在这些端口上与 WatchGuard Wi-Fi 云服务通信。 HTTP TCP 80/443 以及 UDP 3851。
- 如果您有 Firebox,WatchGuard Wi-Fi 云策略将会打开必要的端口。
- 如果网络不支持以太网供电 (PoE),请连接到可选电源适配器或 PoE 供电器(单独销售)。
- 在AP 设备开机后, 请稍等几分钟时间 直至电源指示灯与以太网(LAN)指示灯变为绿色长亮 这表示 AP 设备已连上网络,且可与WatchGuard Wi-Fi 云通信。
连接到 WatchGuard Wi-Fi 云
要连接到 WatchGuard Wi-Fi 云,请登录到 WatchGuard 支持中心,或转到 https://login.watchguard.cloudwifi.com
配置 AP 设备
- 从 WatchGuard Wi-Fi 云控制面板中,点击开始。
- 添加一个新的无线网络,并输入要使用的 SSID。
- 选择一种安全模式。我们建议使用 WPA2 PSK。
- 点击保存以使用新配置重置 AP 设备。
- 开启您的新无线网络。
验证 AP 状态
- 从 WatchGuard Wi-Fi Cloud 仪表板,启动 Discover。
- 选择 Monitor > WiFi > Access Points
- 确保您的 AP 显示,并且状态为活动。
啟動您的 AP 裝置
1. 請前往 https://myproducts.watchguard.com/activate.
2. 登入您的 WatchGuard 帳戶,或是建立新的帳戶*。
*若您建立新帳戶,請在完成帳戶建立程序之後返回 https://myproducts.watchguard.com/activate.
3. 輸入您的裝置序號。
連接 AP 裝置
- 將乙太網路線連接到網路與您 AP 裝置的 乙太網路 介面。
- AP125 — LAN2 interface (PoE)
- AP225W — PoE IN/LAN Uplink port
- AP325 / AP327X / AP420 — LAN1 interface (PoE+)
- 您必須在 AP 裝置所連接的網路啟用 DHCP。
- 確定 AP 裝置可連線到網際網路,而且可以在下列連接埠與 WatchGuard Wi-Fi Cloud 服務通訊: HTTP TCP 80/443 與 UDP 3851。
- 若您有 Firebox,WatchGuard Wi-Fi Cloud 原則會開啟必要連接埠。
- 若您的網路不支援乙太網路供電 (PoE),請連接選擇性的變壓器或 PoE 插入器 (另行銷售)。
- 在您開啟AP 裝置的電源後,請等待幾分鐘,直到電源指示燈,以及以太網絡(LAN) 指示燈長亮綠 色。 這表示AP 裝置的狀態是線上,並且與WatchGuard Wi-Fi 雲端建立了通信。
連線到 WatchGuard Wi-Fi Cloud
若要連線到 WatchGuard Wi-Fi Cloud,請登入 WatchGuard 支援中心,或移至 https://login.watchguard.cloudwifi.com
設定您的 AP 裝置
- 從 WatchGuard Wi-Fi Cloud 儀表板,按一下 [Go] (執行)。
- 新增無線網路並輸入您要使用的 SSID。
- 選取安全性模式。我們建議使用 WPA2 PSK。
- 按一下 [Save] (儲存) 以使用新設定重設您的 AP 裝置。
- 切換到您的新無線網路。
驗證 AP 狀態
- 從 WatchGuard Wi-Fi Cloud 儀錶板,啟動 Discover。
- 請選擇 Monitor > WiFi > Access Points.
- 請確認您的 AP 已經出現,且處於作用中狀態。
在初始配置后,AP 设备可能需要几分 钟才会显示为活动。