Capture Packet Trace
Applies To: Wi-Fi Cloud-managed Access Points (AP125, AP225W, AP325, AP327X, AP420)
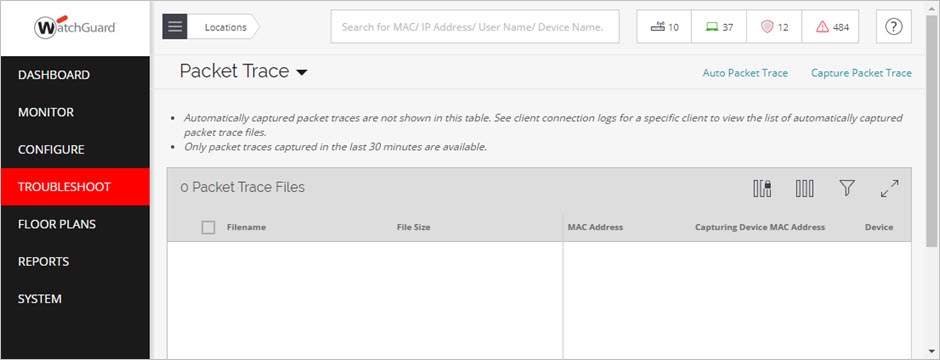
Automatic packet captures are not shown on this page. If you have enabled Auto Packet Trace, see the Client Connection Logs in Discover for a specific client to view the list of packet capture files. For more information, see Auto Packet Trace and Client Connection Logs.
Capture Packet Trace for a Client
To perform a packet trace for a client:
- Select Troubleshoot > Capture Packet Trace, then search for a device by IP or MAC address.
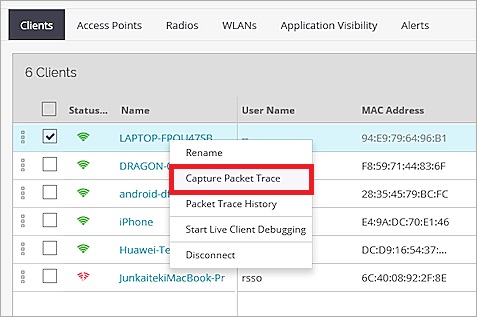
You can also select Monitor > WiFi > Clients, right-click on a client, then select Capture Packet Trace.
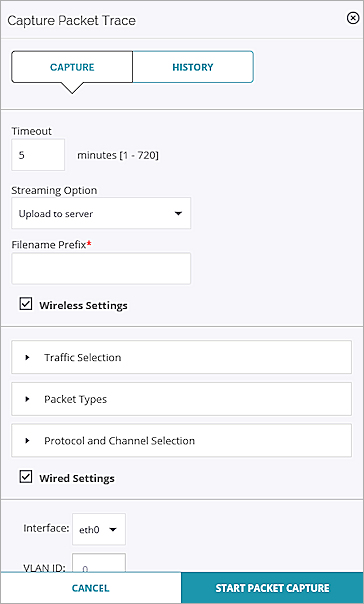
- From the Capture tab in the Capture Packet Trace dialog box, configure these options:
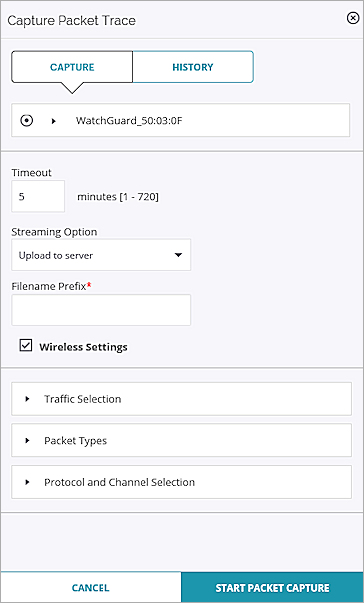
- AP — Select the AP seeing this client that will perform the packet trace.
- Timeout — The time interval in minutes for the packet trace capture. The range is from 1 to 720 minutes.
- Streaming Option — Specify the type of packet capture to be used:
- Upload to server: Captures the packet trace to a file that you can view after the entire packet capture process is complete.
- Wireshark on local machine: Open the packet trace with Wireshark during the ongoing capture process.
- Filename Prefix — Specify the prefix for the filename. For example, Packet_wireless_143438.pcap, where "Packet" is the file prefix.
- Wireless Settings — Edit advanced wireless settings.
- Traffic Selection — The type of traffic utilized for troubleshooting:
- All packets on the channel: Capture all packets from all clients visible to the selected AP.
- Only packets for the selected Client <MAC address>: Capture only packets from the selected client.
- Packet Types — Select the type of packets that you want to capture, including data frames and management frames types.
- Protocol and Channel Selection — Select the frequency band and channels that you want to troubleshoot. If you want to select a single channel, choose the Select Channel option and specify the channel number and channel width (channel offset). By default, the selections are displayed based on the device template applied to the troubleshooting AP. Select the Rotate on all Channels option to troubleshoot on all available channels.
- A dialog box appears that displays the progress of the packet trace capture. Click Stop to stop the packet capture.
- After the successful completion of the packet trace capture, click Download to view the file.
View Packet Trace History for a Client
You can view the Packet Trace History for a selected client. Only packet traces captured in the last 30 minutes are displayed in the history.
To view the packet trace history:
- Select Monitor > WiFi > Clients.
- Right-click the client, then select Packet Trace History.
- Select the History tab in the Capture Packet Trace dialog box to view the packet capture history.
This information is available for a packet capture:
- Filename — Filename specifies the name of the captured packet trace.
- MAC Address — MAC Address of the device for which the packet trace is captured.
- Capturing Device MAC Address — MAC Address of the AP that captured the packet trace.
- Start — Start time of packet capture.
- End — End time of packet capture.
- Troubleshooting Mode — Indicates the troubleshooting mode used.
- Status — Current status of the packet trace (Completed or in progress).
- Click the menu icon for a packet capture to view the available actions:
- Download — Download the packet trace file.
- Delete — Delete the packet trace file.
- Open — Open the trace file.
Capture Packet Trace for an AP
You can perform packet captures for APs in either access point mode or sensor mode. You can inspect these packets with tools such as Wireshark to help diagnose and resolve wireless network issues.
- Select Troubleshoot > Capture Packet Trace, then search for a device by IP or MAC address.
You can also select Monitor > WiFi > Access Points, right-click on an AP, then select Capture Packet Trace.

From the Capture tab in the Capture Packet Trace dialog box, configure these options:
- Timeout — The time interval in minutes for the packet trace capture. The range is from 1 to 720 minutes.
- Streaming Option — Specifies the type of packet capture to be used:
- Upload to server: Captures the packet trace to a file that you can view after the entire packet capture process is complete.
- Wireshark on local machine: Open the packet trace with Wireshark during the ongoing capture process.
- Filename Prefix — Specify the prefix for a filename. For example, Packet_wireless_143438.pcap, where "Packet" is the file prefix.
- Wireless Settings — Edit advanced wireless settings.
- Traffic Selection — The type of traffic utilized for troubleshooting:
- All packets on the channel: Capture all packets from all clients visible to the selected AP.
- Only packets for the selected Client <MAC address>: View only packets from the selected AP.
- Packet Types — Select the type of packets that you want to capture.
- Protocol and Channel Selection — Select the frequency band and channels that you want to troubleshoot. If you want to select a single channel, choose the Select Channel option and specify the channel number and channel width (channel offset). By default, the protocol and channels are displayed based on the device template applied to the troubleshooting AP. Select the Rotate on all Channels option to troubleshoot on all available channels.
- Wired Settings — Select this option to capture packets from wired devices.
- Interface — Select from the available Ethernet ports from the list. The default value is eth0.
- VLAN ID — Type the VLAN ID.
- Protocols — Select the required protocols from the list (ICMP, UDP, DHCP, MDNS, LLMNR, DNS, RADIUS, ARP, TCP).
- A dialog box indicates the progress of the packet trace capture. Click Stop to stop the packet capture.
- After the successful completion of the packet trace, click Download to view the file.
View Packet Trace History for an AP
You can view the Packet Trace History for a selected AP. Only packet traces captured in the last 30 minutes are displayed in the history.
To view the packet trace history:
- Select Monitor > WiFi > Clients.
- Right-click the AP to view the available actions, then select Packet Trace History.
- Select the History tab in the Capture Packet Trace window to view the packet capture history.
This information is available for a packet capture:
- Filename — Filename specifies the name of the captured packet trace.
- MAC Address — MAC Address of the device for which the packet trace is captured.
- Capturing Device MAC Address — MAC Address of the AP that captured the packet trace.
- Start — Start time of packet capture.
- End — End time of packet capture.
- Troubleshooting Mode — Indicates the troubleshooting mode.
- Status — Current status of the packet trace (Completed or in progress).
- Click on the menu icon for a packet capture to view the available actions:
- Download — Download the packet trace file.
- Delete — Delete the packet trace file.
- Open — Open the trace file.
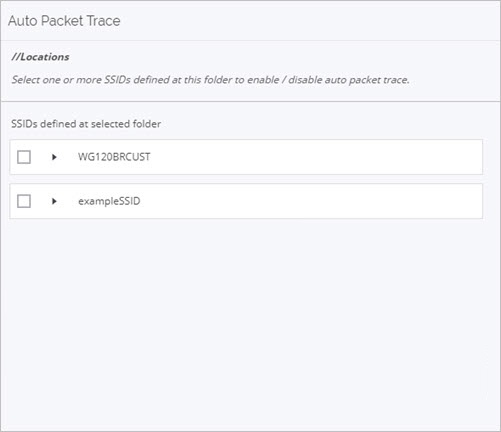
Auto Packet Trace
Select Auto Packet Trace to automatically capture a packet trace when client connectivity failures are detected.
You can then analyze these packet traces in the Client Connection Logs in Discover to troubleshoot connectivity issues with your devices.
A Download Packet Trace link will appear in the logs when a failure occurs. Five of the latest packet traces are stored for each client and these traces are retained for a maximum of seven days. For more information. see Client Connection Logs.