Configure Role Profiles in Discover
Applies To: Wi-Fi Cloud-managed Access Points (AP125, AP225W, AP325, AP327X, AP420)
In a Role Profile, you can define a VLAN ID, firewall rules, application firewall rules, per-user bandwidth controls, and redirection URLs. These features can be customized or the settings can be inherited from the SSID configuration.
To configure a Role Profile in Discover:
- Open Discover.
- Open the Navigator, and select a location where to create the Role Profile.
- Select Configure > Network Profiles > Role Profiles.
- Click Add Role Profile.
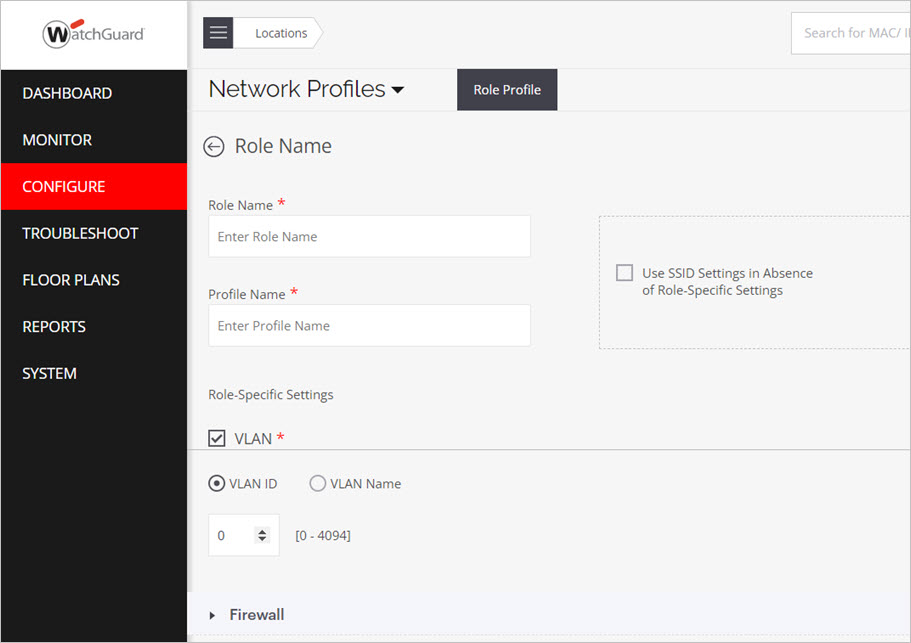
- In the Role Name text box, type a descriptive name for the role.
- In the Profile Name text box, type a descriptive name for the role profile.
- Use SSID Settings in Absence of Role-Specific Settings — To inherit the role attributes from the SSID settings, select this check box. For example, if you have set the firewall rules in the SSID settings and want the same settings to apply to all users, you can select this option and you do not need to configure the firewall rules in the role profile.
- VLAN — Select VLAN, then select the VLAN ID for this role profile. The VLAN ID range is between 0 and 4094. To map to the untagged VLAN on the switch port, type 0 as the VLAN ID, even if the VLAN ID assigned to the untagged VLAN on the switch is assigned a different ID. The VLAN ID set in the role profile overrides the configured SSID VLAN ID. If you have not selected the Use SSID Settings in Absence of Role-Specific Settings check box, then you must enable this option and specify one or more VLAN IDs. If you do not configure this setting in the Role Profile, then you must select the Use SSID Settings in Absence of Role-Specific Settings check box.
- Firewall — Enable or disable the Firewall or Application Firewall for this role profile. For more information, see Firewall Settings and Application Firewall. The role profile firewall rules override the configured SSID firewall rules.
- Bandwidth Control — Enable or disable per user bandwidth controls for this role profile. For more information, see . The role profile bandwidth controls override the configured SSID bandwidth controls. If you configure Bandwidth Control in the role profile, you must select the Enable per user bandwidth control option in the Traffic Shaping & QoS section of the SSID settings.
- Redirection — You can configure a redirection URL for a role profile. Clients that are assigned the role profile are redirected to the configured portal URL. All other network access is blocked, except for sites configured in the Websites That Can Be Accessed Before Authorization settings. The redirect URL web page can provide more details to Wi-Fi users about the network restrictions enforced on their session.
You can select Static Redirection or Dynamic Redirection.
You can redirect onboarding clients to a dynamic URL defined by the RADIUS server. If the RADIUS access-accept request has a role and a redirection URL for a client, APs can redirect the client's HTTP or HTTPS requests.
Prerequisites:
The access-accept request for a client must contain the URL and the role that is configured with the dynamic redirection option. The RADIUS must send the URL in the given VSA:
Vendor-id : 16901 WatchGuard Wi-Fi
Attribute-Id: 8
Data-type: string
Attribute Name: arista-portal-url
Add all the hostnames and IP addresses to the Websites That Can Be Accessed Before Authorization section. The website address must include the IP or hostname of the host that hosts the portal.
Select Enable HTTPS Redirection to securely redirect users to the portal when they try to get access to an HTTPS site. If HTTPS Redirection is not enabled, the client is not redirected to the portal when they browse to an HTTPS site. Type the organization details (Common Name, Organization, and Organization Unit) to use for HTTPS redirection purposes.
You can configure RADIUS MAC authentication to assign roles to clients both before and after authentication to enable the use of portals with RADIUS authentication. For example, you can assign a pre-authentication role that redirects a client to the portal for authentication to the RADIUS server. After the user successfully authenticates, the RADIUS server can use Change of Authorization (CoA) to assign a post-authenticaton role to the client. For more information, see Configure RADIUS MAC Authentication.
- Click Save.