Configure RADIUS MAC Authentication
Applies To: Wi-Fi Cloud-managed Access Points (AP125, AP225W, AP325, AP327X, AP420)
You can also configure RADIUS MAC authentication to assign roles to clients that fail MAC authentication (to restrict access or redirect the client), or you can assign roles both pre-authentication and post-authentication. For example, you can assign a pre-authentication role that redirects a client to a portal for authentication to the RADIUS server. After the user successfully authenticates, the RADIUS server can use Change of Authorization (CoA) to assign a post-authenticaton role to the client. For more information, see Role-Based Access Control for RADIUS MAC Authentication.
How RADIUS MAC Authentication Works
- User authentication is initiated based on the security settings configured for the SSID. For example, the user can associate using WPA2 with PSK.
- After the user successfully associates to the SSID, the AP authenticates the MAC address of the connecting client with a RADIUS server.
- If the MAC authentication is successful, the client device is allowed to access the wireless network.
- If the MAC authentication fails, you can configure the AP to take one of these actions:
- Connect the client even though it not authorized. You can optionally assign a role to the client from your defined role profiles. This role can assign the client to a specific VLAN ID or have other restrictions based on the role configuration. You can also redirect the user to web site or portal that provides information about why access was denied or displays instructions for self-registration.
- Disconnect the client device because it is not authorized.
- You can enable the use of pre-authentication and post-authentication role profiles so that the pre-authentication role redirects the client to a web authentication portal hosted on the RADIUS server after MAC authentication fails.
- When the user authenticates successfully, the RADIUS server registers the client MAC address for this user.
- The RADIUS server then sends a Change of Authorization (CoA) message that contains the post-authentication role profile for the client.
The MAC addresses defined on your RADIUS server must all be in lower case format. For example: 00:aa:11:bb:22:cc.
Configure RADIUS MAC Authentication
To configure RADIUS MAC Authentication, select an action to take if the client authorization fails: Disconnect or Stay connected and select a Role from the drop-down list. Only role profiles you have defined are listed here. For more information, see Role Based Control.
RADIUS Server Settings
To configure your RADIUS server settings, click RADIUS Settings.
- Primary Authentication Server — Select a RADIUS profile from the drop-down list for the primary authentication server.
- Primary Accounting Server — Select a RADIUS profile from the drop-down list for the primary accounting server.
- Additional Authentication Server — Select a RADIUS profile from the drop-down list for additional authentication servers.
- Additional Accounting Server — Select a RADIUS profile from the drop-down list for additional accounting servers.
- Prefer Primary RADIUS Server — Check the availability of the primary authentication server if it was previously unavailable. If this option is not selected and the primary authentication server is down, the AP continues to use the additional servers.
- RADIUS Retry Parameters — You can configure the Timeout value before another RADIUS connection attempt from 1 to 10 seconds. Set the total number of Attempts from 1 to 10 before the RADIUS connection attempt times out.
- Dynamic VLANs — Enables the AP to accept the VLAN for the current user from the RADIUS server. When you enable dynamic VLANs, BYOD, firewall, portal and NAT features are disabled for the Wi-Fi profile. Type a comma-separated list of dynamic VLAN IDs. You can configure a maximum of 32 VLAN IDs. If the RADIUS server does not return a VLAN ID, or returns a VLAN ID that is not in the list of dynamic VLANs configured in the Wi-Fi profile, the AP redirects the user traffic to the default VLAN ID specified in the Wi-Fi profile network settings.
- COA — Enable Change of Authorization to enable the RADIUS server to send CoA messages after the session is authenticated. When CoA is enabled, you can change the per-user VLAN settings and per-user bandwidth settings for an authenticated user session. Make sure that port 3799 is open on the firewall in the direction of the AP from the RADIUS server for CoA packets. WatchGuard recommends that no two SSIDs applied to a device have the same NAS ID for CoA to function correctly.
- Username / Password — From the drop-down list, select:
MAC Address without Delimiter — For example: 00aa11bb33cc
MAC Address with Hyphen — For example: 00-aa-11-bb-33-cc
MAC Address with Colon — For example: 00:aa:11:bb:33:cc
MAC Address with Single Hyphen — For example: 00aa11-bb33cc
Custom Password — Enter a custom password
The MAC addresses on your RADIUS server must all be in lower case format. For example: 00:aa:11:bb:22:cc. - Called Station ID — A free-form text parameter that the AP passes to the RADIUS server during the authentication or accounting process as the standard RADIUS parameter, Called-Station-Id. You can use one or more of the special format specifiers, %m, %n, %l or %s, to represent the called station ID. The AP replaces %m with the Ethernet MAC address of the AP. The AP replaces %s with the SSID. The AP replaces %l with the location tag. The AP replaces %n with the device name. You can repeat the format specifiers. You can enter text instead of using the format specifiers. Note: If the length of this parameter exceeds 255 characters, the AP uses only the first 255 characters.
- NAS ID — This parameter is used when a network access server (NAS) serves as a single point to access network resources. Generally, a NAS supports hundreds of simultaneous users. When a RADIUS client connects to a NAS, the NAS sends access request packets to the RADIUS server. These packets must contain either the NAS IP address or the NAS identifier. The RADIUS server uses the NAS ID or the NAS-Identifier to authenticate RADIUS clients.
- You can specify a string for the NAS ID. You can use one or more of the special format specifiers, '%m, %n, %l and/or %s, to represent the NAS ID. The AP replaces %m with the Ethernet MAC address of the AP. The AP replaces %s with the SSID. The AP replaces %l with the location tag. The AP replaces %n with the device name. You can repeat the format specifiers. The default value of NAS ID is %m-%s. The NAS ID corresponds to the NAS-Identifier attribute on the RADIUS server. The attribute ID for the NAS-Identifier RADIUS attribute is 32.
Make sure that the NAS ID you specify is not the same as the shared secret configured for the RADIUS server in the RADIUS Authentication section. - APs also support the NAS-IP-Address and NAS-IPv6-Address attributes. The AP uses these attributes along with the existing NAS-ID attribute to uniquely identify the NAS in Disconnect-Request and CoA-Request packets. These attributes simplify integrations with servers such as Cisco ISE, Forescout, and Aruba ClearPass because the NAS ID is not required. The AP will give preference to a NAS ID, if specified, then the NAS-IP-Address and NAS-IPv6-Address attributes.
Role-Based Access Control for RADIUS MAC Authentication
You can configure RADIUS MAC Authentication to assign roles to clients both before and after authentication. This is useful in deployments that use central web authentication through an external captive portal with RADIUS to onboard guest users or employee-owned devices.
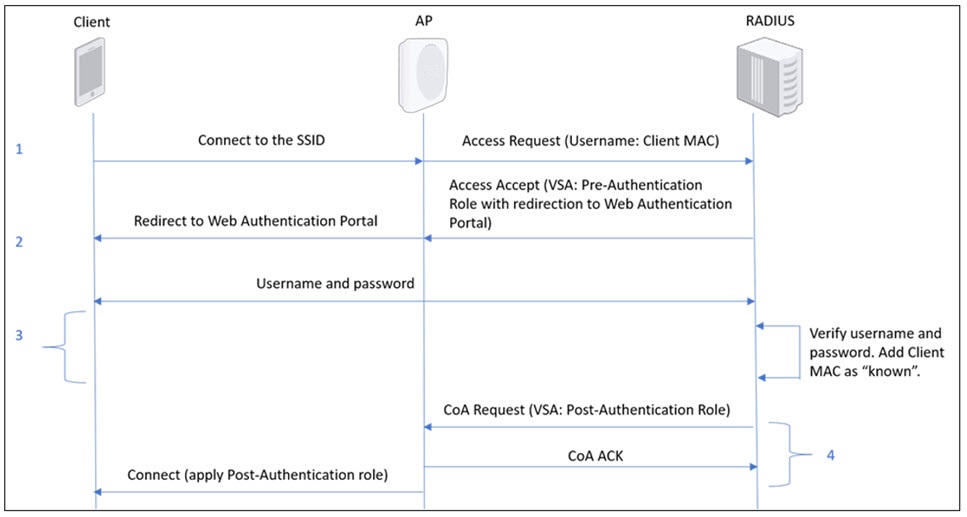
- When the client first connects to the SSID, the AP sends an "Access Request" that contains the client’s MAC address to the RADIUS server.
- The RADIUS server responds with an "Access-Accept" message that contains the Pre-Authentication role. The Pre-Authentication role redirects the client to a web authentication portal hosted on the RADIUS server.
- The user types a username and password on the authentication portal. The RADIUS server authenticates these credentials and registers the client MAC address for this user.
- The RADIUS server sends a Change of Authorization (CoA) message that contains the Post-Authentication role to the AP. The AP then connects the client to the network.
Configure Role-Based Access Control with RADIUS MAC Authentication
To configure role-based access control with RADIUS MAC authentication, you can create two roles: a Pre-Authentication role and a Post-Authentication role.
RADIUS MAC Authentication is available only if the Security Mode is set to Open, WPA2, or Mixed mode. For WPA2 and Mixed mode, PSK must be selected. This option is not available with 802.1x.
Add a RADIUS Server
To add a RADIUS server profile:
- Open Discover.
- Open the Navigator, and select the location where you want to create the RADIUS server.
- Select Configure > WiFi.
- Select the RADIUS tab.
- Click Add RADIUS Server.
- Configure these settings:
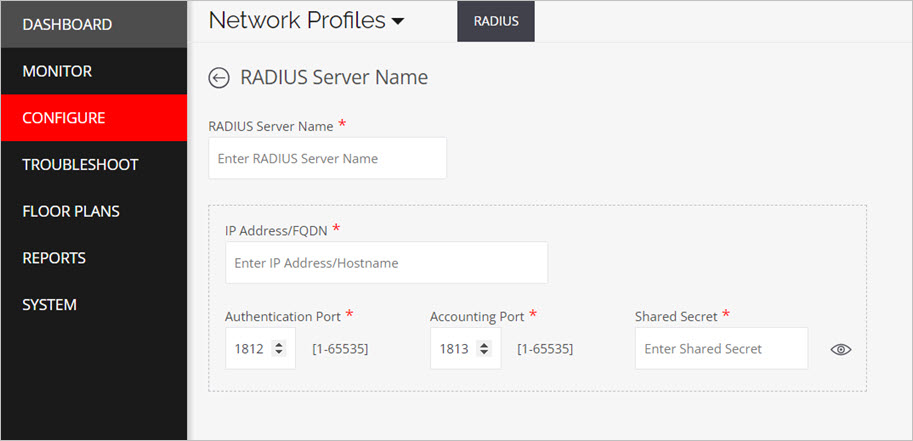
- RADIUS Server Name — Descriptive name for the RADIUS server.
- IP Address/FQDN — IP address or FQDN of the RADIUS server.
- Authentication Port — Port number on which the RADIUS server listens for authentication requests. The default is 1812.
- Accounting Port — Port number on which the RADIUS server listens for accounting requests. The default is 1813.
- Shared Secret — Shared secret for the RADIUS server.
- Click Save.
Create a Pre-Authentication Role Profile
The Pre-Authentication role profile enables redirection to the URL of the RADIUS web authentication portal.
- Open Discover.
- Open the Navigator, and select a location where to create the Role Profile.
- Select Configure > WiFi.
- Select the Role Profile tab.
- Click Add Role Profile.
- Type a descriptive Role Name for the role. For example: Pre-Authentication.
- Type a descriptive Profile Name for the role profile. For example: Pre-Authentication.
- Select the Use SSID Settings in Absence of Role-Specific Settings check box.
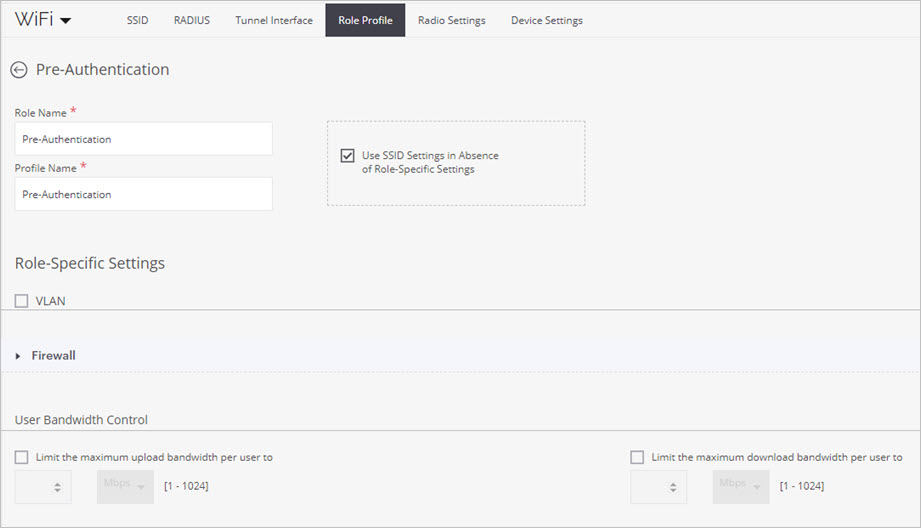
- Select the Redirection check box, then type the URL of your web authentication portal in the Redirect URL text box.
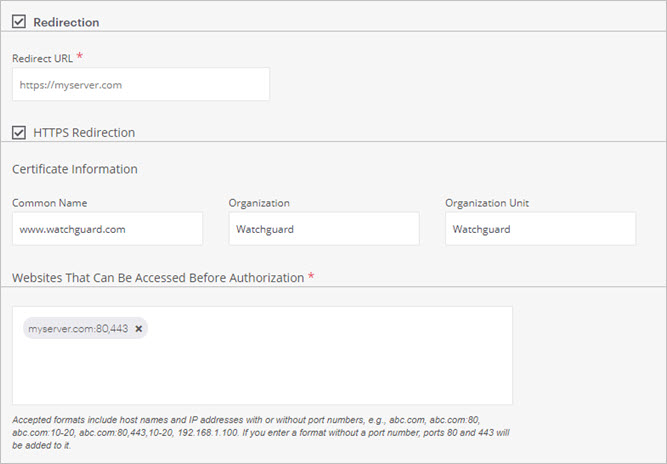
Select Enable HTTPS Redirection to securely redirect users to the portal when they try to get access to an HTTPS site. If HTTPS Redirection is not enabled, the client is not redirected to the portal when they browse to an HTTPS site. Type the organization details (Common Name, Organization, and Organization Unit) to use for HTTPS redirection purposes.
Make sure the web authentication portal URL and ports 80 and 443 are added to the Websites That Can Be Accessed Before Authorization list so that the client can access the portal URL before authentication.
- Click Save.
Create a Post-Authentication Role Profile
The Post-Authentication role profile defines the connection settings, such as a VLAN ID, Firewall rules, and bandwidth controls, for clients that have successfully authenticated.
The RADIUS server must be configured to return this role in the Change Of Authorization (CoA) message it sends to the AP.
- Open Discover.
- Open the Navigator, and select a location where to create the Role Profile.
- Select Configure > WiFi.
- Select the Role Profile tab.
- Click Add Role Profile.
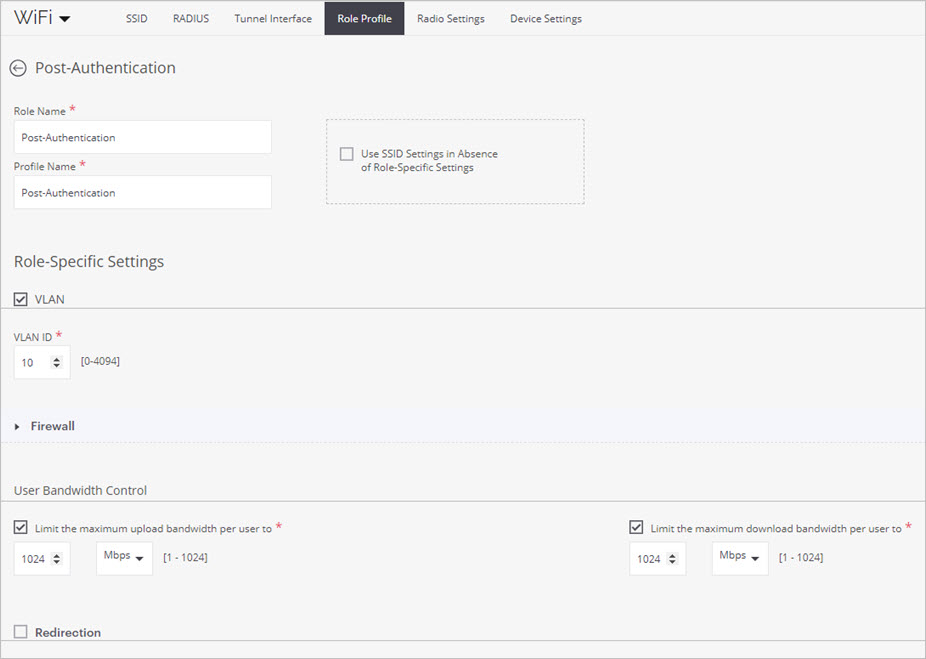
- Type a descriptive Role Name for the role. For example: Post-Authentication.
- Type a descriptive Profile Name for the role profile. For example: Post-Authentication.
- Configure the settings for the VLAN, Firewall, and Bandwidth Control features for the user.
- Click Save.
Configure RADIUS MAC Authentication for an SSID
You must now configure the Access Control settings for an SSID to enable RADIUS MAC Authentication.
- Open Discover.
- Open the Navigator, and select a location where to create the Role Profile.
- Select Configure > WiFi.
- Select SSID.
- Select the SSID you want to configure.
- Select the Access Control tab.
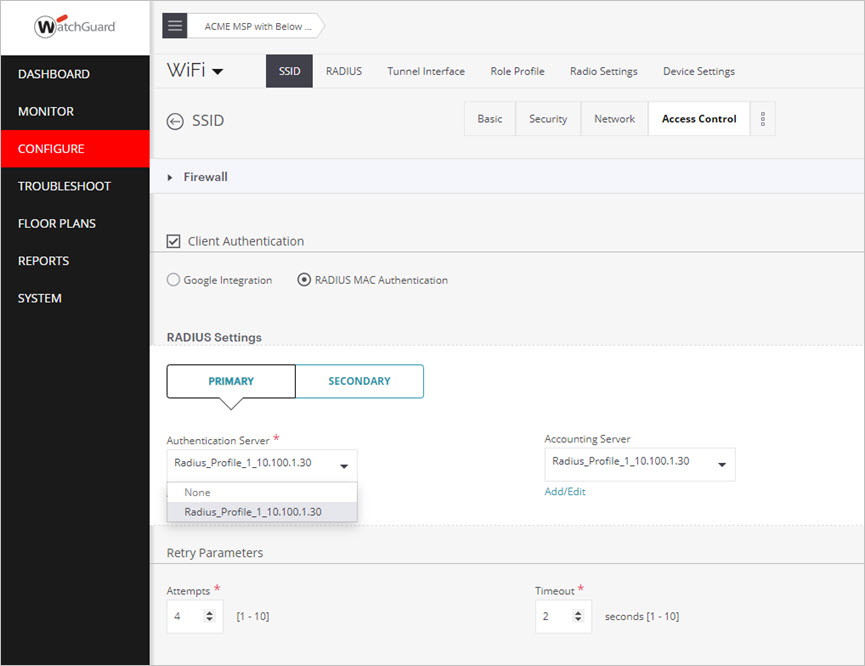
- Select the Client Authentication check box.
- Select RADIUS MAC Authentication.
- From the RADIUS Settings drop-down list for the Primary and Secondary Authentication and Accounting servers, select the RADIUS server profile you created.
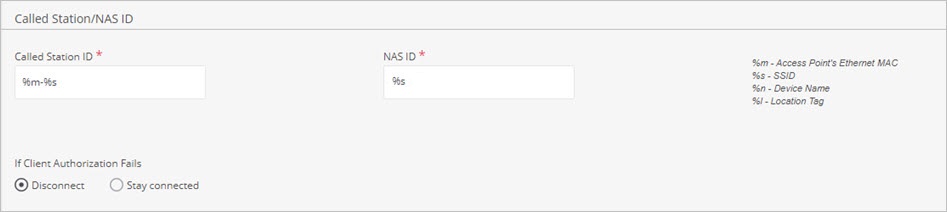
- Set the Calling Station ID to %m-%s (MAC Address and SSID), and the NAS ID to %s (only the SSID).
- In the If Client Authorization Fails section, select Disconnect. This disconnects the client if authentication fails. If authentication succeeds, the roles defined in the SSID are applied to the client.
- Save the SSID settings.
Enable Role-Based Control on an SSID
Enable Role-Based Control on the SSID, then assign both the Pre-Authentication and Post-Authentication roles using the RADIUS VSA.
- Open Discover.
- Open the Navigator, and select a location where to create the Role Profile.
- Select Configure > WiFi.
- Select SSID.
- Select the SSID you want to configure.
- Select the Access Control tab.
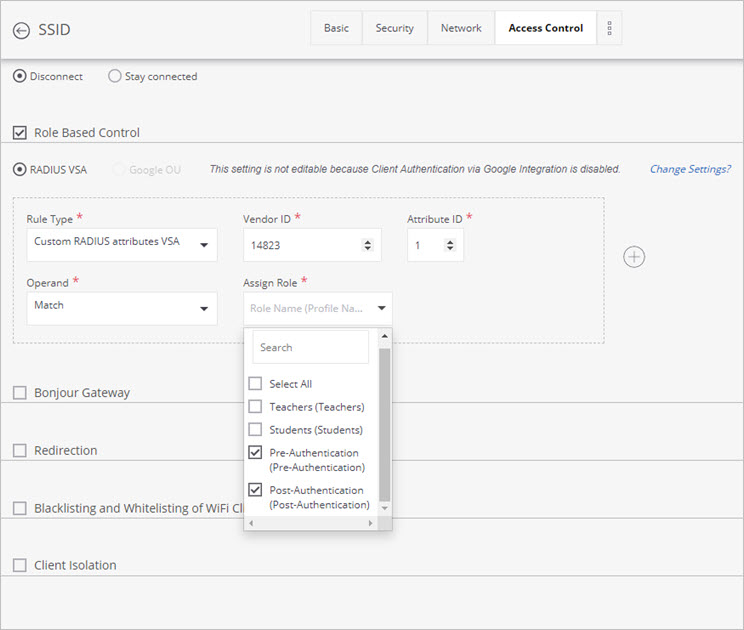
- Enable the Role Based Control check box.
- Select RADIUS VSA.
- In the Rule Type drop-down list, select Custom RADIUS attributes VSA, then select the Vendor ID and Attribute ID for the VSA.
The VSA and its values may vary depending on the type of RADIUS server you use.
- In the Operand drop-down list, select Match.
- Select both the Pre-Authentication and Post-Authentication role profiles you created.
- Save the SSID settings.