Applies To: Wi-Fi Cloud-managed Access Points (AP125, AP225W, AP325, AP327X, AP420)
You can configure social media plug-ins on your captive portal that allow guest users to log in to your wireless network with their social media account credentials. Wi-Fi Cloud supports Facebook, Twitter, LinkedIn, Foursquare, and Okta for social media authentication.
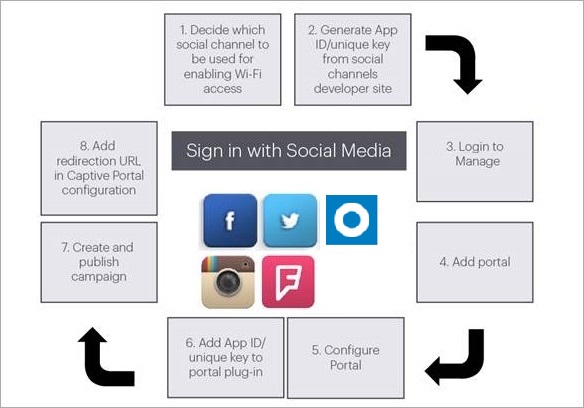
- You can use the WatchGuard default app IDs for some social media plug-in configurations. Due to compliance regulations, many social media vendors restrict the use of certain types of social media profile data provided to unapproved third-party apps.
- To manage your own analytics data from the social media vendor, we recommend you create your own social media app and have the app approved by the social media vendor. These sections contain instructions on how to log in the developer's page for each social media site and create your own unique app IDs.
- For more information on how to configure social plug-ins in Analyze, see Configure Portal Social Media Plug-Ins.
- You can also configure social media plug-ins directly in Discover when you configure a captive portal for an SSID. For more information, see Configure SSID Settings.
Facebook has recently implemented new compliance requirements about the storage and use of opt-in demographic profile information (age and gender) collected from guest Wi-Fi users. This data will no longer be available from the Wi-Fi Cloud-managed Facebook app, and profile information such as age and gender will appear as "Unspecified" in Analyze reports.
To use your own Facebook app, you must register the app in your Facebook developers account, then have the app approved.
- Log in to the Facebook Developers web site (https://developers.facebook.com) and register as a developer.
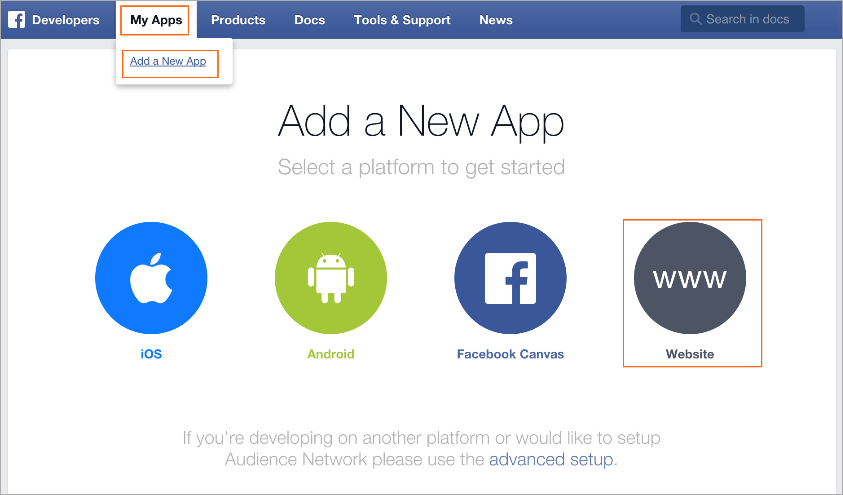
- Click My Apps, and then click Add a New App.
- Select Website and use the basic setup.
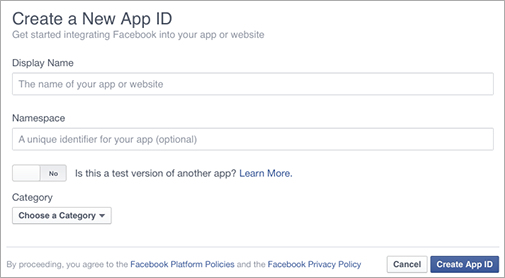
- Enter a Display Name for your app.
- Select the Category as Business.
- Click Create App ID.
- Complete the security check.
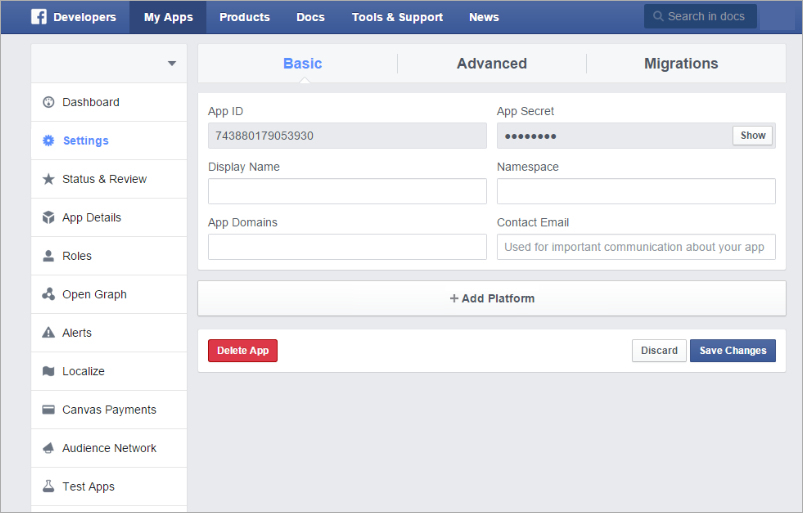
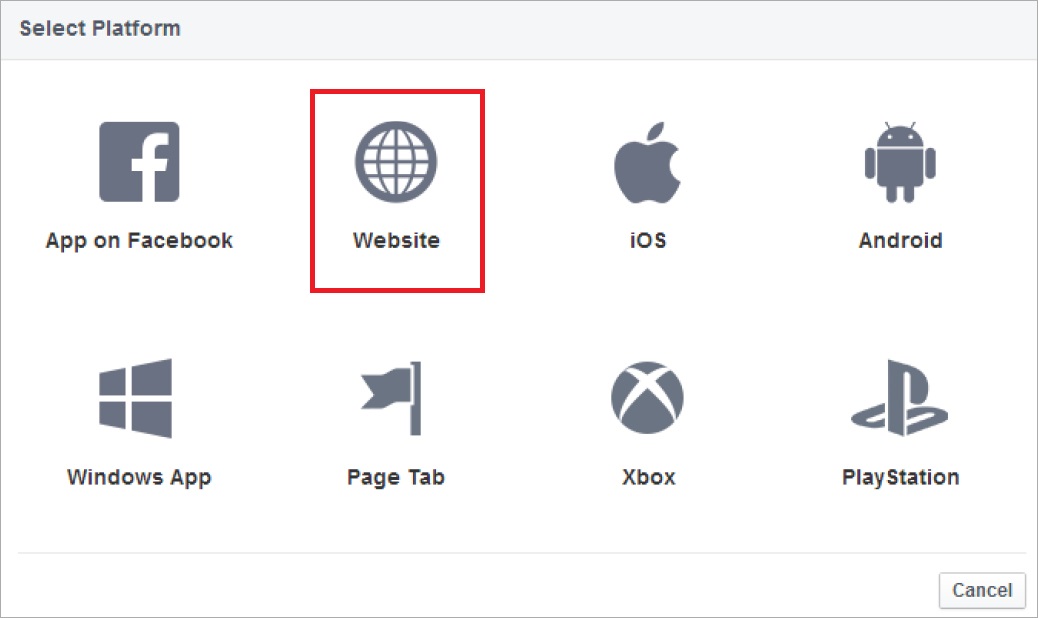
- Click Settings on the left pane and then click +Add Platform on the Basic tab.
- Click Website on the Select Platform window.
- In the App Domains text box, type the full domain for the Analyze service.
For example: mgm-wg11001.watchguard.cloudwifi.com - In the Contact Email text box, type your email address.
- (Optional) Add a Privacy Policy URL and Terms of Service URL for your organization.
- In the Site URL text box, type the URL for the Analyze service.
For example: https://mgm-wg11001.watchguard.cloudwifi.com
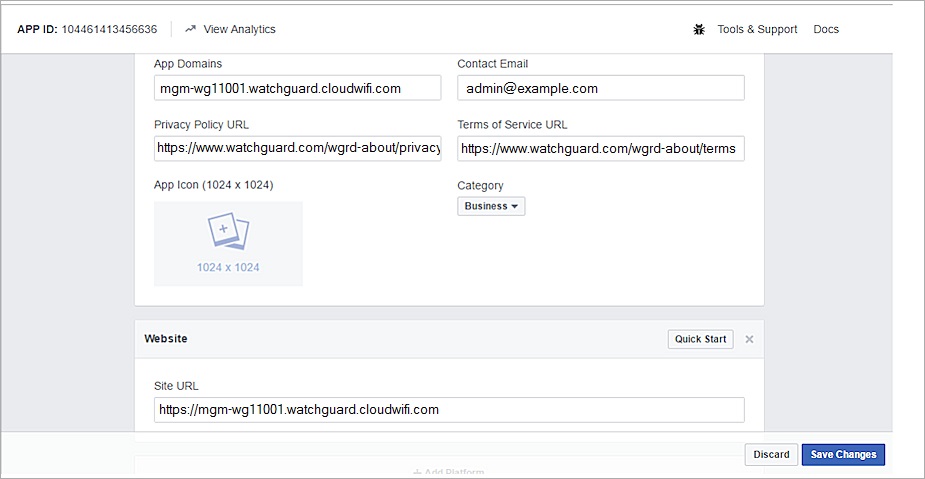
- Click Save Changes.
Configure Server IP Whitelist
We recommend you add your Analyze server address to the Server IP Whitelist to make sure that Wi-Fi Cloud servers are never blocked by Facebook for your app. This option is located in Settings > Advanced Settings in your Facebook app configuration.
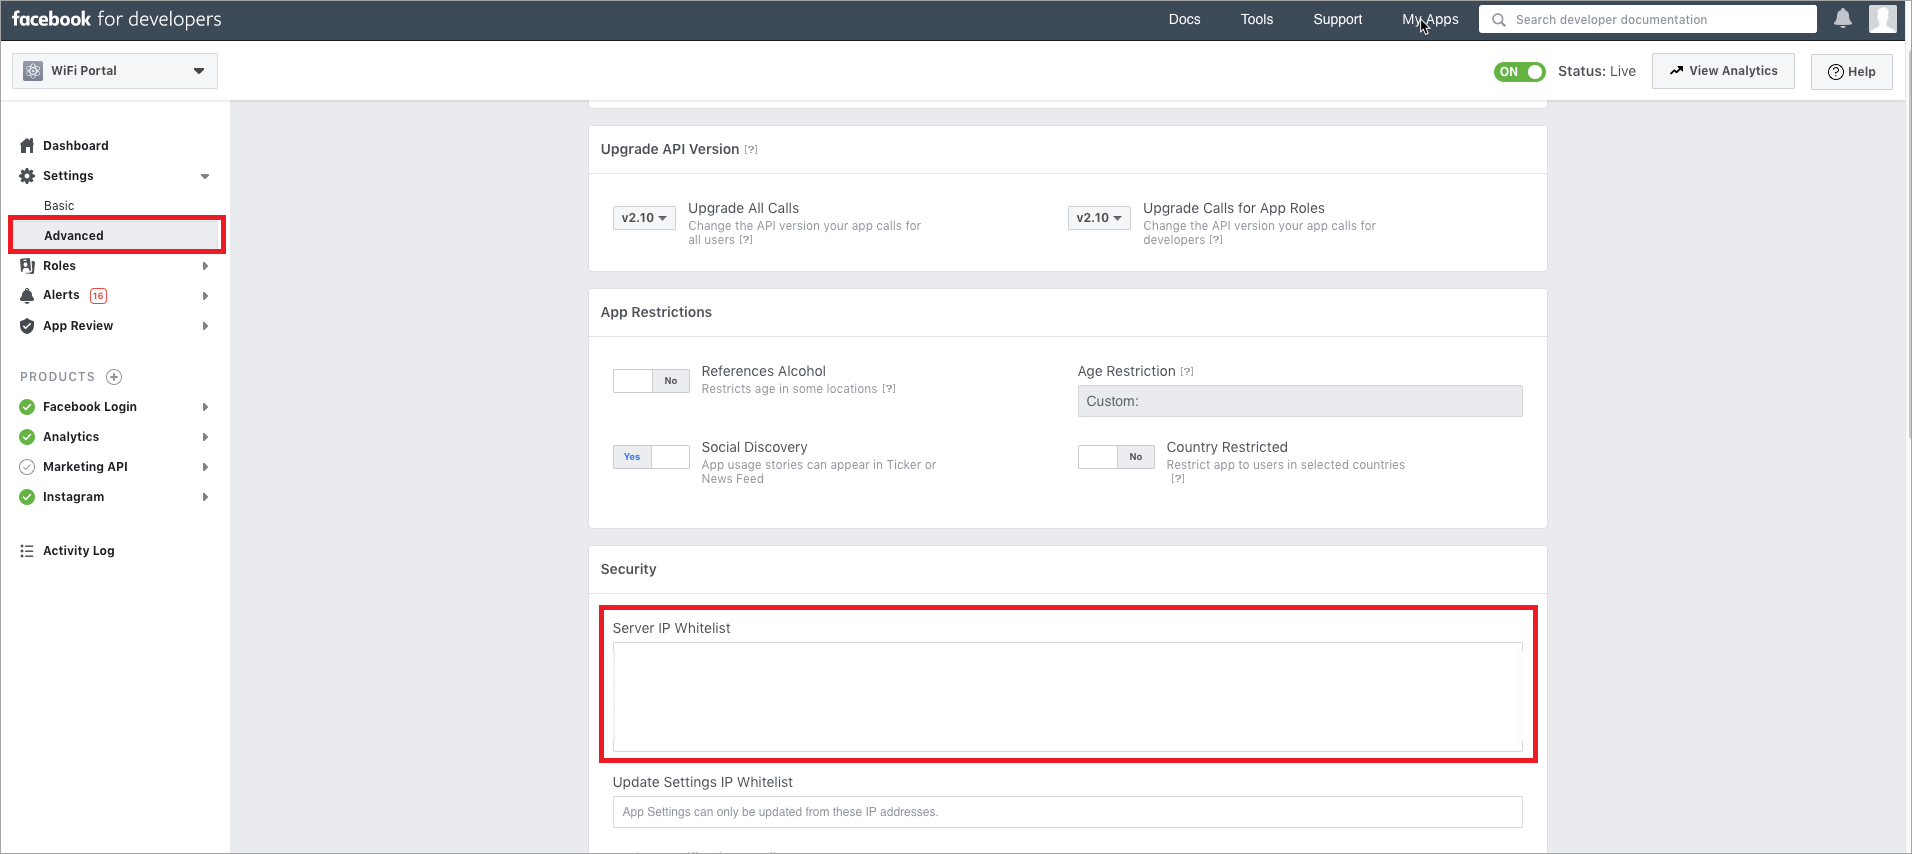
Add the regional Analyze server address for your Wi-Fi Cloud account. This is the server name you see when you open the Analyze service in Wi-Fi Cloud.
These are the IP addresses for all Wi-Fi Cloud Analyze servers:
- mgm-wg11003.watchguard.cloudwifi.com 52.206.127.247
- mgm-wg11004.watchguard.cloudwifi.com 35.170.224.2
- mgm-wg15001.watchguard.cloudwifi.com 52.58.196.26
- mgm-wg17001.watchguard.cloudwifi.com 52.199.235.104
- mgm-wg17002.watchguard.cloudwifi.com 54.199.105.157
- mgm-wg15002.watchguard.cloudwifi.com 35.158.199.120
- mgm-wg31002.watchguard.cloudwifi.com 18.207.64.219
- mgm-wg11001.watchguard.cloudwifi.com 52.2.150.98
- mgm-wg11002.watchguard.cloudwifi.com 52.206.127.243
Configure OAuth Settings
You must also add the URL for the Analyze service in the Facebook login OAuth settings.
- Select Products > Facebook Login > Settings.
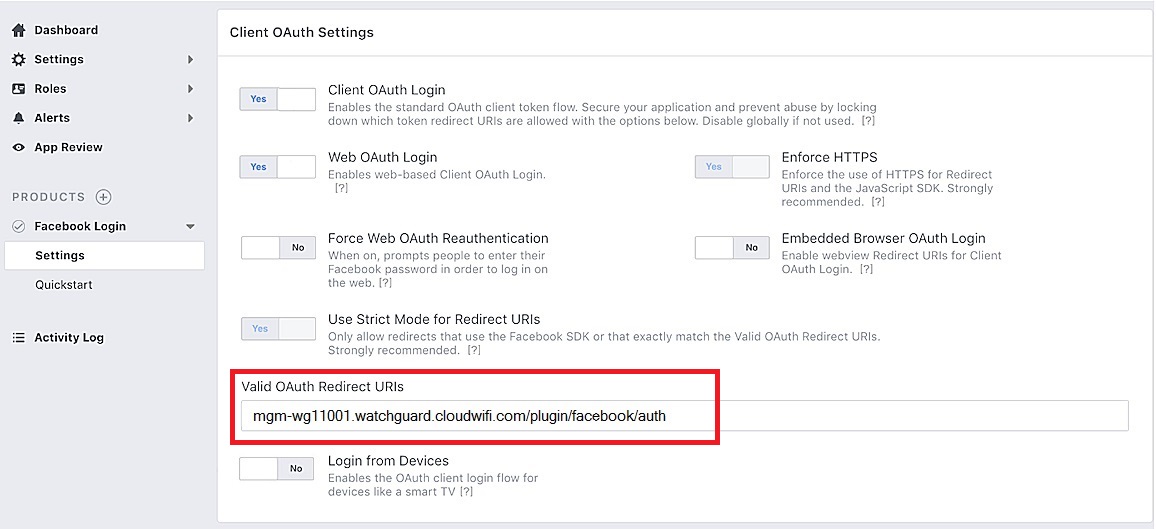
- In the Valid OAuth Redirect URIs text box, type the URL for the Analyze service appended with the path /plugin/facebook/auth.
For example: mgm-wg11001.watchguard.cloudwifi.com/plugin/facebook/auth - Click Save Changes.
Submit the Facebook App for Review
To make the Facebook app live:
- Click Status & Review, then click the No switch on the right pane to make it Yes.
- Click Confirm.
- Click App Details, and type the Long Description, Privacy Policy URL, Terms of Service URL, and User Support Email.
- Upload an App Icon.
- Click Save Changes.
- Click Status & Review, then click Start a Submission.
To obtain a guest user's likes, location, and birthday from their Facebook profile, you must select these options and submit the app for approval. The guest user's email address and basic profile information (first name, last name, and profile picture URL), can be fetched without having to obtain an approval for the Facebook app.
- Select the items you want to include in the submission and then click Add Items.
- For each item, click Add Notes and provide a description on how you are using the item within the app and add screen shots of how you use Facebook in your app,
- Click Submit for Review.
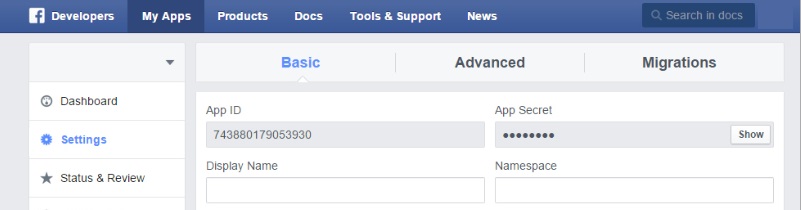
Get App ID and App Secret
To view the App ID and App Secret of your Facebook app that you will use in your captive portal configuration in Analyze:
- Select Settings, then click the Basic tab.
- Click Show to see the App Secret.
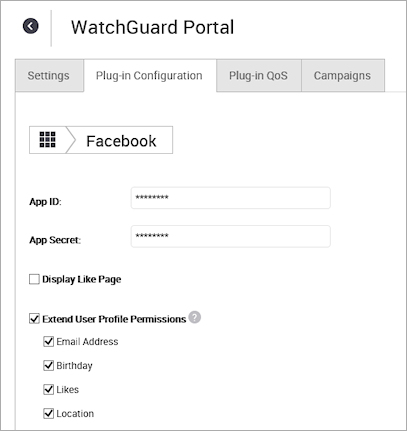
Configure the Facebook Plug-in in Analyze
To configure the Facebook Plug-in in Analyze:
- In Analyze, add the App ID and App Secret provided by Facebook in the Facebook plug-in of your portal.
- Log in to the Twitter App Developers website (https://apps.twitter.com) with your Twitter credentials.
- Click Create New App.
- Provide these details:
- Name: A name for the application.
- Description: A short description of the application.
- Website: URL for the website from which the application is accessed. This is the URL for the Analyze service.
For example: https://mgm-wg11001.watchguard.cloudwifi.com - Callback URL: The URL to which Twitter must redirect the user after successful authentication.
For example: https://mgm-wg11001.watchguard.cloudwifi.com/plugin/twitter/auth
- Read and accept the Developer Agreement, then click Create your Twitter application.
The consumer key and secret is generated and the app becomes live. - Click the Keys and Access Tokens tab to obtain the Consumer Key and Consumer Secret.
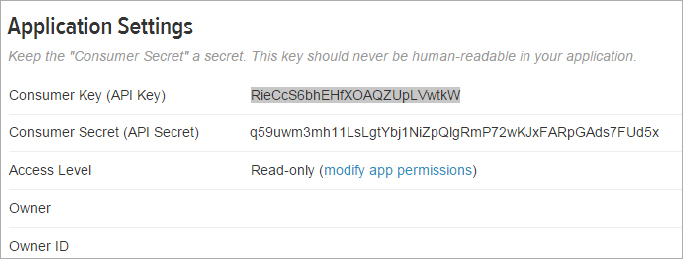
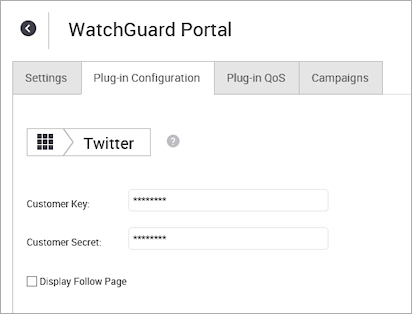
- In Analyze, add the Customer Key and Customer Secret provided by Twitter in the Twitter plug-in configuration for your portal.
- Log in to the LinkedIn developer site (http://developer.linkedin.com) with your LinkedIn credentials.
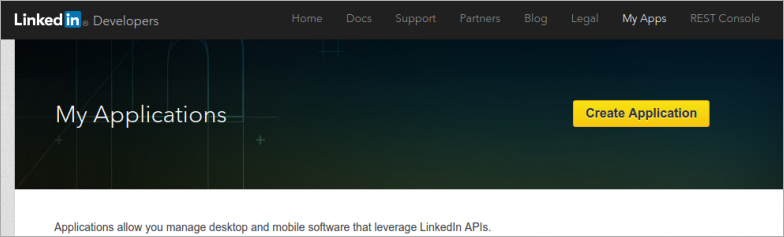
- Click My Apps.
- Click Create Application.
- Provide these details:
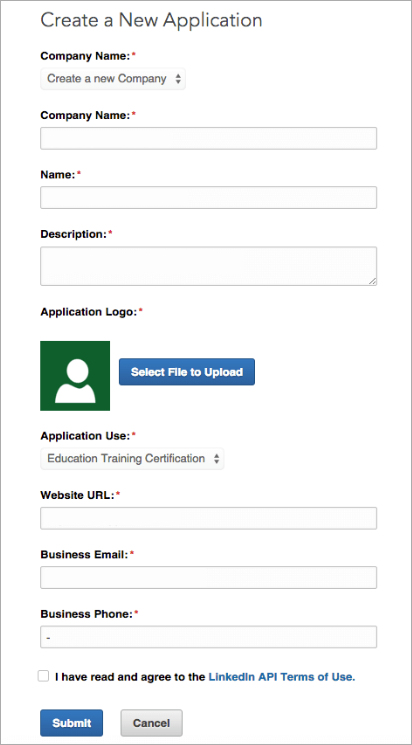
- Company Name: Name of your company.
- Application Name: A name for the application.
- Description: A short description of the application.
- Application Logo: A logo for the application.
- Application Use: Describe the application's purpose.
- Website URL: URL of the web site from where the application is accessed. This is the URL for the Analyze service.
For example: https://mgm-wg11001.watchguard.cloudwifi.com - Business Email: The business email ID of the contact person for this application.
- Business Phone: The business phone number of the contact person for this application.
- Read and accept the Terms of Use.
- Click Submit.
A Client ID and Client secret is generated and displayed.
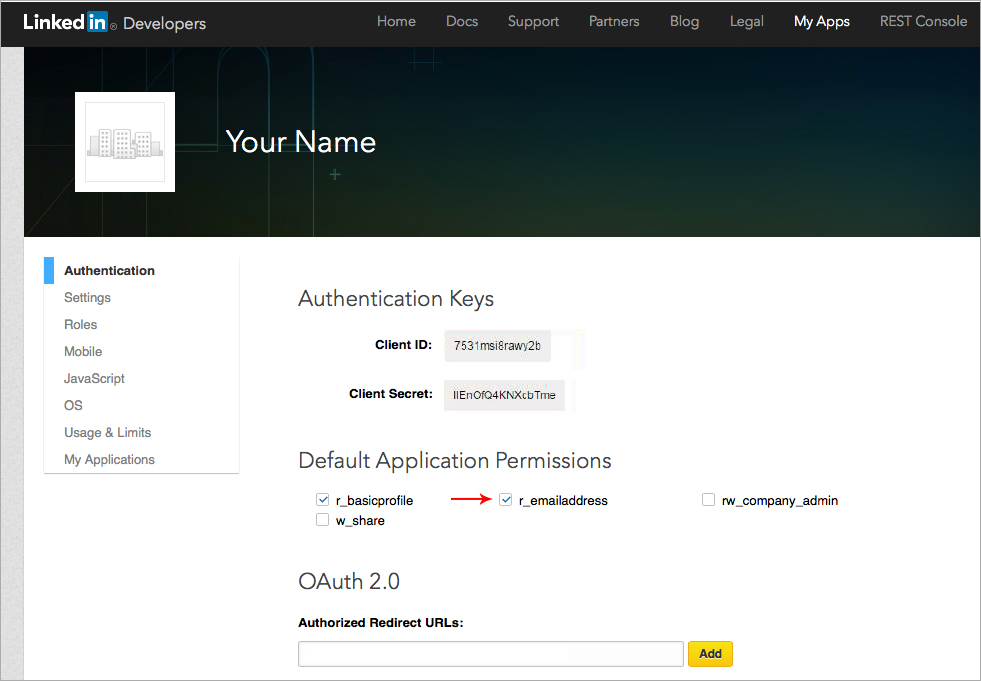
- Type the Authorized Redirect URLs to which LinkedIn must redirect the user after successful authentication.
This URL is published on the LinkedIn plug-in configuration page in Analyze in the Authorized Redirect URLs under Oauth2.0 field.
For example: https://mgm-wg11001.watchguard.cloudwifi.com/plugin/linkedin/auth
- Click Add.
- Read and accept the Terms of Service.
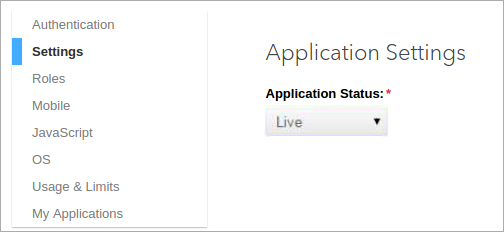
- Select Settings, then from the Application Status drop-down list, select Live.
- Select an appropriate language in the Legal Agreement Language field if you want to change the language of the user agreement.
- Click Update.
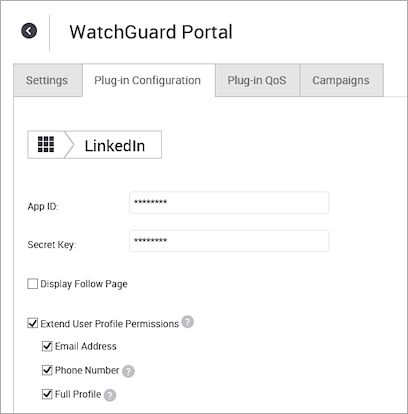
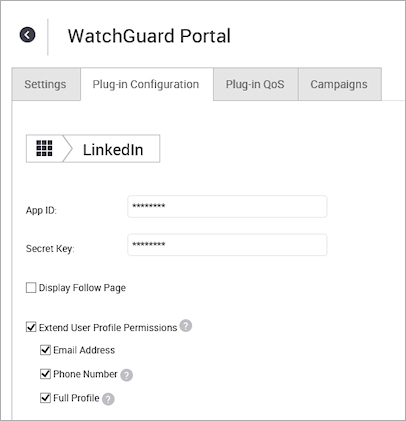
- In Analyze, add the App ID (Client ID) and the Secret Key (Client Secret) to the LinkedIn plug-in configuration for your portal.
- Log in to the Foursquare developer website (https://foursquare.com/developers) with your Foursquare credentials.
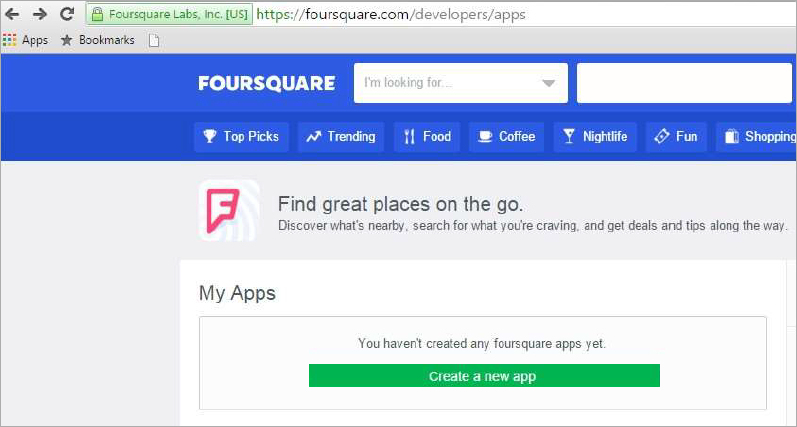
- Click Create a new app.
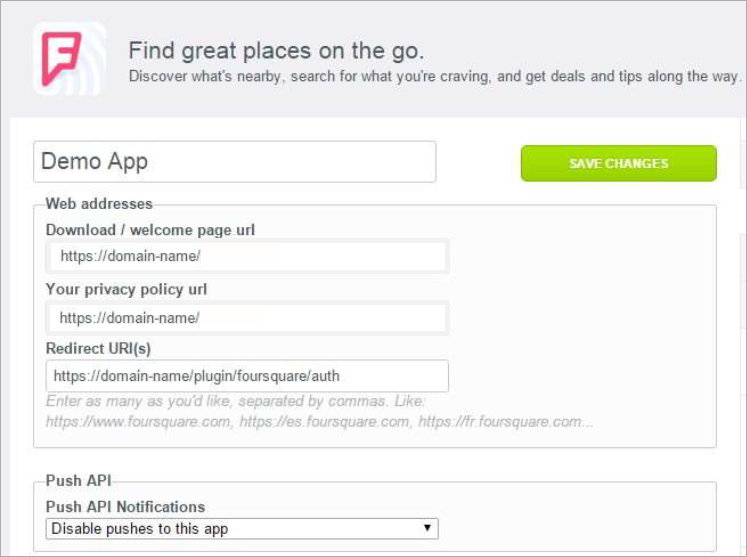
- Type a name for the app.
- In the Web addresses section, type the Download / welcome page URL and Your privacy policy URL.
- In the Redirect URI(s) text box, type the URL to which Foursquare must redirect the user after successful authentication.
For example: https://mgm-wg11001.watchguard.cloudwifi.com/plugin/foursquare/auth - From the Push API Notifications drop-down list, select Disable pushes to this app.
- Click Save Changes.
- In Analyze, add the App ID and Client Secret to the Foursquare plug-in configuration for your portal.
Wi-Fi Cloud Okta integration uses the Okta OAuth application. You must first create and configure an OAuth application in Okta, then use the settings to complete the integration in Wi-Fi Cloud.
For end users, when they connect to your SSID and open a web site with a browser, they are redirected to the Okta sign-in site. After the user enters their credentials in Okta, they are allowed access to the Internet.
The security mode for your SSID with the captive portal enabled must be set to Open or WPA2-PSK to work correctly with Okta. This feature also supports two-factor authentication with Okta Verify.
Create a New Okta App Integration
- Log in to your Okta Cloud account.
- Expand the Applications menu, then select Applications.
- Click Create App Integration.

- From the Create a new application integration dialog box, select these options:
- Sign-in method — OIDC - OpenID Connect
- Application type — Web Application
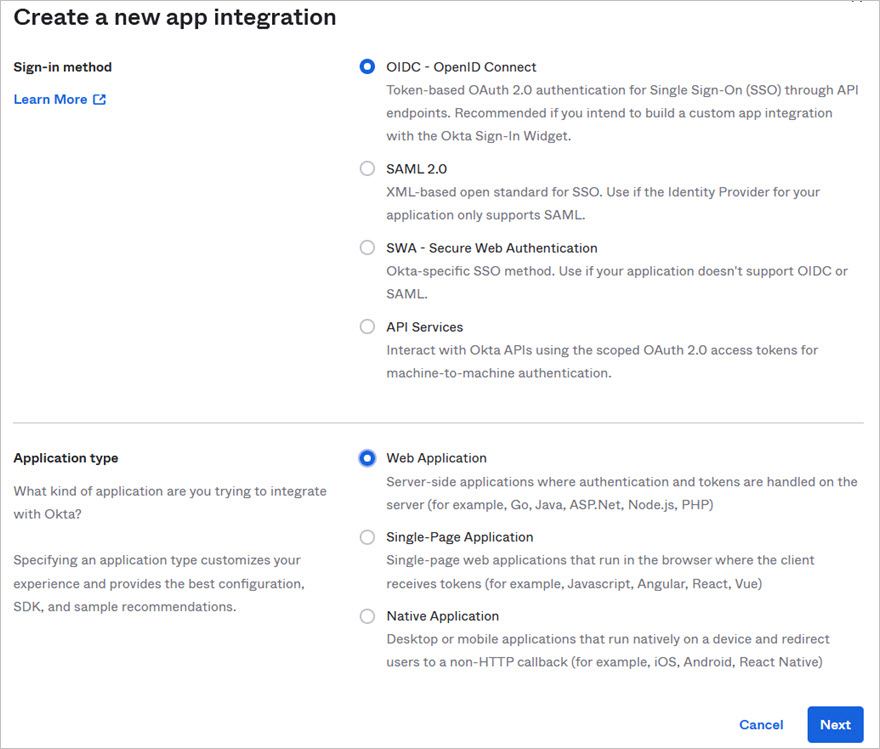
- Click Next.
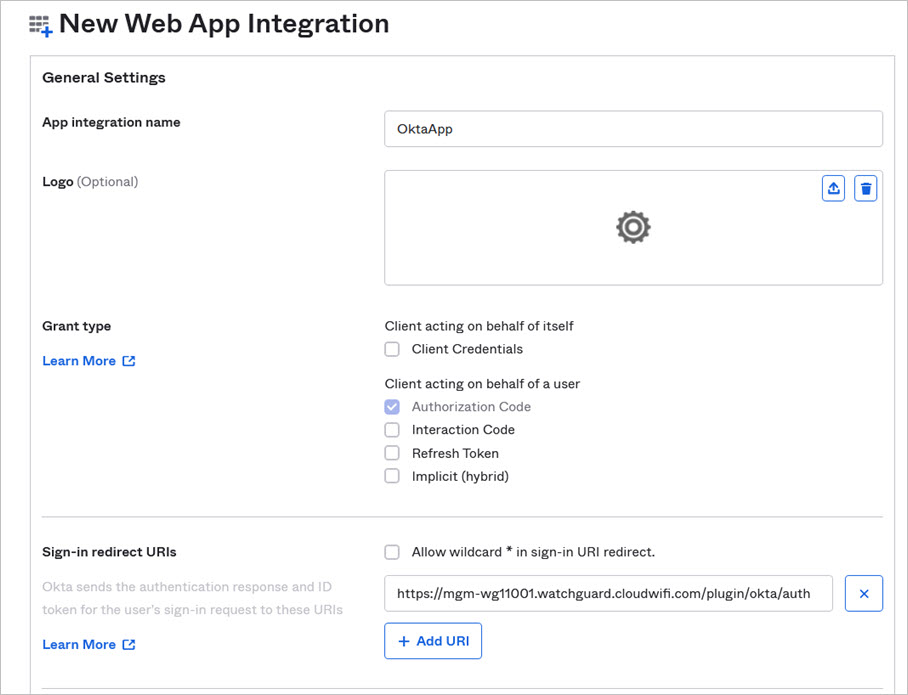
- In the App integration name text box, type a name for your Okta app.
- In the Sign-in redirect URIs section, add the URI of your regional Analyze server in Wi-Fi Cloud.
For example: https://mgm-wg11001.watchguard.cloudwifi.com/plugin/okta/auth.
- In the Assignments section, assign Controlled access to Allow everyone in your organization to access, or to Limit access to selected groups based on your organization's requirements.
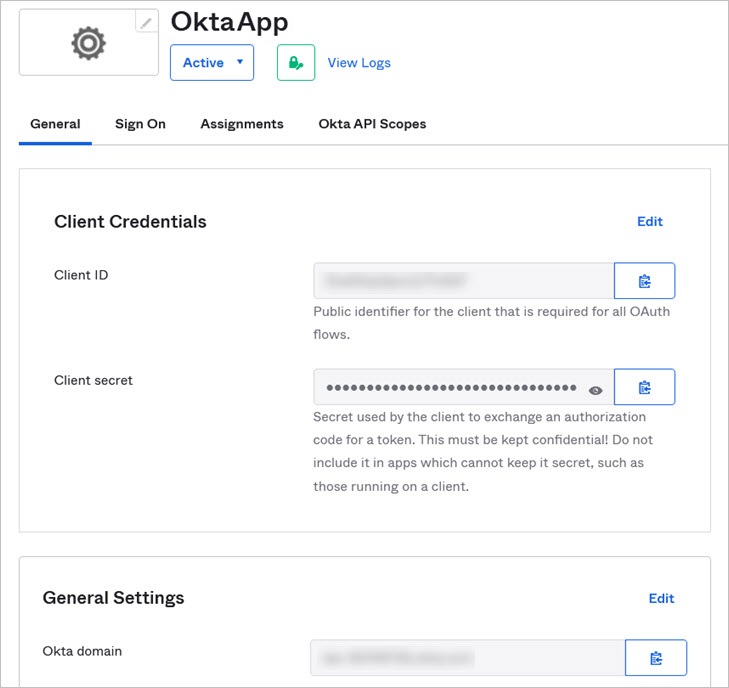
- Click Save.
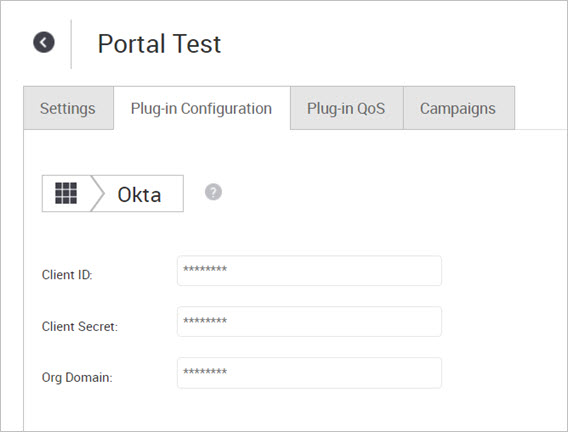
The Okta App is successfully created. - Open the Okta app and copy the Client ID, Client secret, and Okta domain settings. You will use these settings when you configure Okta in Discover or Analyze in Wi-Fi Cloud.
Configure Okta Plug-in in Wi-Fi Cloud
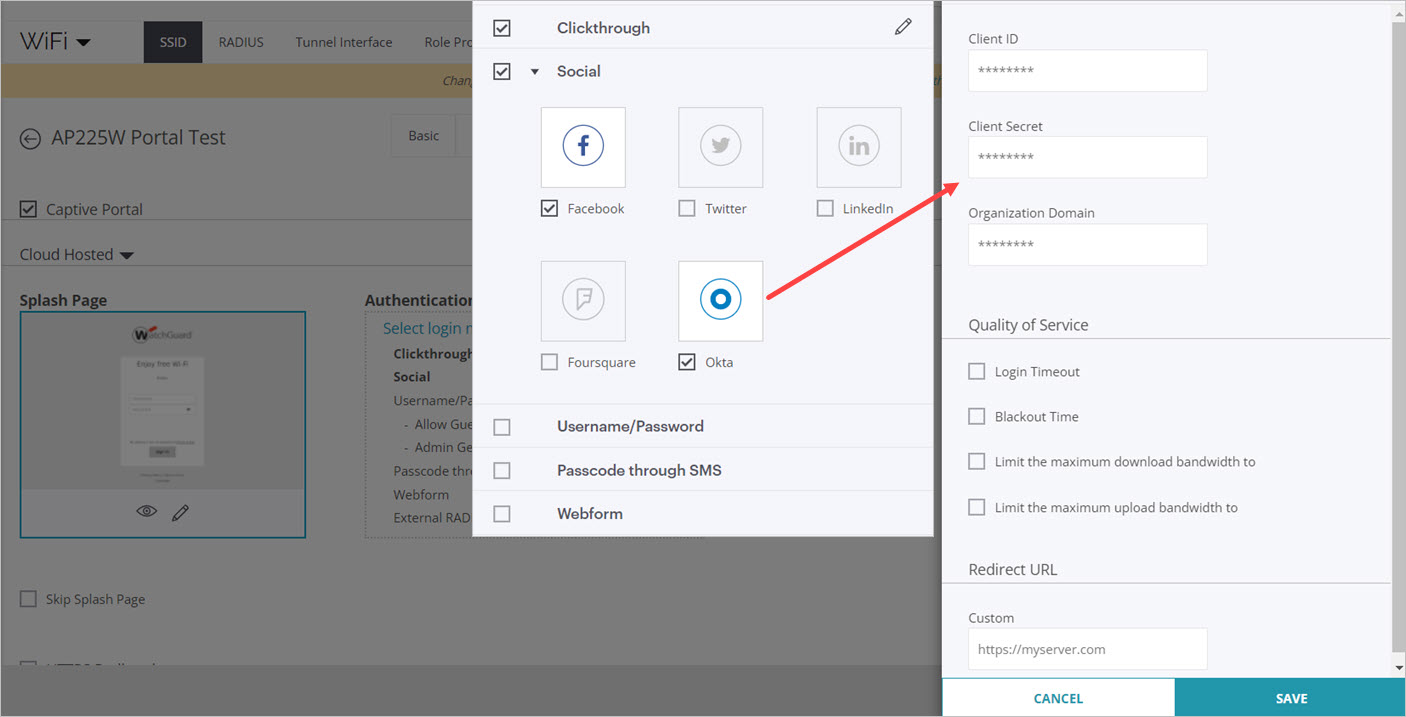
To configure the Okta plug-in in Analyze, add the Client ID, Client Secret, and Org Domain (Organization Domain) to the Okta plug-in configuration for your portal. For more information, see Configure Portal Social Media Plug-Ins.
To configure the Okta plug-in in Discover, add the Client ID, Client Secret, and Org Domain (Organization Domain) to the Okta plug-in configuration for your portal in the Captive Portal section of an SSID. For more information, see Configure SSID Settings.
Make sure the security mode for your SSID with the captive portal enabled is set to Open or WPA2-PSK to work correctly with Okta.