Some of the features described in this topic are only available to participants in the WatchGuard Cloud Beta program. If a feature described in this topic is not available in your version of WatchGuard Cloud, it is a beta-only feature.
To simplify the log in process for users, you can configure Security Assertion Markup Language (SAML) single sign-on (SSO). SAML 2.0 is a standard that specifies how a Service Provider (SP) and an Identity Provider (IdP) exchange user identity information.
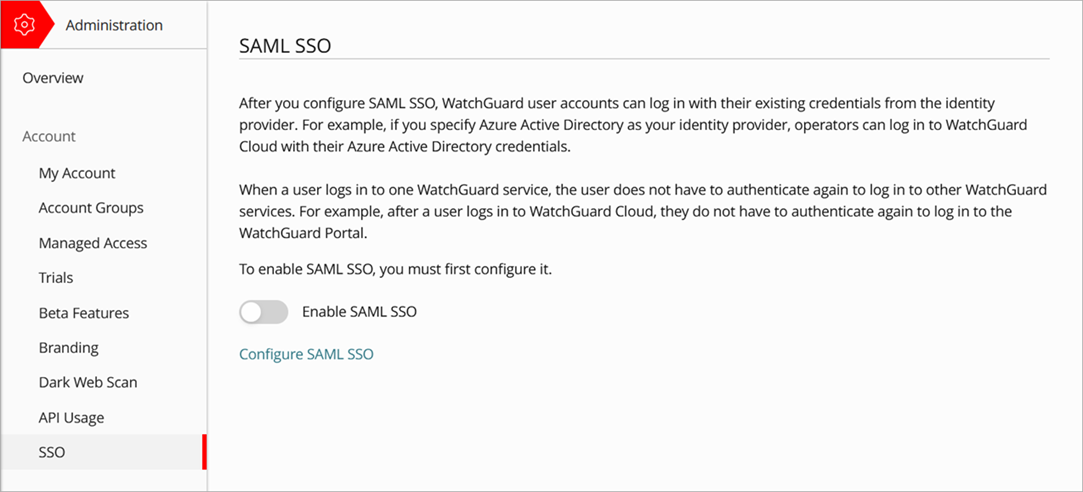
After you configure SAML SSO, WatchGuard user accounts can log in with their existing credentials from the identity provider. For example, if you specify Azure Active Directory as your identity provider, operators can log in to WatchGuard Cloud with their Azure Active Directory credentials.
When a user logs in to one WatchGuard service, the user does not have to authenticate again to log in to other WatchGuard services. For example, after a user logs in to WatchGuard Cloud, they do not have to authenticate again to log in to the WatchGuard website.
You must log in directly to WatchGuard services. SAML SSO for WatchGuard accounts does not support identity provider login.
When you configure SAML SSO for your WatchGuard account, users can either log in with SSO or with their WatchGuard credentials. We recommend users log in with SSO so they do not have to re-authenticate after their initial login.
Before You Begin
Before you start the configuration wizard, you must have:
- Fully configured IDP with SAML SSO enabled
- SAML metadata URL or a local metadata file from your identity provider
- SAML entity ID
- Single sign-on URL
- Single logout URL
- X.509 certificate
- Contact information for your support team
Configure SSO for Your WatchGuard Accounts
To set up SAML single sign-on for your WatchGuard accounts, you use the WatchGuard Account SSO Configuration Wizard. Before you complete these steps, you must configure SSO for your identity provider. To complete the steps in this procedure, you need the metadata file from your identity provider.
If your identity provider requires metadata from WatchGuard, this information is available in the upper section of every page in the SSO Configuration Wizard.
Your operator role determines what you can see and do in WatchGuard Cloud. You must have the Owner or Administrator role to view or configure this feature. For more information, go to Manage WatchGuard Cloud Operators and Roles.
To configure SSO for your WatchGuard accounts:
- Log in to WatchGuard Cloud.
- Select Administration > SSO.
The SAML SSO page opens.
- Click Configure SAML SSO.
The WatchGuard Account SSO Configuration Wizard opens.
The WatchGuard Service Provider SAML Metadata URL is provided on every page of the SSO Configuration Wizard. Provide this URL to your identity provider administrator.

-
You must provide SAML metadata from your Identity Provider. You can provide a URL or upload a local file. We recommend that you provide a URL to import the metadata.
-
To import the SAML metadata with a URL, enter the URL for your identity provider metadata file in the Metadata URL text box.
-
To upload a local metadata file, click Select a Metadata File and select the metadata file from your local files.
-
- Click Next.
The SAML Configuration page opens.
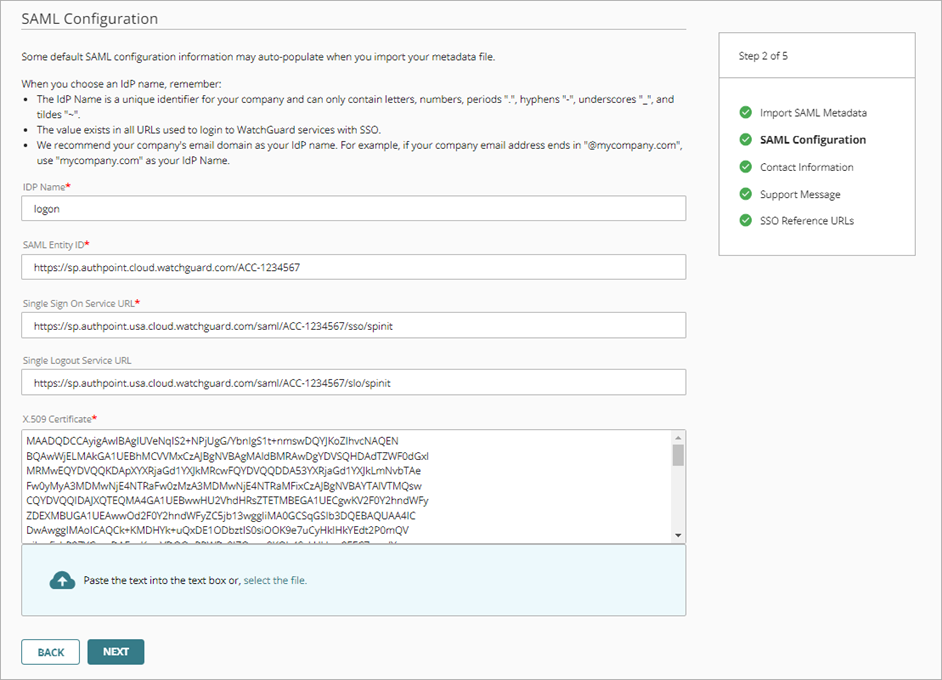
Some default SAML configuration information auto-populates when you import your metadata file.
- In the IdP Name text box, enter a unique identifier for your company. This value can only contain letters, numbers, periods, hyphens, underscores, and tildes.
We recommend that you use your company email domain as your IdP name. For example, if your company email address ends in @mycompany.com, you would use mycompany.com as your IdP Name.
- Enter the SAML Entity ID. You can find this value in your identity provider metadata file.
- Enter the Single Sign-on Service URL. You can find this value in your identity provider metadata file.
- Enter your Single Log out Service URL. You can find this value in your identity provider metadata file.
- In the X.509 Certificate text box, copy and paste the X.509 certificate value from your identity provider metadata file or click Select the File and upload your certificate.
When the metadata file you upload on the SAML Configuration page includes a certificate, the X.509 Certificate text box automatically populates. Make sure that the certificate in the X.509 Certificate text box is correct.
- Click Next.
The Contact Information page opens.

- (Optional) You can specify a technical contact. If there are issues related to SSO, WatchGuard uses the information provided to contact your organization. Enter this information in the corresponding text boxes of the Contact Information page:
- Email address of the contact.
- First name or given name of the contact.
- Last name or surname of the contact.
- Phone number of the contact. This value can contain only numbers.
- Click Next.
The Support Message page opens.
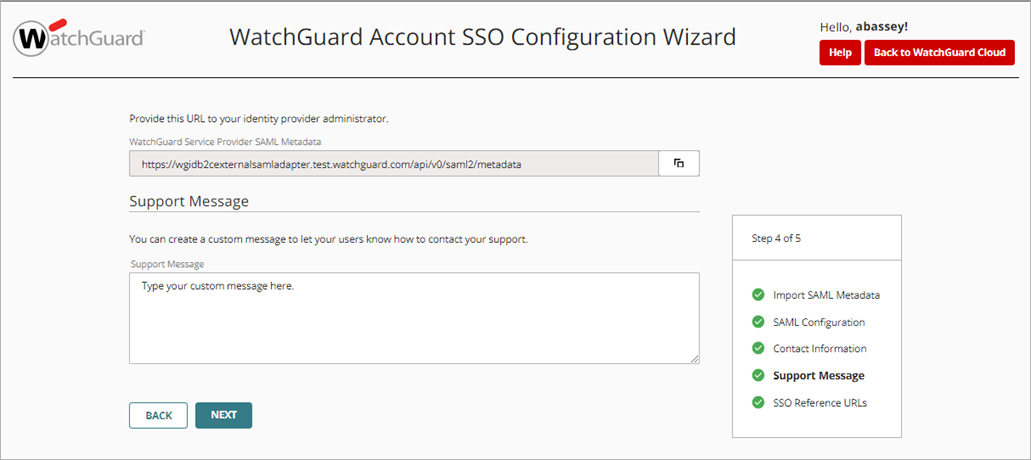
- In the Support Message text box, enter a custom message that users receive when there is an error. The custom message lets your users know how to contact your support team in case of issues with SSO.
- Click Next.
The SSO Reference URLs page opens.
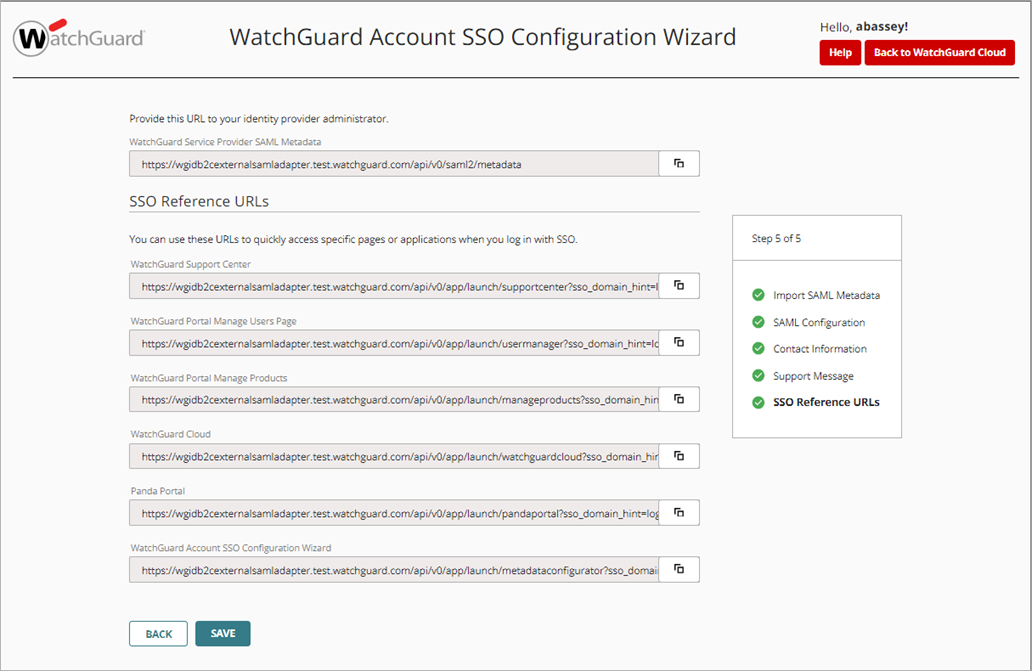
The SSO Reference URLs page provides you with several URLs unique to your company. These are direct links to the SSO log in page for each product. The URLs are for your information, and are not editable.
- Bookmark the reference URLs or add them to your favorites.
- Click Save to complete the WatchGuard Account SSO Configuration Wizard.
- Click Back to WatchGuard Cloud.
After you configure SAML SSO for your account, login with SAML SSO is enabled for each account operator.
Log In with SSO
After you configure SAML SSO, operators, can use the same set of credentials to log in to the WatchGuard Support Center and WatchGuard Cloud. To log in with SSO, on the log in page select Log in with SSO.
For example:
- Go www.watchguard.com and click Log In.
The login page opens.

- Select Log in with SSO.
The SSO login page opens.

- Enter your IdP name in the text box. This is the value you specified when you configured SSO in the previous section.
- Click Log In to go to the single sign-on page for your organization.
Control How Operators Log In to WatchGuard Cloud
WatchGuard Account SSO Integration with AuthPoint
WatchGuard Account SSO Integration with Okta
WatchGuard Account SSO Integration with Azure Active Directory
WatchGuard Account SSO Integration with Duo and AuthPoint
WatchGuard Account SSO Integration with Duo and Active Directory