If you are new to WatchGuard and want to activate a product, you must first create an account.
When you create your account, you also create your WatchGuard Cloud account and select your cloud data storage region. For more information, go to About the WatchGuard Cloud User Interface.
You can create an account from the WatchGuard login page.
To create a WatchGuard.com account:
- Go to https://login.watchguard.com.
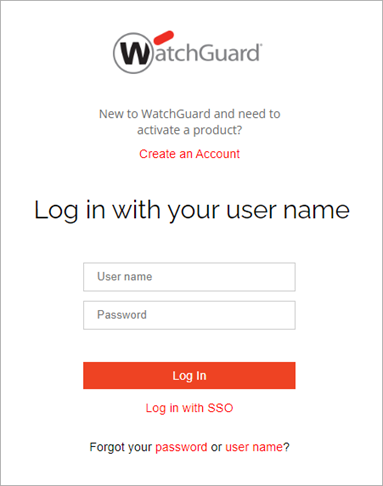
- Click Create an Account.
The Create Account page opens.
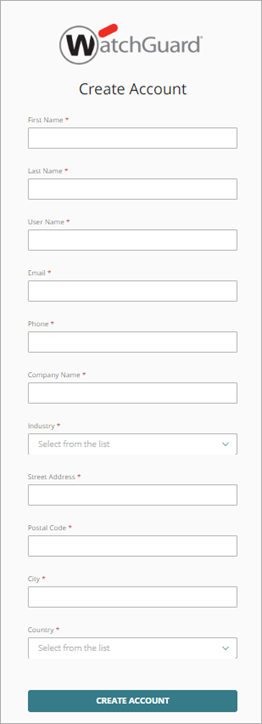
- Specify a First Name and Last Name for your account.
- In the User Name text box, type the name you want to use to log in. You cannot edit this later. The User Name can include only these characters:
- Alphanumeric characters (without accent marks)
- Other characters: underscore (_), plus (+), minus (-), and dot (.)
- In the Email text box, type your email address. To complete account setup, you must be able to receive the invitation email at this address.
- Specify a Phone number.
- In the Company Name text box, type the name of your company.
- From the Industry drop-down list, select the industry for your company.
- In the Street Address, Postal Code, and City text boxes, type your company address.
- From the Country drop-down list, select your country.
- If applicable, from the State/Province/Region drop-down list, select your company location.
- Click Create Account.
A confirmation page opens and you should receive an email confirmation from WatchGuard. From the email message, you can verify your email address and create a password.
If you do not receive an email message, make sure the user name you entered is correct. If you forgot your user name, you can click user name in the login page. For more information, go to Retrieve Your WatchGuard User Name.
- When you receive the WatchGuard New User Account Set Password confirmation email message, click Set Password.
The Enter a New Password page opens. - In the Password text box, type a secure password. Your password must include:
- At least 12 characters and a lowercase letter, uppercase letter, number, and symbol. Do not use <, >, emojis, or spaces.
- A unique pattern. For example, do not use 123456 or password.
- In the Confirm Password text box, type the password again.
- Click Save Password.
The Select Cloud Data Storage Region page opens.
To protect your account from known threats, WatchGuard checks passwords against databases of compromised passwords.
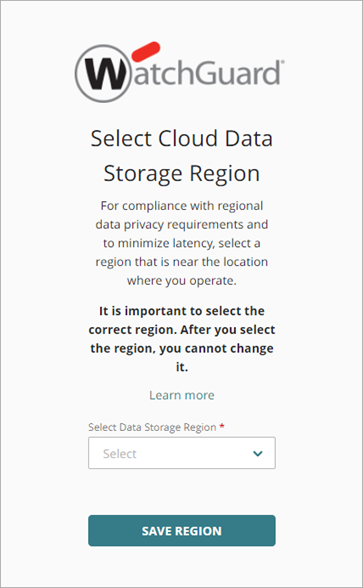
- From the Select Data Storage Region drop-down list, select a region that is near the location where you operate. This is the region used for your WatchGuard Cloud data storage for compliance with regional data privacy requirements and to minimize latency.
Caution: It is important to select the correct region. After you select the region, you cannot change it. For more information about how to select your storage region, go to Region Selection for Cloud Services (external) in the WatchGuard Knowledge Base.
- Click Save Region.
A confirmation page opens.
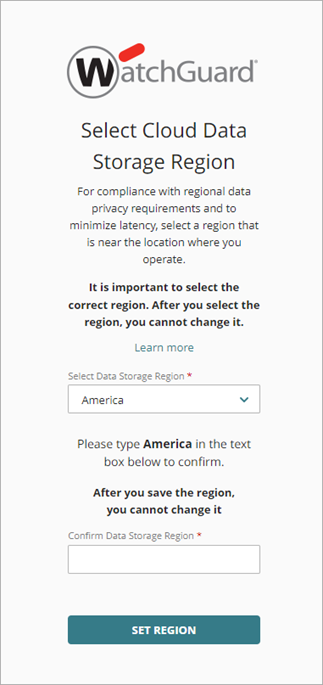
- In the Confirm Data Storage Region text box, type the region.
- Click Set Region.
- In the Congratulations! page, to log in, click Return to Login Page.
Manage Your WatchGuard Account
Retrieve Your WatchGuard User Name
Reset Your WatchGuard Password
About the WatchGuard Cloud User Interface