Use Mobile VPN with IPSec with Active Directory Groups
Many organizations want to allow different levels of access to internal network resources for different groups of remote users. To restrict network access for specific users or groups, you must first set up user authentication. You can then set up different Mobile VPN with IPSec profiles for each group of users. This example shows the steps to configure Mobile VPN with IPSec profiles for different groups that are defined on an Active Directory server.
At a high level, the steps are:
- Enable and configure Active Directory authentication.
- Create Mobile VPN with IPSec Group Profiles that match the user group names on your Active Directory server.
Example Scenario
To show how to set up this configuration, we use a school that wants to set different levels of web access for three groups:
- Students (more restricted access)
- Teachers (less restricted access)
- IT team members (unrestricted access)
Configure User Authentication
Before you configure Mobile VPN with IPSec profiles, you must set up user authentication. You can use any authentication method, such as Active Directory, local authentication, Radius, or LDAP. For more information about the supported authentication methods, go to Authentication Server Types. In this example, the school wants to use Active Directory authentication.
Enable Active Directory Authentication
You can use an Active Directory authentication server so that users can authenticate to your Firebox with their current network credentials. Before you configure your device to use Active Directory authentication, make sure your users can successfully authenticate to the Active Directory server.
When you enable Active Directory authentication, you must specify the search base. You set a search base to put limits on the directories on the authentication server that the Firebox uses to search for an authentication match. We recommend that you set the search base to the root of the domain. This enables you to find all users and all groups to which those users belong. The standard format for the search base setting is: ou=<name of organizational unit>,dc=<first part of the distinguished server name>,dc=<any part of the distinguished server name that appears after the dot>.
For more information about how to find your search base on the Active Directory server, go to Find Your Active Directory Search Base.
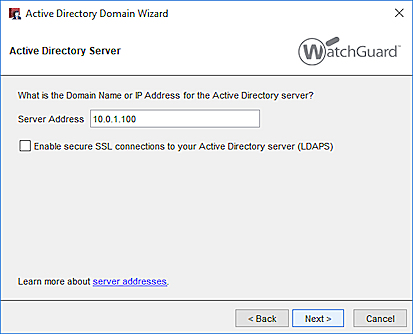
For this example, the school's Active Directory server uses the IP address 10.0.1.100.
- Select Authentication > Servers.
The Authentication Servers page appears. - Select Active Directory.
The Servers / Active Directory page appears. - Click Add.
In Fireware v12.3 or higher, the Active Directory Domain wizard page appears. - (Recommended) To use the wizard, click Next.
The Domain Name page appears. - In the Domain Name text box, type the domain name to use for this Active Directory server.
The domain name must include a domain suffix. For example, type example.com, not example.
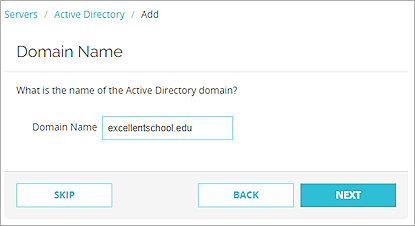
- Click Next.
- In the Server Address text box, type the IP address or domain name of the primary Active Directory server.
For this example, type 10.0.1.100.
The Active Directory server can be located on any Firebox interface. You can also configure the device to use an Active Directory server available through a VPN tunnel.
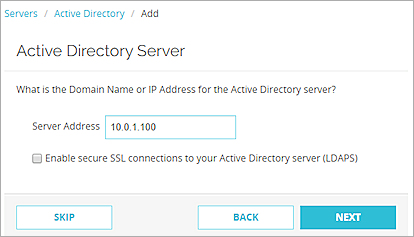
- Click Next.
The final page of the wizard appears with a summary of the settings. - Select Edit the Active Directory domain settings after you click Finish.
- Click Finish.
The Active Directory Server settings appear.
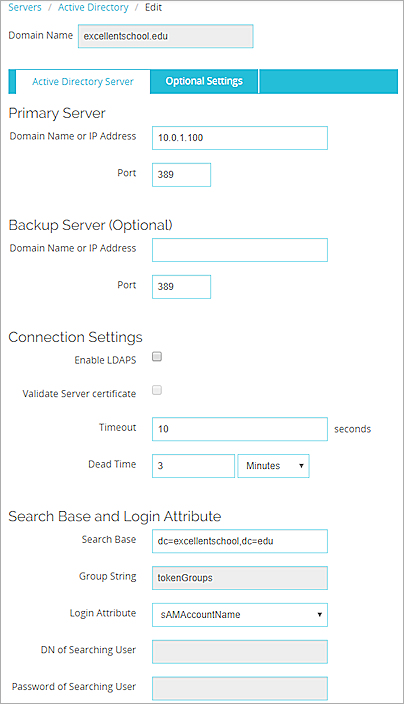
- In the Port text box, type or select the TCP port number used to connect to the Active Directory server. The default port number is 389.
If your Active Directory server is a global catalog server, it can be useful to change the default port. For more information, go to Change the Default Port for the Active Directory Server.
- (Optional) In the Backup Server section, specify the IP address or domain name of a backup server, and specify the port number.
- (Optional) To enable secure SSL connections to your Active Directory server, select the Enable LDAPS check box.
- If you selected Enable LDAPS, a dialog box appears that asks whether to use the default port 636. Select Yes or No.
- (Optional) To verify the certificate of the Active Directory server is valid, select the Validate Server certificate check box.
- In the Timeout text box, type or select the number of seconds the device waits for a response from the Active Directory server before it closes the connection and tries to connect again.
- In the Dead Time text box, type a time after which an inactive server is marked as active again.
To set the duration, select minutes or hours from the adjacent drop-down list.
After an authentication server has not responded for a period of time, it is marked as inactive. Additional authentication attempts do not use this server until it is marked as active again.
- In the Search Base text box, type the location in the directory to begin the search in the format:
ou=<name of organizational unit>,dc=<first part of the distinguished server name>,dc=<any part of the distinguished server name that appears after the dot>.
For this example, the root domain name in the Active Directory database is excellentschool.edu, so for the search base, type dc=excellentschool,dc=edu.
- In the Group String text box, type the attribute string that is used to hold user group information on the Active Directory server. If you have not changed your Active Directory schema, the group string is always tokenGroups.
- In the Login Attribute text box, type an Active Directory login attribute to use for authentication. The login attribute is the name used to connect to the Active Directory database. The default login attribute is sAMAccountName. If you use sAMAccountName, you can leave the DN of Searching User field and the Password of Searching User empty.
- In the DN of Searching User text box, type the distinguished name (DN) for a search operation.
It is not necessary to enter anything in this text box if you keep the login attribute of sAMAccountName. If you change the login attribute, you must add a value in the DN of Searching User text box. You can use any user DN with the privilege to search LDAP/Active Directory, such as Administrator. However, a weaker user DN with only the privilege to search is usually sufficient.
- In the Password of Searching User text box, type the password associated with the distinguished name for a search operation.
- Click Save.
- Click
 .
.
Or, select Setup > Authentication > Authentication Servers.
The Authentication Servers dialog box appears. - Select the Active Directory tab.
The Active Directory settings appear. - Click Add.
In Fireware v12.3 or higher, the Active Directory Domain wizard page appears. - (Recommended) To use the wizard, click Next.
The Domain Name page appears. - In the Domain Name text box, type the domain name to use for this Active Directory server.
The domain name must include a domain suffix. For example, type example.com, not example.
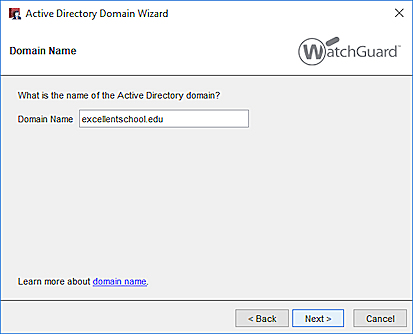
- Click Next.
The Server Address dialog box appears. - In the Server Address text box, type the IP address or domain name of the primary Active Directory server.
For this example, type 10.0.1.100.
The Active Directory server can be located on any Firebox interface. You can also configure the device to use an Active Directory server available through a VPN tunnel.
- Click Next.
The final page of the wizard appears with a summary of the settings. - Select Edit the Active Directory domain settings after you click Finish.
- Click Finish.
The Edit Active Directory Domain settings appear. - Click the IP address or DNS name.
- Click Add.
- In the Port text box, type or select the TCP port number used to connect to the Active Directory server. The default port number is 389.
If your Active Directory server is a global catalog server, it can be useful to change the default port. For more information, go to Change the Default Port for the Active Directory Server.
- Click OK.
- In the Timeout text box, type or select the number of seconds the device waits for a response from the Active Directory server before it closes the connection and tries to connect again.
- In the Dead Time text box, type a time after which an inactive server is marked as active again.
To set the duration, select minutes or hours from the adjacent drop-down list.
After an authentication server has not responded for a period of time, it is marked as inactive. Additional authentication attempts do not use this server until it is marked as active again. - In the Search Base text box, type the location in the directory to begin the search in the format:
ou=<name of organizational unit>,dc=<first part of the distinguished server name>,dc=<any part of the distinguished server name that appears after the dot>.
For this example, the root domain name in the Active Directory database is excellentschool.edu, so for the search base, type dc=excellentschool,dc=edu.
- In the Group String text box, type the attribute string that is used to hold user group information on the Active Directory server. If you have not changed your Active Directory schema, the group string is always memberOf.
- In the Login Attribute text box, type an Active Directory login attribute to use for authentication.
The login attribute is the name used to connect to the Active Directory database. The default login attribute is sAMAccountName. If you use sAMAccountName, you can leave the DN of Searching User field and the Password of Searching User empty. - In the DN of Searching User text box, type the distinguished name (DN) for a search operation.
It is not necessary to enter anything in this text box if you keep the login attribute of sAMAccountName. If you change the login attribute, you must add a value in the DN of Searching User text box. You can use any user DN with the privilege to search LDAP/Active Directory, such as Administrator. However, a weaker user DN with only the privilege to search is usually sufficient.
- In the Password of Searching User text box, type the password associated with the distinguished name for a search operation.
- (Optional) To enable secure SSL connections to your Active Directory server, select the Enable LDAPS check box.
- If you selected Enable LDAPS, a dialog box appears that asks whether to use the default port 636. Select Yes or No.
- (Optional) To verify the certificate of the Active Directory server is valid, select the Validate Server certificate check box.
- Click OK.
- Save the Configuration File.
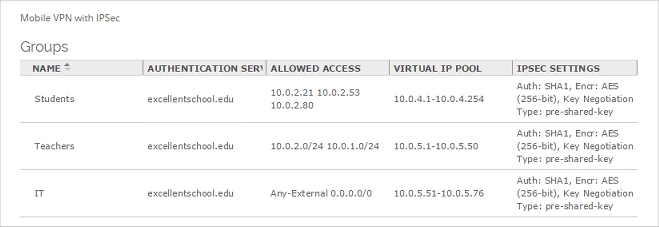
Create a Group Profile for the Students
The school only wants the students to have access to the internal DNS, FTP, and web servers.
- (Fireware v12.3 or higher) Select VPN > Mobile VPN.
- In the IPSec section, select Configure.
The Mobile VPN with IPSec page appears. - (Fireware v12.2.1 or lower) Select VPN > Mobile VPN with IPSec.
The Mobile VPN with IPSec page appears. - Click Add.
The Mobile VPN with IPSec / Add page appears.
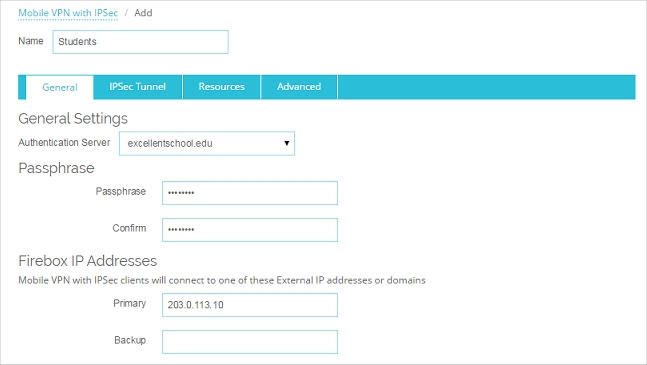
- In the Name text box, type the name of the user group.
For this example, because the students are in the Students Active Directory group, type Students. - In the Passphrase and Confirm text boxes, type the passphrase to use to encrypt the Mobile VPN profile you distribute to users in this group. This passphrase is also used to encrypt the exported certificate file you send to the students.
- From the Authentication Server drop-down list, select the Active Directory domain for this user group.
For this example, select excellentschool.edu. - In the Primary text box, type the primary external IP address to which Mobile VPN users in this group can connect. This can be an external IP address, secondary external IP address, or external VLAN. For a device in drop-in mode, use the IP address assigned to all interfaces.
- Select the Resources tab.
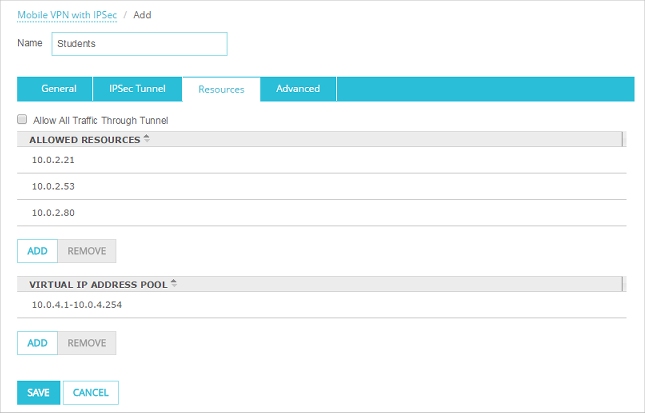
- Make sure the Allow All Traffic Through Tunnel check box is not selected.
This option causes the VPN client to route all traffic from the client computer to the Internet through the VPN. In this example, because the school allows students very limited access to resources on this network through the VPN tunnel, they do not have a reason to route traffic that is not for their network through the VPN tunnel. - To add the IP addresses of the resources that students can get access to through the tunnel, below the Allowed Resources list, click Add.
The school only wants the students to have access to the internal DNS, FTP, and web servers. For this example, add the three Host IPv4 addresses 10.0.2.21, 10.0.2.53, and 10.0.2.80.
- To add an IPv4 host range of IP addresses for student connections, below the Virtual IP Address Pool list, click Add.
For this example, add the IP address range 10.0.4.1 - 10.0.4.254 to the virtual IP address pool. This enables the device to support over 200 simultaneous VPN client connections from students.
Mobile VPN users are assigned an IP address from the virtual IP address pool when they connect to your network. The number of IP addresses in the virtual IP address pool should be the same as the number of Mobile VPN users.
WARNING: The virtual IP addresses must be on a different subnet than the local networks. The virtual IP addresses cannot be used for anything else on your network.
- Click Save.
- Select VPN > Mobile VPN > IPSec.
The Mobile VPN with IPSec Configuration dialog box appears. - Click Add.
The Add Mobile VPN with IPSec Wizard appears. - Click Next.
The Select a user authentication server page appears.
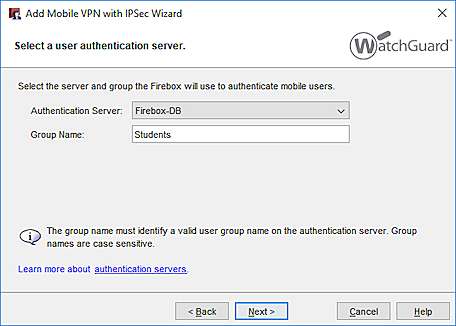
- From the Authentication Server drop-down list, select the Active Directory domain for this user group.
- In the Group Name text box, type the name of the user group.
For this example, because the students are in the Students Active Directory group, type Students. - Click Next.
The Select a tunnel authentication method page appears.
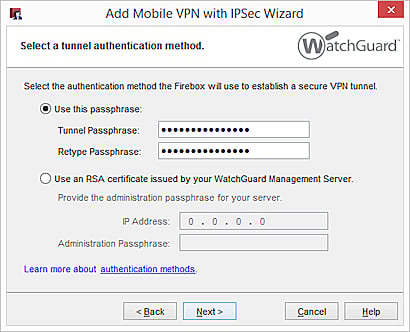
- Select an option for tunnel authentication:
- Use this passphrase
Type and confirm a passphrase for this tunnel. - Use an RSA certificate issued by your WatchGuard Management Server
Type the IP Address of your Management Server and the Administration Passphrase.
- Use this passphrase
- Click Next.
The Direct the flow of Internet traffic page appears.
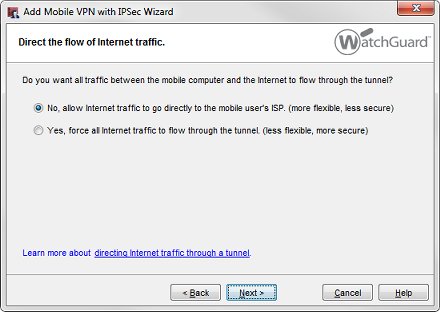
- Select an option for Internet traffic:
- No, allow Internet traffic to go directly to the mobile user's ISP.
(Split tunneling) - Yes, force all Internet traffic to flow through the tunnel.
(Default-route VPN)
- No, allow Internet traffic to go directly to the mobile user's ISP.
For the Students profile, choose the option that starts with No. In this example, because the school allows students very limited access to resources on this network through the VPN tunnel, they do not have a reason to route traffic from student computers to the Internet through the VPN tunnel.
- Click Next.
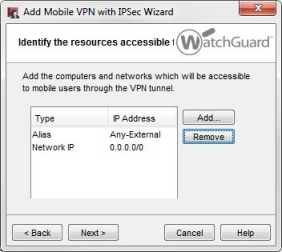
The Identify the resources accessible through the tunnel screen appears.
The school only wants the students to have access to the internal DNS, FTP, and web servers. For this example, add the IP addresses 10.0.2.21, 10.0.2.53, and 10.0.2.80.
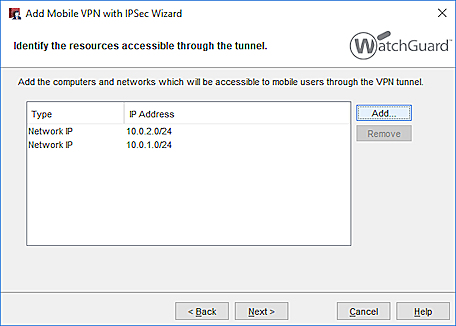
- To specify the host or network IP addresses that students can connect to through the VPN tunnel, click Add.
- Click Next.
The Create the virtual IP address pool page appears.
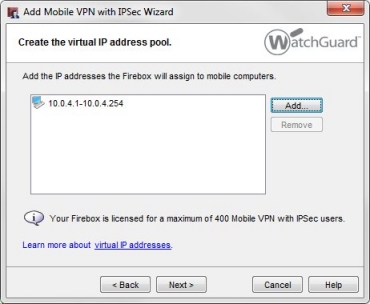
- To add one IP address or an IP address range, click Add.
For this example, add the IP address range 10.0.4.1 - 10.0.4.254 to the virtual IP address pool. This enables the device to support over 200 simultaneous VPN client connections from students.
Mobile VPN users are assigned an IP address from the virtual IP address pool when they connect to your network. The number of IP addresses in the virtual IP address pool should be the same as the number of Mobile VPN users.
WARNING: The virtual IP addresses must be on a different subnet than the local networks. The virtual IP addresses cannot be used for anything else on your network.
- Click Next.
The Add Mobile VPN with IPSec Wizard has completed successfully page appears. The Mobile VPN with IPSec group end-user configuration file is available at the location specified on this page. - Click Finish.
Create a Group Profile for the Teachers
The Teachers group needs to have access to both the trusted and optional networks.
- (Fireware v12.3 or higher) Select VPN > Mobile VPN.
- In the IPSec section, select Configure.
The Mobile VPN with IPSec page appears. - (Fireware v12.2.1 or lower) Select VPN > Mobile VPN with IPSec.
The Mobile VPN with IPSec page appears. - Click Add.
The Mobile VPN with IPSec / Add page appears. - In the Name text box, type the name of the user group.
For this example, because teachers are in the Teachers Active Directory group, type Teachers. - In the Passphrase and Confirm text boxes, type the passphrase to use to encrypt the Mobile VPN profile you distribute to users in this group. This passphrase is also used to encrypt the exported certificate file you send to the teachers.
- From the Authentication Server drop-down list, select the Active Directory domain for this user group.
For this example, select excellentschool.edu. - In the Primary text box, type the primary external IP address to which Mobile VPN users in this group can connect. This can be an external IP address, secondary external IP address, or external VLAN. For a device is drop-in mode, use the IP address assigned to all interfaces.
- Select the Resources tab.

- Make sure the Allow All Traffic Through Tunnel check box is not selected.
This option causes the VPN client to route all traffic from the client computer to the Internet through the VPN. Traffic from the Teachers group to resources on your network is routed through the tunnel. Teachers can continue to use their home Internet connection for traffic to locations that are not on the private network. - To add the IP addresses of the resources teachers can get access to through the tunnel, below the Allowed Resources list, click Add.
The Teachers group needs to have access to both the trusted and optional networks. To enable access to these networks, add the network IP addresses of those two networks. For this example, add these network IP addresses:
10.0.2.0/24 and 10.0.1.0/24.
- To add an IPv4 host range of IP addresses for teacher connections, below the Virtual IP Address Pool list, click Add
At this school, 50 IP addresses are enough for the Teachers group. For this example, add the IP address range 10.0.5.1 - 10.0.5.50 to the virtual IP address pool.
- Click Save.
- Select VPN > Mobile VPN > IPSec.
The Mobile VPN with IPSec Configuration dialog box appears. - Click Add.
The Add Mobile VPN with IPSec Wizard appears. - Click Next.
The Select a user authentication server page appears.

- From the Authentication Server drop-down list, select the Active Directory domain for this user group.
- In the Group Name text box, type the name of the Teachers group.
For this example, because the teachers are in the Teachers Active Directory group, type Teachers. - Click Next.
The Select a tunnel authentication method page appears.
- Select an option for tunnel authentication:
- Use this passphrase
Type and confirm a passphrase for this tunnel. - Use an RSA certificate issued by your WatchGuard Management Server
Type the IP Address of your Management Server and the Administration Passphrase.
- Use this passphrase
- Click Next.
The Direct the flow of Internet traffic page appears.
- Select an option for Internet traffic:
- No, allow Internet traffic to go directly to the mobile user's ISP.
(Split tunneling) - Yes, force all Internet traffic to flow through the tunnel.
(Default-route VPN)
- No, allow Internet traffic to go directly to the mobile user's ISP.
For the Teachers profile, choose the option that starts with No. Traffic from the Teachers group to resources on your network is routed through the tunnel. Teachers can continue to use their home Internet connections for traffic to locations that are not on your private network.
- Click Next.
The Identify the resources accessible through the tunnel page appears.

- To specify the host or network IP addresses that teachers can connect to through the VPN tunnel, click Add .
Because the Teachers group must have access to both the trusted and optional networks, we add the network IP addresses of those two networks. For this example, add the network IP addresses 10.0.2.0/24 and 10.0.1.0/24.
- Click Next.
The Create the virtual IP address pool page appears. For this example, we assume that 50 host IP addresses are enough for the Teachers group.

- Click Add to add one IP address or an IP address range.
At this school, 50 IP addresses are enough for the Teachers group. For this example, add the IP address range 10.0.5.1 - 10.0.5.50 to the virtual IP address pool.
- Click Next.
The Add Mobile VPN with IPSec Wizard has completed successfully page appears. The Mobile VPN with IPSec group end-user configuration file is available at the location specified on this screen. - Click Finish.
Create a Group Profile for the IT Group
The IT group has unlimited access to the network, and also needs to connect to several sites which connect to the network by Branch Office VPN tunnels.
- (Fireware v12.3 or higher) Select VPN > Mobile VPN.
- In the IPSec section, select Configure.
The Mobile VPN with IPSec page appears. - (Fireware v12.2.1 or lower) Select VPN > Mobile VPN with IPSec.
The Mobile VPN with IPSec page appears. - Click Add.
The Mobile VPN with IPSec / Add page appears. - In the Name text box, type the name of the user group.
For this example, because the IT members are in the IT Active Directory group, type IT. - From the Authentication Server drop-down list, select the Active Directory domain for this user group.
For this example, select excellentschool.edu. - In the Passphrase and Confirm text boxes, type the passphrase to use to encrypt the Mobile VPN profile you distribute to users in this group. This passphrase is also used to encrypt the exported certificate file you send to the IT group.
- In the Primary text box, type the primary external IP address to which Mobile VPN users in this group can connect. This can be an external IP address, secondary external IP address, or external VLAN. For a device is drop-in mode, use the IP address assigned to all interfaces.
- Select the Resources tab.
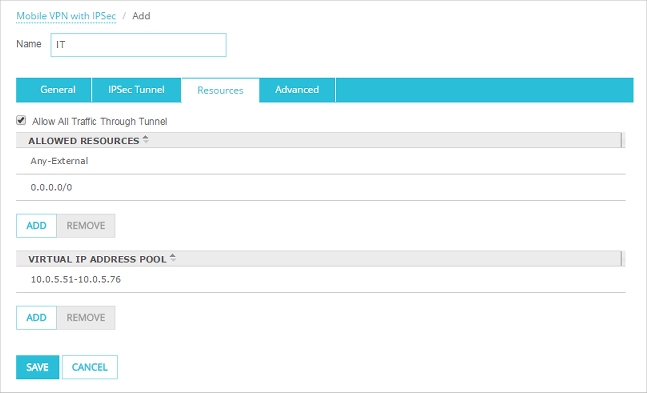
- Select the Allow All Traffic Through Tunnel check box.
When you select this option, the Allowed Resources list automatically includes all network resources.
The IT group has unlimited access to the network, and also needs to connect to several sites which connect to the network by Branch Office VPN tunnels. This setting also means that connections from users in the IT group connect to Internet hosts that use the same Internet connection as the local users on the network. This can be useful for network troubleshooting.
- To add an IPv4 host range of IP addresses for IT member connections, below the Virtual IP Address Pool list, click Add.
At this school, the IT group needs only 25 virtual IP addresses. For this example, add the IP address range 10.0.5.51 - 10.0.5.76 to the virtual IP address pool.
- Click Save.
The IT group configuration is added.
- Select VPN > Mobile VPN > IPSec.
The Mobile VPN with IPSec Configuration dialog box appears. - Click Add.
The Add Mobile VPN with IPSec Wizard appears. - Click Next.
The Select a user authentication server page appears.
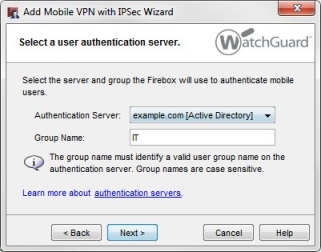
- From the Authentication Server drop-down list, select the Active Directory domain for this user group.
For this example, because the IT team is in the IT Active Directory group, type IT. - In the Group Name text box, type the name of the IT Group.
- Click Next.
The Select a tunnel authentication method page appears.
- Select an option for tunnel authentication:
- Use this passphrase
Type and confirm a passphrase for this tunnel. - Use an RSA certificate issued by your WatchGuard Management Server
Type the IP Address of your Management Server and the Administration Passphrase.
- Use this passphrase
- Click Next.
The Direct the flow of Internet traffic page appears.
- Select an option for Internet traffic:
- No, allow Internet traffic to go directly to the mobile user's ISP.
(Split tunneling) - Yes, force all Internet traffic to flow through the tunnel.
(Default-route VPN)
- No, allow Internet traffic to go directly to the mobile user's ISP.
For the IT profile, choose the option that starts with Yes. The IT group has unlimited access to the network, and also needs to connect to several sites which connect to the network by Branch Office VPN tunnels. With this setting, connections from users in the IT group that connect to Internet hosts use the same Internet connection as the local users on the network. This can be useful for network troubleshooting
- Click Next.
The Identify the resources accessible through the tunnel page appears. Because you selected Yes, force all Internet traffic to flow through the tunnel in the previous step, you do not have to change the configuration settings on this page.
- Click Next.
The Create the virtual IP address pool page appears.
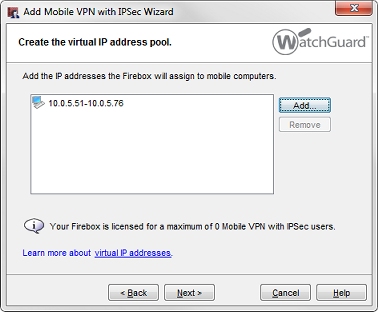
- To add one IP address or an IP address range, click Add.
For this example, because the IT group needs only 25 virtual IP addresses, we specify this range of addresses: 10.0.5.51 - 10.0.5.76. - Click Next.
The Add Mobile VPN with IPSec Wizard has completed successfully page appears. The Mobile VPN with IPSec group end-user configuration file is available at the location specified on this screen. - Click Finish.
- Save the configuration to the Firebox.
Summary
The VPN profiles described in this example enable students, teachers, and IT team members to use the Mobile VPN with IPSec client to authenticate to the Active Directory server and connect to different resources on the school network. The IT team is set up with a default-route VPN. The teachers and students are set up with a split tunnel VPN. For more information about these two options, go to Internet Access Options for Mobile VPN Users.
The administrator can now distribute the end-user configuration files to the students, teachers, and IT team members, along with the VPN client. If the configuration uses a tunnel passphrase, the users must also know the tunnel passphrase to install the end-user profile in the WatchGuard IPSec Mobile VPN client. To start a VPN connection, each user must specify their credentials as they are defined on the Active Directory server.
For more information about client setup go to Install the IPSec Mobile VPN Client Software.