Applies To: Locally-managed Fireboxes
You can configure the proxy policies and subscription services in your Firebox Cloud configuration file to protect a web server on the virtual network connected to your Firebox Cloud instance.
For more information about Firebox Cloud features, go to:
Step 1 — Launch an Instance of Firebox Cloud
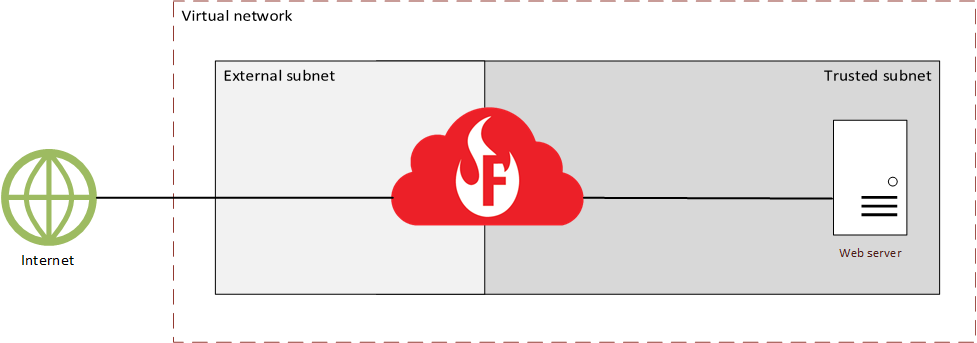
To protect a web server with Firebox Cloud, you must launch an instance of Firebox Cloud in the same virtual network as the web server you want to protect. You must assign a public IP address to eth0 of the Firebox Cloud instance. This is the public IP address of Firebox Cloud. The web server to protect must be on the private subnet of the virtual network where you deploy the instance of Firebox Cloud.
For detailed steps to launch and configure a Firebox Cloud instance on AWS or Azure, go to:
https://<eth0_public_IP>:8080
After you have connected to Fireware Web UI for your instance of Firebox Cloud, you can configure your Firebox Cloud.
Step 2 — Add A Static NAT Action
Add a static NAT action for traffic from the external interface to the internal IP address of the web server. You can then use the static NAT action in policies that allow traffic to your web server.
To add a static NAT action, from Fireware Web UI:
- Select Firewall > SNAT.
- Add a static NAT action that allows traffic from the external interface to the private IP address of the web server. In Fireware v12.2 or higher, you can also specify an FQDN in the static NAT action.
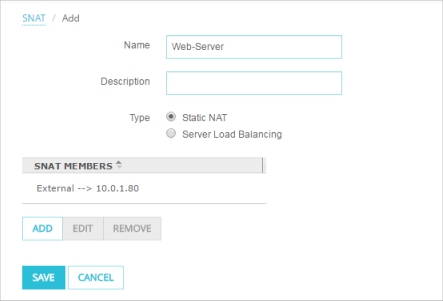
- Click Save.
Step 3 — Add HTTP and HTTPS Proxy Policies
After you add the static NAT action, to allow HTTP and HTTPS traffic to the web server, you can add proxy policies that use the new static NAT action. You also clone the predefined proxy actions for each policy and create user-defined proxy actions that you can edit.
Add an HTTP-Proxy Policy
To allow HTTP traffic through Firebox Cloud to the web server over port 80, you must add an HTTP-proxy policy to the Firebox Cloud configuration.
To add the HTTP-Proxy policy, from Fireware Web UI:
- Select Firewall > Firewall Policies.
- Click Add Policy.
- Select Proxies.
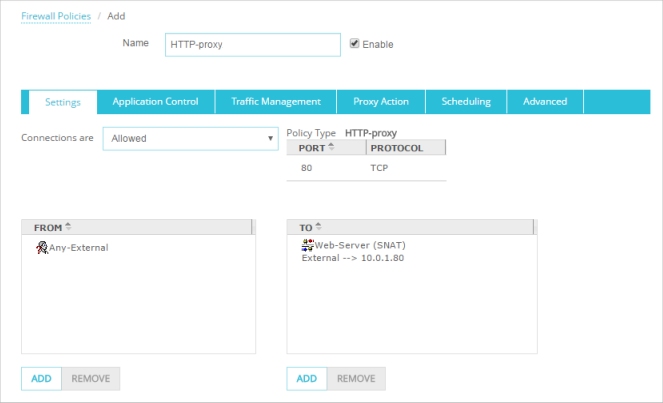
- Select the HTTP-proxy and the HTTP-Server.Standard proxy action.
- Click Add Policy.
By default, the policy allows traffic from Any-External to Any-Trusted. - From the policy To list, remove Any-Trusted, then click Add.
- From the Member type drop-down list, select Static NAT and select the static NAT action you added. Click OK.
The static NAT action is added to the policy.
To select a user-defined proxy action for HTTP traffic:
- Select the Proxy Action tab.
- From the Proxy Action drop-down list, select Clone the current proxy action.
A user-defined proxy action based on the predefined proxy action is created and assigned to the policy. The cloned proxy action has a number appended to the name. For example, HTTP-Server.Standard.1. - Click Save.
Add an HTTPS-Proxy Policy
To allow secure web traffic (HTTPS) to your web server, you must also add an HTTPS-proxy policy that allows HTTPS connections to the server over port 443. In the proxy configuration, you clone the predefined HTTPS proxy action and enable inspection of HTTPS content.
To add the HTTPS-proxy policy, from Fireware Web UI:
- Select Firewall > Firewall Policies.
- Click Add Policy.
- Select Proxies.
- Select the HTTPS-proxy and the HTTPS-Server.Standard proxy action.
- Click Add Policy.
By default, the policy allows traffic from Any-External to Any-Trusted. - From the To list, remove Any-Trusted, then click Add.
- From the Member type drop-down list, select Static NAT and select the static NAT action you added. Click OK.
The static NAT action is added to the policy.
To select a user-defined proxy action and enable inspection of HTTPS content:
- Select the Proxy Action tab.
- From the Proxy Action drop-down list, select Clone the current proxy action.
A user-defined proxy action based on the predefined proxy action is created and assigned to the policy. The cloned proxy action has a number appended to the name. For example, HTTPS-Server.Standard.1.
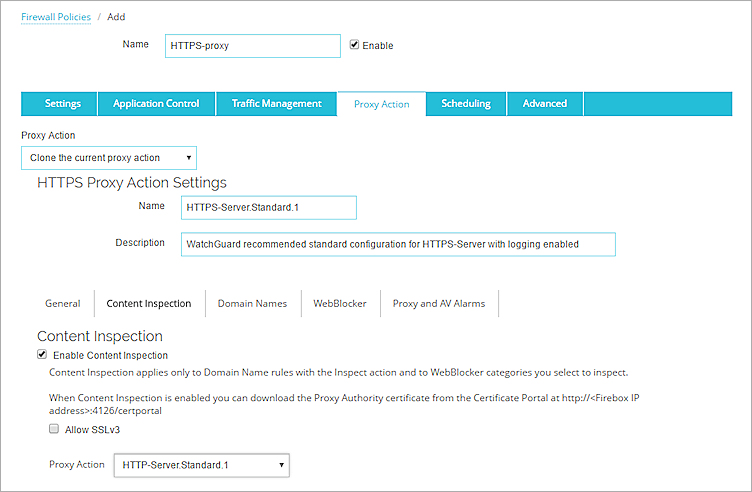
- In the HTTPS Proxy Action Settings section, select the Content Inspection tab.
- Select the Enable Content Inspection check box.
- From the Proxy Action drop-down list, select the user-defined HTTP proxy action you created when you cloned the HTTP proxy action in the HTTP-Proxy policy. For example, select HTTP-Server.Standard.1.
- Click Save.
Import a Proxy Server Certificate
If you enable inspection of HTTPS content, the HTTPS proxy intercepts the HTTPS request and starts a new connection to the destination HTTPS server on behalf of the client. The HTTPS proxy in your Firebox Cloud configuration sends a self-signed certificate to the client that originated the connection. To avoid certificate errors in the web browser for users that connect to the server with HTTPS, you must get the proxy server certificate and key pair from the web server and import it to Firebox Cloud as a proxy server certificate.
To import the certificate, from Fireware Web UI:
- Select System > Certificates.
- Select Import Certificate.
- For the Certificate Function, select Proxy Server.
- Import the certificate file from your web server.
- Save the configuration.
For more information, go to Manage Device Certificates (Web UI).
Step 4 — Enable Subscription Services
Firebox Cloud includes activated subscription services you can use to control network traffic. Follow the instructions in these procedures to enable subscription services for the HTTP and HTTPS proxy policies.
Enable Gateway AntiVirus
Gateway AntiVirus works with the SMTP, POP3, HTTP, FTP, and TCP-UDP proxies. When a new virus is identified, the features that make the virus unique are recorded. These recorded features are known as the signature. Gateway AntiVirus uses these signatures to find viruses when content is scanned by the proxy.
To enable Gateway AntiVirus in the user-defined HTTP-proxy action assigned to your HTTP-proxy policy, from Fireware Web UI:
- Select Subscription Services > Gateway AV.
The Gateway AntiVirus Activation Wizard starts automatically if Gateway AntiVirus is not already enabled. - Complete the wizard.
Enable Intrusion Prevention Service (IPS)
Intrusion Prevention Service (IPS) provides real-time protection from threats, such as spyware, SQL injections, cross-site scripting, and buffer overflows.
To enable IPS, from Fireware Web UI:
- Select Subscription Services > IPS.
- Select the Enable Intrusion Prevention check box.
- Make sure that IPS is enabled in the HTTP-proxy and HTTPS-proxy policies you added.
Enable Botnet Detection
The Botnet Detection subscription service uses a feed of known botnet site IP addresses gathered by Reputation Enabled Defense (RED). These known botnet sites are added to the Blocked Sites List that enables Firebox Cloud to block these sites at the packet level.
To enable Botnet Detection, from Fireware Web UI:
- Select Subscription Services > Botnet Detection.
- Select the Block traffic from suspected botnet sites check box.
- Click Save.
Enable Data Loss Prevention
The Data Loss Prevention (DLP) service enables you to detect, monitor, and prevent accidental unauthorized transmission of confidential information outside your network or across network boundaries. You can use the built-in PCI Audit or HIPAA Audit sensors, or create your own sensor.
For example, to enable Data Loss Prevention for PCI compliance, from Fireware Web UI:
- Select Subscription Services > Data Loss Prevention.
- Select the Enable Data Loss Prevention check box.
- Select the Policies tab.
- Configure the HTTP-proxy and HTTPS-proxy to use the PCI Audit Sensor.
- Click Save.
The default Data Loss Prevention sensors monitor and send log messages when they detect data that matches the rules enabled in the sensor. To change the action for the sensor, you can clone the sensor and then edit the settings in the new sensor.
Configure Geolocation
The Geolocation subscription service uses a database of IP addresses and countries to identify the geographic location of connections through the Firebox. Geolocation is enabled by default. You can configure Geolocation to block connections to or from specific regions.
WARNING: If your internal network configuration includes IP addresses outside the reserved private IP address ranges defined in RFC 1918, RFC 5737, or RFC 3330, make sure to look up the geolocation of the IP addresses in your network before you block a country.
To look up the geolocation of an IP address, from Fireware Web UI:
- Select Dashboard > Geolocation > Lookup.
- Specify the IP address to look up.
To select the countries to block, from Fireware Web UI:
- Select Subscription Services > Geolocation.
- Select the Enable Geolocation check box.
- Select countries to block on a map or from a list.
- If there are sites you want to allow in the blocked countries, configure exceptions.
- Save the configuration.
For more information about how to select countries and configure exceptions, go to Configure Geolocation.