Applies To: Locally-managed Fireboxes
WatchGuard Firebox Cloud brings the proven protection of Firebox UTM appliances to public cloud environments and enables organizations to extend their security perimeter to protect business critical assets in Amazon Web Services. Under the AWS Shared Responsibility Model, security in the cloud falls to the customer. For this reason, it is crucial that administrators take every step possible to defend their data and deflect cyber criminals. Firebox Cloud can quickly and easily be deployed to protect a Virtual Private Cloud (VPC) from attacks such as Botnets, cross-site scripting, SQL injection attempts, and other intrusion vectors.
AWS Regions and Availability Zones
AWS has multiple AWS Regions. Each region contains several Availability Zones. A VPC can contain subnets in different Availability Zones.
Regions available in AWS:
- Africa (Cape Town) — af-south-1
- Asia Pacific (Hong Kong) — ap-east-1
- Asia Pacific (Tokyo) — ap-northeast-1
- Asia Pacific (Seoul) — ap-northeast-2
- Asia Pacific (Osaka) — ap-northeast-3
- Asia Pacific (Mumbai) — ap-south-1
- Asia Pacific (Singapore) — ap-southeast-1
- Asia Pacific (Sydney) — ap-southeast-2
- Asia Pacific (Jakarta) — ap-southeast-3
- AWS GovCloud (US-East) — us-gov-east-1
- AWS GovCloud (US-West) — us-gov-west-1
- Canada (Central) — ca-central-1
- Europe (Frankfurt) — eu-central-1
- Europe (Ireland) — eu-west-1
- Europe (London) — eu-west-2
- Europe (Milan) — eu-south-1
- Europe (Paris) — eu-west-3
- Europe (Stockholm) — eu-north-1
- Middle East (Bahrain) — me-south-1
- South America (São Paulo) — sa-east-1
- US East (N. Virginia) — us-east-1
- US East (Ohio) — us-east-2
- US West (N. California) — us-west-1
- US West (Oregon) — us-west-2
If you deploy a Firebox Cloud instance with the following instructions, each virtual machine instance is available in a single region and single availability zone.
AWS accounts have default quotas, or limits, for each AWS service. For information, go to AWS Service Quotas.
Supported Instance Types
Firebox Cloud supports these instance sizes and families:
- M5
- M6/M6i
- C5
- C6/C6i
- C4
We recommend that you deploy your instance with 5th generation instance types, or higher.
For detailed information about supported EC2 instance types for Firebox Cloud (BYOL) and Firebox Cloud (Hourly) specific to selected regions, go to the Firebox Cloud product information in the AWS Marketplace.
For information about how to deploy load balancers with Firebox Cloud, go to Deploy Firebox Cloud with AWS Load Balancers.
Before You Begin
Deployment of Firebox Cloud on AWS requires familiarity with AWS. We recommend you have familiarity with networking, cloud networking, and network security.
For more information about how to get started with AWS, go to:
http://docs.aws.amazon.com/gettingstarted/latest/awsgsg-intro/gsg-aws-intro.html
For information about the AWS Management Console, go to:
http://docs.aws.amazon.com/awsconsolehelpdocs/latest/gsg/getting-started.html
AWS Identity and Access Management (IAM)
Before you can use Firebox Cloud, you must create an AWS account. When you set up your AWS account, you specify billing information and the security credentials you use to connect to the AWS Management Console.
AWS IAM is a web service that enables you to securely control access to AWS resources. You use IAM to control who is authenticated and authorized to use resources. When you first create your AWS account, you begin with a root user, which is a single sign-in identity that has complete access to all AWS services and resources in the account. Because of this access, we recommend you do not use the root user for your Firebox Cloud deployment or operations. The root user should only be used to create your first IAM user.
To enable an IAM user to launch an instance with an IAM role or to attach or replace an IAM role for an existing instance, you must grant the user permission to use the following API actions:
- iam:PassRole
- ec2:AssociateIamInstanceProfile
- ec2:ReplaceIamInstanceProfileAssociation
For more information about roles for Amazon EC2, go to IAM Roles for Amazon EC2.
For more information about policies and permissions, go to Policies and Permissions in IAM.
Deployment Overview
This diagram shows a basic Firebox Cloud deployment on AWS.
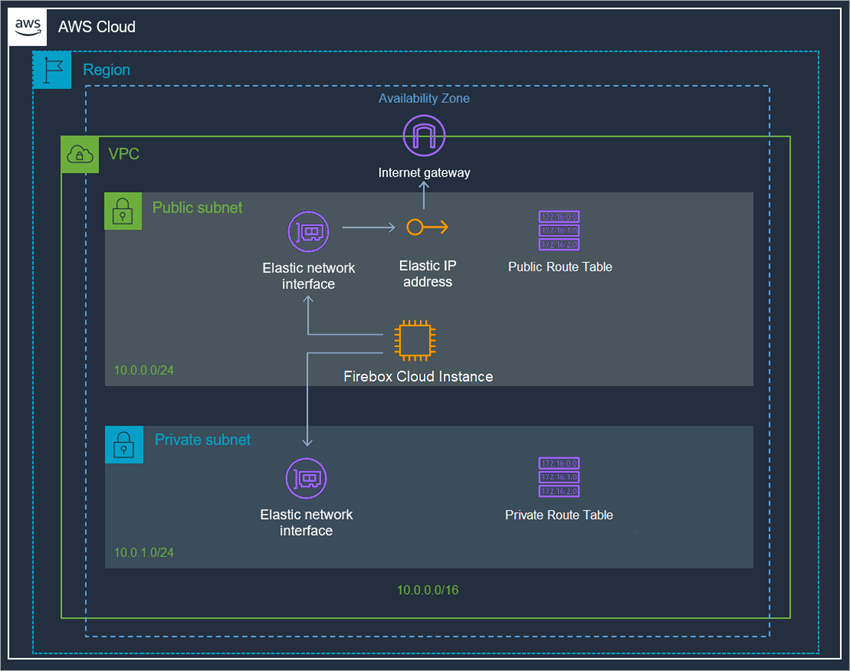
All AWS services that are part of the deployment are mandatory to run Firebox Cloud. To deploy your instance of Firebox Cloud on AWS, you must complete these procedures:
Allocate an Elastic IP address
Allocate an Elastic IP address from Amazon's pool of public IPv4 addresses, or from a custom IP address you brought to your AWS account.
Create a Virtual Private Cloud (VPC)
Use the VPC Wizard to create a VPC with public and private subnets.
Create an instance of Firebox Cloud
Launch an EC2 instance for Firebox Cloud with these properties:
- VPC Configuration — VPC with Public and Private Subnets
- AMI — WatchGuard Firebox Cloud
- Instance Type — If you select Firebox Cloud with a BYOL license, make sure to select the instance type that has the same number of vCPUs as the Firebox Cloud license you purchased
- Network — A VPC with public and private subnets
- Interfaces — Eth0 must use a public subnet; Eth1 must use a private subnet
- Storage — Keep the default size
- Security Group — Allow all inbound traffic
Disable the Source/Destination checks for Firebox Cloud
For your Firebox Cloud to function as a NAT device for your VPC, you must disable the source/destination check for the instance of Firebox Cloud.
Assign an Elastic IP address to the instance of Firebox Cloud
Assign an Elastic IP (EIP) address to the eth0 interface for your instance of Firebox Cloud.
Configure the default route for the private network
Change the routing for the private subnet so that it uses the instance of Firebox Cloud as the default gateway.
Check instance status
Check the state of the instance of Firebox Cloud to verify that it has powered up, that it has a public IP address and DNS server assigned, and the correct security group is configured.
Each of these procedures is described in detail in the next sections. Deployment will take approximately 20 minutes.
Allocate or Associate an Elastic IP Address
Before you create a VPC, you must allocate or associate an elastic IP to the external interface. You can either select an existing elastic IP address, or allocate an elastic IP address from Amazon's pool of IPv4 addresses.
Allocate an Elastic IP Address
To allocate an elastic IP address:
- Log in to the AWS Management Console at aws.amazon.com.
- From the top navigation bar, select
 > Compute > EC2.
The EC2 Dashboard page opens. - In the Network & Security section, select Elastic IPs.
- Click Allocate Elastic IP address.
The Allocate Elastic IP address page opens with Amazon's pool of IPv4 addresses selected. - Click Allocate and record your allocated elastic IP address.
Associate an Elastic IP Address
To associate an existing elastic IP address:
- Log in to the AWS Management Console at aws.amazon.com.
- From the top navigation bar, select > Compute > EC2.
The EC2 Dashboard page opens. - In the Network & Security section, select Elastic IPs.
- Select the check box next to the elastic IP address you want to associate.
- Select the Actions drop-down list. Click Associate Elastic IP address.
The Associate Elastic IP address page opens. - In the Resource type section, select Network interface.
- In the Network interface drop-down list, select a network interface.
- In the Private IP address drop-down list, select a private IP address.
- Click Associate.
You can assign a secondary IP address to the network interface for an instance as you launch the instance, or after the instance is already running. To add a secondary external IP address, you must assign a secondary private IP address to the network interface, and then associate an elastic IP address with that secondary private IP address. You also must configure the instance to recognize the new IP address. For detailed steps, go to Secondary IP addresses for your EC2 instances in the AWS documentation.
Create a VPC with Public and Private Subnets
If you do not already have a VPC with public and private subnets, you must create one.
To use the VPC Wizard to create a VPC:
- Log in to the AWS Management Console at aws.amazon.com.
- From the top navigation bar, select > Networking & Content Delivery > VPC.
The VPC Dashboard page opens. - Click Create VPC.
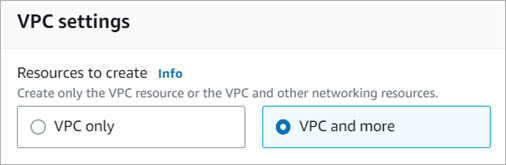
- In the VPC settings section, select VPC and more.
- In the Name tag auto-generation section, you can edit the name tag of individual resources, or auto-generate the name tags. Clear the Auto-generate check box to edit the name tags of your VPC and subnets.
- In the IPV6 CIDR block section, select Amazon-provided IPv6 CIDR block for the VPC.
- Configure the Availability Zone for each subnet. Make sure that the public subnet and private subnet are in the same zone.
- (Optional). If you use two or more availability zones, you can customize the order of the availability zones. For more information, go to Regions and Zones.
- Configure at least one public and one private subnet for each Availability Zone the VPC is in. You can use the default public and private subnets or select other subnets. AWS requires that each subnet must include enough space for a least 16 IP addresses.
- Configure the NAT gateways, VPC endpoints, and DNS options.
- Click Create VPC.
The wizard creates the VPC.
Create an Instance of Firebox Cloud
From the EC2 dashboard, you can create an EC2 instance for Firebox Cloud.
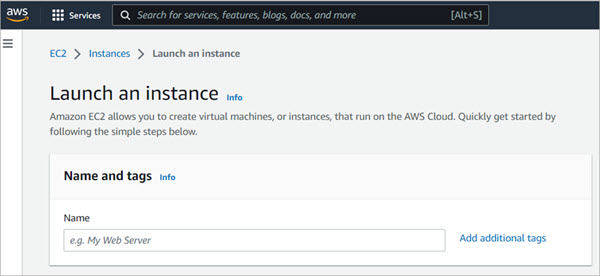
To launch an instance of Firebox Cloud:
- Log in to the AWS Management Console at aws.amazon.com.
- From the top navigation bar, select > Compute > EC2.
The EC2 Dashboard page opens. - From the navigation menu, in the Instances section, click Instances.
- Click Launch instances.
- In the Name text box, enter a name for your instance.
- In the Application and OS Images (Amazon Machine Image) search text box, enter Firebox and select the AWS Marketplace AMIs tab.
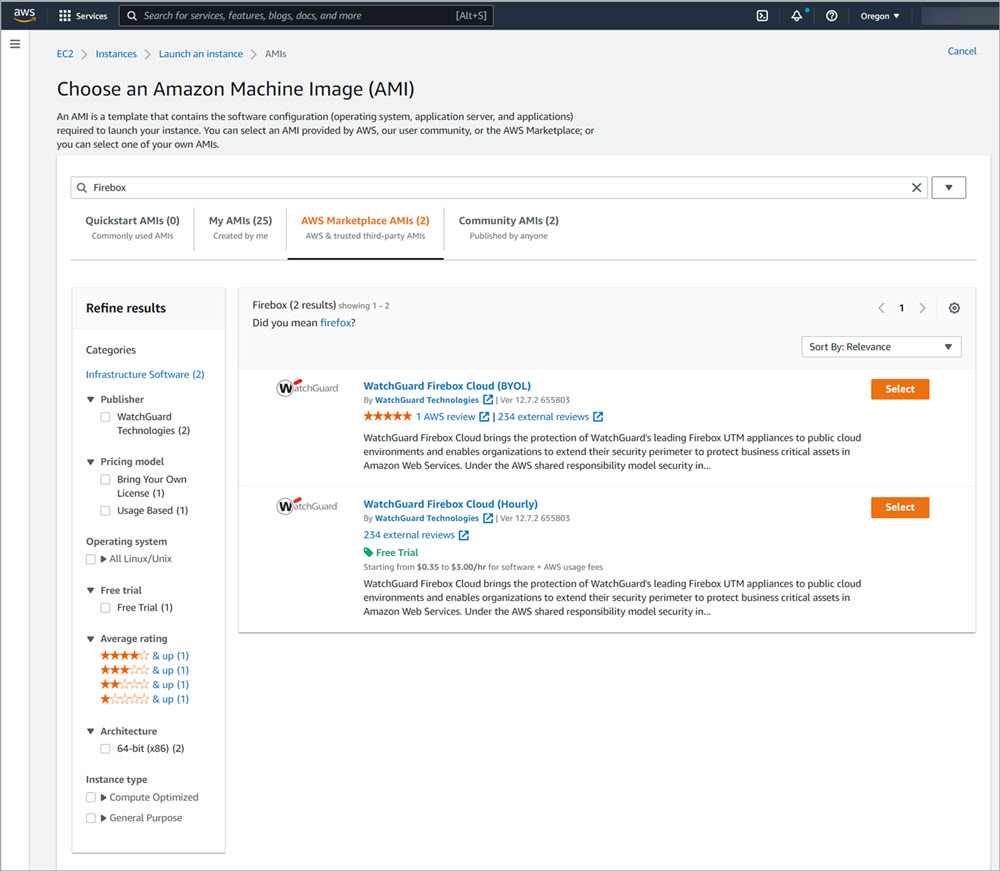
- Select WatchGuard Firebox Cloud Hourly, Hourly Annual, or BYOL.
- Click Continue if you already have a license, or Subscribe on instance launch or Subscribe now if you do not have a subscription.
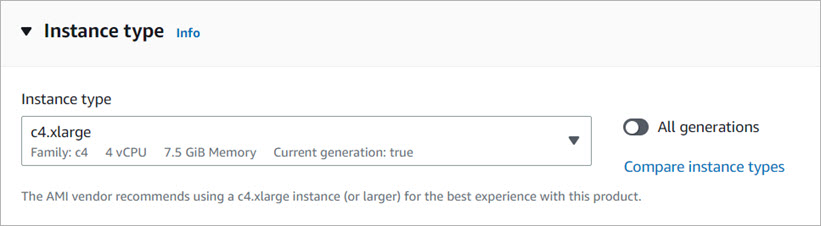
- In the Instance type section, select the AWS instance type from the drop-down list or from the Compare instance types page. If you selected Firebox Cloud with a BYOL license, select an instance that has the number of vCPUs your Firebox Cloud license supports.
- For information about the maximum number of vCPUs supported for each Firebox Cloud model, go to Firebox Cloud License Options.
- For information about supported EC2 instance types for Firebox Cloud (BYOL) and Firebox Cloud (Hourly), go to the Firebox Cloud product information in the AWS Marketplace.
- In the Key pair (login) section, select or create a key pair for SSH authentication. The key pair is needed only for ssh connections to the Fireware command line interface (CLI) for Firebox Cloud. You do not need the key pair to connect to Fireware Web UI. If you proceed without a key pair, you can log in to Fireware Web UI, but you cannot connect to the CLI from outside of the VPC.
- To use an existing key pair, select a key pair from the drop-down list.
- To create a new key pair, select Create new key pair.
The Create key pair dialog box opens. - In the Key pair name text box, type a name for the new key pair.
- In the Key pair type section, make sure that RSA is selected. Firebox Cloud supports RSA SSH Format.
- Click Create key pair.
The .PEM file that contains the private key is downloaded. - Save the private key to a location that is secure and accessible. You cannot download the private key file again.

Save the private key file in a secure location. You must provide the private key to connect to the Fireware command line interface.
- In the Network settings section, click Edit.
- From the VPC drop-down list, select your VPC.
- From the Subnet drop-down list, select the public subnet to use for eth0.
- From the Auto-assign public IP drop-down list, select Disable.
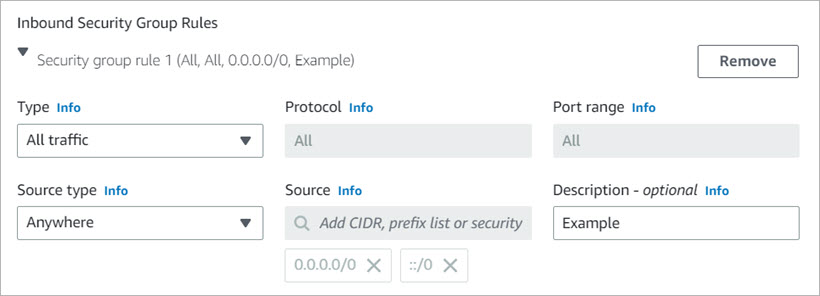
- In the Firewall (security groups) section, select Create security group. By default, the instance uses a security group that functions as a basic firewall. Because Firebox Cloud is a firewall, you must add a new security group that allows all traffic, and assign that security group to this EC2 instance.
- Edit the Security group name and Description.
- In the Inbound Security Groups Rules section, configure an existing security group rule or add a new security group rule. Make sure that the security group rule selected allows all traffic. From the Type drop-down list, select All traffic.
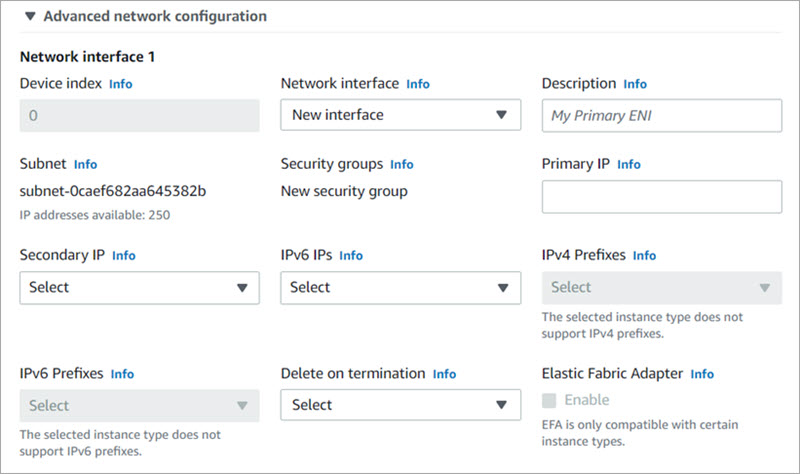
- To add a second interface, expand the Advanced network configuration section.
- Description — Type a description for the new network interface.
- Subnet — The subnet in which to create the new network interface. For the primary network interface (eth0), this is the subnet used to launch the instance. If you enter an existing network interface for eth0, the instance is launched in the subnet where the network interface is located.
- Security groups — The security group in your VPC to associate with the network interface.
- Primary IP — A private IPv4 address from the range of your subnet. Leave blank to allow Amazon EC2 to select a private IPv4 address.
- Secondary IP — One or more additional private IPv4 addresses from the range of your subnet. Select Manually assign and enter an IP address or select Automatically assign to allow Amazon EC2 select an IP address, and enter a value to indicate the number of IP addresses to add.
- IPv6 IPs — An IPv6 address from the range of the subnet. Select Manually assign and enter an IP address or select Automatically assign to allow Amazon EC2 select an IP address, and enter a value to indicate the number of IP addresses to add.
- IPv4 Prefixes — The IPv4 prefixes for the network interface.
- IPv6 Prefixes — The IPv6 prefixes for the network interface.
- Delete on termination — Select Yes or No to delete the network interface when the instance is deleted.
- From the Interface type drop-down list, select EFA with ENA or EFA-only.
- EFA with ENA — EFA (EFA with ENA) interfaces provide both the ENA device for IP networking and the EFA device for low-latency, high-throughput communication.
- EFA-only — EFA-only interfaces support only the EFA device capabilities, without the ENA device for traditional IP networking.
- ENA Express — If you enable ENA Express, you enable supported instances to communicate with AWS Scalable Reliable Datagram (SRD) technology. SRD is a high performance network transport protocol that uses dynamic routing to increase throughput and minimize tail latency. ENA Express enables you to communicate between two EC2 instances in the same Availability Zone.
Available network configuration options depend on your instance type.
- In the Configure Storage section, use the default storage size.
- Review the Summary side panel. Click Launch instance.

Disable Source/Destination Checks
By default, each EC2 instance completes source/destination checks. For the networks on your VPC to successfully use your instance of Firebox Cloud for NAT, you must disable the source/destination check for the network interfaces assigned to the instance of Firebox Cloud.
To disable source/destination checks for the public interface:
- From the EC2 Management Console, select Instances > Instances.
- Select the check box next to the instance of Firebox Cloud.
- Select Actions > Networking > Change source/destination check.
The Source / destination check dialog box opens. - Select the Stop check box.
- Click Save.

Assign an Elastic IP Address to the External Interface
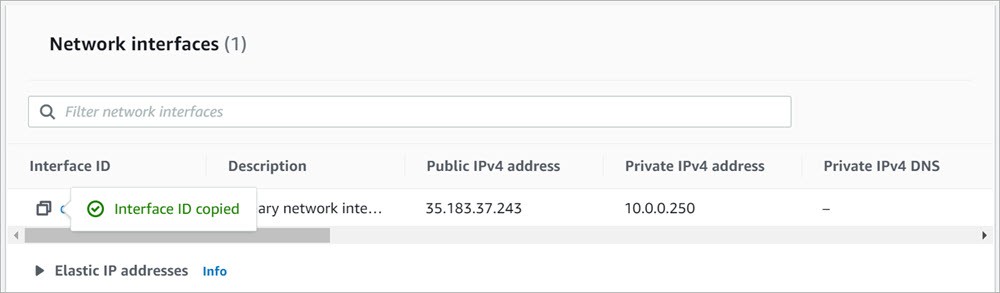
You must assign an Elastic IP (EIP) address to the eth0 interface for the instance of Firebox Cloud. To make sure you assign it to the correct interface, find and copy the eth0 interface ID for your instance of Firebox Cloud.
To find the eth0 interface ID for your instance of Firebox Cloud:
- From the EC2 Dashboard, select Instances.
- Select the instance of Firebox Cloud.
The instance details appear. - Select the Networking tab.
- In the Network interfaces section, copy the Interface ID from the Primary network interface.
The Interface ID copied confirmation is displayed.
To associate the Elastic IP address with the eth0 interface:
- From the EC2 Management Console, select Network & Security > Elastic IPs.
- Select an available Elastic IP address.
- Select Actions > Associate Elastic IP Address.
The Associate Elastic IP Address page opens.
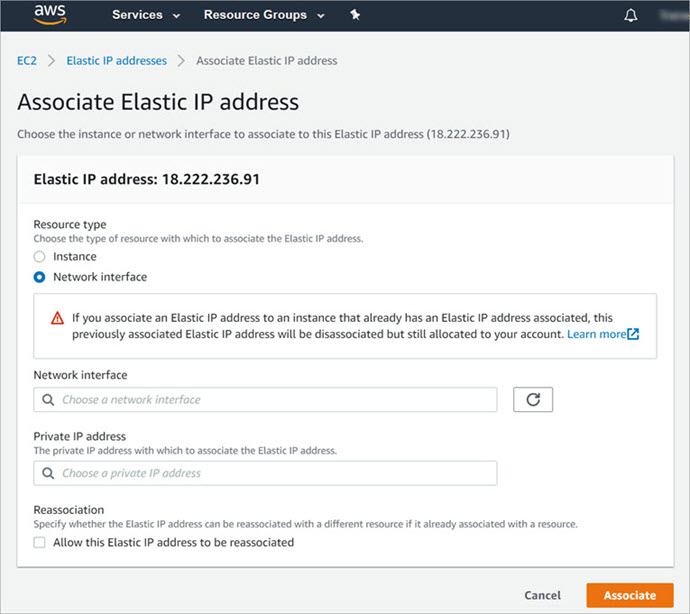
- In the Resource type settings, select Network interface.
- In the Network Interface text box, paste the Interface ID for eth0.
- Click Associate.
You can now use the EIP address to connect to Fireware Web UI for your instance of Firebox Cloud.
To connect to Fireware Web UI, open a web browser and go to https://<eth0_EIP>:8080.
Configure the Default Route
To enable Firebox Cloud to control outbound traffic from the private network connected to eth1, you must change the route table for the private subnet so that it uses Firebox Cloud as the default gateway.
To find the network interface ID of the private network:
- On the EC2 dashboard, select Network & Security > Network Interfaces.
- Find the private network interface for your instance ID. It is the interface that does not have a public IP address assigned.
- Copy the network interface ID.
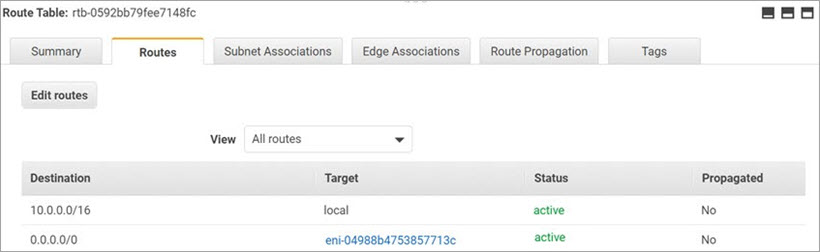
To edit the route table:
- From the top navigation bar, select > VPC.
The VPC Dashboard page opens. - In the Virtual Private Cloud section, select Route tables.
- To find the interface for the private network, select each route table for your VPC one at a time.
The route table details appear, with the interface information for each route table. - To view the routes for each network, select the Routes tab.
- On the Routes tab for the private network, click Edit routes.
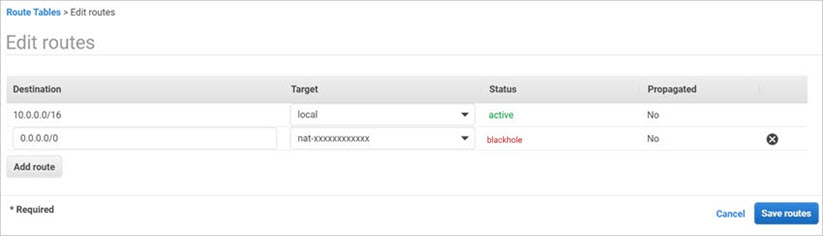
- In the Target text box, paste the Interface ID over the NAT Gateway ID.
The route status changes from Black Hole to Active.
- Click Save routes.
Verify the Instance Status
After you finish all the steps to deploy your instance of Firebox Cloud, review the instance details on the EC2 Instances page to verify that:
- Public IP address and Public DNS server are assigned
- The security group to allow all traffic is assigned
If you delete the Firebox Cloud VM, make sure you delete the associated resources to avoid additional charges.
Find the Instance ID (VM ID)
After you deploy your Firebox Cloud instance, you must find the Instance ID, also known as the VM ID. You will need this log in to the Fireware Web UI to run the Firebox Cloud Setup Wizard.
To find the Firebox Cloud Instance ID:
- From the EC2 Management Console, select Instances > Instances.
- Open your instance.
- Copy the Instance ID.
You must have this instance ID to run the Firebox Cloud Setup Wizard.
Activate your Firebox Cloud License (BYOL Only)
For Firebox Cloud with a BYOL license, you must activate the Firebox Cloud serial number and license key at www.watchguard.com. Before you can activate Firebox Cloud, you must have the Firebox Cloud serial number and a license key you received from WatchGuard. When you activate Firebox Cloud, if you do not see an option to type a license key, your device does not require a license key.
To activate your Firebox Cloud license:
- Go to www.watchguard.com.
- Click Support.
- Click Activate Products.
- Log in to your WatchGuard Customer or Partner account. If you do not have an account, you can create one.
- If necessary, navigate to the Support Center and select My WatchGuard > Activate Products.
- When prompted, enter your Firebox Cloud serial number.
- If prompted, enter your Firebox Cloud license key.
- If you want to activate the Firebox Cloud license with MSSP points, select the Activate For Use in MSSP Command check box.
- When activation is complete, copy the feature key and save it to a local file.
Run the Firebox Cloud Setup Wizard
After you deploy Firebox Cloud, you can connect to Fireware Web UI through the public IP address to run the Firebox Cloud Setup Wizard. You use the wizard to set the administrative passphrases for Firebox Cloud.
To run the Firebox Cloud Setup Wizard:
- Connect to Fireware Web UI for your Firebox Cloud with the public IP address:
https://<eth0_public_IP>:8080 - Log in with the default Administrator account user name and passphrase:
- User name — admin
- Passphrase — The Firebox Cloud Instance ID
The Firebox Cloud Setup Wizard welcome page opens.
- Click Next.
The setup wizard starts. - Review and accept the End-User License Agreement. Click Next.
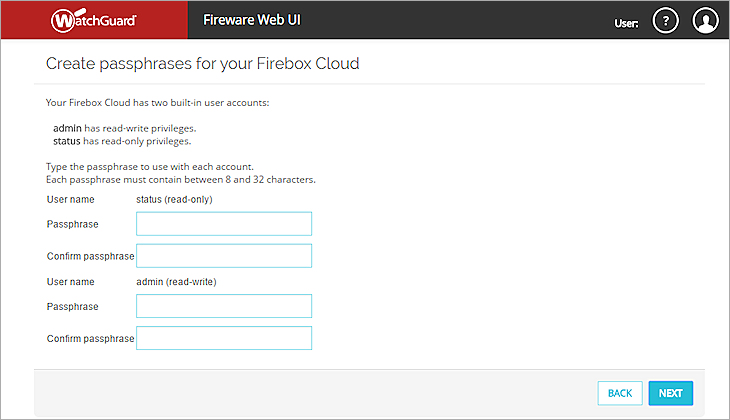
- Specify new passphrases for the built-in status and admin user accounts.
- Click Next.
The configuration is saved to Firebox Cloud and the wizard is complete.
WatchGuard does not store any sensitive customer information in the Firebox Cloud configuration or on the AWS cloud-based platform.
Connect to Fireware Web UI
To connect to Fireware Web UI and administer Firebox Cloud:
- Open a web browser and go to the public IP address for your instance of Firebox Cloud at:
https://<eth0_public_IP>:8080 - Log in with the admin user account. Make sure to specify the passphrase you set in the Firebox Cloud Setup Wizard.
By default, Firebox Cloud allows more than one user with Device Administrator credentials to log in at the same time. To prevent changes by more than one administrator at the same time, the configuration is locked by default. To unlock the configuration so you can make changes, click ![]() .
.
If you prefer to allow only one Device Administrator to log in at the same time, select System > Global Settings and clear the Enable more than one Device Administrator to log in at the same time check box.
Add the Feature Key (BYOL Only)
If you activated a Firebox Cloud license at www.watchguard.com, your feature key is available directly from WatchGuard. You must add this feature key to the Firebox Cloud configuration to enable all functionality and configuration options on Firebox Cloud.
After you add the feature key, Firebox Cloud automatically reboots with a new serial number.
To add the feature key, from Fireware Web UI:
- Select System > Feature Key.
The Feature Key Wizard page opens.
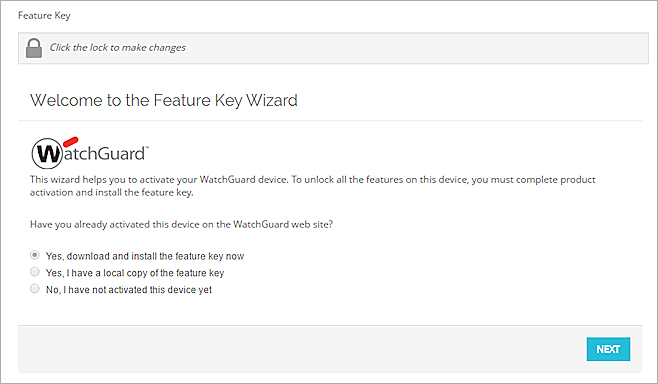
- To unlock the configuration file, click
 .
. - To download and install the feature key, click Next.
- On the Summary page, verify that your feature key was successfully installed.
When your feature key has been installed, Feature Key Retrieval Success appears on the Summary page.
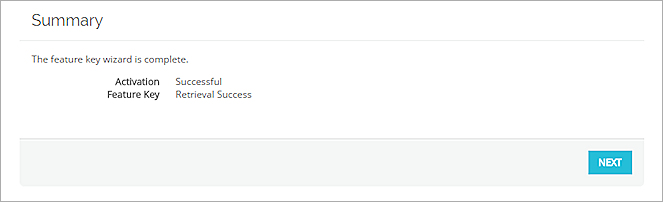
- Click Next.
The wizard completes and Firebox Cloud reboots with a new serial number.
Next Steps
After you run the setup wizard and add the feature key you can use Fireware Web UI or Policy Manager to configure the settings for Firebox Cloud.
Enable Feature Key Synchronization
Enable Firebox Cloud to automatically check for feature key updates when services are about to expire.
To enable feature key synchronization, in Fireware Web UI:
- Select System > Feature Key.
- Select the Enable automatic feature key synchronization check box.
- Click Save.
To enable feature key synchronization, in Policy Manager:
- Connect to Firebox Cloud in WatchGuard System Manager.
- Open Policy Manager.
- Select System > Feature Keys.
- Select the Enable automatic feature key synchronization check box.
- Click Save.
Configure Firebox Cloud to Send Feedback to WatchGuard
To enable Firebox Cloud to send feedback, in Fireware Web UI:
- Select System > Global Settings.
- Select the Send advanced device feedback to WatchGuard check box.
- Select the Send threat telemetry to WatchGuard check box (Fireware v12.11 and higher).
- Select the Send Fault Reports to WatchGuard daily check box.
To enable Firebox Cloud to send feedback, in Policy Manager:
- Connect to Firebox Cloud in WatchGuard System Manager.
- Open Policy Manager.
- Select Setup > Global Settings.
- Select the Send advanced device feedback to WatchGuard check box.
- Select the Send threat telemetry to WatchGuard check box (Fireware v12.11 and higher).
- Select the Send Fault Reports to WatchGuard daily check box.
Configure Firewall Policies and Services
The default WatchGuard and WatchGuard Web UI policies allow management connections from any computer on the trusted, optional, or external networks.
We strongly recommend that you do not allow management connections from the external network, and that you edit the WatchGuard and WatchGuard Web UI policies to remove the Any-External alias from the From list after you complete initial configuration.
To allow management from only a specific computer on the external network, you can add the address of that management computer to the From list in these policies.
Configure other policies and services as you would for any other Firebox.
Firebox Cloud does not support every Fireware feature. For a summary of the differences between Firebox Cloud and other Firebox models, go to Firebox Cloud Feature Differences.
Troubleshooting
If you experience issues with your Firebox Cloud deployment on AWS, check to make sure that you have followed the procedures in the Deployment Overview section:
- Allocate an Elastic IP address
- Create a Virtual Private Cloud (VPC)
- Create an instance of Firebox Cloud
- Disable the Source/Destination checks for Firebox Cloud
- Configure the default route for the private network
- Check the instance status. With instance status monitoring, you can check if Amazon EC2 has detected any problems with the health of your instance and set up an Amazon CloudWatch alarm. For more information, go to Status checks for your instances.